User Manual
Page 4
Windows 69 Multi-Page Printing Options - Windows 76 Selecting a Printing Preset - Paper Loading Capacity ...48 Available Epson Papers ...49 Borderless Paper Type Compatibility 51 Paper or Media Type Settings ...52 Placing Originals on the Product ...53... Windows 73 Selecting Additional Layout and Print Options - Windows 77 Printing Your Document or Photo - Windows 79 Changing the Language of the Printer Software Screens 80 Changing Automatic Update Options 81 Printing with Windows ...66 Selecting Basic Print Settings - Windows 72 Print Density Adjustments - Copying......
Windows 69 Multi-Page Printing Options - Windows 76 Selecting a Printing Preset - Paper Loading Capacity ...48 Available Epson Papers ...49 Borderless Paper Type Compatibility 51 Paper or Media Type Settings ...52 Placing Originals on the Product ...53... Windows 73 Selecting Additional Layout and Print Options - Windows 77 Printing Your Document or Photo - Windows 79 Changing the Language of the Printer Software Screens 80 Changing Automatic Update Options 81 Printing with Windows ...66 Selecting Basic Print Settings - Windows 72 Print Density Adjustments - Copying......
User Manual
Page 9
... Product Cannot Connect to a Wireless Router or Access Point 265 Network Software Cannot Find Product on a Network 266 Product Does Not Appear in Mac OS X Printer Window 266 Cannot Print Over a Network...267 9 Windows 234 Printing With Expended Color Cartridges - Printing With Black Ink and Expended Color Cartridges 234 Printing With...
... Product Cannot Connect to a Wireless Router or Access Point 265 Network Software Cannot Find Product on a Network 266 Product Does Not Appear in Mac OS X Printer Window 266 Cannot Print Over a Network...267 9 Windows 234 Printing With Expended Color Cartridges - Printing With Black Ink and Expended Color Cartridges 234 Printing With...
User Manual
Page 15
.../Pause button 5 The Contacts button 6 The LCD screen 7 The back button 8 The arrow buttons and the OK button 9 The - Press the down arrow button, select Printer Setup, and then press OK. 4. and + buttons 10 The numeric keypad 11 The B&W button 12 The Color button 13 The Stop/Reset button Parent topic...
.../Pause button 5 The Contacts button 6 The LCD screen 7 The back button 8 The arrow buttons and the OK button 9 The - Press the down arrow button, select Printer Setup, and then press OK. 4. and + buttons 10 The numeric keypad 11 The B&W button 12 The Color button 13 The Stop/Reset button Parent topic...
User Manual
Page 16
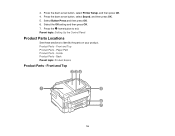
3. Parent topic: Setting Up the Control Panel Product Parts Locations See these sections to exit. Press the down arrow button, select Sound, and then press OK. 5. Inside Product Parts - Front and Top 16 Product Parts - Press the down arrow button, select Printer Setup, and then press OK. 4. Select Button Press and then press OK. 6. Front and Top Product Parts - Select the Off setting and then press OK. 7. Back Parent topic: Product Basics Product Parts - Paper Path Product Parts - Press the home button to identify the parts on your product.
3. Parent topic: Setting Up the Control Panel Product Parts Locations See these sections to exit. Press the down arrow button, select Sound, and then press OK. 5. Inside Product Parts - Front and Top 16 Product Parts - Press the down arrow button, select Printer Setup, and then press OK. 4. Select Button Press and then press OK. 6. Front and Top Product Parts - Select the Off setting and then press OK. 7. Back Parent topic: Product Basics Product Parts - Paper Path Product Parts - Press the home button to identify the parts on your product.
User Manual
Page 20
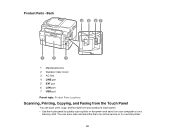
You can scan, print, copy, and fax right from the Touch Panel You can even scan and send the file to an online service or to quickly scan a photo or document and save it on your computer or on a memory card. Product Parts - Back 1 Maintenance box 2 Duplexer (rear cover) 3 AC inlet 4 LINE port 5 EXT port 6 LAN port 7 USB port Parent topic: Product Parts Locations Scanning, Printing, Copying, and Faxing from your product's touch panel. • Use the touch panel to a remote printer. 20
You can scan, print, copy, and fax right from the Touch Panel You can even scan and send the file to an online service or to quickly scan a photo or document and save it on your computer or on a memory card. Product Parts - Back 1 Maintenance box 2 Duplexer (rear cover) 3 AC inlet 4 LINE port 5 EXT port 6 LAN port 7 USB port Parent topic: Product Parts Locations Scanning, Printing, Copying, and Faxing from your product's touch panel. • Use the touch panel to a remote printer. 20
User Manual
Page 22
... product name, and select Printing Preferences. • Windows XP: Click Start and select Printers and Faxes. (Or open the Control Panel, select Printers and Other Hardware if necessary, and select Printers and Faxes.) Right-click your product name and select Printing Preferences. • Windows Vista...: Click and select Control Panel. 4. Press the home button to change the time period before the printer enters sleep mode. 1. Do one of the following: • Windows 8: Open the Charms bar and select Settings. Click the Maintenance tab....
... product name, and select Printing Preferences. • Windows XP: Click Start and select Printers and Faxes. (Or open the Control Panel, select Printers and Other Hardware if necessary, and select Printers and Faxes.) Right-click your product name and select Printing Preferences. • Windows Vista...: Click and select Control Panel. 4. Press the home button to change the time period before the printer enters sleep mode. 1. Do one of the following: • Windows 8: Open the Charms bar and select Settings. Click the Maintenance tab....
User Manual
Page 23
... the Apple menu or the Dock, select System Preferences. Select Print & Fax, select your product, and select Options & Supplies. Select Printer Settings. Select Utility and select Open Printer Utility. • Mac OS X 10.5: In the Apple menu or the Dock, select System Preferences. Select Utility. 2. You see... this screen: 23 Mac OS X You can use the printer software to close the open program windows. Select the time period you want as the Sleep Timer setting and click Send. 5. Select Print & ...
... the Apple menu or the Dock, select System Preferences. Select Print & Fax, select your product, and select Options & Supplies. Select Printer Settings. Select Utility and select Open Printer Utility. • Mac OS X 10.5: In the Apple menu or the Dock, select System Preferences. Select Utility. 2. You see... this screen: 23 Mac OS X You can use the printer software to close the open program windows. Select the time period you want as the Sleep Timer setting and click Send. 5. Select Print & ...
User Manual
Page 24
... use the product's touch panel to exit. Press the home button to select 2-sided copying, or see the confirmation message, click Yes, then close the Printer Settings window. Click Apply. 5. Press the home button, if necessary. 2. Select the time period you see a reminder that the Preview feature will save paper and...
... use the product's touch panel to exit. Press the home button to select 2-sided copying, or see the confirmation message, click Yes, then close the Printer Settings window. Click Apply. 5. Press the home button, if necessary. 2. Select the time period you see a reminder that the Preview feature will save paper and...
User Manual
Page 27
... running the latest version of a web browser. 5. If your product is already on -screen instructions to the same wireless network that your Epson wireless product. Select the check box to agree to launch the sign-in page. Connect your Apple device to update your product. 6. Print... your product for wireless printing as described on . Locate your product off and back on the Start Here sheet. Set up your Epson printer and computer are setting up your product for wireless printing as described on the network status sheet. 4. You can print from Chromebooks ...
... running the latest version of a web browser. 5. If your product is already on -screen instructions to the same wireless network that your Epson wireless product. Select the check box to agree to launch the sign-in page. Connect your Apple device to update your product. 6. Print... your product for wireless printing as described on . Locate your product off and back on the Start Here sheet. Set up your Epson printer and computer are setting up your product for wireless printing as described on the network status sheet. 4. You can print from Chromebooks ...

User Manual
Page 28
Visit Epson Support for a list of supported apps. Parent topic: Product Basics 28 Click Finish printer registration to your Google Account username and password and click Sign in, or, if you don't have an account, click Sign up for a new Google Account and follow the on using Google Cloud Print, or the Google Cloud Print website for more information on -screen instructions. 10. Enter your Google Account and can be accessed from any Chromebook, computer, Apple or Android device with internet access. Your product is now linked to complete setup and print a test page. 9.
Visit Epson Support for a list of supported apps. Parent topic: Product Basics 28 Click Finish printer registration to your Google Account username and password and click Sign in, or, if you don't have an account, click Sign up for a new Google Account and follow the on using Google Cloud Print, or the Google Cloud Print website for more information on -screen instructions. 10. Enter your Google Account and can be accessed from any Chromebook, computer, Apple or Android device with internet access. Your product is now linked to complete setup and print a test page. 9.
User Manual
Page 47
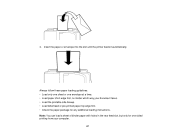
Insert the paper or envelope into the slot until the printer feeds it automatically. Always follow these paper loading guidelines: • Load only one sheet or one -sided printing from your document faces. • Load the printable side faceup. • Load letterhead or pre-printed paper top edge first. • Check the paper package for any additional loading instructions. 4. Note: You can load a sheet of binder paper with holes in the rear feed slot, but only for one envelope at a time. • Load paper short edge first, no matter which way your computer. 47
Insert the paper or envelope into the slot until the printer feeds it automatically. Always follow these paper loading guidelines: • Load only one sheet or one -sided printing from your document faces. • Load the printable side faceup. • Load letterhead or pre-printed paper top edge first. • Check the paper package for any additional loading instructions. 4. Note: You can load a sheet of binder paper with holes in the rear feed slot, but only for one envelope at a time. • Load paper short edge first, no matter which way your computer. 47
User Manual
Page 64
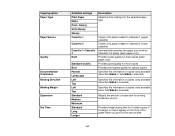
... Ultra Glossy Glossy Cassette 1 Cassette 2 Cassette 1>Cassette 2 Draft Standard Quality Best Portrait Landscape Left Top Left Top Standard Medium Minimum Standard Long Longer Description Adjusts printer settings for the selected paper type Copies onto paper loaded in Cassette 1 (upper cassette) Copies onto paper loaded in Cassette 2 (lower cassette) Automatically switches the...
... Ultra Glossy Glossy Cassette 1 Cassette 2 Cassette 1>Cassette 2 Draft Standard Quality Best Portrait Landscape Left Top Left Top Standard Medium Minimum Standard Long Longer Description Adjusts printer settings for the selected paper type Copies onto paper loaded in Cassette 1 (upper cassette) Copies onto paper loaded in Cassette 2 (lower cassette) Automatically switches the...
User Manual
Page 67
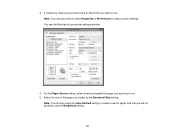
You see the Main tab of the paper you loaded as the printer you want to use the Borderless setting. 67 For the Paper Source setting, select where you loaded the paper you will not be able to view your product name as the Document Size setting. Select the size of your printer settings window: 4. If necessary, select your print settings. Note: You can also select the User-Defined setting to create a custom paper size, but you want to print on. 5. 3. Note: You may also need to select Properties or Preferences to use .
You see the Main tab of the paper you loaded as the printer you want to use the Borderless setting. 67 For the Paper Source setting, select where you loaded the paper you will not be able to view your product name as the Document Size setting. Select the size of your printer settings window: 4. If necessary, select your print settings. Note: You can also select the User-Defined setting to create a custom paper size, but you want to print on. 5. 3. Note: You may also need to select Properties or Preferences to use .
User Manual
Page 74
... the Document Size setting, and the size of the Additional Settings options to your document or photo by a specific percentage. To add a watermark to your printer software. • Select Image Options to customize the text and location. 5. Select any of the following Color Correction options: • Select Automatic to manually adjust...
... the Document Size setting, and the size of the Additional Settings options to your document or photo by a specific percentage. To add a watermark to your printer software. • Select Image Options to customize the text and location. 5. Select any of the following Color Correction options: • Select Automatic to manually adjust...
User Manual
Page 75
Note: Fix Photo uses a sophisticated face recognition technology to work, both eyes and the nose must be visible in your printer software so you can also adjust the midtone density using only your photo includes a face with an intentional color cast, such as a statue, you may ...
Note: Fix Photo uses a sophisticated face recognition technology to work, both eyes and the nose must be visible in your printer software so you can also adjust the midtone density using only your photo includes a face with an intentional color cast, such as a statue, you may ...
User Manual
Page 79
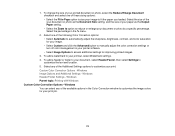
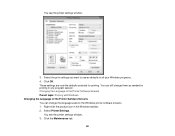
... as this one: 2. Windows When you change the print settings you use in all your Windows programs, you can select new default print settings. 1. Select Printer Settings. 79 Printing Your Document or Photo - Parent topic: Printing with Windows Selecting Default Print Settings - Right-click the product icon in that program session...
... as this one: 2. Windows When you change the print settings you use in all your Windows programs, you can select new default print settings. 1. Select Printer Settings. 79 Printing Your Document or Photo - Parent topic: Printing with Windows Selecting Default Print Settings - Right-click the product icon in that program session...
User Manual
Page 80
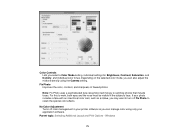
... Screens You can still change the language used on the Windows printer software screens. 1. Right-click the product icon in any program session. You see the printer settings window: 3. Click OK. You see the printer settings window. 3. These settings are now the defaults selected for printing in the Windows taskbar. 2. You can change...
... Screens You can still change the language used on the Windows printer software screens. 1. Right-click the product icon in any program session. You see the printer settings window: 3. Click OK. You see the printer settings window. 3. These settings are now the defaults selected for printing in the Windows taskbar. 2. You can change...
User Manual
Page 81
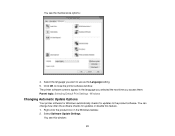
... the next time you want to use as the Language setting. 5. Select Software Update Settings. You see this feature. 1. The printer software screens appear in the Windows taskbar. 2. You can change how often the software checks for updates to close the... printer software window. Parent topic: Selecting Default Print Settings - Select the language you access them. Windows Changing Automatic Update Options Your printer software for Windows automatically checks for updates or disable this window: 81 You...
... the next time you want to use as the Language setting. 5. Select Software Update Settings. You see this feature. 1. The printer software screens appear in the Windows taskbar. 2. You can change how often the software checks for updates to close the... printer software window. Parent topic: Selecting Default Print Settings - Select the language you access them. Windows Changing Automatic Update Options Your printer software for Windows automatically checks for updates or disable this window: 81 You...
User Manual
Page 83
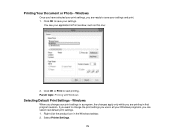
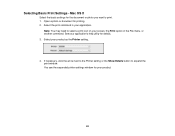
Note: You may need to select a print icon on your product as the Printer setting. 4. Select your screen, the Print option in your product: 83 Mac OS X Select the basic settings for details. 3. See your application's help utility for ...the document or photo you want to expand the print window. You see the expanded printer settings window for printing. 2. Selecting Basic Print Settings - If necessary, click the arrow next to the Printer setting or the Show Details button to print. 1. Open a photo or document for your application. Select the...
Note: You may need to select a print icon on your product as the Printer setting. 4. Select your screen, the Print option in your product: 83 Mac OS X Select the basic settings for details. 3. See your application's help utility for ...the document or photo you want to expand the print window. You see the expanded printer settings window for printing. 2. Selecting Basic Print Settings - If necessary, click the arrow next to the Printer setting or the Show Details button to print. 1. Open a photo or document for your application. Select the...
User Manual
Page 92
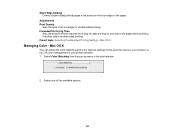
... the paper. Short-Edge binding Orients double-sided printed pages to fine-tune the colors in your printout, or turn off color management in your printer software. 1. Select one side of time required for double-sided printing. Increased Ink Drying Time Sets the amount of the paper before printing the other...
... the paper. Short-Edge binding Orients double-sided printed pages to fine-tune the colors in your printout, or turn off color management in your printer software. 1. Select one side of time required for double-sided printing. Increased Ink Drying Time Sets the amount of the paper before printing the other...


