
User Manual
Page 4
... Selecting the Default Printer Settings 66 Paper Source Settings Options 68 Setting the Universal Print Settings 68 Universal Print Settings Options 70 Placing Originals on the Product ...71 Placing Originals on the Scanner Glass 71 Placing Originals in the Rear Paper Feed Slot 56 Paper Loading Capacity ...61 Available Epson Papers ...62...
... Selecting the Default Printer Settings 66 Paper Source Settings Options 68 Setting the Universal Print Settings 68 Universal Print Settings Options 70 Placing Originals on the Product ...71 Placing Originals on the Scanner Glass 71 Placing Originals in the Rear Paper Feed Slot 56 Paper Loading Capacity ...61 Available Epson Papers ...62...
User Manual
Page 5
... 83 Double-sided Printing Options - Windows 87 Custom Color Correction Options - Windows 94 Printing Your Document or Photo - Windows 96 Changing the Language of the Printer Software Screens 97 Changing Automatic Update Options 98 Printing with OS X ...99 Selecting Basic Print Settings - OS X...109 Color Matching and Color Options - OS X...112...
... 83 Double-sided Printing Options - Windows 87 Custom Color Correction Options - Windows 94 Printing Your Document or Photo - Windows 96 Changing the Language of the Printer Software Screens 97 Changing Automatic Update Options 98 Printing with OS X ...99 Selecting Basic Print Settings - OS X...109 Color Matching and Color Options - OS X...112...
User Manual
Page 9
... ...269 Product Cannot Connect to a Wireless Router or Access Point 269 Network Software Cannot Find Product on a Network 270 Product Does Not Appear in OS X Printer Window 271 Cannot Print Over a Network...271 Cannot Scan Over a Network ...273 Solving Copying Problems ...274 Product Makes Noise, But Nothing Copies 274 9
... ...269 Product Cannot Connect to a Wireless Router or Access Point 269 Network Software Cannot Find Product on a Network 270 Product Does Not Appear in OS X Printer Window 271 Cannot Print Over a Network...271 Cannot Scan Over a Network ...273 Solving Copying Problems ...274 Product Makes Noise, But Nothing Copies 274 9

User Manual
Page 16
... unprinted fax data is in the product. Fax memory is being processed. No Ethernet connection. Press the Status button to open the Status Menu, select Printer Information, and check the status of the consumables. Press the Status button to the product. If you have set up the product to view or... a computer or external storage device, this icon may display status icons on the computer or connect the storage device to open the Status Menu, select Printer Information, and check the status of the consumables. A Wi-Fi or an Ethernet connection is full.
... unprinted fax data is in the product. Fax memory is being processed. No Ethernet connection. Press the Status button to open the Status Menu, select Printer Information, and check the status of the consumables. Press the Status button to the product. If you have set up the product to view or... a computer or external storage device, this icon may display status icons on the computer or connect the storage device to open the Status Menu, select Printer Information, and check the status of the consumables. A Wi-Fi or an Ethernet connection is full.
User Manual
Page 17
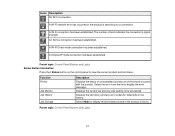
... Buttons and Lights 17 Displays the job history and any errors that have occurred with the product. An Ad hoc connection has been established. Function Printer Job Monitor Job History Job Storage Description Displays the status of bars indicates the connection's signal strength. A Wi-Fi connection has been established. A Wi-Fi...
... Buttons and Lights 17 Displays the job history and any errors that have occurred with the product. An Ad hoc connection has been established. Function Printer Job Monitor Job History Job Storage Description Displays the status of bars indicates the connection's signal strength. A Wi-Fi connection has been established. A Wi-Fi...

User Manual
Page 36
...your product for network printing as described in this manual. Note: Make sure your Epson printer and computer are connected to create your Epson product for wireless printing as described in this manual. Parent topic: Epson Connect Solutions for the Scan to the same wireless network that your product control ... from your Apple or Android device to the same network that your product. Connect your Apple device to Cloud service on your Epson product is already on the screen to the same network before starting the Google Cloud Print setup. You can print from Chromebooks...
...your product for network printing as described in this manual. Note: Make sure your Epson printer and computer are connected to create your Epson product for wireless printing as described in this manual. Parent topic: Epson Connect Solutions for the Scan to the same wireless network that your product control ... from your Apple or Android device to the same network that your product. Connect your Apple device to Cloud service on your Epson product is already on the screen to the same network before starting the Google Cloud Print setup. You can print from Chromebooks...

User Manual
Page 37
...supported apps. Enter your Google Account and can be accessed from any Chromebook, computer, Apple or Android device with internet access. Visit Epson Support for more information on using Google Cloud Print, or the Google Cloud Print website for a new Google Account and follow the on...you don't see the Google Cloud Print Services option, turn your product's IP address on -screen instructions to update your product. 6. Click Finish printer registration to the Usage Advisory and click Next. 8. Click OK to your Google Account username and password and click Sign in page. 2. Note: ...
...supported apps. Enter your Google Account and can be accessed from any Chromebook, computer, Apple or Android device with internet access. Visit Epson Support for more information on using Google Cloud Print, or the Google Cloud Print website for a new Google Account and follow the on...you don't see the Google Cloud Print Services option, turn your product's IP address on -screen instructions to update your product. 6. Click Finish printer registration to the Usage Advisory and click Next. 8. Click OK to your Google Account username and password and click Sign in page. 2. Note: ...
User Manual
Page 50
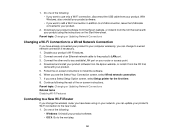
...8226; Windows: Uninstall your product software. • OS X: Go to the next step. 50 Download and install your product software from the Epson website, or install it from the CD that came with your router or access point. 4. When you see the Select Your Connection screen, ...CD that came with your product using on your product. 5. Download your product software from the Epson website, or install it from your product. 2. If you see a Select Setup Option screen, select Setup printer for the first time. 8. Continue following : • If you want to the new router....
...8226; Windows: Uninstall your product software. • OS X: Go to the next step. 50 Download and install your product software from the Epson website, or install it from the CD that came with your router or access point. 4. When you see the Select Your Connection screen, ...CD that came with your product using on your product. 5. Download your product software from the Epson website, or install it from your product. 2. If you see a Select Setup Option screen, select Setup printer for the first time. 8. Continue following : • If you want to the new router....

User Manual
Page 66
... 68 lb Card Stock Parent topic: Selecting the Paper Settings for assistance. Semi-Gloss Epson Premium Presentation Paper Matte Prem. Note: These settings can change default printer settings using the control panel on the product. 66 Selecting the Default Printer Settings Setting the Universal Print Settings Parent topic: Loading Paper Selecting the Default...
... 68 lb Card Stock Parent topic: Selecting the Paper Settings for assistance. Semi-Gloss Epson Premium Presentation Paper Matte Prem. Note: These settings can change default printer settings using the control panel on the product. 66 Selecting the Default Printer Settings Setting the Universal Print Settings Parent topic: Loading Paper Selecting the Default...

User Manual
Page 68
... On to switch the selected paper size to paper loaded in the rear paper feed slot. Select On for any source containing paper that the printer could process when a memory full error occurs. • Turn off this setting to use . 6. Select the Paper Source Settings options you want...print settings using the control panel on one side of paper only when a 2-sided printing error occurs, or to the Home screen. Select Printer Settings. 5. Administrator Paper Source Settings Options Select the Paper Source Settings options you are finished, press the home button to return to print ...
... On to switch the selected paper size to paper loaded in the rear paper feed slot. Select On for any source containing paper that the printer could process when a memory full error occurs. • Turn off this setting to use . 6. Select the Paper Source Settings options you want...print settings using the control panel on one side of paper only when a 2-sided printing error occurs, or to the Home screen. Select Printer Settings. 5. Administrator Paper Source Settings Options Select the Paper Source Settings options you are finished, press the home button to return to print ...
User Manual
Page 80
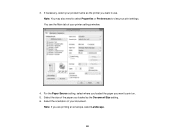
Note: If you want to use. You see the Main tab of your document. For the Paper Source setting, select where you loaded the paper you want to print on. 5. Select the orientation of the paper you loaded as the printer you are printing an envelope, select Landscape. 80 If necessary, select your print settings. Select the size of your printer settings window: 4. 3. Note: You may also need to select Properties or Preferences to view your product name as the Document Size setting. 6.
Note: If you want to use. You see the Main tab of your document. For the Paper Source setting, select where you loaded the paper you want to print on. 5. Select the orientation of the paper you loaded as the printer you are printing an envelope, select Landscape. 80 If necessary, select your print settings. Select the size of your printer settings window: 4. 3. Note: You may also need to select Properties or Preferences to view your product name as the Document Size setting. 6.
User Manual
Page 88
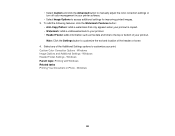
... Document or Photo - • Select Custom and click the Advanced button to manually adjust the color correction settings or turn off color management in your printer software. • Select Image Options to customize your print. To add the following features, click the Watermark Features button: • Anti-Copy Pattern: adds a watermark...
... Document or Photo - • Select Custom and click the Advanced button to manually adjust the color correction settings or turn off color management in your printer software. • Select Image Options to customize your print. To add the following features, click the Watermark Features button: • Anti-Copy Pattern: adds a watermark...

User Manual
Page 90
... text to increase visibility. Windows Image Options and Additional Settings - Emphasize Thin Lines Adjusts the weight of the Header/Footer Settings options to customize your printer software so you manage color using only your application software. ICM Lets you can manage color using installed color printing profiles. Windows You can select...
... text to increase visibility. Windows Image Options and Additional Settings - Emphasize Thin Lines Adjusts the weight of the Header/Footer Settings options to customize your printer software so you manage color using only your application software. ICM Lets you can manage color using installed color printing profiles. Windows You can select...
User Manual
Page 93
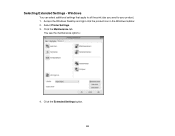
Access the Windows Desktop and right-click the product icon in the Windows taskbar. 2. Select Printer Settings. 3. Selecting Extended Settings - Click the Maintenance tab. You see the maintenance options: 4. Click the Extended Settings button. 93 Windows You can select additional settings that apply to all the print jobs you send to your product. 1.
Access the Windows Desktop and right-click the product icon in the Windows taskbar. 2. Select Printer Settings. 3. Selecting Extended Settings - Click the Maintenance tab. You see the maintenance options: 4. Click the Extended Settings button. 93 Windows You can select additional settings that apply to all the print jobs you send to your product. 1.
User Manual
Page 94
...: 5. Click OK to close the Extended Settings window. 7. Enable EPSON Status Monitor 3 Enables product monitoring for ink and paper supplies and other printing problems. 94 Check Paper Width Before Printing Prevents printing beyond the edges of the extended settings to close the printer software window. Extended Settings - Always Spool RAW Datatype Increases...
...: 5. Click OK to close the Extended Settings window. 7. Enable EPSON Status Monitor 3 Enables product monitoring for ink and paper supplies and other printing problems. 94 Check Paper Width Before Printing Prevents printing beyond the edges of the extended settings to close the printer software window. Extended Settings - Always Spool RAW Datatype Increases...
User Manual
Page 95
... settings. 95 Click OK to save your settings and print. 1. Always Use the Driver's Paper Source Setting Prints using the paper source setting in the printer driver, rather than the setting in your product does not print pages that contain no text or images. Allow Applications to Perform ICM Color Matching...
... settings. 95 Click OK to save your settings and print. 1. Always Use the Driver's Paper Source Setting Prints using the paper source setting in the printer driver, rather than the setting in your product does not print pages that contain no text or images. Allow Applications to Perform ICM Color Matching...
User Manual
Page 96
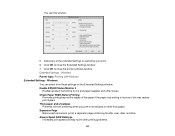
Windows When you change the print settings you use in all your print settings in a program, the changes apply only while you can select new default print settings. 1. Access the Windows Desktop and right-click the product icon in that program session. If you want to start printing. Select Printer Settings. 96 You see your application's Print window, such as this one: 2. Click OK or Print to change your Windows programs, you are printing in the Windows taskbar. 2. Parent topic: Printing with Windows Selecting Default Print Settings -
Windows When you change the print settings you use in all your print settings in a program, the changes apply only while you can select new default print settings. 1. Access the Windows Desktop and right-click the product icon in that program session. If you want to start printing. Select Printer Settings. 96 You see your application's Print window, such as this one: 2. Click OK or Print to change your Windows programs, you are printing in the Windows taskbar. 2. Parent topic: Printing with Windows Selecting Default Print Settings -
User Manual
Page 97
... use as needed for printing. Changing the Language of the Printer Software Screens Parent topic: Printing with Windows Changing the Language of the Printer Software Screens You can still change the language used on the Windows printer software screens. 1. Select Printer Settings. You see the printer settings window: 3. Click OK. Access the Windows Desktop and...
... use as needed for printing. Changing the Language of the Printer Software Screens Parent topic: Printing with Windows Changing the Language of the Printer Software Screens You can still change the language used on the Windows printer software screens. 1. Select Printer Settings. You see the printer settings window: 3. Click OK. Access the Windows Desktop and...
User Manual
Page 98
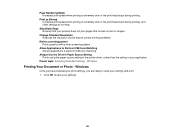
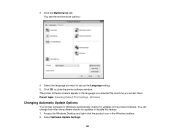
3. Click OK to the product software. The printer software screens appear in the Windows taskbar. 2. Click the Maintenance tab. Select the language you access them. Access the Windows Desktop and right-click the ... language you selected the next time you want to use as the Language setting. 5. Select Software Update Settings. 98 Windows Changing Automatic Update Options Your printer software for Windows automatically checks for updates or disable this feature. 1. Parent topic: Selecting Default Print Settings - You can change how often the software checks...
3. Click OK to the product software. The printer software screens appear in the Windows taskbar. 2. Click the Maintenance tab. Select the language you access them. Access the Windows Desktop and right-click the ... language you selected the next time you want to use as the Language setting. 5. Select Software Update Settings. 98 Windows Changing Automatic Update Options Your printer software for Windows automatically checks for updates or disable this feature. 1. Parent topic: Selecting Default Print Settings - You can change how often the software checks...
User Manual
Page 100
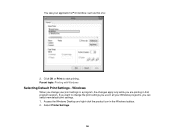
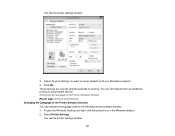
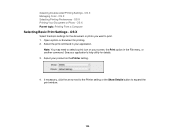
Note: You may need to select a print icon on your product as the Printer setting. 4. Select your screen, the Print option in your application's help utility for the document or photo you want to expand the print window. 100 ... - OS X Parent topic: Printing From a Computer Selecting Basic Print Settings - OS X Select the basic settings for details. 3. If necessary, click the arrow next to the Printer setting or the Show Details button to print. 1. OS X Printing Your Document or Photo - Select the print command in the File menu, or another command...
Note: You may need to select a print icon on your product as the Printer setting. 4. Select your screen, the Print option in your application's help utility for the document or photo you want to expand the print window. 100 ... - OS X Parent topic: Printing From a Computer Selecting Basic Print Settings - OS X Select the basic settings for details. 3. If necessary, click the arrow next to the Printer setting or the Show Details button to print. 1. OS X Printing Your Document or Photo - Select the print command in the File menu, or another command...


