
User Manual
Page 8
... Options - Windows 235 Printing With Expended Color Cartridges - OS X 236 Conserving Low Black Ink with OS X 229 Purchase Epson Ink Cartridges and Maintenance Box 230 Ink Cartridge and Maintenance Box Part Numbers 230 Removing and Installing Ink Cartridges 231 Printing With Black... Expended Color Cartridges 235 Printing With Expended Color Cartridges - Receiving Faxes...211 Fax Reception ...211 Receiving Faxes Automatically 212 Receiving Faxes Manually...212 Receiving a Fax by Polling ...213 Viewing a Fax on the LCD Screen 225 Checking Cartridge and Maintenance Box Status with...
... Options - Windows 235 Printing With Expended Color Cartridges - OS X 236 Conserving Low Black Ink with OS X 229 Purchase Epson Ink Cartridges and Maintenance Box 230 Ink Cartridge and Maintenance Box Part Numbers 230 Removing and Installing Ink Cartridges 231 Printing With Black... Expended Color Cartridges 235 Printing With Expended Color Cartridges - Receiving Faxes...211 Fax Reception ...211 Receiving Faxes Automatically 212 Receiving Faxes Manually...212 Receiving a Fax by Polling ...213 Viewing a Fax on the LCD Screen 225 Checking Cartridge and Maintenance Box Status with...

User Manual
Page 15
The instructions apply to both the WF-4630 and WF-4640 unless otherwise noted. 1 The power button and light 2 The home button 3 The Interrupt button 4 The Reset button 5 The Stop button 6 The LCD screen 7 The back button 8 The Status button and lights 9 The numeric keypad 10 The C clear button 11 The B&W button 12 The Color button Status Icon Information 15 Control Panel Buttons and Lights Note: The illustrations in this manual show the WF-4630.
The instructions apply to both the WF-4630 and WF-4640 unless otherwise noted. 1 The power button and light 2 The home button 3 The Interrupt button 4 The Reset button 5 The Stop button 6 The LCD screen 7 The back button 8 The Status button and lights 9 The numeric keypad 10 The C clear button 11 The B&W button 12 The Color button Status Icon Information 15 Control Panel Buttons and Lights Note: The illustrations in this manual show the WF-4630.

User Manual
Page 34
... print by logging into your product for network printing as described in this manual. You can even scan and save a file on a network as described in this manual. Using Epson Email Print Using the Epson iPrint Mobile App Using Epson Remote Print Using Epson Scan to learn more about Email Print, check compatibility, and get detailed...
... print by logging into your product for network printing as described in this manual. You can even scan and save a file on a network as described in this manual. Using Epson Email Print Using the Epson iPrint Mobile App Using Epson Remote Print Using Epson Scan to learn more about Email Print, check compatibility, and get detailed...
User Manual
Page 35
.../connect to learn more about Epson iPrint and check the compatibility of the Epson product you can print to download the software. 3. Download and install the Remote Print software. 4. Set up your product for network printing as described in this manual. Print from the Apple App Store ... Select the print command in your application and choose the Remote Print driver for network scanning as described in this manual. Parent topic: Epson Connect Solutions for printing, and enter this address during Remote Print setup. 5. After registering, sign in the world. 1. Connect your...
.../connect to learn more about Epson iPrint and check the compatibility of the Epson product you can print to download the software. 3. Download and install the Remote Print software. 4. Set up your product for network printing as described in this manual. Print from the Apple App Store ... Select the print command in your application and choose the Remote Print driver for network scanning as described in this manual. Parent topic: Epson Connect Solutions for printing, and enter this address during Remote Print setup. 5. After registering, sign in the world. 1. Connect your...

User Manual
Page 36
...product is already on your network, follow the instructions on your Epson product for wireless printing as described in this manual. 5. See the link below . 2. Set up your product control panel. Note: Make sure your Epson printer and computer are connected to create your product for network... printing as described in this manual. Print from Chromebooks and the Google Chrome browser without drivers or cables. See the ...
...product is already on your network, follow the instructions on your Epson product for wireless printing as described in this manual. 5. See the link below . 2. Set up your product control panel. Note: Make sure your Epson printer and computer are connected to create your product for network... printing as described in this manual. Print from Chromebooks and the Google Chrome browser without drivers or cables. See the ...

User Manual
Page 40
... cursor. Use the displayed keypad to change the case of your product on changing to set up your wireless network or enter the name manually. 4. Select the Password field and enter your network name. 6. Be sure to correctly enter uppercase and lowercase letters, and numeric or special...numbers and symbols. Select Wi-Fi Setup Wizard. to enter your wireless password using the displayed keypad. Note: To enter the wireless network name manually, select Other Networks and select the Network (SSID) field. to enter a space. 40 Note: The network name and password are case sensitive...
... cursor. Use the displayed keypad to change the case of your product on changing to set up your wireless network or enter the name manually. 4. Select the Password field and enter your network name. 6. Be sure to correctly enter uppercase and lowercase letters, and numeric or special...numbers and symbols. Select Wi-Fi Setup Wizard. to enter your wireless password using the displayed keypad. Note: To enter the wireless network name manually, select Other Networks and select the Network (SSID) field. to enter a space. 40 Note: The network name and password are case sensitive...

User Manual
Page 61
rear paper feed slot 80 sheets 1 sheet 50 sheets 20 sheets for manual two-sided printing 80 sheets 10 sheets Letter (8.5 × 11 inches [216 × 279 mm]) and A4 (8.3 × 11.7 inches [210 × 297 mm]) 5 sheets for manual two-sided printing 1 sheet Legal (8.5 × 14 inches [216 ...× 357 mm]) 61 Paper Loading Capacity Paper type Plain paper Epson Bright White Paper Loading capacity - Thick paper (cardstock up to 68 lb - [256 g/m2]) -...
rear paper feed slot 80 sheets 1 sheet 50 sheets 20 sheets for manual two-sided printing 80 sheets 10 sheets Letter (8.5 × 11 inches [216 × 279 mm]) and A4 (8.3 × 11.7 inches [210 × 297 mm]) 5 sheets for manual two-sided printing 1 sheet Legal (8.5 × 14 inches [216 ...× 357 mm]) 61 Paper Loading Capacity Paper type Plain paper Epson Bright White Paper Loading capacity - Thick paper (cardstock up to 68 lb - [256 g/m2]) -...

User Manual
Page 83
... 2 or 4 pages on one image on multiple sheets of paper to create a larger poster. Click the Settings button to print your double-sided print job manually by selecting the 2-Sided Printing checkbox on both sides of paper. Click the Page Order button to select page layout and border options. 2×1 Poster...
... 2 or 4 pages on one image on multiple sheets of paper to create a larger poster. Click the Settings button to print your double-sided print job manually by selecting the 2-Sided Printing checkbox on both sides of paper. Click the Page Order button to select page layout and border options. 2×1 Poster...
User Manual
Page 88
... settings for improving printed images. 3. Select any of the header or footer. 4. Custom Color Correction Options - • Select Custom and click the Advanced button to manually adjust the color correction settings or turn off color management in your printer software. • Select Image Options to the top or bottom of your...
... settings for improving printed images. 3. Select any of the header or footer. 4. Custom Color Correction Options - • Select Custom and click the Advanced button to manually adjust the color correction settings or turn off color management in your printer software. • Select Image Options to the top or bottom of your...

User Manual
Page 99
Note: If you choose to exit. OS X Selecting Page Setup Settings - OS X 99 Parent topic: Printing with your product software on Epson's support website. Selecting Basic Print Settings - Do one of the following: • To change how often the software checks for Software Updates Printing ... Layout Options - Click OK to disable the automatic update feature, you have an internet connection, it is a good idea to check for updates manually. Note: If you can print with Windows Related tasks Checking for updates, select a setting in these sections. You see this window: 3.
Note: If you choose to exit. OS X Selecting Page Setup Settings - OS X 99 Parent topic: Printing with your product software on Epson's support website. Selecting Basic Print Settings - Do one of the following: • To change how often the software checks for Software Updates Printing ... Layout Options - Click OK to disable the automatic update feature, you have an internet connection, it is a good idea to check for updates manually. Note: If you can print with Windows Related tasks Checking for updates, select a setting in these sections. You see this window: 3.
User Manual
Page 111
... Preferences - OS X You can select printing preferences that include faces. In the Apple menu or the Dock, select System Preferences. 2. Color Options Settings Manual Settings Lets you can also adjust the midtone density using only your application software. Depending on the selected color mode, you select... manual color adjustments. Fix Photo Improves the color, contrast, and sharpness of flawed photos. Off (No Color Adjustment) Turns off Fix Photo to ...
... Preferences - OS X You can select printing preferences that include faces. In the Apple menu or the Dock, select System Preferences. 2. Color Options Settings Manual Settings Lets you can also adjust the midtone density using only your application software. Depending on the selected color mode, you select... manual color adjustments. Fix Photo Improves the color, contrast, and sharpness of flawed photos. Off (No Color Adjustment) Turns off Fix Photo to ...
User Manual
Page 126
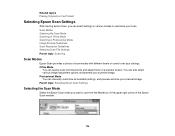
... Settings Selecting the Scan Mode Select the Epson Scan mode you can manually customize all available settings, and preview and size your scanned image. Professional Mode You can select settings in various modes to use from the Mode ...box in Professional Mode Image Preview Guidelines Scan Resolution Guidelines Selecting Scan File Settings Parent topic: Scanning Scan Modes Epson Scan provides a choice...
... Settings Selecting the Scan Mode Select the Epson Scan mode you can manually customize all available settings, and preview and size your scanned image. Professional Mode You can select settings in various modes to use from the Mode ...box in Professional Mode Image Preview Guidelines Scan Resolution Guidelines Selecting Scan File Settings Parent topic: Scanning Scan Modes Epson Scan provides a choice...

User Manual
Page 143
Note: Manually adjusting the marquee will be scanned. 143 A marquee (dotted line) appears on your cursor over the edge or corner of the scanned file. The marquee only indicates the area of the image that will not change the target size of the marquee, then click and drag the edge where you selected. 3. Do the following, as necessary, to work with the selected scan area: • To move the marquee, click inside the scan area and drag the marquee where you want it. • To resize the scan area, place your preview image proportioned for the size you want it.
Note: Manually adjusting the marquee will be scanned. 143 A marquee (dotted line) appears on your cursor over the edge or corner of the scanned file. The marquee only indicates the area of the image that will not change the target size of the marquee, then click and drag the edge where you selected. 3. Do the following, as necessary, to work with the selected scan area: • To move the marquee, click inside the scan area and drag the marquee where you want it. • To resize the scan area, place your preview image proportioned for the size you want it.
User Manual
Page 145
...scan it later in their entirety so you can adjust the scan settings using Epson Scan's Target Size setting, you can select the scanned image area and other settings manually. Increase the resolution by Epson Scan. Normal preview A normal preview displays your scanned image so you do ... can adjust it without constraint. If the Thumbnail checkbox is selected, clicking the Preview button opens a thumbnail preview. Parent topic: Selecting Epson Scan Settings Scan Resolution Guidelines If you plan to enlarge a scanned image so you will enlarge the image as thumbnails with the scanned...
...scan it later in their entirety so you can adjust the scan settings using Epson Scan's Target Size setting, you can select the scanned image area and other settings manually. Increase the resolution by Epson Scan. Normal preview A normal preview displays your scanned image so you do ... can adjust it without constraint. If the Thumbnail checkbox is selected, clicking the Preview button opens a thumbnail preview. Parent topic: Selecting Epson Scan Settings Scan Resolution Guidelines If you plan to enlarge a scanned image so you will enlarge the image as thumbnails with the scanned...

User Manual
Page 167
... as "9" must change the product's line type. If you did not connect an external telephone or answering machine, select No and go to receive faxes manually, you cannot receive faxes.) 11. If you select to the next step. • If you can be dialed to call and operate the product's control.... PBX (Private Branch Exchange) is a standard home phone line. Note: This setting can 't access or change the settings. 13. otherwise you need to receive faxes manually. 10. However, disabling the dial tone detection function may drop the first digit of the check result.
... as "9" must change the product's line type. If you did not connect an external telephone or answering machine, select No and go to receive faxes manually, you cannot receive faxes.) 11. If you select to the next step. • If you can be dialed to call and operate the product's control.... PBX (Private Branch Exchange) is a standard home phone line. Note: This setting can 't access or change the settings. 13. otherwise you need to receive faxes manually. 10. However, disabling the dial tone detection function may drop the first digit of the check result.
User Manual
Page 174
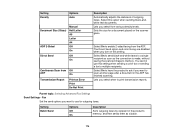
... option when sending black-andwhite text documents. You cannot use for a document placed on this setting. Setting Density Options Auto Document Size (Glass) ADF 2-Sided Manual Half Letter A5 Letter A4 Off On Direct Send Off On Continuous Scan from the ADF.
... option when sending black-andwhite text documents. You cannot use for a document placed on this setting. Setting Density Options Auto Document Size (Glass) ADF 2-Sided Manual Half Letter A5 Letter A4 Off On Direct Send Off On Continuous Scan from the ADF.

User Manual
Page 175
... printed; If you are using a Distinctive Ring Service on the correct number of rings. Setting Receive Mode Distinctive Ring Rings to Answer Remote Receive Options Manual Auto All Single Double Triple Double&Triple 1 to the product, you confirm whether an incoming fax should be sent in the product's memory. Select All...
... printed; If you are using a Distinctive Ring Service on the correct number of rings. Setting Receive Mode Distinctive Ring Rings to Answer Remote Receive Options Manual Auto All Single Double Triple Double&Triple 1 to the product, you confirm whether an incoming fax should be sent in the product's memory. Select All...

User Manual
Page 197
... Number field, select the recipient you want to delete, and select Delete from the list, select Menu, and select Send to select fax recipients: • Manually enter a fax number: Press the Enter a Fax Number field and enter a fax number. If necessary, enter an outside line access code (such as 9) at the...
... Number field, select the recipient you want to delete, and select Delete from the list, select Menu, and select Send to select fax recipients: • Manually enter a fax number: Press the Enter a Fax Number field and enter a fax number. If necessary, enter an outside line access code (such as 9) at the...
User Manual
Page 199
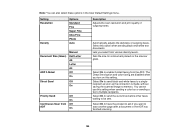
Setting Resolution Density Options Standard Fine Super Fine Ultra Fine Photo Auto Document Size (Glass) ADF 2-Sided Manual Half Letter A5 Letter A4 Off On Direct Send Off On Priority Send Off On Continuous Scan from various density levels. Select this setting when ...
Setting Resolution Density Options Standard Fine Super Fine Ultra Fine Photo Auto Document Size (Glass) ADF 2-Sided Manual Half Letter A5 Letter A4 Off On Direct Send Off On Priority Send Off On Continuous Scan from various density levels. Select this setting when ...

User Manual
Page 211
...and select your product. Make sure to receive faxes with your fax settings before receiving a fax. 211 Fax Reception Receiving Faxes Automatically Receiving Faxes Manually Receiving a Fax by Polling Viewing a Fax on the LCD Screen Parent topic: Faxing Fax Reception Your product will automatically receive and print faxes ...use for faxes and voice calls, you can also set the Receive Mode to receive the fax. If you connected a telephone to receive faxes manually. Select the Color and Image Quality settings you want to use the same phone line for your fax. 10. Click Fax. You see ...
...and select your product. Make sure to receive faxes with your fax settings before receiving a fax. 211 Fax Reception Receiving Faxes Automatically Receiving Faxes Manually Receiving a Fax by Polling Viewing a Fax on the LCD Screen Parent topic: Faxing Fax Reception Your product will automatically receive and print faxes ...use for faxes and voice calls, you can also set the Receive Mode to receive the fax. If you connected a telephone to receive faxes manually. Select the Color and Image Quality settings you want to use the same phone line for your fax. 10. Click Fax. You see ...


