User Manual
Page 2
... are for any damage resulting from electromagnetic interference that occurs from the use with Seiko Epson Corporation's operating and maintenance instructions. This information is a registered logomark of their respective owners. EPSON is registered trademark, SureLab is a trademark, and EPSON Exceed Your Vision is subject to the purchaser of this product or third parties for...
... are for any damage resulting from electromagnetic interference that occurs from the use with Seiko Epson Corporation's operating and maintenance instructions. This information is a registered logomark of their respective owners. EPSON is registered trademark, SureLab is a trademark, and EPSON Exceed Your Vision is subject to the purchaser of this product or third parties for...
User Manual
Page 3
... 77 Checking the System Application Version 78 Changing the System Application Version . . . . . .78 Removing the System Application 81 OPEN SOURCE SOFTWARE LICENSE TERMS. . .82 SEIKO EPSON CORPORATION SOFTWARE LICENSE AGREEMENT 90 Notes 93 Error History Acquire Log Add/Delete Printer When a Message is Displayed About Error Messages 68 3
... 77 Checking the System Application Version 78 Changing the System Application Version . . . . . .78 Removing the System Application 81 OPEN SOURCE SOFTWARE LICENSE TERMS. . .82 SEIKO EPSON CORPORATION SOFTWARE LICENSE AGREEMENT 90 Notes 93 Error History Acquire Log Add/Delete Printer When a Message is Displayed About Error Messages 68 3

User Manual
Page 4
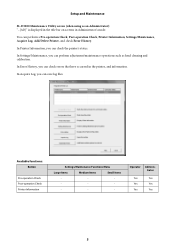
... perform a Pre-operation Check, Post-operation Check, Printer Information, Settings/Maintenance, , and check Error History. In Printer Information, you can check the printer's status. SL-D3000 Maintenance Utility screen (when using as head cleaning. In Error History, you can set the user authority to "Operator" or "Administrator". You can check errors...
... perform a Pre-operation Check, Post-operation Check, Printer Information, Settings/Maintenance, , and check Error History. In Printer Information, you can check the printer's status. SL-D3000 Maintenance Utility screen (when using as head cleaning. In Error History, you can set the user authority to "Operator" or "Administrator". You can check errors...
User Manual
Page 5
... can perform a Pre-operation Check, Post-operation Check, Printer Information, Settings/Maintenance, Acquire Log, Add/Delete Printer, and check Error History. Setup and Maintenance SL-D3000 Maintenance Utility screen (when using as head cleaning and calibration.
... can perform a Pre-operation Check, Post-operation Check, Printer Information, Settings/Maintenance, Acquire Log, Add/Delete Printer, and check Error History. Setup and Maintenance SL-D3000 Maintenance Utility screen (when using as head cleaning and calibration.

User Manual
Page 6
...Yes Yes Yes Yes Yes Yes Yes Yes Yes Yes Yes Yes Yes Yes Yes Yes Yes Yes Yes Tip: See the "SL-D3000 Operation Guide" for Optional - Yes CR Unit Head Cleaning (031) Auto Cleaning (0311) Yes Adjustment/Mainten ance (03) Nozzle ... Calibration (0341) No (034) History of Correction No Values (0342) Create Calibration No (0343) Gray Adjustment (035) - Yes - - - U "SL-D3000 Operation Guide" - No Settings(013) Print Condition Image Quality - "Setup and Maintenance" 6 No Settings/Inspections Information Settings (01) (011) Settings for more information...
...Yes Yes Yes Yes Yes Yes Yes Yes Yes Yes Yes Yes Yes Yes Yes Yes Yes Yes Yes Tip: See the "SL-D3000 Operation Guide" for Optional - Yes CR Unit Head Cleaning (031) Auto Cleaning (0311) Yes Adjustment/Mainten ance (03) Nozzle ... Calibration (0341) No (034) History of Correction No Values (0342) Create Calibration No (0343) Gray Adjustment (035) - Yes - - - U "SL-D3000 Operation Guide" - No Settings(013) Print Condition Image Quality - "Setup and Maintenance" 6 No Settings/Inspections Information Settings (01) (011) Settings for more information...
User Manual
Page 7
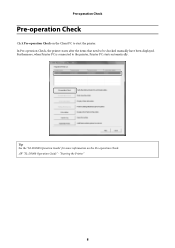
U "SL-D3000 Operation Guide" - "Starting the Printer" 8 Pre-operation Check Pre-operation Check Click Pre-operation Check on the Pre-operation Check. In Pre-operation Check, the printer starts after the items that need to start the printer. Tip: See the "SL-D3000 Operation Guide" for more information on the Client PC to be checked manually have been displayed. Furthermore, when Printer PC is connected to the printer, Printer PC starts automatically.
U "SL-D3000 Operation Guide" - "Starting the Printer" 8 Pre-operation Check Pre-operation Check Click Pre-operation Check on the Pre-operation Check. In Pre-operation Check, the printer starts after the items that need to start the printer. Tip: See the "SL-D3000 Operation Guide" for more information on the Client PC to be checked manually have been displayed. Furthermore, when Printer PC is connected to the printer, Printer PC starts automatically.
User Manual
Page 8
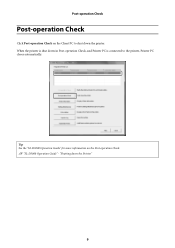
"Shutting down the printer. U "SL-D3000 Operation Guide" - Tip: See the "SL-D3000 Operation Guide" for more information on the Client PC to the printer, Printer PC closes automatically. Post-operation Check Post-operation Check Click Post-operation Check on the Post-operation Check. When the printer is shut down in Post-operation Check, and Printer PC is connected to shut down the Printer" 9
"Shutting down the printer. U "SL-D3000 Operation Guide" - Tip: See the "SL-D3000 Operation Guide" for more information on the Client PC to the printer, Printer PC closes automatically. Post-operation Check Post-operation Check Click Post-operation Check on the Post-operation Check. When the printer is shut down in Post-operation Check, and Printer PC is connected to shut down the Printer" 9
User Manual
Page 9
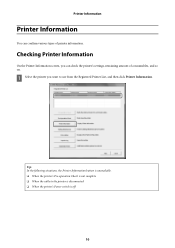
Printer Information Printer Information You can check the printer's settings, remaining amount of printer information. Checking Printer Information On the Printer Information screen, you want to the printer is disconnected O When the printer's Power switch is unavailable. A Select the printer you can confirm various types of consumables, and so on. Tip: In the following situations, the Printer Information button is off 10 O When the printer's Pre-operation Check is not complete O When the cable to use from the Registered Printer List, and then click Printer Information.
Printer Information Printer Information You can check the printer's settings, remaining amount of printer information. Checking Printer Information On the Printer Information screen, you want to the printer is disconnected O When the printer's Power switch is unavailable. A Select the printer you can confirm various types of consumables, and so on. Tip: In the following situations, the Printer Information button is off 10 O When the printer's Pre-operation Check is not complete O When the cable to use from the Registered Printer List, and then click Printer Information.
User Manual
Page 10
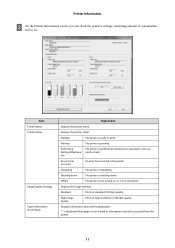
Item Printer Name Printer Status Image Quality Settings Paper Information (Front/Rear) Explanation Displays the printer name. Shutting down . Standard Prints at high resolution (1440 dpi) quality. High Image Quality Prints at standard (720 dpi) quality. Standby The printer is shutting down The printer is ready to print. "-" is displayed when paper is printing. Printing The printer is not loaded or information cannot be acquired from the printer. 11 Displays the image settings. Offline The printer is not turned on . Displays the printer status. An...
Item Printer Name Printer Status Image Quality Settings Paper Information (Front/Rear) Explanation Displays the printer name. Shutting down . Standard Prints at high resolution (1440 dpi) quality. High Image Quality Prints at standard (720 dpi) quality. Standby The printer is shutting down The printer is ready to print. "-" is displayed when paper is printing. Printing The printer is not loaded or information cannot be acquired from the printer. 11 Displays the image settings. Offline The printer is not turned on . Displays the printer status. An...

User Manual
Page 11
... not be acquired from the printer, the bar is displayed when the amount of ink remaining has fallen below the minimum limit. For the Single Roll Model, information is a problem with the ink cartridge. "-" is displayed when information cannot be faint or the amount of free space in... is installed, a message is displayed indicating that it is running low. Closes the Printer Information screen. Tip: Only the Dual Roll Model supports front roll paper. Displays the amount of ink remaining may be acquired from the trimmed waste paper box, click Clear Usage to display the Help...
... not be acquired from the printer, the bar is displayed when the amount of ink remaining has fallen below the minimum limit. For the Single Roll Model, information is a problem with the ink cartridge. "-" is displayed when information cannot be faint or the amount of free space in... is installed, a message is displayed indicating that it is running low. Closes the Printer Information screen. Tip: Only the Dual Roll Model supports front roll paper. Displays the amount of ink remaining may be acquired from the trimmed waste paper box, click Clear Usage to display the Help...
User Manual
Page 12
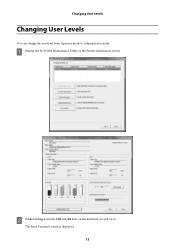
B While holding down the Ctrl and Alt keys on the keyboard, press S (or s). The Enter Password screen is displayed. 13 A Display the SL-D3000 Maintenance Utility or the Printer Information screen. Changing User Levels Changing User Levels You can change the user level from Operator mode to Administrator mode.
B While holding down the Ctrl and Alt keys on the keyboard, press S (or s). The Enter Password screen is displayed. 13 A Display the SL-D3000 Maintenance Utility or the Printer Information screen. Changing User Levels Changing User Levels You can change the user level from Operator mode to Administrator mode.
User Manual
Page 13
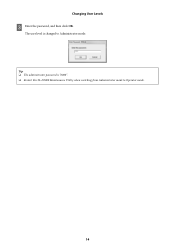
Tip: O The administrator password is changed to Operator mode. 14 O Restart this SL-D3000 Maintenance Utility when switching from Administrator mode to Administrator mode. The user level is "0000". Changing User Levels C Enter the password, and then click OK.
Tip: O The administrator password is changed to Operator mode. 14 O Restart this SL-D3000 Maintenance Utility when switching from Administrator mode to Administrator mode. The user level is "0000". Changing User Levels C Enter the password, and then click OK.
User Manual
Page 14
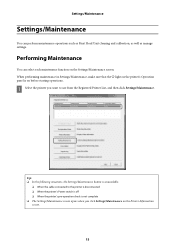
A Select the printer you click Settings/Maintenance on before starting operations. When performing maintenance in Settings/Maintenance, make sure that the p light on the printer's Operation panel is on the Printer Information screen. 15 O When the cable connected to use from the Registered Printer List, and then click Settings/Maintenance. Tip: O In the following situations, the Settings/Maintenance button is not complete O The Settings/Maintenance screen opens when you want to the printer is disconnected O When the printer's Power switch is off O When the printer's pre-operation ...
A Select the printer you click Settings/Maintenance on before starting operations. When performing maintenance in Settings/Maintenance, make sure that the p light on the printer's Operation panel is on the Printer Information screen. 15 O When the cable connected to use from the Registered Printer List, and then click Settings/Maintenance. Tip: O In the following situations, the Settings/Maintenance button is not complete O The Settings/Maintenance screen opens when you want to the printer is disconnected O When the printer's Power switch is off O When the printer's pre-operation ...
User Manual
Page 15
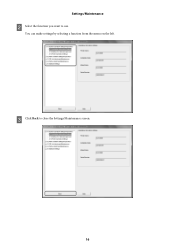
Settings/Maintenance B Select the function you want to close the Settings/Maintenance screen. 16 C Click Back to use. You can make settings by selecting a function from the menu on the left.
Settings/Maintenance B Select the function you want to close the Settings/Maintenance screen. 16 C Click Back to use. You can make settings by selecting a function from the menu on the left.
User Manual
Page 16
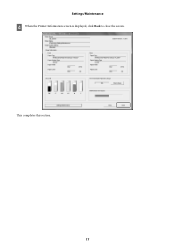
This completes this section. 17 Settings/Maintenance D When the Printer Information screen is displayed, click Back to close the screen.
This completes this section. 17 Settings/Maintenance D When the Printer Information screen is displayed, click Back to close the screen.
User Manual
Page 17
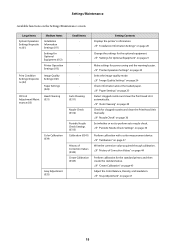
U "Image Quality Settings" on page 30 Set whether or not to perform auto nozzle check. Settings/Maintenance Available functions on the Settings/Maintenance screen: Large Items System Operation Settings/Inspectio ns (01) Medium Items Installation Information Settings (011) Settings for Optional Equipment" on page 21 - - - U "Settings for Optional Equipment (012) Printer Operation Settings (013) Print Condition Settings/Inspectio ns (02) Image Quality Settings (021) Paper Settings (022) CR Unit Adjustment/Maint enance (03) Head Cleaning (031) Color Calibration (034) Gray ...
U "Image Quality Settings" on page 30 Set whether or not to perform auto nozzle check. Settings/Maintenance Available functions on the Settings/Maintenance screen: Large Items System Operation Settings/Inspectio ns (01) Medium Items Installation Information Settings (011) Settings for Optional Equipment" on page 21 - - - U "Settings for Optional Equipment (012) Printer Operation Settings (013) Print Condition Settings/Inspectio ns (02) Image Quality Settings (021) Paper Settings (022) CR Unit Adjustment/Maint enance (03) Head Cleaning (031) Color Calibration (034) Gray ...
User Manual
Page 18
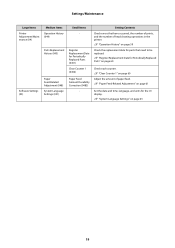
Register Replacement Date for Periodically Replaced Parts" on page 60 Check each counter. U "Clear Counter 1" on page 63 19 Settings/Maintenance Large Items Printer Adjustment/Maint enance (04) Software Settings (05) Medium Items Operation History (044) Parts Replacement History (045) Paper Feed-Related Adjustment (048) System Language Settings (051) Small Items - U "Register Replacement Date for Periodically Replaced Parts (0451) Clear Counter 1 (0452) Paper Feed Amount Durability Correction (0483) - U "Operation History" on page 61 Set the date and time, language, and ...
Register Replacement Date for Periodically Replaced Parts" on page 60 Check each counter. U "Clear Counter 1" on page 63 19 Settings/Maintenance Large Items Printer Adjustment/Maint enance (04) Software Settings (05) Medium Items Operation History (044) Parts Replacement History (045) Paper Feed-Related Adjustment (048) System Language Settings (051) Small Items - U "Register Replacement Date for Periodically Replaced Parts (0451) Clear Counter 1 (0452) Paper Feed Amount Durability Correction (0483) - U "Operation History" on page 61 Set the date and time, language, and ...
User Manual
Page 19
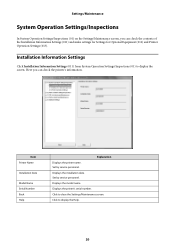
Installation Information Settings Click Installation Information Settings (011) from System Operation Settings/Inspections (01) to display the Help. 20 Displays the model name. Click to display the screen. Item Printer Name Installation Date Model Name Serial Number Back Help Explanation Displays the printer name. Displays the printer's serial number. Set by service personnel. Here you can check the printer's information. Set by service personnel. Displays the installation date. Click to close the Settings/Maintenance screen. Settings/Maintenance System Operation ...
Installation Information Settings Click Installation Information Settings (011) from System Operation Settings/Inspections (01) to display the Help. 20 Displays the model name. Click to display the screen. Item Printer Name Installation Date Model Name Serial Number Back Help Explanation Displays the printer name. Displays the printer's serial number. Set by service personnel. Here you can check the printer's information. Set by service personnel. Displays the installation date. Click to close the Settings/Maintenance screen. Settings/Maintenance System Operation ...
User Manual
Page 20
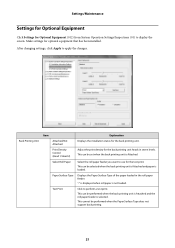
... Type of the paper loaded in seven levels. Back Printing Unit Item Attached/Not Attached Print Density Control (Head 1/Head 2) Select Roll Paper Paper Surface Type Test Print Explanation Displays the installation status for optional equipment that has been installed. Click to use for the test... print. Select the roll paper feeder you want to perform a test print. "-" is displayed when roll paper is Attached. Make settings for the back printing unit. After changing settings, click Apply to ...
... Type of the paper loaded in seven levels. Back Printing Unit Item Attached/Not Attached Print Density Control (Head 1/Head 2) Select Roll Paper Paper Surface Type Test Print Explanation Displays the installation status for optional equipment that has been installed. Click to use for the test... print. Select the roll paper feeder you want to perform a test print. "-" is displayed when roll paper is Attached. Make settings for the back printing unit. After changing settings, click Apply to ...
User Manual
Page 21
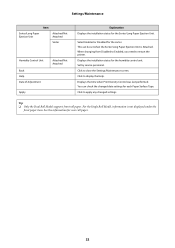
...You can be set when the Sorter/Long Paper Ejection Unit is not displayed under the front paper item. Tip: O Only the Dual Roll Model supports front roll paper. See the information for the sorter. Displays the time when Print Density Control was last performed. Settings/Maintenance Item Sorter/Long Paper ... control unit. Displays the installation status for the Sorter/Long Paper Ejection Unit. Set by service personnel. Click to display the Help. For the Single Roll Model, information is Attached. Click to apply any changed date settings for each Paper Surface Type.
...You can be set when the Sorter/Long Paper Ejection Unit is not displayed under the front paper item. Tip: O Only the Dual Roll Model supports front roll paper. See the information for the sorter. Displays the time when Print Density Control was last performed. Settings/Maintenance Item Sorter/Long Paper ... control unit. Displays the installation status for the Sorter/Long Paper Ejection Unit. Set by service personnel. Click to display the Help. For the Single Roll Model, information is Attached. Click to apply any changed date settings for each Paper Surface Type.