User's Guide
Page 3
... Accessories Registration and Warranty Using This Manual Setting Up the Projector Choosing a Location Installing the Projector Connecting the Cables Connecting Video and Computer Equipment Making Other Connections Installing Batteries in the Remote Control Turning the Projector On and Off Turning On the Projector Turning Off the Projector Selecting the Image Source Positioning the Image Making Basic Adjustments Focusing and Zooming Choosing the Aspect Ratio Choosing the Color Mode Advanced Color Adjustments Adjusting the Gamma Setting Adjusting RGBCMY Locking the Projector 6 7 9 10 10 11 12...
... Accessories Registration and Warranty Using This Manual Setting Up the Projector Choosing a Location Installing the Projector Connecting the Cables Connecting Video and Computer Equipment Making Other Connections Installing Batteries in the Remote Control Turning the Projector On and Off Turning On the Projector Turning Off the Projector Selecting the Image Source Positioning the Image Making Basic Adjustments Focusing and Zooming Choosing the Aspect Ratio Choosing the Color Mode Advanced Color Adjustments Adjusting the Gamma Setting Adjusting RGBCMY Locking the Projector 6 7 9 10 10 11 12...

User's Guide
Page 4
... Picture Quality Settings 37 Color Settings 40 Adjustments for Computer Images 42 Selecting Memory Settings and Resetting the Projector 43 Selecting Memory Settings 43 Creating Memory Settings 44 Renaming Memory Settings 44 Deleting Saved Memory Settings 45 Resetting the Projector 45 Customizing Projector Features 46 Image Sizing 46 Screen Options 47 Other Setup Options 47 Maintenance 50 Cleaning the Lens 50 Cleaning the Projector Case 51 Cleaning and Replacing the Air Filter 51 Replacing the Lamp 53 Resetting the Lamp Usage Timer 56 Checking...
... Picture Quality Settings 37 Color Settings 40 Adjustments for Computer Images 42 Selecting Memory Settings and Resetting the Projector 43 Selecting Memory Settings 43 Creating Memory Settings 44 Renaming Memory Settings 44 Deleting Saved Memory Settings 45 Resetting the Projector 45 Customizing Projector Features 46 Image Sizing 46 Screen Options 47 Other Setup Options 47 Maintenance 50 Cleaning the Lens 50 Cleaning the Projector Case 51 Cleaning and Replacing the Air Filter 51 Replacing the Lamp 53 Resetting the Lamp Usage Timer 56 Checking...
User's Guide
Page 6
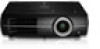
Introduction The PowerLite® Pro Cinema 9350/9700 UB projector lets you enjoy theater-quality images in the relaxing environment of your projected content, for perfectly adjusted images and deepest blacks ■ Epson C2Fine® 3LCD technology for reliable picture quality, increased contrast ratio and uniform colors ■ 1080Perfect™ video processing (using HQV® Reon-VX technology for the Pro Cinema 9700 UB)for more film-like images free of noise...
Introduction The PowerLite® Pro Cinema 9350/9700 UB projector lets you enjoy theater-quality images in the relaxing environment of your projected content, for perfectly adjusted images and deepest blacks ■ Epson C2Fine® 3LCD technology for reliable picture quality, increased contrast ratio and uniform colors ■ 1080Perfect™ video processing (using HQV® Reon-VX technology for the Pro Cinema 9700 UB)for more film-like images free of noise...
User's Guide
Page 10
.... Registering also lets you won't have to wait for your Extra Care Home Service brochure for the projector: Product Replacement lamp Air filter replacement Kensington security lock (anti-theft device) Cable cover Projector mount Fixed Anamorphic Lens Kit (Pro Cinema 9700 UB only) Anamorphic lens kit (Pro Cinema 9700 UB only) Part number V13H010L49 V13H134A21 ELPSL01 V12H003003 ELPHB800 ELPFALKP ELPALK2 In addition to be repaired. Optional Accessories Epson provides the following optional accessories for details. For details, see page...
.... Registering also lets you won't have to wait for your Extra Care Home Service brochure for the projector: Product Replacement lamp Air filter replacement Kensington security lock (anti-theft device) Cable cover Projector mount Fixed Anamorphic Lens Kit (Pro Cinema 9700 UB only) Anamorphic lens kit (Pro Cinema 9700 UB only) Part number V13H010L49 V13H134A21 ELPSL01 V12H003003 ELPHB800 ELPFALKP ELPALK2 In addition to be repaired. Optional Accessories Epson provides the following optional accessories for details. For details, see page...
User's Guide
Page 20
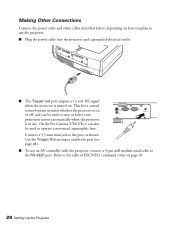
On the Pro Cinema 9700 UB, it can be used to raise or lower your projection screen automatically when the projector is in use. Use the Trigger Out setting to enable the port (see page 48). ■ To use an AV controller with the projector, connect a 9-pin null modem serial cable to the port, as shown. This lets a central control system monitor whether the projector is on . Making Other Connections Connect the power cable and other...
On the Pro Cinema 9700 UB, it can be used to raise or lower your projection screen automatically when the projector is in use. Use the Trigger Out setting to enable the port (see page 48). ■ To use an AV controller with the projector, connect a 9-pin null modem serial cable to the port, as shown. This lets a central control system monitor whether the projector is on . Making Other Connections Connect the power cable and other...
User's Guide
Page 21
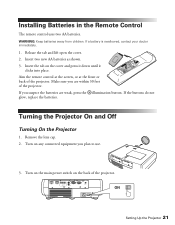
... plan to use. 3. ON Setting Up the Projector 21 Insert the tab on the back of the projector. Insert two new AA batteries as shown. 3. Turn on any connected equipment you suspect the batteries are within 30 feet of the projector. WARNING: Keep batteries away from children. Installing Batteries in the Remote Control The remote control uses two AA batteries. Aim the remote control at the screen, or at...
... plan to use. 3. ON Setting Up the Projector 21 Insert the tab on the back of the projector. Insert two new AA batteries as shown. 3. Turn on any connected equipment you suspect the batteries are within 30 feet of the projector. WARNING: Keep batteries away from children. Installing Batteries in the Remote Control The remote control uses two AA batteries. Aim the remote control at the screen, or at...
User's Guide
Page 36
... Screen (Pro Cinema 9700 UB), or Theatre Black 2 (Pro Cinema 9350) (see page 28). Decrease the brightness for your video equipment's specifications to be used only when a composite video, S-Video, or component video signal is being input and the Color Mode is set to changes in a brightly lit room or onto an especially large screen, you would like the projector to respond to x.v.Color (see page 28). For example, if you're projecting...
... Screen (Pro Cinema 9700 UB), or Theatre Black 2 (Pro Cinema 9350) (see page 28). Decrease the brightness for your video equipment's specifications to be used only when a composite video, S-Video, or component video signal is being input and the Color Mode is set to changes in a brightly lit room or onto an especially large screen, you would like the projector to respond to x.v.Color (see page 28). For example, if you're projecting...
User's Guide
Page 46
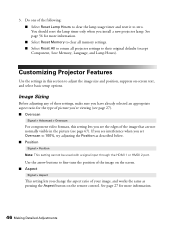
... selected an appropriate aspect ratio for the type of the following: ■ Select Reset Lamp Hours to clear the lamp usage timer and reset it to 100%, try adjusting the Position as pressing the Aspect button on -screen text, and select basic setup options. Use the arrow buttons to adjust the image size and position, suppress on the remote control. 3. Image Sizing Before adjusting any of these settings, make sure you install a new projector lamp.
... selected an appropriate aspect ratio for the type of the following: ■ Select Reset Lamp Hours to clear the lamp usage timer and reset it to 100%, try adjusting the Position as pressing the Aspect button on -screen text, and select basic setup options. Use the arrow buttons to adjust the image size and position, suppress on the remote control. 3. Image Sizing Before adjusting any of these settings, make sure you install a new projector lamp.

User's Guide
Page 47
... appears when you switch between image sources or color modes). ■ Startup Screen Settings > Display > Startup Screen Turn this setting off if you press the Blank button to Zoom). Signal > Zoom Caption Pos. Making Detailed Adjustments 47 ■ Zoom Caption Pos. Other Setup Options ■ Projection Settings > Projection You can cause the projector to start when the main power switch is turned on, without pressing the P power button on -screen messages from appearing while the projector is not receiving a signal or when...
... appears when you switch between image sources or color modes). ■ Startup Screen Settings > Display > Startup Screen Turn this setting off if you press the Blank button to Zoom). Signal > Zoom Caption Pos. Making Detailed Adjustments 47 ■ Zoom Caption Pos. Other Setup Options ■ Projection Settings > Projection You can cause the projector to start when the main power switch is turned on, without pressing the P power button on -screen messages from appearing while the projector is not receiving a signal or when...
User's Guide
Page 48
...; Component Settings > Input Signal > Component Change this setting to deactivate the lights on the projector's Ppower and buttons. For component video, select Auto to lower your video equipment's signal. ■ Trigger Out Settings > Trigger Out Turn on this setting if you lock the Ppower button on the projector's control panel to make it more information. 48 Making Detailed Adjustments or select YCbCr or YPbPr to manually select your projection screen when the projector is selected...
...; Component Settings > Input Signal > Component Change this setting to deactivate the lights on the projector's Ppower and buttons. For component video, select Auto to lower your video equipment's signal. ■ Trigger Out Settings > Trigger Out Turn on this setting if you lock the Ppower button on the projector's control panel to make it more information. 48 Making Detailed Adjustments or select YCbCr or YPbPr to manually select your projection screen when the projector is selected...

User's Guide
Page 53
... bare hands; Unplug the power cord and any cables. 4. It's time to replace the lamp when: ■ The projected image gets darker or starts to stop flashing. 2. In the unlikely event that the lamp has broken, small glass fragments may shorten the lamp life. Be sure to avoid injury. You can purchase lamp part number V13H010L49 from an authorized Epson reseller. Lamp light Turn off the power switch on the back of...
... bare hands; Unplug the power cord and any cables. 4. It's time to replace the lamp when: ■ The projected image gets darker or starts to stop flashing. 2. In the unlikely event that the lamp has broken, small glass fragments may shorten the lamp life. Be sure to avoid injury. You can purchase lamp part number V13H010L49 from an authorized Epson reseller. Lamp light Turn off the power switch on the back of...

User's Guide
Page 56
... button. When you 've used the lamp for at least 10 hours. The Lamp Hours shows 0H until you 're finished, press the Menu button to open the Info menu. The resolution indicates the total number of visible scan lines depends on the projector or remote control. 2. Resetting the Lamp Usage Timer After replacing the lamp, plug the projector back in, turn on the power switch on the currently selected image source. Press the Menu button on the projector or remote control...
... button. When you 've used the lamp for at least 10 hours. The Lamp Hours shows 0H until you 're finished, press the Menu button to open the Info menu. The resolution indicates the total number of visible scan lines depends on the projector or remote control. 2. Resetting the Lamp Usage Timer After replacing the lamp, plug the projector back in, turn on the power switch on the currently selected image source. Press the Menu button on the projector or remote control...

User's Guide
Page 58
... of the projector. Then turn off the power switch in back to turn off . Turn off the power switch in back to turn off the power switch on . 58 Problem Solving If this doesn't solve the problem, check the status lights on . Problem Solving This section explains how to appear. Status lights Warning lights Lights indicating normal operation Light state All lights are off Power light is on Power light flashes and source light is in standby mode. If necessary, connect the power cord and turn on the power switch on...
... of the projector. Then turn off the power switch in back to turn off . Turn off the power switch in back to turn off the power switch on . 58 Problem Solving If this doesn't solve the problem, check the status lights on . Problem Solving This section explains how to appear. Status lights Warning lights Lights indicating normal operation Light state All lights are off Power light is on Power light flashes and source light is in standby mode. If necessary, connect the power cord and turn on the power switch on...

User's Guide
Page 59
... replaced the lamp, make sure the lamp and its cover are red back of the projector, and unplug it from the electrical outlet. The temperature light flashes orange and the power light is flashing High-speed cooling is too hot, which turns off the power switch on . Let the projector cool for ventilation. The temperature light flashes red There is an internal problem. Both warning lights There is a fan or sensor problem. Turn off the lamp automatically. Then contact Epson...
... replaced the lamp, make sure the lamp and its cover are red back of the projector, and unplug it from the electrical outlet. The temperature light flashes orange and the power light is flashing High-speed cooling is too hot, which turns off the power switch on . Let the projector cool for ventilation. The temperature light flashes red There is an internal problem. Both warning lights There is a fan or sensor problem. Turn off the lamp automatically. Then contact Epson...

User's Guide
Page 60
... light is not flashing, and the lens cover is off. ■ The projector may need to use the remote control to turn on the projector (see page 32). ■ If you've set the Control Panel Lock, the control panel buttons are disabled; If part of the Source buttons on the remote control, or press the source button on the projector, to see page 45). 60 Problem Solving No picture appears on the screen or you must use the Zoom...
... light is not flashing, and the lens cover is off. ■ The projector may need to use the remote control to turn on the projector (see page 32). ■ If you've set the Control Panel Lock, the control panel buttons are disabled; If part of the Source buttons on the remote control, or press the source button on the projector, to see page 45). 60 Problem Solving No picture appears on the screen or you must use the Zoom...
User's Guide
Page 74
... of the date of a part, the item replaced becomes Epson property. This limited warranty applies only to the projector and not to the projector lamp, which carries a limited warranty period of ninety (90) days from the date of Product: Model: Marketing Name: Epson Projector H373F/H420A PowerLite Pro Cinema 9350/PowerLite Pro Cinema 9700 UB Epson America, Inc. and/or CPU Boards and Power Supplies used with 47CFR Part 2 and 15 of...
... of the date of a part, the item replaced becomes Epson property. This limited warranty applies only to the projector and not to the projector lamp, which carries a limited warranty period of ninety (90) days from the date of Product: Model: Marketing Name: Epson Projector H373F/H420A PowerLite Pro Cinema 9350/PowerLite Pro Cinema 9700 UB Epson America, Inc. and/or CPU Boards and Power Supplies used with 47CFR Part 2 and 15 of...
User's Guide
Page 76
... Auto Setup, 42 B Batteries, remote control, 21 Blank button, 23 Block NR, 39 Blurry picture, 62 Brightness setting, 36 specification, 65 Buttons projector, 8 remote control, 9 C Cables, connecting, 18 to 20 Child Lock, 32, 48 76 Index Cleaning air filter, 51 to 52 lens, 50 projector case, 51 Codes, AV controller, 69 Color adjusting, 29 to 31, 40 to 41 isolating, 40 problems, 62 Color Gamut setting, 42 Color Mode, 9, 28, 62 Color Saturation setting, 40 Color temperature setting, 40 Component setting, 48 Component video connection, 18 Computer adjusting image...
... Auto Setup, 42 B Batteries, remote control, 21 Blank button, 23 Block NR, 39 Blurry picture, 62 Brightness setting, 36 specification, 65 Buttons projector, 8 remote control, 9 C Cables, connecting, 18 to 20 Child Lock, 32, 48 76 Index Cleaning air filter, 51 to 52 lens, 50 projector case, 51 Codes, AV controller, 69 Color adjusting, 29 to 31, 40 to 41 isolating, 40 problems, 62 Color Gamut setting, 42 Color Mode, 9, 28, 62 Color Saturation setting, 40 Color temperature setting, 40 Component setting, 48 Component video connection, 18 Computer adjusting image...

User's Guide
Page 77
..., 74 to 75 EPSON Super White setting, 36 ESC/VP21 command codes, 69 F FCC Compliance Statement, 73 Filter, see Air filter Flickering, 38, 62 Focus ring, 26 Frame Interpolation, 39 G Gain, color, 41 Gamma, 29 to 30, 41 Gamma button, 9 H HDMI, 18, 19, 36 to 37 Help, 64 High Altitude Mode, 49 Home Service, 10 I Illumination of buttons projector, 48, 58 to 59 remote control, 21 Illumination setting, 48, 59 Image adjusting, 29 to 31...
..., 74 to 75 EPSON Super White setting, 36 ESC/VP21 command codes, 69 F FCC Compliance Statement, 73 Filter, see Air filter Flickering, 38, 62 Focus ring, 26 Frame Interpolation, 39 G Gain, color, 41 Gamma, 29 to 30, 41 Gamma button, 9 H HDMI, 18, 19, 36 to 37 Help, 64 High Altitude Mode, 49 Home Service, 10 I Illumination of buttons projector, 48, 58 to 59 remote control, 21 Illumination setting, 48, 59 Image adjusting, 29 to 31...
User's Guide
Page 78
... Projection distance, 14 to 15, 65 Projector checking status, 56 cleaning, 51 control panel, 8 dimensions, 17, 66 installing, 16 lights, 48, 58 to 59 locking buttons, 32 menus, 35 to 49 parts, 7 to 8 positioning, 12 to 15 resetting menu options, 45 security lock, 7, 10 storing, 57 transporting, 57 turning on and off, 21 to 22, 60 R Registration, 10 Remote control batteries, 21 buttons, 9 lighting up buttons, 21 problems, 63 Replacing lamp, 53 to 55 Resetting lamp usage timer...
... Projection distance, 14 to 15, 65 Projector checking status, 56 cleaning, 51 control panel, 8 dimensions, 17, 66 installing, 16 lights, 48, 58 to 59 locking buttons, 32 menus, 35 to 49 parts, 7 to 8 positioning, 12 to 15 resetting menu options, 45 security lock, 7, 10 storing, 57 transporting, 57 turning on and off, 21 to 22, 60 R Registration, 10 Remote control batteries, 21 buttons, 9 lighting up buttons, 21 problems, 63 Replacing lamp, 53 to 55 Resetting lamp usage timer...
User's Guide
Page 79
... Sleep mode, 48 Source buttons, 8, 9 Source, selecting image, 23 Specifications compatible video formats, 67 to 68 dimensions, 66 electrical, 66 environmental, 67 general, 65 lamp, 65 remote control, 66 Startup screen, selecting, 47 Static, 62 Storing projector, 57 Super-resolution, 42 Support, 11, 64 S-Video connection, 18 Sync (Synchronization) setting, 42 T Technical support, 11, 64 Test pattern, 24, 40 THX setting, 28 Tint, 40 Tracking, 42 Transporting projector, 57 Trigger out port...
... Sleep mode, 48 Source buttons, 8, 9 Source, selecting image, 23 Specifications compatible video formats, 67 to 68 dimensions, 66 electrical, 66 environmental, 67 general, 65 lamp, 65 remote control, 66 Startup screen, selecting, 47 Static, 62 Storing projector, 57 Super-resolution, 42 Support, 11, 64 S-Video connection, 18 Sync (Synchronization) setting, 42 T Technical support, 11, 64 Test pattern, 24, 40 THX setting, 28 Tint, 40 Tracking, 42 Transporting projector, 57 Trigger out port...


