
User's Guide
Page 1
PowerLite® Home Cinema 8350/8700 UB Home Theater Projector User's Guide
PowerLite® Home Cinema 8350/8700 UB Home Theater Projector User's Guide
User's Guide
Page 3
... the Cables Connecting Video and Computer Equipment Making Other Connections Installing Batteries in the Remote Control Turning the Projector On and Off Turning On the Projector Turning Off the Projector Selecting the Image Source Positioning the Image Making Basic Adjustments Focusing and Zooming Choosing the Aspect Ratio Choosing the ...Color Mode Advanced Color Adjustments Adjusting the Gamma Setting Adjusting RGBCMY Locking the Projector 6 7 9 10 10 11 12 12 16 18 18 20 21 21 21 22 23 24 26 26 27 28 29 30 31...
... the Cables Connecting Video and Computer Equipment Making Other Connections Installing Batteries in the Remote Control Turning the Projector On and Off Turning On the Projector Turning Off the Projector Selecting the Image Source Positioning the Image Making Basic Adjustments Focusing and Zooming Choosing the Aspect Ratio Choosing the ...Color Mode Advanced Color Adjustments Adjusting the Gamma Setting Adjusting RGBCMY Locking the Projector 6 7 9 10 10 11 12 12 16 18 18 20 21 21 21 22 23 24 26 26 27 28 29 30 31...
User's Guide
Page 4
... Picture Quality Settings 37 Color Settings 40 Adjustments for Computer Images 42 Selecting Memory Settings and Resetting the Projector 43 Selecting Memory Settings 43 Creating Memory Settings 44 Renaming Memory Settings 44 Deleting Saved Memory Settings 45 Resetting the... Projector 45 Customizing Projector Features 46 Image Sizing 46 Screen Options 47 Other Setup Options 47 Maintenance 50 Cleaning the Lens 50 Cleaning the Projector Case 51 Cleaning and Replacing the Air Filter 51 Replacing ...
... Picture Quality Settings 37 Color Settings 40 Adjustments for Computer Images 42 Selecting Memory Settings and Resetting the Projector 43 Selecting Memory Settings 43 Creating Memory Settings 44 Renaming Memory Settings 44 Deleting Saved Memory Settings 45 Resetting the... Projector 45 Customizing Projector Features 46 Image Sizing 46 Screen Options 47 Other Setup Options 47 Maintenance 50 Cleaning the Lens 50 Cleaning the Projector Case 51 Cleaning and Replacing the Air Filter 51 Replacing ...
User's Guide
Page 6
Introduction The PowerLite® Home Cinema 8350/8700 UB projector lets you enjoy theater-quality images in the relaxing environment of your projected content, for perfectly adjusted images and deepest blacks ■ Epson C2Fine® 3LCD technology for reliable picture quality, increased contrast ratio and uniform colors ... free of noise or artifacts ■ 10-bit color quality (digital only for the Home Cinema 8350) for unmatched color accuracy, with over a billion colors available ■ Epson AccuCinema™ color management delivered by the built-in any room lighting ■ Auto ...
Introduction The PowerLite® Home Cinema 8350/8700 UB projector lets you enjoy theater-quality images in the relaxing environment of your projected content, for perfectly adjusted images and deepest blacks ■ Epson C2Fine® 3LCD technology for reliable picture quality, increased contrast ratio and uniform colors ... free of noise or artifacts ■ 10-bit color quality (digital only for the Home Cinema 8350) for unmatched color accuracy, with over a billion colors available ■ Epson AccuCinema™ color management delivered by the built-in any room lighting ■ Auto ...
User's Guide
Page 7
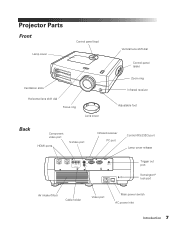
Projector Parts Front Lamp cover Control panel (top) Vertical lens shift dial Control panel (side) Ventilation slots Horizontal lens shift dial Focus ring Lens cover Zoom ring Infrared receiver Adjustable foot Back Component video port HDMI ports S-Video port Infrared receiver PC port Control (RS-232C) port Lamp cover release Trigger out port Kensington® lock port Air intake (filter) Cable holder Video port Main power switch AC power inlet Introduction 7
Projector Parts Front Lamp cover Control panel (top) Vertical lens shift dial Control panel (side) Ventilation slots Horizontal lens shift dial Focus ring Lens cover Zoom ring Infrared receiver Adjustable foot Back Component video port HDMI ports S-Video port Infrared receiver PC port Control (RS-232C) port Lamp cover release Trigger out port Kensington® lock port Air intake (filter) Cable holder Video port Main power switch AC power inlet Introduction 7
User's Guide
Page 8
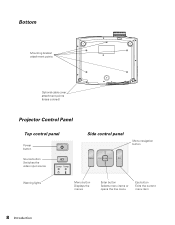
Bottom Mounting bracket attachment points Optional cable cover attachment points (brass colored) Projector Control Panel Top control panel Power button Source button Switches the video input source Side control panel Menu navigation button Warning lights Menu button Displays the menus Enter button Selects menu items or opens the line menu Esc button Exits the current menu item 8 Introduction
Bottom Mounting bracket attachment points Optional cable cover attachment points (brass colored) Projector Control Panel Top control panel Power button Source button Switches the video input source Side control panel Menu navigation button Warning lights Menu button Displays the menus Enter button Selects menu items or opens the line menu Esc button Exits the current menu item 8 Introduction
User's Guide
Page 9
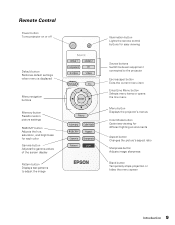
... to adjust the image Illumination button Lights the remote control buttons for easy viewing Source buttons Switch between equipment connected to the projector Esc (escape) button Exits the current menu item Enter/Line Menu button Selects menu items or opens the line menu Menu button ...Displays the projector's menus Color Mode button Optimizes viewing for different lighting environments Aspect button Changes the picture's aspect ratio Sharpness button Adjusts image sharpness...
... to adjust the image Illumination button Lights the remote control buttons for easy viewing Source buttons Switch between equipment connected to the projector Esc (escape) button Exits the current menu item Enter/Line Menu button Selects menu items or opens the line menu Menu button ...Displays the projector's menus Color Mode button Optimizes viewing for different lighting environments Aspect button Changes the picture's aspect ratio Sharpness button Adjusts image sharpness...
User's Guide
Page 10
... you receive special updates on the CD, or register online at epson.com/webreg. Optional Accessories Epson provides the following optional accessories for the projector: Product Replacement lamp Air filter replacement Kensington security lock (anti-theft device) Cable cover Projector mount Anamorphic lens kit (Home Cinema 8700 UB only) Part number V13H010L49 V13H134A21 ELPSL01 V12H003002 ELPHB550...
... you receive special updates on the CD, or register online at epson.com/webreg. Optional Accessories Epson provides the following optional accessories for the projector: Product Replacement lamp Air filter replacement Kensington security lock (anti-theft device) Cable cover Projector mount Anamorphic lens kit (Home Cinema 8700 UB only) Part number V13H010L49 V13H134A21 ELPSL01 V12H003002 ELPHB550...

User's Guide
Page 11
... (Frequently Asked Questions) or product information and e-mail your projector. Introduction 11 Tip: Contains helpful projection tips. Take advantage of Epson's automated support services 24 hours a day at epson.com/support (U.S.) or epson.ca/support (Canada). Using This Manual This book contains all... the information you can use the projector, in addition to basic setup and maintenance ...
... (Frequently Asked Questions) or product information and e-mail your projector. Introduction 11 Tip: Contains helpful projection tips. Take advantage of Epson's automated support services 24 hours a day at epson.com/support (U.S.) or epson.ca/support (Canada). Using This Manual This book contains all... the information you can use the projector, in addition to basic setup and maintenance ...
User's Guide
Page 12
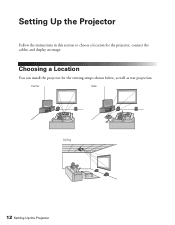
Choosing a Location You can install the projector for the projector, connect the cables, and display an image. Center Side Ceiling 12 Setting Up the Projector Setting Up the Projector Follow the instructions in this section to choose a location for the viewing setups shown below, as well as rear projection.
Choosing a Location You can install the projector for the projector, connect the cables, and display an image. Center Side Ceiling 12 Setting Up the Projector Setting Up the Projector Follow the instructions in this section to choose a location for the viewing setups shown below, as well as rear projection.
User's Guide
Page 13
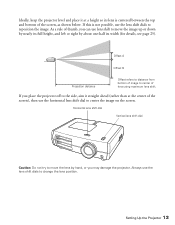
... bottom of image to move the image up or down by nearly its full height, and left or right by hand, or you place the projector off to the side, aim it at the center of lens using maximum lens shift. Offset A Offset B Projection distance Offset refers to distance from bottom... try to center of the screen), then use the horizontal lens shift dial to center the image on the screen. Setting Up the Projector 13 Ideally, keep the projector level and place it straight ahead (rather than at a height so its width (for details, see page 25). As a rule of thumb, you...
... bottom of image to move the image up or down by nearly its full height, and left or right by hand, or you place the projector off to the side, aim it at the center of lens using maximum lens shift. Offset A Offset B Projection distance Offset refers to distance from bottom... try to center of the screen), then use the horizontal lens shift dial to center the image on the screen. Setting Up the Projector 13 Ideally, keep the projector level and place it straight ahead (rather than at a height so its width (for details, see page 25). As a rule of thumb, you...
User's Guide
Page 14
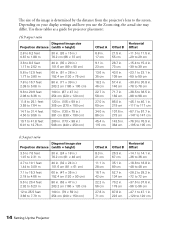
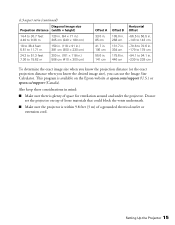
Depending on your display settings and how you use the Zoom ring, the actual size may differ. Use these tables as a guide for projector placement: 16:9 aspect ratio Diagonal image size Projection distance (width × height) 2.8 to 6.2 feet 0.87 to 1.88 m 30 in. (26 × 15 in.) 76.2 cm (....6 in. -96 to 96 cm -47.1 to 47.1 in. -120 to the screen. The size of the image is determined by the distance from the projector's lens to 120 cm 14 Setting Up the...
Depending on your display settings and how you use the Zoom ring, the actual size may differ. Use these tables as a guide for projector placement: 16:9 aspect ratio Diagonal image size Projection distance (width × height) 2.8 to 6.2 feet 0.87 to 1.88 m 30 in. (26 × 15 in.) 76.2 cm (....6 in. -96 to 96 cm -47.1 to 47.1 in. -120 to the screen. The size of the image is determined by the distance from the projector's lens to 120 cm 14 Setting Up the...
User's Guide
Page 15
... loose materials that could block the vents underneath. ■ Make sure the projector is plenty of a grounded electrical outlet or extension cord. Do not set the projector on the Epson website at epson.com/support (U.S.) or epson.ca/support (Canada). Setting Up the Projector 15 Also keep these considerations in . -239 to 94.1 in mind: ■...
... loose materials that could block the vents underneath. ■ Make sure the projector is plenty of a grounded electrical outlet or extension cord. Do not set the projector on the Epson website at epson.com/support (U.S.) or epson.ca/support (Canada). Setting Up the Projector 15 Also keep these considerations in . -239 to 94.1 in mind: ■...

User's Guide
Page 16
... a projection screen or operate a motorized anamorphic lens (see page 48). 16 Setting Up the Projector Press the Menu button when done. In addition, the projector's Trigger out port can rotate the Epson logo plate 180 degrees when suspending the projector from loosening and do not use adhesives to prevent the screws from a ceiling. Note...
... a projection screen or operate a motorized anamorphic lens (see page 48). 16 Setting Up the Projector Press the Menu button when done. In addition, the projector's Trigger out port can rotate the Epson logo plate 180 degrees when suspending the projector from loosening and do not use adhesives to prevent the screws from a ceiling. Note...

User's Guide
Page 17
The following illustrations show the dimensions of the projector: Center of lens 5.4 in. 36 mm 0.5 in. 2.3 mm 0.2 in. 4.5 mm 17.7 in. 450 mm 11.8 in. 300 mm 5.2 in. 131 mm 3.0 in. 75 mm 1.8 in. 45 mm 5.9 in. 150 mm 2.2 in. 56 mm 5.8 in. 2.8 in. 148.3 mm 72 mm 5.3 in. 134.7 mm 6.3 in. 160 mm 15.3 in. 389.7 mm M4 × 9 mm Setting Up the Projector 17
The following illustrations show the dimensions of the projector: Center of lens 5.4 in. 36 mm 0.5 in. 2.3 mm 0.2 in. 4.5 mm 17.7 in. 450 mm 11.8 in. 300 mm 5.2 in. 131 mm 3.0 in. 75 mm 1.8 in. 45 mm 5.9 in. 150 mm 2.2 in. 56 mm 5.8 in. 2.8 in. 148.3 mm 72 mm 5.3 in. 134.7 mm 6.3 in. 160 mm 15.3 in. 389.7 mm M4 × 9 mm Setting Up the Projector 17
User's Guide
Page 18
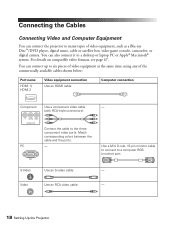
Connecting the Cables Connecting Video and Computer Equipment You can connect the projector to many types of the commercially available cables shown below: Port name HDMI 1/ HDMI 2 Video equipment connection Use an HDMI cable: Computer connection Component Use a ...;/DVD player, digital tuner, cable or satellite box, video game console, camcorder, or digital camera. Video Use an RCA video cable: - 18 Setting Up the Projector
Connecting the Cables Connecting Video and Computer Equipment You can connect the projector to many types of the commercially available cables shown below: Port name HDMI 1/ HDMI 2 Video equipment connection Use an HDMI cable: Computer connection Component Use a ...;/DVD player, digital tuner, cable or satellite box, video game console, camcorder, or digital camera. Video Use an RCA video cable: - 18 Setting Up the Projector
User's Guide
Page 19
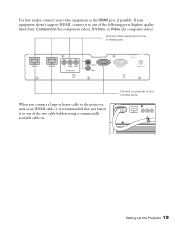
Connect a computer to one of these ports When you connect a large or heavy cable to the projector, such as an HDMI cable, it is recommended that you fasten it to one of these ports Setting Up the Projector 19 If your video equipment to one of the two cable holders using a commercially available cable tie. For best results, connect your equipment doesn't support HDMI, connect it to one of the following ports (highest quality listed first): Component (for component video), S-Video, or Video (for composite video). Connect video equipment to the HDMI port, if possible.
Connect a computer to one of these ports When you connect a large or heavy cable to the projector, such as an HDMI cable, it is recommended that you fasten it to one of these ports Setting Up the Projector 19 If your video equipment to one of the two cable holders using a commercially available cable tie. For best results, connect your equipment doesn't support HDMI, connect it to one of the following ports (highest quality listed first): Component (for component video), S-Video, or Video (for composite video). Connect video equipment to the HDMI port, if possible.
User's Guide
Page 20
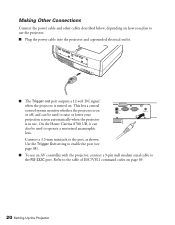
... the Trigger Out setting to enable the port (see page 48). ■ To use . This lets a central control system monitor whether the projector is on or off, and can also be used to operate a motorized anamorphic lens. Making Other Connections Connect the power cable and other cables ...electrical outlet. ■ The Trigger out port outputs a 12-volt DC signal when the projector is in use an AV controller with the projector, connect a 9-pin null modem serial cable to the RS-232C port. On the Home Cinema 8700 UB, it can be used to raise or lower your projection screen automatically when...
... the Trigger Out setting to enable the port (see page 48). ■ To use . This lets a central control system monitor whether the projector is on or off, and can also be used to operate a motorized anamorphic lens. Making Other Connections Connect the power cable and other cables ...electrical outlet. ■ The Trigger out port outputs a 12-volt DC signal when the projector is in use an AV controller with the projector, connect a 9-pin null modem serial cable to the RS-232C port. On the Home Cinema 8700 UB, it can be used to raise or lower your projection screen automatically when...
User's Guide
Page 21
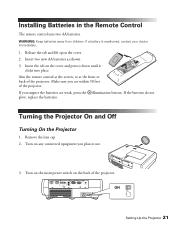
... lift open the cover. 2. Aim the remote control at the screen, or at the front or back of the projector. If you suspect the batteries are within 30 feet of the projector. Remove the lens cap. 2. Turn on the main power switch on the cover and press it down until it... If a battery is swallowed, contact your doctor immediately. 1. Insert two new AA batteries as shown. 3. Make sure you plan to use. 3. ON Setting Up the Projector 21 Installing Batteries in the Remote Control The remote control uses two AA batteries. WARNING: Keep batteries away from children. If the buttons do not...
... lift open the cover. 2. Aim the remote control at the screen, or at the front or back of the projector. If you suspect the batteries are within 30 feet of the projector. Remove the lens cap. 2. Turn on the main power switch on the cover and press it down until it... If a battery is swallowed, contact your doctor immediately. 1. Insert two new AA batteries as shown. 3. Make sure you plan to use. 3. ON Setting Up the Projector 21 Installing Batteries in the Remote Control The remote control uses two AA batteries. WARNING: Keep batteries away from children. If the buttons do not...
User's Guide
Page 22
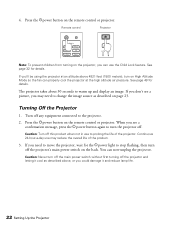
... to prolong the life of the product. 3. Turning Off the Projector 1. If you don't see a confirmation message, press the Ppower button again to the projector. 2. Continuous 24-hour-a-day use may need to move the projector, wait for the Ppower light to change the image source as ... the Ppower button on the remote control or projector. 4. Remote control Projector Note: To prevent children from turning on High Altitude Mode so the fan can properly cool the projector at an altitude above , or you can now unplug the projector. See page 49 for details. Press the Ppower...
... to prolong the life of the product. 3. Turning Off the Projector 1. If you don't see a confirmation message, press the Ppower button again to the projector. 2. Continuous 24-hour-a-day use may need to move the projector, wait for the Ppower light to change the image source as ... the Ppower button on the remote control or projector. 4. Remote control Projector Note: To prevent children from turning on High Altitude Mode so the fan can properly cool the projector at an altitude above , or you can now unplug the projector. See page 49 for details. Press the Ppower...


