User's Guide
Page 4
... 47 Other Setup Options 47 Maintenance 50 Cleaning the Lens 50 Cleaning the Projector Case 51 Cleaning and Replacing the Air Filter 51 Replacing the Lamp 53 Resetting the Lamp Usage Timer 56 Checking the Projector Status 56 Storing the Projector 57 Transporting the Projector 57 4 Contents
... 47 Other Setup Options 47 Maintenance 50 Cleaning the Lens 50 Cleaning the Projector Case 51 Cleaning and Replacing the Air Filter 51 Replacing the Lamp 53 Resetting the Lamp Usage Timer 56 Checking the Projector Status 56 Storing the Projector 57 Transporting the Projector 57 4 Contents
User's Guide
Page 5
Limited Warranty 74 Index 76 Contents 5 Problem Solving 58 What To Do When the Lights Come On or Flash 58 Solving Picture Problems 60 Solving Remote Control Problems 63 Where to Get Help 64 Specifications 65 General 65 Lamp 65 Remote Control 66 Dimensions 66 Electrical 66 Environmental 67 Safety 67 Compatible Video Formats 67 ESC/VP21 Command Codes 69 Notices 71 Important Safety Information 71 FCC Compliance Statement 73 Declaration of Conformity 74 Epson America, Inc.
Limited Warranty 74 Index 76 Contents 5 Problem Solving 58 What To Do When the Lights Come On or Flash 58 Solving Picture Problems 60 Solving Remote Control Problems 63 Where to Get Help 64 Specifications 65 General 65 Lamp 65 Remote Control 66 Dimensions 66 Electrical 66 Environmental 67 Safety 67 Compatible Video Formats 67 ESC/VP21 Command Codes 69 Notices 71 Important Safety Information 71 FCC Compliance Statement 73 Declaration of Conformity 74 Epson America, Inc.
User's Guide
Page 7
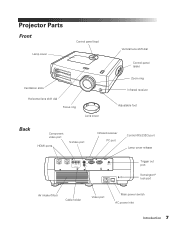
Projector Parts Front Lamp cover Control panel (top) Vertical lens shift dial Control panel (side) Ventilation slots Horizontal lens shift dial Focus ring Lens cover Zoom ring Infrared receiver Adjustable foot Back Component video port HDMI ports S-Video port Infrared receiver PC port Control (RS-232C) port Lamp cover release Trigger out port Kensington® lock port Air intake (filter) Cable holder Video port Main power switch AC power inlet Introduction 7
Projector Parts Front Lamp cover Control panel (top) Vertical lens shift dial Control panel (side) Ventilation slots Horizontal lens shift dial Focus ring Lens cover Zoom ring Infrared receiver Adjustable foot Back Component video port HDMI ports S-Video port Infrared receiver PC port Control (RS-232C) port Lamp cover release Trigger out port Kensington® lock port Air intake (filter) Cable holder Video port Main power switch AC power inlet Introduction 7
User's Guide
Page 10
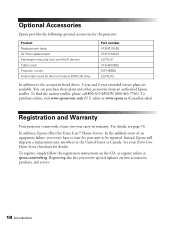
... wait for your Extra Care Home Service brochure for the projector: Product Replacement lamp Air filter replacement Kensington security lock (anti-theft device) Cable cover Projector mount Anamorphic lens kit (Home Cinema 8700 UB only) Part number V13H010L49 V13H134A21 ELPSL01 V12H003002 ELPHB550 ELPALK2 In addition to be repaired. Instead, Epson will ship you receive special...
... wait for your Extra Care Home Service brochure for the projector: Product Replacement lamp Air filter replacement Kensington security lock (anti-theft device) Cable cover Projector mount Anamorphic lens kit (Home Cinema 8700 UB only) Part number V13H010L49 V13H134A21 ELPSL01 V12H003002 ELPHB550 ELPALK2 In addition to be repaired. Instead, Epson will ship you receive special...
User's Guide
Page 22
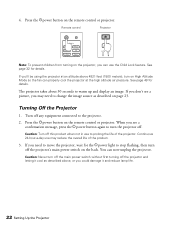
Press the Ppower button on the remote control or projector. See page 32 for details. Turn off the projector and letting it and reduce lamp life. 22 Setting Up the Projector Continuous 24-hour-a-day use to change the image source as described above 4921 feet (1500 meters), turn off ...
Press the Ppower button on the remote control or projector. See page 32 for details. Turn off the projector and letting it and reduce lamp life. 22 Setting Up the Projector Continuous 24-hour-a-day use to change the image source as described above 4921 feet (1500 meters), turn off ...
User's Guide
Page 36
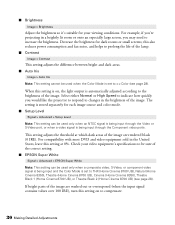
... of the lamp. ■ Contrast Image > Contrast This setting adjusts the difference between bright and dark areas. ■ Auto Iris Image > Auto Iris Note: This setting cannot be used only when a composite video, S-Video, or component video signal is set to THX (Home Cinema 8700 UB), Natural (Home Cinema 8350), Theatre (Home Cinema 8700 UB), Cinema (Home Cinema 8350), Theatre Black 1 (Home Cinema 8700...
... of the lamp. ■ Contrast Image > Contrast This setting adjusts the difference between bright and dark areas. ■ Auto Iris Image > Auto Iris Note: This setting cannot be used only when a composite video, S-Video, or component video signal is set to THX (Home Cinema 8700 UB), Natural (Home Cinema 8350), Theatre (Home Cinema 8700 UB), Cinema (Home Cinema 8350), Theatre Black 1 (Home Cinema 8700...
User's Guide
Page 37
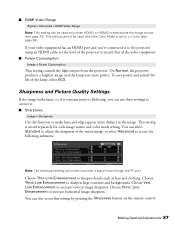
On Normal, the projector produces a brighter image and the lamp uses more distinct in the image. To save power and extend the life of the video equipment. ■ Power Consumption Image > Power Consumption This setting ... following submenu: Note: The Advanced setting cannot be used when the Color Mode is set the level of the projector to match that of the lamp, select ECO. You can use these settings to correct it to the projector using an HDMI cable, set to x.v.Color (see page 23). Choose Thick...
On Normal, the projector produces a brighter image and the lamp uses more distinct in the image. To save power and extend the life of the video equipment. ■ Power Consumption Image > Power Consumption This setting ... following submenu: Note: The Advanced setting cannot be used when the Color Mode is set the level of the projector to match that of the lamp, select ECO. You can use these settings to correct it to the projector using an HDMI cable, set to x.v.Color (see page 23). Choose Thick...

User's Guide
Page 45
... reset the Image menu settings: Open the Image menu . . . Press the Menu button on the remote control. 2. and select Reset You can also reset the lamp usage timer or restore all your memory settings at a time with the Erase Memory setting under the Memory menu. Note: You can restore the projector...
... reset the Image menu settings: Open the Image menu . . . Press the Menu button on the remote control. 2. and select Reset You can also reset the lamp usage timer or restore all your memory settings at a time with the Erase Memory setting under the Memory menu. Note: You can restore the projector...
User's Guide
Page 46
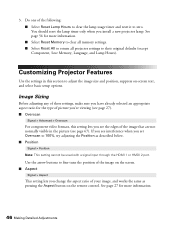
...image size and position, suppress on the remote control. Use the arrow buttons to their original defaults (except Component, Save Memory, Language, and Lamp Hours). See page 27 for more information. ■ Select Reset Memory to clear all memory settings. ■ Select Reset All to return all...Overscan For component video formats, this setting lets you see interference when you see the edges of the following: ■ Select Reset Lamp Hours to clear the lamp usage timer and reset it to 100%, try adjusting the Position as pressing the Aspect button on -screen text, and select basic...
...image size and position, suppress on the remote control. Use the arrow buttons to their original defaults (except Component, Save Memory, Language, and Lamp Hours). See page 27 for more information. ■ Select Reset Memory to clear all memory settings. ■ Select Reset All to return all...Overscan For component video formats, this setting lets you see interference when you see the edges of the following: ■ Select Reset Lamp Hours to clear the lamp usage timer and reset it to 100%, try adjusting the Position as pressing the Aspect button on -screen text, and select basic...
User's Guide
Page 48
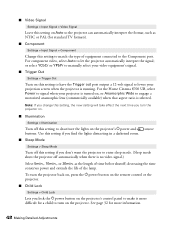
... Settings > Input Signal > Video Signal Leave this setting on Auto so the projector can automatically interpret the format, such as the length of the lamp. or select YCbCr or YPbPr to manually select your video equipment's signal. ■ Trigger Out Settings > Trigger Out Turn on , or Anamorphic...on this setting to have the Trigger out port output a 12-volt signal to make it more information. 48 Making Detailed Adjustments For the Home Cinema 8700 UB, select Power to signal when your projection screen when the projector is no video signal.) Select 5min., 10min., or 30min. ...
... Settings > Input Signal > Video Signal Leave this setting on Auto so the projector can automatically interpret the format, such as the length of the lamp. or select YCbCr or YPbPr to manually select your video equipment's signal. ■ Trigger Out Settings > Trigger Out Turn on , or Anamorphic...on this setting to have the Trigger out port output a 12-volt signal to make it more information. 48 Making Detailed Adjustments For the Home Cinema 8700 UB, select Power to signal when your projection screen when the projector is no video signal.) Select 5min., 10min., or 30min. ...
User's Guide
Page 50
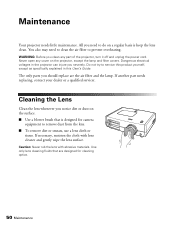
... filter to service this product yourself, except as specifically explained in the projector can injure you notice dirt or dust on the projector, except the lamp and filter covers. Cleaning the Lens Clean the lens whenever you severely. You also may need to do on a regular basis is designed for ... unplug the power cord. The only parts you clean any cover on the surface. ■ Use a blower brush that are the air filter and the lamp. WARNING: Before you should replace are designed for camera equipment to remove dust from the lens. ■ To remove dirt or smears, use a lens ...
... filter to service this product yourself, except as specifically explained in the projector can injure you notice dirt or dust on the projector, except the lamp and filter covers. Cleaning the Lens Clean the lens whenever you severely. You also may need to do on a regular basis is designed for ... unplug the power cord. The only parts you clean any cover on the surface. ■ Use a blower brush that are the air filter and the lamp. WARNING: Before you should replace are designed for camera equipment to remove dust from the lens. ■ To remove dirt or smears, use a lens ...

User's Guide
Page 53
... should be removed carefully to avoid injury. In the unlikely event that the lamp has broken, small glass fragments may shorten the lamp life. Use a cloth or glove to replace the lamp: 1. Wait about 1 hour) before replacing the lamp. sales) or www.epson.ca (Canadian sales). If the projector is no longer hot. Maintenance 53...
... should be removed carefully to avoid injury. In the unlikely event that the lamp has broken, small glass fragments may shorten the lamp life. Use a cloth or glove to replace the lamp: 1. Wait about 1 hour) before replacing the lamp. sales) or www.epson.ca (Canadian sales). If the projector is no longer hot. Maintenance 53...

User's Guide
Page 54
WARNING: The lamp(s) in the trash. 54 Maintenance Do not put in this product contain mercury. Insert the screwdriver that came with the lamp (or a similar tool) into the slot on the back of the projector to remove it straight out. Then lift up the cover to release the lamp cover. Grasp the lamp as shown and pull it . 6. 5. Please consult your state and local regulations regarding disposal or recycling. Loosen the two screws securing the lamp (they don't come all the way out). 7.
WARNING: The lamp(s) in the trash. 54 Maintenance Do not put in this product contain mercury. Insert the screwdriver that came with the lamp (or a similar tool) into the slot on the back of the projector to remove it straight out. Then lift up the cover to release the lamp cover. Grasp the lamp as shown and pull it . 6. 5. Please consult your state and local regulations regarding disposal or recycling. Loosen the two screws securing the lamp (they don't come all the way out). 7.
User's Guide
Page 55
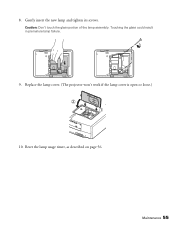
Touching the glass could result in premature lamp failure. 9. Replace the lamp cover. (The projector won't work if the lamp cover is open or loose.) 10. Caution: Don't touch the glass portion of the lamp assembly. 8. Reset the lamp usage timer, as described on page 56. Maintenance 55 Gently insert the new lamp and tighten its screws.
Touching the glass could result in premature lamp failure. 9. Replace the lamp cover. (The projector won't work if the lamp cover is open or loose.) 10. Caution: Don't touch the glass portion of the lamp assembly. 8. Reset the lamp usage timer, as described on page 56. Maintenance 55 Gently insert the new lamp and tighten its screws.
User's Guide
Page 56
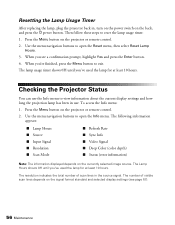
... standard and selected display settings (see a confirmation prompt, highlight Yes and press the Enter button. 4. The lamp usage timer shows 0H until you see page 67). 56 Maintenance The following information appears: ■ Lamp Hours ■ Source ■ Input Signal ■ Resolution ■ Scan Mode ■ Refresh Rate ■...to open the Info menu. Then follow these steps to view information about the current display settings and how long the projection lamp has been in the source signal. Use the menu navigation buttons to open the Reset menu, then select Reset...
... standard and selected display settings (see a confirmation prompt, highlight Yes and press the Enter button. 4. The lamp usage timer shows 0H until you see page 67). 56 Maintenance The following information appears: ■ Lamp Hours ■ Source ■ Input Signal ■ Resolution ■ Scan Mode ■ Refresh Rate ■...to open the Info menu. Then follow these steps to view information about the current display settings and how long the projection lamp has been in the source signal. Use the menu navigation buttons to open the Reset menu, then select Reset...

User's Guide
Page 59
... from the electrical outlet. Also, clean or replace the filter if necessary (see page 51). The lamp light flashes red The lamp needs to be replaced. Both warning lights There is a fan or sensor problem. Then contact Epson for assistance (see page 49). If the temperature rises further, projection will stop automatically. Turn...
... from the electrical outlet. Also, clean or replace the filter if necessary (see page 51). The lamp light flashes red The lamp needs to be replaced. Both warning lights There is a fan or sensor problem. Then contact Epson for assistance (see page 49). If the temperature rises further, projection will stop automatically. Turn...

User's Guide
Page 63
... the picture looks dark, you 're within about 30 feet of its service life (see how long the lamp has been in direct sunlight. ■ Turn off any fluorescent lights. Replace the lamp if it's close to replace the remote control batteries (see page 21). Make sure the projector is aimed at...
... the picture looks dark, you 're within about 30 feet of its service life (see how long the lamp has been in direct sunlight. ■ Turn off any fluorescent lights. Replace the lamp if it's close to replace the remote control batteries (see page 21). Make sure the projector is aimed at...
User's Guide
Page 65
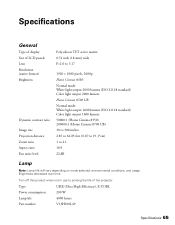
...: White light output 1600 lumens (ISO 21118 standard) Color light output 1600 lumens 50000:1 (Home Cinema 8350) 200000:1 (Home Cinema 8700 UB) 30 to 300 inches 2.85 to 62.83 feet (0.87 to 19.15 m) 1 to 2.1 16:9 22 dB Lamp Note: Lamp life will vary depending on mode selected, environmental conditions, and usage. Brightness decreases over time...
...: White light output 1600 lumens (ISO 21118 standard) Color light output 1600 lumens 50000:1 (Home Cinema 8350) 200000:1 (Home Cinema 8700 UB) 30 to 300 inches 2.85 to 62.83 feet (0.87 to 19.15 m) 1 to 2.1 16:9 22 dB Lamp Note: Lamp life will vary depending on mode selected, environmental conditions, and usage. Brightness decreases over time...

User's Guide
Page 71
... service; Notices 71 Keep plastic bags away from the wall outlet before cleaning. Refer all servicing to avoid any cover on the projector, except the lamp and filter covers. This can cause fire or electric shock. ■ Don't block the slots and openings in fraying or damage to the plug. ■... plug into an outlet with dust present, and insert the plug firmly into the outlet. Never let children look into the projector lens when the lamp is on. ■ Never open any risk of power source indicated on the projector.
... service; Notices 71 Keep plastic bags away from the wall outlet before cleaning. Refer all servicing to avoid any cover on the projector, except the lamp and filter covers. This can cause fire or electric shock. ■ Don't block the slots and openings in fraying or damage to the plug. ■... plug into an outlet with dust present, and insert the plug firmly into the outlet. Never let children look into the projector lens when the lamp is on. ■ Never open any risk of power source indicated on the projector.

User's Guide
Page 72
■ The lamp(s) in this product contain chemicals, including lead, known to the State of time. WARNING: The cords included with Proposition 65 in accordance with this product ... cause damage to 35 °C). Please consult your state and local regulations regarding disposal or recycling. Do not put in the trash. ■ Allow the lamp to cool for one hour before replacing it. ■ Unplug the projector during lightning storms or when not in use for extended periods. ■ Don...
■ The lamp(s) in this product contain chemicals, including lead, known to the State of time. WARNING: The cords included with Proposition 65 in accordance with this product ... cause damage to 35 °C). Please consult your state and local regulations regarding disposal or recycling. Do not put in the trash. ■ Allow the lamp to cool for one hour before replacing it. ■ Unplug the projector during lightning storms or when not in use for extended periods. ■ Don...


