User Manual
Page 2
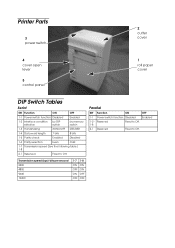
Parallel SW Function ON OFF 1-1 Power switch function Disabled Enabled 1-2~ Reserved 1-8 Fixed to Off. 2-1 Reserved Fixed to Off. Printer Parts 3 power switch 2 cutter cover 4 cover open lever 5 control panel 1 roll paper cover DIP Switch Tables Serial SW Function ON OFF 1-1 Power switch function Disabled ...
Parallel SW Function ON OFF 1-1 Power switch function Disabled Enabled 1-2~ Reserved 1-8 Fixed to Off. 2-1 Reserved Fixed to Off. Printer Parts 3 power switch 2 cutter cover 4 cover open lever 5 control panel 1 roll paper cover DIP Switch Tables Serial SW Function ON OFF 1-1 Power switch function Disabled ...
User Manual
Page 4
... to the following standards are applied only to the printers that changes or modifications not expressly approved by Seiko Epson Corporation could void your authority to operate the equipment. Operation of this product may cause radio interference in which case the user may ... cable to this printer will be required to correct the interference at his own expense. These limits are cautioned that are so labeled. (EMC is tested using the Epson power supplies.) Europe: CE marking North America: FCC/ICES-003 Class A Oceania: AS/NZS CISPR22 Class A WARNING This is a Class A product....
... to the following standards are applied only to the printers that changes or modifications not expressly approved by Seiko Epson Corporation could void your authority to operate the equipment. Operation of this product may cause radio interference in which case the user may ... cable to this printer will be required to correct the interference at his own expense. These limits are cautioned that are so labeled. (EMC is tested using the Epson power supplies.) Europe: CE marking North America: FCC/ICES-003 Class A Oceania: AS/NZS CISPR22 Class A WARNING This is a Class A product....

User Manual
Page 6
... to set this equipment on this product is hot. 2 TM-L90 User's Manual Excessive humidity and dust may fall or collapse... functional/precision devices, etc.; Never stand or lean on a firm, stable, horizontal surface. CAUTION: The thermal head is used for applications requiring high reliability/ safety, such as aerospace equipment, main communication equipment, nuclear ... devices related to injure your fingers on top of Use When this product. otherwise, the printer and the telephone line may cause equipment damage and burning. Do not place heavy objects on the manual cutter ...
... to set this equipment on this product is hot. 2 TM-L90 User's Manual Excessive humidity and dust may fall or collapse... functional/precision devices, etc.; Never stand or lean on a firm, stable, horizontal surface. CAUTION: The thermal head is used for applications requiring high reliability/ safety, such as aerospace equipment, main communication equipment, nuclear ... devices related to injure your fingers on top of Use When this product. otherwise, the printer and the telephone line may cause equipment damage and burning. Do not place heavy objects on the manual cutter ...
User Manual
Page 7
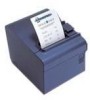
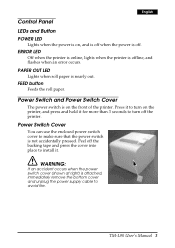
... more than 3 seconds to install it to turn off the backing tape and press the cover into place to turn on the front of the printer. Peel off the printer. TM-L90 User's Manual 3 PAPER OUT LED Lights when roll paper is offline, and flashes when an error occurs. ERROR LED Off when the...
... more than 3 seconds to install it to turn off the backing tape and press the cover into place to turn on the front of the printer. Peel off the printer. TM-L90 User's Manual 3 PAPER OUT LED Lights when roll paper is offline, and flashes when an error occurs. ERROR LED Off when the...
User Manual
Page 8
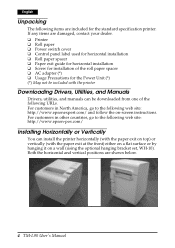
... it on a wall (using the optional hanging bracket set, WH-10). If any items are shown below. 4 TM-L90 User's Manual For customers in North America, go to the following web site: http://www.epson-pos.com/ Installing Horizontally or Vertically You can install the printer horizontally (with the paper exit on -screen instructions.
... it on a wall (using the optional hanging bracket set, WH-10). If any items are shown below. 4 TM-L90 User's Manual For customers in North America, go to the following web site: http://www.epson-pos.com/ Installing Horizontally or Vertically You can install the printer horizontally (with the paper exit on -screen instructions.
User Manual
Page 9
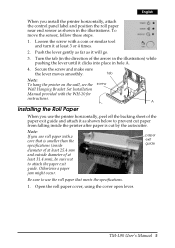
...to prevent cut by the autocutter. Note: If you use the roll paper that is cut paper from falling inside the printer after paper is smaller than the specifications (inside diameter of at least 25.4 mm and outside diameter of at least 3...might occur. Open the roll paper cover, using the cover open lever. A Installing the Roll Paper When you install the printer horizontally, attach the control panel label and position the roll paper near end sensor as it will go. 3. Turn the ... shown in hole A. 4. paper exit guide Be sure to attach the paper exit guide. TM-L90 User's Manual 5
...to prevent cut by the autocutter. Note: If you use the roll paper that is cut paper from falling inside the printer after paper is smaller than the specifications (inside diameter of at least 25.4 mm and outside diameter of at least 3...might occur. Open the roll paper cover, using the cover open lever. A Installing the Roll Paper When you install the printer horizontally, attach the control panel label and position the roll paper near end sensor as it will go. 3. Turn the ... shown in hole A. 4. paper exit guide Be sure to attach the paper exit guide. TM-L90 User's Manual 5
User Manual
Page 10
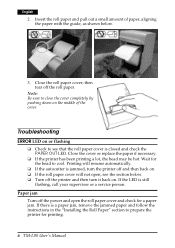
... the guide, as shown below . ❏ Turn off the printer and then turn the printer off and then back on. ❏ If the roll paper cover will not open the roll paper cover and check for printing. 6 TM-L90 User's Manual Printing will resume automatically. ❏ If the autocutter... is still flashing, call your supervisor or a service person. Close the cover or replace the paper if necessary. ❏ If the printer has been printing a lot, the head may...
... the guide, as shown below . ❏ Turn off the printer and then turn the printer off and then back on. ❏ If the roll paper cover will not open the roll paper cover and check for printing. 6 TM-L90 User's Manual Printing will resume automatically. ❏ If the autocutter... is still flashing, call your supervisor or a service person. Close the cover or replace the paper if necessary. ❏ If the printer has been printing a lot, the head may...
User Manual
Page 11
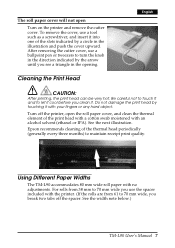
Turn off the spacer. Epson recommends cleaning of the thermal head periodically (generally every three months) to maintain receipt print quality. ....insert it with no adjustments. See the width note below.) TM-L90 User's Manual 7 Be careful not to touch it and to let it . Using Different Paper Widths The TM-L90 accommodates 80 mm wide roll paper with your fingers or ...and clean the thermal element of the print head with a cotton swab moistened with the printer. (If the rolls are from 38 mm to 70 mm wide you break two tabs off the printer, open Turn on the printer and remove ...
Turn off the spacer. Epson recommends cleaning of the thermal head periodically (generally every three months) to maintain receipt print quality. ....insert it with no adjustments. See the width note below.) TM-L90 User's Manual 7 Be careful not to touch it and to let it . Using Different Paper Widths The TM-L90 accommodates 80 mm wide roll paper with your fingers or ...and clean the thermal element of the print head with a cotton swab moistened with the printer. (If the rolls are from 38 mm to 70 mm wide you break two tabs off the printer, open Turn on the printer and remove ...
User Manual
Page 12
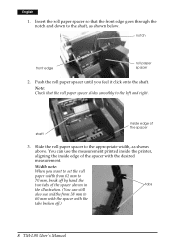
...it click onto the shaft. shaft inside edge of the spacer with the tabs broken off.) 8 TM-L90 User's Manual Slide the roll paper spacer to the left and right. English 1. Insert the ...want to set the roll paper width from 61 mm to 70 mm, break off by hand the two tabs of the spacer 3. notch front edge roll paper spacer 2. Note: Check that the front edge ... with the spacer with the desired measurement. You can still also use the measurement printed inside the printer, aligning the inside edge of the spacer shown in tabs the illustration. (You can use widths from...
...it click onto the shaft. shaft inside edge of the spacer with the tabs broken off.) 8 TM-L90 User's Manual Slide the roll paper spacer to the left and right. English 1. Insert the ...want to set the roll paper width from 61 mm to 70 mm, break off by hand the two tabs of the spacer 3. notch front edge roll paper spacer 2. Note: Check that the front edge ... with the spacer with the desired measurement. You can still also use the measurement printed inside the printer, aligning the inside edge of the spacer shown in tabs the illustration. (You can use widths from...


