Information Guide
Page 2
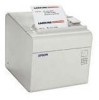
... alphanumeric: 95 characters; international: 37 characters; Accessories Paper Other options Printer Specifications Printing Printing method Dot density Paper width thermal line printing (single and two-color) 203 dpi × 203 dpi 3.15" {80 mm} (default) or variable with an optional paper roll spacer EPSON TM-L90 Printable area 2.83" {72 mm} for 80 mm paper Print.... {150 mm/sec.} printing a 2-dimensional bar code - 3.54"/sec. {90/mm/sec.} maximum two-color: 3.94"/sec. 1.97"/sec. {50 mm/sec.} maximum Characters per line 48 (using font A on receipts) 1/02 EPSON TM-L90 - 1
... alphanumeric: 95 characters; international: 37 characters; Accessories Paper Other options Printer Specifications Printing Printing method Dot density Paper width thermal line printing (single and two-color) 203 dpi × 203 dpi 3.15" {80 mm} (default) or variable with an optional paper roll spacer EPSON TM-L90 Printable area 2.83" {72 mm} for 80 mm paper Print.... {150 mm/sec.} printing a 2-dimensional bar code - 3.54"/sec. {90/mm/sec.} maximum two-color: 3.94"/sec. 1.97"/sec. {50 mm/sec.} maximum Characters per line 48 (using font A on receipts) 1/02 EPSON TM-L90 - 1
Information Guide
Page 3
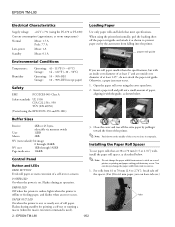
EPSON TM-L90 Electrical Characteristics Supply voltage +24 V ± 7% (using the PS-170 or PS-180) Current consumption (approximate, at room temperature) Normal Mean: 1.7 A Peak: 7.7 A Low-power Mean: 1 A ..., or nearly out, of a self-test or a macro. Button and LEDs FEED BUTTON Feeds roll paper or starts execution of roll paper. EPSON TM-L90 1/02 ERROR LED Off when the printer is online, lights when the printer is on .) 2 - Insert a paper roll and pull out a small amount of paper, aligning it as described below .
EPSON TM-L90 Electrical Characteristics Supply voltage +24 V ± 7% (using the PS-170 or PS-180) Current consumption (approximate, at room temperature) Normal Mean: 1.7 A Peak: 7.7 A Low-power Mean: 1 A ..., or nearly out, of a self-test or a macro. Button and LEDs FEED BUTTON Feeds roll paper or starts execution of roll paper. EPSON TM-L90 1/02 ERROR LED Off when the printer is online, lights when the printer is on .) 2 - Insert a paper roll and pull out a small amount of paper, aligning it as described below .

Information Guide
Page 4
...and close the paper roll cover. EPSON TM-L90 2. Insert the paper roll spacer so that the front edge goes into the notch and down the button, and turn on each side of the main case and spreading the case in the autocutter frame.) 3. Testing the Printer Follow these steps to receive data ...as soon as shown below . When printing starts, release the button. After the printer prints the lines for the desired paper width. The printer is jammed in the direction of the arrows. 4. Push the paper roll spacer until you cannot open the paper roll cover, and ...
...and close the paper roll cover. EPSON TM-L90 2. Insert the paper roll spacer so that the front edge goes into the notch and down the button, and turn on each side of the main case and spreading the case in the autocutter frame.) 3. Testing the Printer Follow these steps to receive data ...as soon as shown below . When printing starts, release the button. After the printer prints the lines for the desired paper width. The printer is jammed in the direction of the arrows. 4. Push the paper roll spacer until you cannot open the paper roll cover, and ...
Information Guide
Page 5
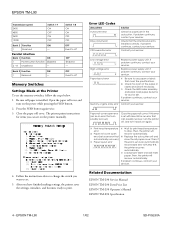
... for items you can set . 5. After you want to print. Related Documentation EPSON TM-L90 Service Manual EPSON TM-L90 Parts Price List EPSON TM-L90 Operator's Manual EPSON TM-L90 Specification 4 - EPSON TM-L90 1/02 SD-PIGL90A Be sure roll paper is installed. Open the paper roll cover and turn on the printer manually. ① ① ② ② ➂ ➂ 4. Follow the instructions above to...
... for items you can set . 5. After you want to print. Related Documentation EPSON TM-L90 Service Manual EPSON TM-L90 Parts Price List EPSON TM-L90 Operator's Manual EPSON TM-L90 Specification 4 - EPSON TM-L90 1/02 SD-PIGL90A Be sure roll paper is installed. Open the paper roll cover and turn on the printer manually. ① ① ② ② ➂ ➂ 4. Follow the instructions above to...


