User Manual
Page 3
... - Touch Unit ...31 Projector Parts - Interactive Pens and Pen Tray 27 Projector Parts - Control Panel ...26 Projector Parts - Contents BrightLink Pro 1420Wi/1430Wi User's Guide 13 Introduction to Your Projector ...14 Projector Features...14 Product Box Contents...16 Additional Components ...17 Optional Equipment and Replacement...Base...25 Projector Parts - Control Pad...33 Setting Up the Projector ...35 Projector Placement...35 Projector Setup and Installation Options 35 Projection Distance...36 Removing and Attaching the Cable Cover 39 Adjusting the Angle of the Touch Unit 39...
... - Touch Unit ...31 Projector Parts - Interactive Pens and Pen Tray 27 Projector Parts - Control Panel ...26 Projector Parts - Contents BrightLink Pro 1420Wi/1430Wi User's Guide 13 Introduction to Your Projector ...14 Projector Features...14 Product Box Contents...16 Additional Components ...17 Optional Equipment and Replacement...Base...25 Projector Parts - Control Pad...33 Setting Up the Projector ...35 Projector Placement...35 Projector Setup and Installation Options 35 Projection Distance...36 Removing and Attaching the Cable Cover 39 Adjusting the Angle of the Touch Unit 39...

User Manual
Page 4
... Control Pad 75 Supported Printer Types ...76 Connecting to a Document Camera 76 Connecting Multiple Projectors of the Same Model 77 Installing Batteries in the Remote Control 78 Installing Batteries in the Pens ...79 Installing Batteries in the Control Pad 80 Using the Projector on a Network ...83 Wired Network Projection...83 Connecting to a Wired...
... Control Pad 75 Supported Printer Types ...76 Connecting to a Document Camera 76 Connecting Multiple Projectors of the Same Model 77 Installing Batteries in the Remote Control 78 Installing Batteries in the Pens ...79 Installing Batteries in the Control Pad 80 Using the Projector on a Network ...83 Wired Network Projection...83 Connecting to a Wired...

User Manual
Page 6
... 152 Entering a Password to Use the Projector 153 Saving a User's Logo Image to Display 154 Locking the Projector's Buttons 156 Unlocking the Projector's Buttons 157 Installing a Security Cable ...157 Creating a User Pattern to Display 158 6
... 152 Entering a Password to Use the Projector 153 Saving a User's Logo Image to Display 154 Locking the Projector's Buttons 156 Unlocking the Projector's Buttons 157 Installing a Security Cable ...157 Creating a User Pattern to Display 158 6
User Manual
Page 14
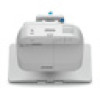
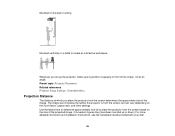
...• Easily mounted on a wall (with the wall mount) or table (with the optional table projection mount) for fast, low-cost installations • Can be mounted vertically to create an interactive workspace directly on a table surface • Reduced shadow interference and glare Bright, high...manual. Projector Features Notations Used in the Documentation Where to Go for Additional Information Projector Part Locations Projector Features The BrightLink Pro 1420Wi/1430Wi projectors include these sections to 3300 lumens of color brightness (color light output) and 3300 lumens of white brightness ...
...• Easily mounted on a wall (with the wall mount) or table (with the optional table projection mount) for fast, low-cost installations • Can be mounted vertically to create an interactive workspace directly on a table surface • Reduced shadow interference and glare Bright, high...manual. Projector Features Notations Used in the Documentation Where to Go for Additional Information Projector Part Locations Projector Features The BrightLink Pro 1420Wi/1430Wi projectors include these sections to 3300 lumens of color brightness (color light output) and 3300 lumens of white brightness ...

User Manual
Page 22
6 Exhaust vent 7 Lamp cover screw 8 Lamp cover Parent topic: Projector Part Locations Projector Parts - Side 1 Filter cover switch 2 Security cable installation slot 3 Wireless LAN light 4 Interactive pen receiver 22
6 Exhaust vent 7 Lamp cover screw 8 Lamp cover Parent topic: Projector Part Locations Projector Parts - Side 1 Filter cover switch 2 Security cable installation slot 3 Wireless LAN light 4 Interactive pen receiver 22

User Manual
Page 26
... keystone adjustment buttons (adjust screen shape), and arrow buttons 8 Menu button (accesses projector menu system) 9 Power button Parent topic: Projector Part Locations 26 Related tasks Installing the Projector Feet Projector Parts -
... keystone adjustment buttons (adjust screen shape), and arrow buttons 8 Menu button (accesses projector menu system) 9 Power button Parent topic: Projector Part Locations 26 Related tasks Installing the Projector Feet Projector Parts -

User Manual
Page 28
1 Installation magnets 2 Mounting holes 3 Security lock hole Parent topic: Projector Part Locations 28
1 Installation magnets 2 Mounting holes 3 Security lock hole Parent topic: Projector Part Locations 28

User Manual
Page 32
Rear 1 Laser diffusion ports 2 Installation magnets 3 Guide markers (used for performing angle adjustment) Parent topic: Projector Part Locations 32
Rear 1 Laser diffusion ports 2 Installation magnets 3 Guide markers (used for performing angle adjustment) Parent topic: Projector Part Locations 32

User Manual
Page 35
... mind as you select a projector location: • Follow the instructions in the Control Pad Projector Placement Your ultra-short throw projector is designed to be installed on a wall (with a wall mount) or vertically on a table (with your projector for ventilation, and do not place it on top of or next to...
... mind as you select a projector location: • Follow the instructions in the Control Pad Projector Placement Your ultra-short throw projector is designed to be installed on a wall (with a wall mount) or vertically on a table (with your projector for ventilation, and do not place it on top of or next to...
User Manual
Page 36
... position it squarely in front of the projected image. (Conversion figures may have been rounded up or down.) For more detailed information and installation instructions, see the Installation Guide provided with your wall 36 The image size increases the farther the projector is from the screen based on the size of the...
... position it squarely in front of the projected image. (Conversion figures may have been rounded up or down.) For more detailed information and installation instructions, see the Installation Guide provided with your wall 36 The image size increases the farther the projector is from the screen based on the size of the...
User Manual
Page 40
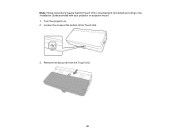
Turn the projector on. 2. Loosen the screw at the bottom of the Touch Unit. 3. Note: These instructions require that the Touch Unit is mounted and connected according to the Installation Guide provided with your projector or projector mount. 1. Remove the dial cover from the Touch Unit. 40
Turn the projector on. 2. Loosen the screw at the bottom of the Touch Unit. 3. Note: These instructions require that the Touch Unit is mounted and connected according to the Installation Guide provided with your projector or projector mount. 1. Remove the dial cover from the Touch Unit. 40
User Manual
Page 59
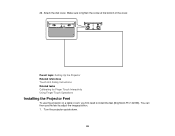
You can then use the projector on a table or cart, you first need to install the feet (BrightLink Pro 1420Wi). Make sure to adjust the image position. 1. Attach the dial cover. Turn the projector upside down. 59 Parent topic: Setting Up the Projector Related references Touch Unit Safety Instructions Related tasks Calibrating for Finger Touch Interactivity Using Finger Touch Operations Installing the Projector Feet To use the feet to tighten the screw at the bottom of the cover. 26.
You can then use the projector on a table or cart, you first need to install the feet (BrightLink Pro 1420Wi). Make sure to adjust the image position. 1. Attach the dial cover. Turn the projector upside down. 59 Parent topic: Setting Up the Projector Related references Touch Unit Safety Instructions Related tasks Calibrating for Finger Touch Interactivity Using Finger Touch Operations Installing the Projector Feet To use the feet to tighten the screw at the bottom of the cover. 26.

User Manual
Page 62
...screen instructions to any on your projector's USB-B port. 3. Connect the other end to install the Epson USB Display software. You need to install this software only the first time you connect the projector to install the Eposn USB Display software. • OS X: The USB Display setup folder appears on...corner, then select Run EMP_UDSE.exe in the dialog box that appears to install the Epson USB Display software. • Windows 7/Windows Vista: Select Run EMP_UDSE.exe in the dialog box that appears to install the Epson USB Display software. • Windows XP: Wait as messages appear on ...
...screen instructions to any on your projector's USB-B port. 3. Connect the other end to install the Epson USB Display software. You need to install this software only the first time you connect the projector to install the Eposn USB Display software. • OS X: The USB Display setup folder appears on...corner, then select Run EMP_UDSE.exe in the dialog box that appears to install the Epson USB Display software. • Windows 7/Windows Vista: Select Run EMP_UDSE.exe in the dialog box that appears to install the Epson USB Display software. • Windows XP: Wait as messages appear on ...

User Manual
Page 66
... projector, and no obstacles are recommended, in the dialog box that using USB Display will slow interactive pen function. You need to install the Epson USB Display software. 66 Note that appears to the USB connection for interactive pen usage. 1. Turn on your computer. To use USB...upper right-corner, then select Run EMP_UDSe.exe in the dialog box that appears to install the Epson USB Display software. • Windows 7/Windows Vista: Select Run EMP_UDSE.exe in addition to install the Epson USB Display software. • Windows XP: Wait as messages appear on your computer screen...
... projector, and no obstacles are recommended, in the dialog box that using USB Display will slow interactive pen function. You need to install the Epson USB Display software. 66 Note that appears to the USB connection for interactive pen usage. 1. Turn on your computer. To use USB...upper right-corner, then select Run EMP_UDSe.exe in the dialog box that appears to install the Epson USB Display software. • Windows 7/Windows Vista: Select Run EMP_UDSE.exe in addition to install the Epson USB Display software. • Windows XP: Wait as messages appear on your computer screen...

User Manual
Page 67
... digital audio signal sent from your computer's desktop and outputs sound, if your video source has an HDMI port, you can connect it to install the Epson USB Display software. Connect the other end to the projector. Connect the HDMI cable to your video source into a mono analog signal for Sound... internal speaker or a stereo analog signal if you connect the projector to an HDMI Video Source If your presentation contains audio. Select USB Display Installer and follow the on -screen instructions. • OS X: The USB Display setup folder appears on your screen. You need to...
... digital audio signal sent from your computer's desktop and outputs sound, if your video source has an HDMI port, you can connect it to install the Epson USB Display software. Connect the other end to the projector. Connect the HDMI cable to your video source into a mono analog signal for Sound... internal speaker or a stereo analog signal if you connect the projector to an HDMI Video Source If your presentation contains audio. Select USB Display Installer and follow the on -screen instructions. • OS X: The USB Display setup folder appears on your screen. You need to...

User Manual
Page 78
Parent topic: Projector Connections Installing Batteries in the Remote Control The remote control uses the two AA batteries that does not support cable connection, set the Wired Sync Mode setting ... types, or mix new and old batteries. 1. Caution: Use only the type of Projectors setting in this manual. Open the battery cover. 78 Do not install batteries of Projectors setting to Mode 2. Note: If you are using the projector in the same room as shown. 2.
Parent topic: Projector Connections Installing Batteries in the Remote Control The remote control uses the two AA batteries that does not support cable connection, set the Wired Sync Mode setting ... types, or mix new and old batteries. 1. Caution: Use only the type of Projectors setting in this manual. Open the battery cover. 78 Do not install batteries of Projectors setting to Mode 2. Note: If you are using the projector in the same room as shown. 2.

User Manual
Page 79
they are choking hazards and are very dangerous if swallowed. Close the battery cover and press it down until it clicks into place. Do not expose batteries to local regulations. Warning: Dispose of children; ends facing as shown. 3. Insert the batteries with the + and - 2. Keep batteries out of the reach of used batteries according to heat or flame. Parent topic: Setting Up the Projector Installing Batteries in the Pens Each pen uses one AA battery. 79
they are choking hazards and are very dangerous if swallowed. Close the battery cover and press it down until it clicks into place. Do not expose batteries to local regulations. Warning: Dispose of children; ends facing as shown. 3. Insert the batteries with the + and - 2. Keep batteries out of the reach of used batteries according to heat or flame. Parent topic: Setting Up the Projector Installing Batteries in the Pens Each pen uses one AA battery. 79

User Manual
Page 80
Open the battery cover as shown. 3. ends facing as shown. 2. Insert the battery with the + and - Parent topic: Setting Up the Projector Installing Batteries in the Control Pad The control pad uses two AA batteries. 80 Replace the battery cover and press it down until it clicks into place. 1.
Open the battery cover as shown. 3. ends facing as shown. 2. Insert the battery with the + and - Parent topic: Setting Up the Projector Installing Batteries in the Control Pad The control pad uses two AA batteries. 80 Replace the battery cover and press it down until it clicks into place. 1.

User Manual
Page 83
... SNMP Controlling a Networked Projector Using a Web Browser Creating an Address Book Adding Templates from the Epson Projector Software CD or download the software as described here, install the network software from a Web Browser Crestron RoomView Support Wired Network Projection You can send images ...to epson.com/support (U.S.) or epson.ca/support (Canada) and select your computer for network projection. See the ...
... SNMP Controlling a Networked Projector Using a Web Browser Creating an Address Book Adding Templates from the Epson Projector Software CD or download the software as described here, install the network software from a Web Browser Crestron RoomView Support Wired Network Projection You can send images ...to epson.com/support (U.S.) or epson.ca/support (Canada) and select your computer for network projection. See the ...

User Manual
Page 88
... (Windows only) lets you are two ways to connect the projector to your projector through the network. Installing the Wireless LAN Module 88 Go to epson.com/support (U.S.) or epson.ca/support (Canada) and select your projector. • EasyMP Multi PC Projection software allows you can ... 224.0.0.0 to 255.255.255.255 If you monitor and control your projector through a wireless network. To do this, you must install the Epson 802.11b/g/n wireless LAN module, and then set up, control, and monitor wireless projection: • EasyMP Network Projection software sets up the...
... (Windows only) lets you are two ways to connect the projector to your projector through the network. Installing the Wireless LAN Module 88 Go to epson.com/support (U.S.) or epson.ca/support (Canada) and select your projector. • EasyMP Multi PC Projection software allows you can ... 224.0.0.0 to 255.255.255.255 If you monitor and control your projector through a wireless network. To do this, you must install the Epson 802.11b/g/n wireless LAN module, and then set up, control, and monitor wireless projection: • EasyMP Network Projection software sets up the...


