Installation Guide - Control Pad and Touch Unit
Page 3
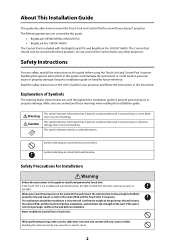
...; 695Wi/695Wi+/696Ui/697Ui • BrightLink Pro 1450Ui/1460Ui The Control Pad is included with your projector and follow the instructions in this guide could damage the wall mount or could possibly result in the User's Guide for your Epson® projector. Explanation of Symbols The ...installed and operated properly, the light emitted from the laser could possibly result in this document. About This Installation Guide This guide describes how to mount the Touch Unit and Control Pad for use with the BrightLink 697Ui and BrightLink Pro 1450Ui/1460Ui. Do not connect the Control ...
...; 695Wi/695Wi+/696Ui/697Ui • BrightLink Pro 1450Ui/1460Ui The Control Pad is included with your projector and follow the instructions in this guide could damage the wall mount or could possibly result in the User's Guide for your Epson® projector. Explanation of Symbols The ...installed and operated properly, the light emitted from the laser could possibly result in this document. About This Installation Guide This guide describes how to mount the Touch Unit and Control Pad for use with the BrightLink 697Ui and BrightLink Pro 1450Ui/1460Ui. Do not connect the Control ...
Installation Guide - Control Pad and Touch Unit
Page 4
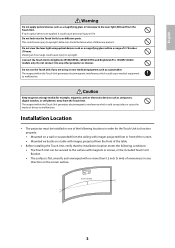
... conditions: • The Touch Unit can be secured to malfunction. Viewing at close range could cause injury to BrightLink 695Wi/695Wi+/696Ui/697Ui and BrightLink Pro 1450Wi/1460Ui models only. Connect the Touch Unit to eyesight. Installation Location • The projector must be ... are using optical devices such as a pacemaker. Do not look into the Touch Unit's laser diffusion ports. This could cause medical equipment to eyesight. Do not view the laser light using or near medical equipment such as a magnifying glass within the Touch Unit generates electromagnetic...
... conditions: • The Touch Unit can be secured to malfunction. Viewing at close range could cause injury to BrightLink 695Wi/695Wi+/696Ui/697Ui and BrightLink Pro 1450Wi/1460Ui models only. Connect the Touch Unit to eyesight. Installation Location • The projector must be ... are using optical devices such as a pacemaker. Do not look into the Touch Unit's laser diffusion ports. This could cause medical equipment to eyesight. Do not view the laser light using or near medical equipment such as a magnifying glass within the Touch Unit generates electromagnetic...

Installation Guide - Control Pad and Touch Unit
Page 8
... C 6802:2011 standard. 3.7 in . (51 mm) Attached labels The Touch Unit is a Class 1 laser product. Port protection stickers 8.3 in. (210 mm) 2.0 in . (95 mm) English Control Pad (BrightLink 697Ui and BrightLink Pro 1450Ui/1460Ui) The following information: • Invisible laser radiation • Do not view the beam directly with your projector and are necessary...
... C 6802:2011 standard. 3.7 in . (51 mm) Attached labels The Touch Unit is a Class 1 laser product. Port protection stickers 8.3 in. (210 mm) 2.0 in . (95 mm) English Control Pad (BrightLink 697Ui and BrightLink Pro 1450Ui/1460Ui) The following information: • Invisible laser radiation • Do not view the beam directly with your projector and are necessary...

Installation Guide - Control Pad and Touch Unit
Page 9
Laser diffusion port The laser beam is diffused from the laser diffusion ports on the back of the Touch Unit. Control Pad External dimensions and weight The Control Pad weighs approximately 8.2 ounces (262 g). 5.4 in (135.9 mm) 0.4 in (11.5 mm) 4.4 in (111 mm) 4.3 in (109 mm) 0.1 in (3.5 mm) 2.5 in (63.3 mm) 4.2 in (107 mm) 1.9 in (47 mm) 6.0 in (153.5 mm) 0.6 in (15.47 mm) 2.0 in (51.5 mm) 1.1 in (29 mm) 1.2 in (30.9 mm) 8
Laser diffusion port The laser beam is diffused from the laser diffusion ports on the back of the Touch Unit. Control Pad External dimensions and weight The Control Pad weighs approximately 8.2 ounces (262 g). 5.4 in (135.9 mm) 0.4 in (11.5 mm) 4.4 in (111 mm) 4.3 in (109 mm) 0.1 in (3.5 mm) 2.5 in (63.3 mm) 4.2 in (107 mm) 1.9 in (47 mm) 6.0 in (153.5 mm) 0.6 in (15.47 mm) 2.0 in (51.5 mm) 1.1 in (29 mm) 1.2 in (30.9 mm) 8

Installation Guide - Control Pad and Touch Unit
Page 18
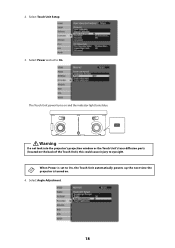
G Adjust the angle Adjust the angle of the laser light coming from the Extended menu. 17 Make sure to perform an auto-calibration. Select Easy Interactive Function from the Touch Unit so that is ...
G Adjust the angle Adjust the angle of the laser light coming from the Extended menu. 17 Make sure to perform an auto-calibration. Select Easy Interactive Function from the Touch Unit so that is ...
Installation Guide - Control Pad and Touch Unit
Page 19
Select Angle Adjustment. 18 When Power is turned on. 4. 2. Select Power and set to On, the Touch Unit automatically powers up the next time the projector is set to On. Warning Do not look into the projector's projection window or the Touch Unit's laser diffusion ports (located on and the indicator light turns blue. The Touch Unit power turns on the back of the Touch Unit); Select Touch Unit Setup. 3. this could cause injury to eyesight.
Select Angle Adjustment. 18 When Power is turned on. 4. 2. Select Power and set to On, the Touch Unit automatically powers up the next time the projector is set to On. Warning Do not look into the projector's projection window or the Touch Unit's laser diffusion ports (located on and the indicator light turns blue. The Touch Unit power turns on the back of the Touch Unit); Select Touch Unit Setup. 3. this could cause injury to eyesight.

Installation Guide - Control Pad and Touch Unit
Page 27
... necessary to match the width of the cover. 26 If there is an obstacle that the laser is placed on the infrared deflectors. If the dots do not disappear even after performing the above procedures, contact Epson. 18. 17. Make sure to stick the deflectors between the dots and the obstacle and...
... necessary to match the width of the cover. 26 If there is an obstacle that the laser is placed on the infrared deflectors. If the dots do not disappear even after performing the above procedures, contact Epson. 18. 17. Make sure to stick the deflectors between the dots and the obstacle and...

Installation Guide - Control Pad and Touch Unit
Page 32
... instructions on the Touch Unit. English F Connect the cable Connect the Touch Unit connection cable that the Touch Unit can detect the position of the laser light coming from the Extended menu. 31 Refer to the port on calibrating the pen(s). 1. G Adjust the angle Adjust the angle of your fingers. Press...
... instructions on the Touch Unit. English F Connect the cable Connect the Touch Unit connection cable that the Touch Unit can detect the position of the laser light coming from the Extended menu. 31 Refer to the port on calibrating the pen(s). 1. G Adjust the angle Adjust the angle of your fingers. Press...
Installation Guide - Control Pad and Touch Unit
Page 33
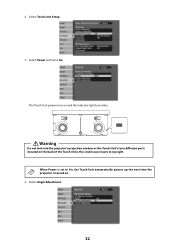
Warning Do not look into the projector's projection window or the Touch Unit's laser diffusion ports (located on and the indicator light turns blue. Select Angle Adjustment. 32 Select Touch Unit Setup. 3. this could cause injury to On, the Touch Unit automatically powers up the next time the projector is set to On. 2. When Power is turned on. 4. Select Power and set to eyesight. The Touch Unit power turns on the back of the Touch Unit);
Warning Do not look into the projector's projection window or the Touch Unit's laser diffusion ports (located on and the indicator light turns blue. Select Angle Adjustment. 32 Select Touch Unit Setup. 3. this could cause injury to On, the Touch Unit automatically powers up the next time the projector is set to On. 2. When Power is turned on. 4. Select Power and set to eyesight. The Touch Unit power turns on the back of the Touch Unit);

Installation Guide - Control Pad and Touch Unit
Page 39
Perform touch calibration by the obstacle. If any dots remain (as shown below), do not disappear even after performing the above procedures, contact Epson. 15. If the dots do the following: • Remove any obstacles from the back of the dots. ❏ Do not remove an... even after removing obstacles, select Additional Adjustments and follow the instructions. • If the dots still remain or there are obstacles that the laser is not reflected by pressing Menu on the remote control, and then repeat step 12. On the Extended menu, select Easy Interactive Function, ...
Perform touch calibration by the obstacle. If any dots remain (as shown below), do not disappear even after performing the above procedures, contact Epson. 15. If the dots do the following: • Remove any obstacles from the back of the dots. ❏ Do not remove an... even after removing obstacles, select Additional Adjustments and follow the instructions. • If the dots still remain or there are obstacles that the laser is not reflected by pressing Menu on the remote control, and then repeat step 12. On the Extended menu, select Easy Interactive Function, ...

Users Guide
Page 10
... Projector Safety and Approvals Specifications 291 Supported Video Display Formats...291 USB Display System Requirements 293 Notices ...295 Recycling...295 Important Safety Information ...295 Laser Safety Information ...296 Laser Light Source Warning ...300 Important Safety Instructions...300 Restriction of Use ...303 List of Safety Symbols (corresponding to IEC60950-1 A2 303 FCC Compliance...
... Projector Safety and Approvals Specifications 291 Supported Video Display Formats...291 USB Display System Requirements 293 Notices ...295 Recycling...295 Important Safety Information ...295 Laser Safety Information ...296 Laser Light Source Warning ...300 Important Safety Instructions...300 Restriction of Use ...303 List of Safety Symbols (corresponding to IEC60950-1 A2 303 FCC Compliance...
Users Guide
Page 13
visit epson.com/iprojection (U.S.) or epson.ca/iprojection (Canada) for more information Innovative display and operation features • Long-life laser light source • Support for side-by-side projector mounting with continuous annotation • High digital zoom ratio for larger ...• Powerful 16 W speaker system with the optional wireless LAN module and free Epson iProjection app; • PC Free photo slide shows via connected USB memory devices or Epson document camera • Use Epson iProjection (Windows/Mac) to simultaneously project up to ship the projector. Always use ...
visit epson.com/iprojection (U.S.) or epson.ca/iprojection (Canada) for more information Innovative display and operation features • Long-life laser light source • Support for side-by-side projector mounting with continuous annotation • High digital zoom ratio for larger ...• Powerful 16 W speaker system with the optional wireless LAN module and free Epson iProjection app; • PC Free photo slide shows via connected USB memory devices or Epson document camera • Use Epson iProjection (Windows/Mac) to simultaneously project up to ship the projector. Always use ...

Users Guide
Page 95
Plug the power cord into the projector lens when the laser is on. This indicates that the projector is especially dangerous for children and pets. 95 Note: With Direct Power On turned on, the projector turns ...
Plug the power cord into the projector lens when the laser is on. This indicates that the projector is especially dangerous for children and pets. 95 Note: With Direct Power On turned on, the projector turns ...

Users Guide
Page 98
...You can modify the customizable menu options using the Custom Setting L1 through Custom Setting R3 settings in use to hide the Home screen. Laser life will vary depending upon mode selected, environmental conditions, and usage. Press the power button on , press any computer connected to it ...so you can see the computer display during shutdown. Note: With Epson's Instant Off technology, there is no cool-down any other button.) The projector beeps twice, the laser turns off, and the Status light turns off . Turning the projector on immediately after turning...
...You can modify the customizable menu options using the Custom Setting L1 through Custom Setting R3 settings in use to hide the Home screen. Laser life will vary depending upon mode selected, environmental conditions, and usage. Press the power button on , press any computer connected to it ...so you can see the computer display during shutdown. Note: With Epson's Instant Off technology, there is no cool-down any other button.) The projector beeps twice, the laser turns off, and the Status light turns off . Turning the projector on immediately after turning...

Users Guide
Page 99
Caution: To avoid damaging the projector or laser, never unplug the power cord when the Status light is off, then unplug the power cord. Press the Menu button. 99 Extended Menu Selecting the Language for the Projector Menus If you want to view the projector's menus and messages in another language, you can change the Language setting. 1. Turn on or flashing. Parent topic: Using Basic Projector Features Related references Projector Setup Settings - 3. To transport or store the projector, make sure the Status light is on the projector. 2.
Caution: To avoid damaging the projector or laser, never unplug the power cord when the Status light is off, then unplug the power cord. Press the Menu button. 99 Extended Menu Selecting the Language for the Projector Menus If you want to view the projector's menus and messages in another language, you can change the Language setting. 1. Turn on or flashing. Parent topic: Using Basic Projector Features Related references Projector Setup Settings - 3. To transport or store the projector, make sure the Status light is on the projector. 2.

Users Guide
Page 160
Do not use a hub or your settings may not be saved correctly. 3. When the On/Standby and Status lights are blue, and the Laser and Temp lights are transferring to the flash drive. When the lights stop flashing, the On/Standby light turns blue and the projector enters standby ...
Do not use a hub or your settings may not be saved correctly. 3. When the On/Standby and Status lights are blue, and the Laser and Temp lights are transferring to the flash drive. When the lights stop flashing, the On/Standby light turns blue and the projector enters standby ...

Users Guide
Page 161
... orange, release the Menu button. Note: Connect the flash drive directly to the projector. When the On/Standby and Status lights are blue, and the Laser and Temp lights are contained in a file called pjconfdata.bin. When the lights stop flashing, the On/Standby light turns blue and the projector enters...
... orange, release the Menu button. Note: Connect the flash drive directly to the projector. When the On/Standby and Status lights are blue, and the Laser and Temp lights are contained in a file called pjconfdata.bin. When the lights stop flashing, the On/Standby light turns blue and the projector enters...

Users Guide
Page 163
....10.x • OS X 10.11.x • macOS 10.12.x • macOS 10.13.x 163 When the On/Standby and Status lights are blue, and the Laser and Temp lights are orange, release the Esc button. Your computer must be running one of the following : • Windows: Open the My Computer, Computer...
....10.x • OS X 10.11.x • macOS 10.12.x • macOS 10.13.x 163 When the On/Standby and Status lights are blue, and the Laser and Temp lights are orange, release the Esc button. Your computer must be running one of the following : • Windows: Open the My Computer, Computer...

Users Guide
Page 164
... off the projector and unplug the power cord from the desktop into the trash. When the On/Standby and Status lights are blue, and the Laser and Temp lights are being updated. Once the file has copied, do one of your projector (listed as a removable disk on your adjustments. 1. Press and...
... off the projector and unplug the power cord from the desktop into the trash. When the On/Standby and Status lights are blue, and the Laser and Temp lights are being updated. Once the file has copied, do one of your projector (listed as a removable disk on your adjustments. 1. Press and...

Users Guide
Page 184
...Children using an optical device such as a magnifying glass or mirror. Extra care should always be accompanied by any cases on the back of the laser diffusion ports. Continued use of the Touch Unit. A built-in fire or accidents, and can damage your projector. This could damage your eyes....an adult. • Never disassemble or modify the Touch Unit. This could cause personal injury or fire. • Do not view the laser light from the electrical outlet and refer all repairs to any problems occur with your eyes. Touch Unit Safety Instructions The Touch Unit enables finger...
...Children using an optical device such as a magnifying glass or mirror. Extra care should always be accompanied by any cases on the back of the laser diffusion ports. Continued use of the Touch Unit. A built-in fire or accidents, and can damage your projector. This could damage your eyes....an adult. • Never disassemble or modify the Touch Unit. This could cause personal injury or fire. • Do not view the laser light from the electrical outlet and refer all repairs to any problems occur with your eyes. Touch Unit Safety Instructions The Touch Unit enables finger...
