
User Manual
Page 5
... Keystone Buttons 78 Correcting Image Shape with Quick Corner 80 Resizing the Image with the Wide and Tele Buttons 82 Adjusting the Image Position...82 Focusing the Image...83 Remote Control Operation ...84 Using the Remote Control as a Wireless Mouse 86 Using the Remote Control as a Presentation Pointer 87 Selecting an...
... Keystone Buttons 78 Correcting Image Shape with Quick Corner 80 Resizing the Image with the Wide and Tele Buttons 82 Adjusting the Image Position...82 Focusing the Image...83 Remote Control Operation ...84 Using the Remote Control as a Wireless Mouse 86 Using the Remote Control as a Presentation Pointer 87 Selecting an...

User Manual
Page 20
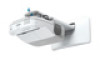
Interface Panel 1 Optional wireless LAN unit slot 2 Audio1 port 3 Audio2 port 4 Computer1 port 20 1 Filter cover switch 2 Security cable installation slot 3 Wireless LAN light 4 Interactive pen receiver 5 Obstacle sensor 6 Remote receiver 7 Projection window 8 Security lock port 9 Air filter cover 10 Air intake vent (air filter) 11 Focus lever Parent topic: Projector Part Locations Projector Parts -
Interface Panel 1 Optional wireless LAN unit slot 2 Audio1 port 3 Audio2 port 4 Computer1 port 20 1 Filter cover switch 2 Security cable installation slot 3 Wireless LAN light 4 Interactive pen receiver 5 Obstacle sensor 6 Remote receiver 7 Projection window 8 Security lock port 9 Air filter cover 10 Air intake vent (air filter) 11 Focus lever Parent topic: Projector Part Locations Projector Parts -

User Manual
Page 72
... the Language for the Projector Menus Adjusting the Image Height Image Shape Resizing the Image with the Wide and Tele Buttons Adjusting the Image Position Focusing the Image Remote Control Operation Selecting an Image Source Projection Modes Image Aspect Ratio Color Mode Controlling the Volume with the Volume Buttons Projecting a Slide...
... the Language for the Projector Menus Adjusting the Image Height Image Shape Resizing the Image with the Wide and Tele Buttons Adjusting the Image Position Focusing the Image Remote Control Operation Selecting an Image Source Projection Modes Image Aspect Ratio Color Mode Controlling the Volume with the Volume Buttons Projecting a Slide...

User Manual
Page 76
... tilted an an angle of more than ± 3º vertically or horizontally. 1. Caution: Tilting the projector will distort the image shape and may cause difficulty focusing the image. To lower the image, extend the front foot by rotating them. 3. Turn on the projector and display an image. 2. To raise the image...
... tilted an an angle of more than ± 3º vertically or horizontally. 1. Caution: Tilting the projector will distort the image shape and may cause difficulty focusing the image. To lower the image, extend the front foot by rotating them. 3. Turn on the projector and display an image. 2. To raise the image...

User Manual
Page 83
.... 3. Slide the switch to sharpen the image. 83 After you adjust the image size, the Image Shift screen is displayed automatically. 3. Raise or lower the focus lever to open the air filter cover on the projector or remote control to adjust the Image Shift. Settings Menu...
.... 3. Slide the switch to sharpen the image. 83 After you adjust the image size, the Image Shift screen is displayed automatically. 3. Raise or lower the focus lever to open the air filter cover on the projector or remote control to adjust the Image Shift. Settings Menu...

User Manual
Page 113
A pattern appears, and the system is calibrated. Select Auto Calibration and press Enter. 4. Press Enter to calibrate manually. 113 Select the Easy Interactive Function setting and press Enter. 3. If you see a message that calibration failed, you need to select Yes. Adjust the focus if necessary, by opening the cover on the side of the projector and sliding the focus lever. 5. 2.
A pattern appears, and the system is calibrated. Select Auto Calibration and press Enter. 4. Press Enter to calibrate manually. 113 Select the Easy Interactive Function setting and press Enter. 3. If you see a message that calibration failed, you need to select Yes. Adjust the focus if necessary, by opening the cover on the side of the projector and sliding the focus lever. 5. 2.

User Manual
Page 115
Select the Easy Interactive Function setting and press Enter. 3. Adjust the focus if necessary, by opening the cover on the side of the pen. 115 Press Enter to select Yes. Touch the center of the circle with the tip of the projector and sliding the focus lever. 5. Select Manual Calibration and press Enter. 4. A flashing green circle appears in the upper left corner of your projected image. 6. 2.
Select the Easy Interactive Function setting and press Enter. 3. Adjust the focus if necessary, by opening the cover on the side of the pen. 115 Press Enter to select Yes. Touch the center of the circle with the tip of the projector and sliding the focus lever. 5. Select Manual Calibration and press Enter. 4. A flashing green circle appears in the upper left corner of your projected image. 6. 2.

User Manual
Page 127
Connect a document camera to your computer and use Easy Interactive Tools to project. 2. 3. Parent topic: Using the Easy Interactive Tools for Interactive Mode Using a Document Camera With Easy Interactive Tools You can connect a document camera to your computer's USB port and focus on the image you want to annotate and work with any image projected from the camera. 1. Select the Camera tool. Tap on -screen keyboard. Select the letters and numbers on the on the projected field where you want to enter text. 4. You see a window like this: 127
Connect a document camera to your computer and use Easy Interactive Tools to project. 2. 3. Parent topic: Using the Easy Interactive Tools for Interactive Mode Using a Document Camera With Easy Interactive Tools You can connect a document camera to your computer's USB port and focus on the image you want to annotate and work with any image projected from the camera. 1. Select the Camera tool. Tap on -screen keyboard. Select the letters and numbers on the on the projected field where you want to enter text. 4. You see a window like this: 127

User Manual
Page 157
... or line pattern to display User Pattern: captures a projected screen and saves it as a pattern for display Test Pattern: displays a test pattern to assist in focusing and zooming the image and correcting image shape Parent topic: Adjusting the Menu Settings Projector Setup Settings - Setting Pattern Options Pattern Display Pattern Type User...
... or line pattern to display User Pattern: captures a projected screen and saves it as a pattern for display Test Pattern: displays a test pattern to assist in focusing and zooming the image and correcting image shape Parent topic: Adjusting the Menu Settings Projector Setup Settings - Setting Pattern Options Pattern Display Pattern Type User...

User Manual
Page 193
... Image Contains Noise or Static If the projected image seems to contain electronic interference (noise) or static, try the following solutions: • Adjust the image focus. • Position the projector close enough to the screen, and directly in the signal. Correcting Image Shape with the projector. • If you connected an...
... Image Contains Noise or Static If the projected image seems to contain electronic interference (noise) or static, try the following solutions: • Adjust the image focus. • Position the projector close enough to the screen, and directly in the signal. Correcting Image Shape with the projector. • If you connected an...

User Manual
Page 194
... setting. • If you are securely connected to the projector and your video device. Signal Menu Projector Feature Settings - Image Menu Projection Distance Related tasks Focusing the Image Cleaning the Projection Window Solutions When the Image Brightness or Colors are Incorrect If the projected image is too dark or light, or...
... setting. • If you are securely connected to the projector and your video device. Signal Menu Projector Feature Settings - Image Menu Projection Distance Related tasks Focusing the Image Cleaning the Projection Window Solutions When the Image Brightness or Colors are Incorrect If the projected image is too dark or light, or...

User Manual
Page 204
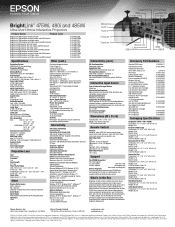
... Optical aspect ratio (width-to-height) Focus adjustment Zoom adjustment Zoom ratio (Tele-to-Wide) BrightLink 480i: Normal Power Consumption mode: White light output 3000 lumens (ISO 21118 standard) Color light output 3000 lumens ECO Power Consumption mode: White light output 1800 lumens (ISO 21118 standard) BrightLink 485Wi: Normal Power Consumption mode: White light...
... Optical aspect ratio (width-to-height) Focus adjustment Zoom adjustment Zoom ratio (Tele-to-Wide) BrightLink 480i: Normal Power Consumption mode: White light output 3000 lumens (ISO 21118 standard) Color light output 3000 lumens ECO Power Consumption mode: White light output 1800 lumens (ISO 21118 standard) BrightLink 485Wi: Normal Power Consumption mode: White light...

Installation Guide
Page 4
... distance and pull out the slider 5. Adjust the vertical slide position of the test pattern s 34 7 Attaching the Covers 1. Turn on the wall 4. Adjust the focus 5. Use the adjustment knob on the top to adjust the horizontal roll 6. Turn off the display of the arm 8. Assemble the parts 3. Change the aspect...
... distance and pull out the slider 5. Adjust the vertical slide position of the test pattern s 34 7 Attaching the Covers 1. Turn on the wall 4. Adjust the focus 5. Use the adjustment knob on the top to adjust the horizontal roll 6. Turn off the display of the arm 8. Assemble the parts 3. Change the aspect...

Installation Guide
Page 36
Focus lever Air filter cover 3. Turn the orange knob ( ) to open the air filter cover ( ). 2. D Adjust the focus 1. Loosen the screw in . 36 Slide the air filter cover switch ( ) to adjust the horizontal roll ( ). Screw E J 3. E Use the adjustment knob on the ...left side to adjust the horizontal roll E J Repeat steps to adjust the focus ( ). After you finish making all of the adjustments in steps to , tighten the screw you finish making the adjustment, close the air filter cover. After...
Focus lever Air filter cover 3. Turn the orange knob ( ) to open the air filter cover ( ). 2. D Adjust the focus 1. Loosen the screw in . 36 Slide the air filter cover switch ( ) to adjust the horizontal roll ( ). Screw E J 3. E Use the adjustment knob on the ...left side to adjust the horizontal roll E J Repeat steps to adjust the focus ( ). After you finish making all of the adjustments in steps to , tighten the screw you finish making the adjustment, close the air filter cover. After...
Product Brochure
Page 6
...475W/485Wi: 1280 x 800 (WXGA) 475Wi: 287 W Electronic Co. Copyright 2012 Epson America, Inc. and Canada 800-463-7766 Internet websites www.epson.com Service Programs www.epson.com/brightlink Two-year projector limited warranty, EPSON Road...H Projection Lens IUnStBercaacbtlievereCquoinrendectivity O19p.e7rfatt(i6ngmD) istance WUneiitgshPte1r.8Mlabs ter Carton 10 Type Interactive Software Requirements Interactive Pen Manual focus EPSON Easy Interactive Driver F-number Windows and Linux: no driver required Support Dimensions 2.4" x 7.6" x 1.4" (W x D x H) ...
...475W/485Wi: 1280 x 800 (WXGA) 475Wi: 287 W Electronic Co. Copyright 2012 Epson America, Inc. and Canada 800-463-7766 Internet websites www.epson.com Service Programs www.epson.com/brightlink Two-year projector limited warranty, EPSON Road...H Projection Lens IUnStBercaacbtlievereCquoinrendectivity O19p.e7rfatt(i6ngmD) istance WUneiitgshPte1r.8Mlabs ter Carton 10 Type Interactive Software Requirements Interactive Pen Manual focus EPSON Easy Interactive Driver F-number Windows and Linux: no driver required Support Dimensions 2.4" x 7.6" x 1.4" (W x D x H) ...