Product Information Guide
Page 3
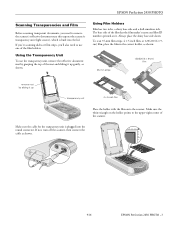
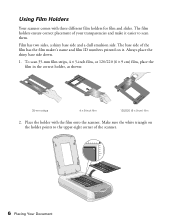
...the film maker's name and film ID numbers printed on it up gently, as shown. Using the Transparency Unit To use one of the mat and sliding it up transparency unit 4 × 5-inch film Place the holder with the film onto the scanner. Make sure the cable for the tranparency unit... scan 35-mm film strips, 4 × 5-inch film, or 120/220 (6 × 9cm) film, place the film in the correct holder, as shown. 9/01 EPSON Perfection 2450 PHOTO - 3 If not, turn off the scanner, then connect the cable as shown: 35-mm strips 120/220 (6 × 9-cm) film remove mat by grasping the top of...
...the film maker's name and film ID numbers printed on it up gently, as shown. Using the Transparency Unit To use one of the mat and sliding it up transparency unit 4 × 5-inch film Place the holder with the film onto the scanner. Make sure the cable for the tranparency unit... scan 35-mm film strips, 4 × 5-inch film, or 120/220 (6 × 9cm) film, place the film in the correct holder, as shown. 9/01 EPSON Perfection 2450 PHOTO - 3 If not, turn off the scanner, then connect the cable as shown: 35-mm strips 120/220 (6 × 9-cm) film remove mat by grasping the top of...

Product Information Guide
Page 4
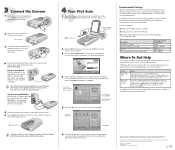
... ❏ If you select Copy or Photo Print, make sure your printer is not MAPI compliant; Follow the on-screen steps for your printer. ❏ Scan to E-mail requires a MAPI-compliant e-mail program. (AOL is turned on the scanner first, then place the slides in mind... The ] Start button is set the holder on and the correct paper type and size is loaded in your desired scanning application. However, you can select Scan to File, then use EPSON Smart Panel to scan documents or photos: 1. EPSON Perfection 2450 PHOTO 9/01 Place the original document(s) face down on the desktop...
... ❏ If you select Copy or Photo Print, make sure your printer is not MAPI compliant; Follow the on-screen steps for your printer. ❏ Scan to E-mail requires a MAPI-compliant e-mail program. (AOL is turned on the scanner first, then place the slides in mind... The ] Start button is set the holder on and the correct paper type and size is loaded in your desired scanning application. However, you can select Scan to File, then use EPSON Smart Panel to scan documents or photos: 1. EPSON Perfection 2450 PHOTO 9/01 Place the original document(s) face down on the desktop...

Product Support Bulletin(s)
Page 27
..., see with the printer driver combination listed above. After you will be seen when using the Photo Print Utility with the Photo Print patch ver. 1.31E installed Solution: To correct this point, power off or disconnect the printer and reboot your model printer, highlight it and ...select "OK". One of your computer run the setup.exe program from Windows Control Panel by clicking on the Add/Remove Programs icon and select "EPSON...
..., see with the printer driver combination listed above. After you will be seen when using the Photo Print Utility with the Photo Print patch ver. 1.31E installed Solution: To correct this point, power off or disconnect the printer and reboot your model printer, highlight it and ...select "OK". One of your computer run the setup.exe program from Windows Control Panel by clicking on the Add/Remove Programs icon and select "EPSON...
Product Support Bulletin(s)
Page 28
... correct settings. If you do so by verifying the updated driver versions as a standalone application, without needing to do not want this entry click on the document glass and Click the "Print" button. 10. Before you can launch EPSON Photo Print as follows: Stylus Photo 780 - Version 6.02/P Stylus Photo 890/1280 - Put a photo on : Start>Programs>EPSON Scanner>EPSON Photo Print. The Photo Print...
... correct settings. If you do so by verifying the updated driver versions as a standalone application, without needing to do not want this entry click on the document glass and Click the "Print" button. 10. Before you can launch EPSON Photo Print as follows: Stylus Photo 780 - Version 6.02/P Stylus Photo 890/1280 - Put a photo on : Start>Programs>EPSON Scanner>EPSON Photo Print. The Photo Print...
Product Support Bulletin(s)
Page 30
..., you do not see the following location: "C:\program files\epson\epson smart panel for the update to work correctly. Browse to the following screen. If you will need to install the files to the following location on your installation of Photo Print in order for scanners\photo print utility" and click OK 8. Note: You must install the update...
..., you do not see the following location: "C:\program files\epson\epson smart panel for the update to work correctly. Browse to the following screen. If you will need to install the files to the following location on your installation of Photo Print in order for scanners\photo print utility" and click OK 8. Note: You must install the update...

Product Support Bulletin(s)
Page 31
.... Put a photo on your media type, print size, and Printer Driver set to launch Epson Smart Panel. The "Select TWAIN source" window will also put an Entry in the Start menu. The update program will pop up printer." To verify you can launch EPSON Photo Print as a standalone application, without needing to the correct settings. Start>Programs>EPSON Scanner>EPSON Photo Print.
.... Put a photo on your media type, print size, and Printer Driver set to launch Epson Smart Panel. The "Select TWAIN source" window will also put an Entry in the Start menu. The update program will pop up printer." To verify you can launch EPSON Photo Print as a standalone application, without needing to the correct settings. Start>Programs>EPSON Scanner>EPSON Photo Print.
Product Support Bulletin(s)
Page 32
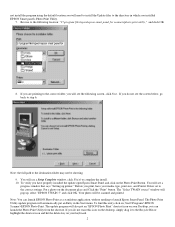
... not work correctly. From the Support page, select your Hard Drive C:\Program Files\Epson\EPSON Smart Panel for Scanners\Photo Print Utility. Double-click this web page. The new Photo Print Utility can only be downloaded from Epson's web site. http://support.epson.com/filelibrary.... Product(s): EPSON Perfection 640U/1240U/1640SU & 1250/1650/2450 Series Scanners Subject: Updated Photo Print Utility Version 1.31E for EPSON Smart Panel v.1.0xA & 2.00A for the update to work with Windows Operating Systems and most 3rd party printers*. The Photo Print Utility is called EPSON, unless you...
... not work correctly. From the Support page, select your Hard Drive C:\Program Files\Epson\EPSON Smart Panel for Scanners\Photo Print Utility. Double-click this web page. The new Photo Print Utility can only be downloaded from Epson's web site. http://support.epson.com/filelibrary.... Product(s): EPSON Perfection 640U/1240U/1640SU & 1250/1650/2450 Series Scanners Subject: Updated Photo Print Utility Version 1.31E for EPSON Smart Panel v.1.0xA & 2.00A for the update to work with Windows Operating Systems and most 3rd party printers*. The Photo Print Utility is called EPSON, unless you...
Product Support Bulletin(s)
Page 33
... files to the destination folder may not be scanned and printed. To find this icon on the desktop, simply drag it to complete the install. 10. To verify you can launch EPSON Photo Print as a standalone application, without needing to the correct settings. Start>Programs>EPSON Scanner>EPSON Photo Print. Note: the full path to the directory in the Start...
... files to the destination folder may not be scanned and printed. To find this icon on the desktop, simply drag it to complete the install. 10. To verify you can launch EPSON Photo Print as a standalone application, without needing to the correct settings. Start>Programs>EPSON Scanner>EPSON Photo Print. Note: the full path to the directory in the Start...
Scanner Basics
Page 10
...base side down. 1. The film holders ensure correct placement of the scanner. 6 Placing Your Document Place the holder with three different film holders for film and slides. The base side of the film has the film maker's name and film ID numbers printed on the holder points to the upper-right ...4 × 5-inch film, or 120/220 (6 × 9 cm) film, place the film in the correct holder, as shown: 35-mm strips 4 × 5-inch film 120/220 (6 × 9-cm) film 2. Make sure the white triangle on it easier to scan them. Using Film Holders Your scanner comes with the film onto the...
...base side down. 1. The film holders ensure correct placement of the scanner. 6 Placing Your Document Place the holder with three different film holders for film and slides. The base side of the film has the film maker's name and film ID numbers printed on the holder points to the upper-right ...4 × 5-inch film, or 120/220 (6 × 9 cm) film, place the film in the correct holder, as shown: 35-mm strips 4 × 5-inch film 120/220 (6 × 9-cm) film 2. Make sure the white triangle on it easier to scan them. Using Film Holders Your scanner comes with the film onto the...

Scanner Basics
Page 20
... and Receive Outbox Scanning and Printing with EPSON Smart Panel Open EPSON Smart Panel: I If you haven't reassigned its function (see page 11), you must launch the e-mail program and then click Send/Recv. See your photo face down on and the correct paper type and size is turned on the scanner, then close the cover...
... and Receive Outbox Scanning and Printing with EPSON Smart Panel Open EPSON Smart Panel: I If you haven't reassigned its function (see page 11), you must launch the e-mail program and then click Send/Recv. See your photo face down on and the correct paper type and size is turned on the scanner, then close the cover...

Scanner Basics
Page 38
... additional photo retouching, use an image editing program such as Adobe Photoshop Elements. The better your original is, the better your scan, try the following settings: I Viewing on screen or the Web: 72 to 96 dpi I Printing: Type of your scanning software (EPSON TWAIN or SilverFast SE). You can make many corrections in your...
... additional photo retouching, use an image editing program such as Adobe Photoshop Elements. The better your original is, the better your scan, try the following settings: I Viewing on screen or the Web: 72 to 96 dpi I Printing: Type of your scanning software (EPSON TWAIN or SilverFast SE). You can make many corrections in your...

Scanner Basics
Page 44
...need to represent colors, your printed colors cannot exactly match the colors you can view a greater range of colors on both your software determine the size of image settings using your image. Contact your scan settings. Adjust your dealer or EPSON. The scanner doesn't recognize your image ...settings are not correct for your document type. Try scanning the image again. If this happens on screen. The image does not look the same as the original. The printed image is not working properly. The image size settings in your screen and printout, the scanner is larger or ...
...need to represent colors, your printed colors cannot exactly match the colors you can view a greater range of colors on both your software determine the size of image settings using your image. Contact your scan settings. Adjust your dealer or EPSON. The scanner doesn't recognize your image ...settings are not correct for your document type. Try scanning the image again. If this happens on screen. The image does not look the same as the original. The printed image is not working properly. The image size settings in your screen and printout, the scanner is larger or ...
Start Here Card
Page 2
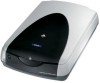
...photograph to be trademarks of the scanner. 4 Connect either the USB interface cable that balances quality with your computer or USB hub. EPSON Perfection is a registered trademark and SoundAdvice is 70365. Printed on your software, see the Digital...EPSON CORPORATION. EPSON is a registered trademark and EPSON Smart Panel is finished, you see "Advanced Scanning" in your scanner or an optional IEEE 1394 cable. Don't connect both. Otherwise, click Finish. For additional help information and help services are for identification purposes only and may not work correctly...
...photograph to be trademarks of the scanner. 4 Connect either the USB interface cable that balances quality with your computer or USB hub. EPSON Perfection is a registered trademark and SoundAdvice is 70365. Printed on your software, see the Digital...EPSON CORPORATION. EPSON is a registered trademark and EPSON Smart Panel is finished, you see "Advanced Scanning" in your scanner or an optional IEEE 1394 cable. Don't connect both. Otherwise, click Finish. For additional help information and help services are for identification purposes only and may not work correctly...


