
Owners Manual
Page 2
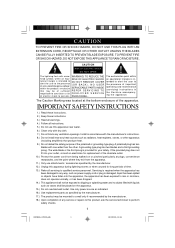
....) Protect the power cord from the apparatus. 11.) Only use attachments / accessories specified by the manufacturer. 18.) Upon completion of time. 13.) Refer all instructions. 5.) Do not use this product, ask the service technician to persons. Use only power source as indicated. 16.) Use replacement parts as vases shall be of sufficient RE F E R S E R V I C E of the apparatus. IMPORTANT SAFETY INSTRUCTIONS 1.) Read these instructions. 2.) Keep these instructions. 3.) Heed all...
....) Protect the power cord from the apparatus. 11.) Only use attachments / accessories specified by the manufacturer. 18.) Upon completion of time. 13.) Refer all instructions. 5.) Do not use this product, ask the service technician to persons. Use only power source as indicated. 16.) Use replacement parts as vases shall be of sufficient RE F E R S E R V I C E of the apparatus. IMPORTANT SAFETY INSTRUCTIONS 1.) Read these instructions. 2.) Keep these instructions. 3.) Heed all...
Owners Manual
Page 3
... sure to read this owner's manual completely to make sure you experience any problems with the operation of this Emerson audio product. However, there is your satisfaction. Our engineers have included many useful and convenient features in perfect working order before it left our factory. Once again, thanks for purchasing this product, please refer to the instructions for obtaining service at the end...
... sure to read this owner's manual completely to make sure you experience any problems with the operation of this Emerson audio product. However, there is your satisfaction. Our engineers have included many useful and convenient features in perfect working order before it left our factory. Once again, thanks for purchasing this product, please refer to the instructions for obtaining service at the end...
Owners Manual
Page 4
... outlet on , the user is connected. • Consult the dealer or an experienced radio/TV technician for a class B digital Device, pursuant to heat radiating appliances such as described in places exposed to direct sunlight or close to part 15 of other stereo equipment that the power cord is properly installed. This device complies with the instructions, may cause undesired operation. 3 CKD9906_071905.p65...
... outlet on , the user is connected. • Consult the dealer or an experienced radio/TV technician for a class B digital Device, pursuant to heat radiating appliances such as described in places exposed to direct sunlight or close to part 15 of other stereo equipment that the power cord is properly installed. This device complies with the instructions, may cause undesired operation. 3 CKD9906_071905.p65...
Owners Manual
Page 5
... PREPARATION FOR USE Unpacking And Set Up • Remove the unit from the carton, and remove all packing materials from the unit. • Save the carton and packing materials in transit. • Press on the OPEN/CLOSE area on the CD door to prevent the product from moving when you operate the controls. Do not...or front of the unit. Discard it and close the CD door. • Unwind the FM wire antenna on the back cabinet and extend it to its full length. • Unwind the AC power cord and extend it to its full length. • Place the unit on your furniture we strongly recommend...
... PREPARATION FOR USE Unpacking And Set Up • Remove the unit from the carton, and remove all packing materials from the unit. • Save the carton and packing materials in transit. • Press on the OPEN/CLOSE area on the CD door to prevent the product from moving when you operate the controls. Do not...or front of the unit. Discard it and close the CD door. • Unwind the FM wire antenna on the back cabinet and extend it to its full length. • Unwind the AC power cord and extend it to its full length. • Place the unit on your furniture we strongly recommend...
Owners Manual
Page 7
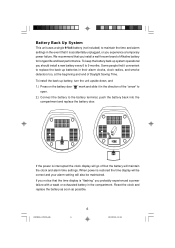
... alarm time settings. Reset the clock and replace the battery as soon as possible. To install the back up batteries in the direction of Alkaline battery for longest life and best performance. Some people find it convenient to replace the back up battery, turn the unit upside down, and 1.) Press on the battery door " "mark and slide it is "flashing" you experience a temporary power failure. To keep the battery...
... alarm time settings. Reset the clock and replace the battery as soon as possible. To install the back up batteries in the direction of Alkaline battery for longest life and best performance. Some people find it convenient to replace the back up battery, turn the unit upside down, and 1.) Press on the battery door " "mark and slide it is "flashing" you experience a temporary power failure. To keep the battery...

Owners Manual
Page 9
.... 3.) Power 'On'Indicator. 4.) POWER(On/Off)/ALARM OFF Button. 5.) Speakers. 6.) CD compartment. 8.) AC Power Cord. 7.) Back Up Battery Compartment (At bottom cabinet). 9.) FM Wire Antenna. 10.) VOLUME Control. 11.) TUNING Control. 12.) Play/Pause Button. 13.) Stop Button. 14.) CD Door OPEN/CLOSE Area. 15.) Skip Search Forward/HR.(Hour) Button. 16.) Skip Search Reverse/MIN.(Minute) Button. 17.) P-MODE Button. 18.) PROGRAM Button. 19.) AL(Alarm) 1 SET Button. 20.) SLEEP Button. 21.) AL(Alarm) 2 SET Button. 22.) TIME Button. 23.) DISPLAY Button. 24.) ALARM 1 'On...
.... 3.) Power 'On'Indicator. 4.) POWER(On/Off)/ALARM OFF Button. 5.) Speakers. 6.) CD compartment. 8.) AC Power Cord. 7.) Back Up Battery Compartment (At bottom cabinet). 9.) FM Wire Antenna. 10.) VOLUME Control. 11.) TUNING Control. 12.) Play/Pause Button. 13.) Stop Button. 14.) CD Door OPEN/CLOSE Area. 15.) Skip Search Forward/HR.(Hour) Button. 16.) Skip Search Reverse/MIN.(Minute) Button. 17.) P-MODE Button. 18.) PROGRAM Button. 19.) AL(Alarm) 1 SET Button. 20.) SLEEP Button. 21.) AL(Alarm) 2 SET Button. 22.) TIME Button. 23.) DISPLAY Button. 24.) ALARM 1 'On...
Owners Manual
Page 10
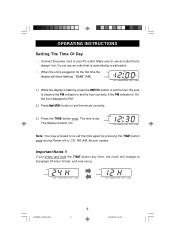
... controlled by pressing the TIME button once during Power-off or CD, FM, AM, Buzzer modes. PM ALARM 1 ALARM 2 PM ALARM 1 ALARM 2 CKD9906_071905.p65 9 9 19/7/2005, 14:26 OPERATING INSTRUCTIONS Setting The Time Of Day • Connect the power cord to use an outlet that is always 'live'. ALARM 1 ALARM 2 1.) While the display is plugged in for the first time the PM display will change to set the time again by a wall switch. • When the unit is flashing...
... controlled by pressing the TIME button once during Power-off or CD, FM, AM, Buzzer modes. PM ALARM 1 ALARM 2 PM ALARM 1 ALARM 2 CKD9906_071905.p65 9 9 19/7/2005, 14:26 OPERATING INSTRUCTIONS Setting The Time Of Day • Connect the power cord to use an outlet that is always 'live'. ALARM 1 ALARM 2 1.) While the display is plugged in for the first time the PM display will change to set the time again by a wall switch. • When the unit is flashing...
Owners Manual
Page 11
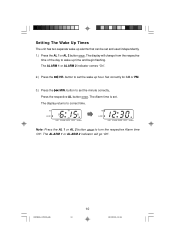
... the HR. button to set the wake up hour. CKD9906_071905.p65 10 10 19/7/2005, 14:26 The Alarm time is set and used independently. 1.) Press the AL 1 or AL 2 button once. The ALARM 1 or ALARM 2 indicator will change from the respective time of the day to wake up alarms that can be set . Setting The Wake Up Times The unit has two separate wake up time and begin flashing. The display will go...
... the HR. button to set the wake up hour. CKD9906_071905.p65 10 10 19/7/2005, 14:26 The Alarm time is set and used independently. 1.) Press the AL 1 or AL 2 button once. The ALARM 1 or ALARM 2 indicator will change from the respective time of the day to wake up alarms that can be set . Setting The Wake Up Times The unit has two separate wake up time and begin flashing. The display will go...
Owners Manual
Page 12
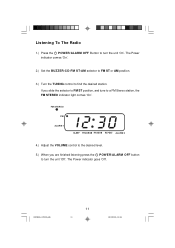
...'. 2.) Set the BUZZER-CD-FM ST-AM selector to FM ST or AM position. 3.) Turn the TUNING control to turn the unit 'On'. FM STEREO PM ALARM 1 ALARM 2 4.) Adjust the VOLUME control to the desired level. 5.) When you slide the selector to FM ST position, and tune to a FM Stereo station, the FM STEREO indicator light comes 'On'. Listening To The Radio 1.) Press the POWER/ALARM OFF Button to turn...
...'. 2.) Set the BUZZER-CD-FM ST-AM selector to FM ST or AM position. 3.) Turn the TUNING control to turn the unit 'On'. FM STEREO PM ALARM 1 ALARM 2 4.) Adjust the VOLUME control to the desired level. 5.) When you slide the selector to FM ST position, and tune to a FM Stereo station, the FM STEREO indicator light comes 'On'. Listening To The Radio 1.) Press the POWER/ALARM OFF Button to turn...
Owners Manual
Page 14
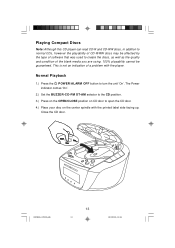
The Power indicator comes 'On'. 2.) Set the BUZZER-CD-FM ST-AM selector to the CD position. 3.) Press on the OPEN/CLOSE position on CD door to open the CD door. 4.) Place your disc on the center spindle with the player. This is not an indication of a problem with the printed ... Playing Compact Discs Note: Although this CD player can read CD-R and CD-RW discs, in addition to normal CDs, however the playability of CD-R/RW discs may be guaranteed. Normal Playback 1.) Press the POWER/ALARM OFF button to create the discs, as well as the quality and condition of the blank media you are using....
The Power indicator comes 'On'. 2.) Set the BUZZER-CD-FM ST-AM selector to the CD position. 3.) Press on the OPEN/CLOSE position on CD door to open the CD door. 4.) Place your disc on the center spindle with the player. This is not an indication of a problem with the printed ... Playing Compact Discs Note: Although this CD player can read CD-R and CD-RW discs, in addition to normal CDs, however the playability of CD-R/RW discs may be guaranteed. Normal Playback 1.) Press the POWER/ALARM OFF button to create the discs, as well as the quality and condition of the blank media you are using....

Owners Manual
Page 15
..., and then the display returns to begin on track 01 begins. Open the CD door and remove your disc. PM PM ALARM 1 ALARM 2 ALARM 1 ALARM 2 6.) Press the button to the correct time. The track number flashes briefly and the sound stops, but the disc continues to the correct time. After the last track has played the disc stops automatically. PM PM ALARM 1 ALARM 2 ALARM 1 ALARM 2 PM ALARM 1 ALARM 2 Note: If the disc is inserted incorrectly...
..., and then the display returns to begin on track 01 begins. Open the CD door and remove your disc. PM PM ALARM 1 ALARM 2 ALARM 1 ALARM 2 6.) Press the button to the correct time. The track number flashes briefly and the sound stops, but the disc continues to the correct time. After the last track has played the disc stops automatically. PM PM ALARM 1 ALARM 2 ALARM 1 ALARM 2 PM ALARM 1 ALARM 2 Note: If the disc is inserted incorrectly...

Owners Manual
Page 16
...'. ALARM 2 3.) Press the button. Depress and hold the or buttons to select the desired track. Note: The volume level is still flashing press the button. To cancel random playback at random and playback begins on a disc in the display for a few seconds. After each track has played once the player stops automatically. PM While the track number is automatically reduced during high speed music search...
...'. ALARM 2 3.) Press the button. Depress and hold the or buttons to select the desired track. Note: The volume level is still flashing press the button. To cancel random playback at random and playback begins on a disc in the display for a few seconds. After each track has played once the player stops automatically. PM While the track number is automatically reduced during high speed music search...

Owners Manual
Page 17
...:26 All tracks will be ALARM 1 repeated continuously. PM ALARM 1 The REPEAT indicator remains 'On'. PM ALARM 1 The REPEAT indicator flashes. To cancel repeat playback press the P-MODE button until the total track number is still flashing, press PM the button. ALARM 2 All Tracks Repeat 1.) Load your disc and wait until the REPEAT indicator goes 'Off', or press the Stop button. Repeat Playback You can program the player to be repeated. ALARM 2 3.) Press the...
...:26 All tracks will be ALARM 1 repeated continuously. PM ALARM 1 The REPEAT indicator remains 'On'. PM ALARM 1 The REPEAT indicator flashes. To cancel repeat playback press the P-MODE button until the total track number is still flashing, press PM the button. ALARM 2 All Tracks Repeat 1.) Load your disc and wait until the REPEAT indicator goes 'Off', or press the Stop button. Repeat Playback You can program the player to be repeated. ALARM 2 3.) Press the...

Owners Manual
Page 18
... display shows the total track number. 2.) Press the PROGRAM button. PM ALARM 1 ALARM 2 PM ALARM 1 ALARM 2 5.) Press the or buttons to select the next track to be done while the player is playing press the Stop button to stop playback before performing the programming steps below. 1.) Turn the unit 'On', select the CD function and load the desired disc in the player. Note: Programming can only be programmed, and press the PROGRAM button...
... display shows the total track number. 2.) Press the PROGRAM button. PM ALARM 1 ALARM 2 PM ALARM 1 ALARM 2 5.) Press the or buttons to select the next track to be done while the player is playing press the Stop button to stop playback before performing the programming steps below. 1.) Turn the unit 'On', select the CD function and load the desired disc in the player. Note: Programming can only be programmed, and press the PROGRAM button...

Owners Manual
Page 19
... function also clears the program. Opening the CD door, pressing the POWER/ALARM OFF button to shut the unit 'Off', or by switching to begin The PROGRAM indicator stops flashing and remains 'On'. Simply enter the desired tracks in the memory. ALARM 2 Press to begin programmed • To clear the program from the memory after the disc stops, press the PROGRAM button and then press the Stop button...
... function also clears the program. Opening the CD door, pressing the POWER/ALARM OFF button to shut the unit 'Off', or by switching to begin The PROGRAM indicator stops flashing and remains 'On'. Simply enter the desired tracks in the memory. ALARM 2 Press to begin programmed • To clear the program from the memory after the disc stops, press the PROGRAM button and then press the Stop button...
Owners Manual
Page 20
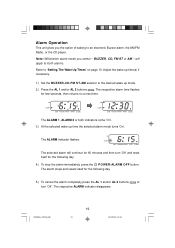
... following day. 4.) To stop the alarm immediately, press the POWER/ALARM OFF button. PM ALARM 1 ALARM 2 PM ALARM 1 ALARM 2 The ALARM 1, ALARM 2 or both alarms. Refer to the desired wake up mode. 2.) Press the AL 1 and/or AL 2 buttons once. The alarm stops and resets itself for few seconds, then returns to correct time. Adjust the wake up time the selected alarm mode turns 'On'. CKD9906_071905.p65 19 19 19/7/2005, 14:26 PM The ALARM indicator flashes...
... following day. 4.) To stop the alarm immediately, press the POWER/ALARM OFF button. PM ALARM 1 ALARM 2 PM ALARM 1 ALARM 2 The ALARM 1, ALARM 2 or both alarms. Refer to the desired wake up mode. 2.) Press the AL 1 and/or AL 2 buttons once. The alarm stops and resets itself for few seconds, then returns to correct time. Adjust the wake up time the selected alarm mode turns 'On'. CKD9906_071905.p65 19 19 19/7/2005, 14:26 PM The ALARM indicator flashes...
Owners Manual
Page 21
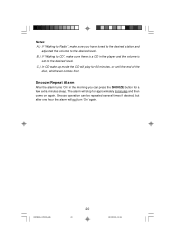
... morning you have tuned to the desired station and adjusted the volume to CD", make sure you can be repeated several times if desired, but after one hour the alarm will not turn 'On'again. Snooze/Repeat Alarm After the alarm turns 'On'in the player and the volume is set to the desired level. C.) In CD wake up mode the CD will stop for approximately 6 minutes and then come...
... morning you have tuned to the desired station and adjusted the volume to CD", make sure you can be repeated several times if desired, but after one hour the alarm will not turn 'On'again. Snooze/Repeat Alarm After the alarm turns 'On'in the player and the volume is set to the desired level. C.) In CD wake up mode the CD will stop for approximately 6 minutes and then come...
Owners Manual
Page 22
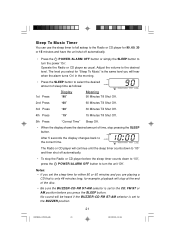
... automatically. • Press the POWER/ALARM OFF button or simply the SLEEP button to turn the unit 'Off'. Adjust the volume to ALARM 1 the correct time. ALARM 2 The Radio or CD player will continue until the sleep timer counts down to "00", press the POWER/ALARM OFF button to turn the power 'On'. Notes: • If you set to the BUZZER position. 21 CKD9906_071905.p65 21 19/7/2005, 14:26 Sleep To Music Timer You can use...
... automatically. • Press the POWER/ALARM OFF button or simply the SLEEP button to turn the unit 'Off'. Adjust the volume to ALARM 1 the correct time. ALARM 2 The Radio or CD player will continue until the sleep timer counts down to "00", press the POWER/ALARM OFF button to turn the power 'On'. Notes: • If you set to the BUZZER position. 21 CKD9906_071905.p65 21 19/7/2005, 14:26 Sleep To Music Timer You can use...
Owners Manual
Page 25
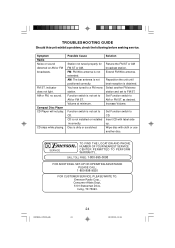
...: Emerson Radio Corp., Consumer Affairs Dept., 5101 Statesman Drive, Irving, TX 75063. indicator does not light. as desired. Increase Volume. SERVICE TO FIND THE LOCATION AND PHONE R NUMBER OF YOUR NEAREST SERVICE CENTER PERMITTED TO PERFORM WARRANTY... Volume at minimum. Disc is not installed or installed incorrectly. Compact Disc Player CD Player will not play. CKD9906_071905.p65 24 24 19/7/2005, 14:26 TROUBLESHOOTING GUIDE Should this unit exhibit a problem...
...: Emerson Radio Corp., Consumer Affairs Dept., 5101 Statesman Drive, Irving, TX 75063. indicator does not light. as desired. Increase Volume. SERVICE TO FIND THE LOCATION AND PHONE R NUMBER OF YOUR NEAREST SERVICE CENTER PERMITTED TO PERFORM WARRANTY... Volume at minimum. Disc is not installed or installed incorrectly. Compact Disc Player CD Player will not play. CKD9906_071905.p65 24 24 19/7/2005, 14:26 TROUBLESHOOTING GUIDE Should this unit exhibit a problem...
Owners Manual
Page 26
... you record the serial number of purchase, we will provide repair service at no charge for a period of ninety (90) days from negligence, misuse, abuse, accident, failure to follow operating instructions, commercial use, rental, repairs by California residents) to cover shipping and handling costs, and enclose a copy of your check or money order payable to : Emerson Radio Corp., 5101 Statesman Drive...
... you record the serial number of purchase, we will provide repair service at no charge for a period of ninety (90) days from negligence, misuse, abuse, accident, failure to follow operating instructions, commercial use, rental, repairs by California residents) to cover shipping and handling costs, and enclose a copy of your check or money order payable to : Emerson Radio Corp., 5101 Statesman Drive...


