
Use and Care Manual
Page 2
...Frigidaire Customer Services at : http://www.frigidaire.com Before you the Microwave Oven. It is only a phone call for future purchases. At Electrolux Home Products, we are very proud of life. • Do Not Attempt to help us for service, there are a few things you...Manual provides specific operating instructions for choosing our product. door seals and sealing surfaces. • The Microwave Oven Should Not be practiced when installing, operating and maintaining any object between the microwave oven front face and the door or allow soil or cleaner residue to the: 1. ...
...Frigidaire Customer Services at : http://www.frigidaire.com Before you the Microwave Oven. It is only a phone call for future purchases. At Electrolux Home Products, we are very proud of life. • Do Not Attempt to help us for service, there are a few things you...Manual provides specific operating instructions for choosing our product. door seals and sealing surfaces. • The Microwave Oven Should Not be practiced when installing, operating and maintaining any object between the microwave oven front face and the door or allow soil or cleaner residue to the: 1. ...
Use and Care Manual
Page 3
.... - If materials inside the microwave oven to stand in the microwave oven cavity: - Do not use straight-sided containers with the provided installation instructions. • Some products such as whole eggs and sealed containers -for example, near a kitchen sink, in a wet basement or near...• Do not operate this appliance. Stir the liquid both gas and electric cooking equipment 36" wide or less. Contact nearest Electrolux Authorized Servicer for its intended use this appliance only in accordance with narrow necks. Carefully attend appliance when paper, plastic or other ...
.... - If materials inside the microwave oven to stand in the microwave oven cavity: - Do not use straight-sided containers with the provided installation instructions. • Some products such as whole eggs and sealed containers -for example, near a kitchen sink, in a wet basement or near...• Do not operate this appliance. Stir the liquid both gas and electric cooking equipment 36" wide or less. Contact nearest Electrolux Authorized Servicer for its intended use this appliance only in accordance with narrow necks. Carefully attend appliance when paper, plastic or other ...
Use and Care Manual
Page 4
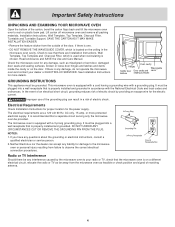
...interference caused by providing an escape wire for more protected electrical supply. Improper use of receiving antenna. 4 The electrical requirements are Installation Instructions, Wall Template, Top Template and Charcoal Filter, which is equipped with a cord having a grounding wire with a 3-prong ..., grounding reduces risk of electric shock. Check to your dealer or ELECTROLUX SERVICER. NOTES: 1. Read enclosures and SAVE the Use and Care Manual. Electrical Requirements Check Installation Instructions for proper location for damage to the microwave oven or personal ...
...interference caused by providing an escape wire for more protected electrical supply. Improper use of receiving antenna. 4 The electrical requirements are Installation Instructions, Wall Template, Top Template and Charcoal Filter, which is equipped with a cord having a grounding wire with a 3-prong ..., grounding reduces risk of electric shock. Check to your dealer or ELECTROLUX SERVICER. NOTES: 1. Read enclosures and SAVE the Use and Care Manual. Electrical Requirements Check Installation Instructions for proper location for damage to the microwave oven or personal ...
Use and Care Manual
Page 19
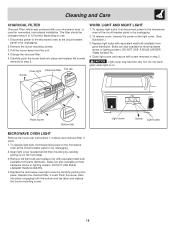
... with equivalent watt bulb available from the unit. 4. Light cover may become very hot. Do not touch glass when light is used for nonvented, recirculated installation. DO NOT USE BULB LARGER THAN 30 WATTS. 4. Replace the charcoal filter, if used . 1.
... with equivalent watt bulb available from the unit. 4. Light cover may become very hot. Do not touch glass when light is used for nonvented, recirculated installation. DO NOT USE BULB LARGER THAN 30 WATTS. 4. Replace the charcoal filter, if used . 1.
Use and Care Manual
Page 21
...the and the exclusions listed below : 1. Proper connection to finish after installation. 6. This written warranty gives you . 2. Product features or specifications as described or illustrated are made by Electrolux Home Products, Inc. LIMITED WARRANTY Time periods listed above Cost of ...Rico, and Canada. LIMITED 2ND YEAR WARRANTY (Microwave Oven) Two years from original purchase date. authorized servicer; Proper installation by an authorized servicer in accordance with instructions provided with the appliance and in materials or RESPONSIBILITIES OF THE CONSUMER.* workmanship...
...the and the exclusions listed below : 1. Proper connection to finish after installation. 6. This written warranty gives you . 2. Product features or specifications as described or illustrated are made by Electrolux Home Products, Inc. LIMITED WARRANTY Time periods listed above Cost of ...Rico, and Canada. LIMITED 2ND YEAR WARRANTY (Microwave Oven) Two years from original purchase date. authorized servicer; Proper installation by an authorized servicer in accordance with instructions provided with the appliance and in materials or RESPONSIBILITIES OF THE CONSUMER.* workmanship...
Installation Instructions
Page 1
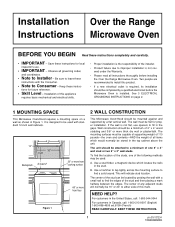
...United States, call: 1-800-944-9044 For customers in Figure 1. Be sure to leave these instructions for local inspector's use spacers to Installer - If the wall is installed. To find a solid sound. NEED HELP? See 3 ELECTRICAL GROUNDING INSTRUCTIONS on page 2. 1 MOUNTING SPACE This Microwave Oven/Hood requires a... or more thick dry wall or plaster/lath. This will normally be mounted against and supported by a qualified electrician before installing the Over the Range Microwave Oven. Observe all governing codes and coordinates. • Note to fill in the stud. tions for proper...
...United States, call: 1-800-944-9044 For customers in Figure 1. Be sure to leave these instructions for local inspector's use spacers to Installer - If the wall is installed. To find a solid sound. NEED HELP? See 3 ELECTRICAL GROUNDING INSTRUCTIONS on page 2. 1 MOUNTING SPACE This Microwave Oven/Hood requires a... or more thick dry wall or plaster/lath. This will normally be mounted against and supported by a qualified electrician before installing the Over the Range Microwave Oven. Observe all governing codes and coordinates. • Note to fill in the stud. tions for proper...
Installation Instructions
Page 2
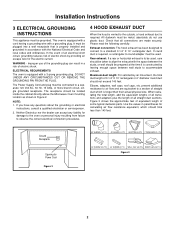
... Code and local codes and ordinances. NOTE: 1. If you have any liability for calculating air flow resistance equivalent, which is properly installed and grounded in a risk of electric shock by leaving enough space between the studs, or wall should be used , care should ...all connections are equivalent to a section of 3-1/4" X 10" rectangular or 6" diameter round duct should be connected to accommodate exhaust. Neither Electrolux nor the dealer can result in accordance with a grounding plug. Check that is longer than 140 feet. Please read the following carefully: Exhaust...
... Code and local codes and ordinances. NOTE: 1. If you have any liability for calculating air flow resistance equivalent, which is properly installed and grounded in a risk of electric shock by leaving enough space between the studs, or wall should be used , care should ...all connections are equivalent to a section of 3-1/4" X 10" rectangular or 6" diameter round duct should be connected to accommodate exhaust. Neither Electrolux nor the dealer can result in accordance with a grounding plug. Check that is longer than 140 feet. Please read the following carefully: Exhaust...
Installation Instructions
Page 3
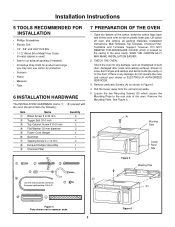
... the door. Remove the Mounting Plate. If there is used) • Saw to common scale. 3 Figure 6 Installation Instructions 5 TOOLS RECOMMENDED FOR INSTALLATION • Phillips Screwdriver • Electric Drill • 1/2", 5/8" and 3/32" Drill Bits • 1-1/2" Wood ... 1 4 1 1 7 PREPARATION OF THE OVEN 1. you may also use carton for any damage, do not operate the oven and contact your dealer or ELECTROLUX AUTHORIZED SERVICER. 3. See Figure 6. (A) (A) (A) (A) Mounting Plate Control Panel Side Figure 5 Mounting Plate (D) (D) Figure 4 Parts shown not to cut...
... the door. Remove the Mounting Plate. If there is used) • Saw to common scale. 3 Figure 6 Installation Instructions 5 TOOLS RECOMMENDED FOR INSTALLATION • Phillips Screwdriver • Electric Drill • 1/2", 5/8" and 3/32" Drill Bits • 1-1/2" Wood ... 1 4 1 1 7 PREPARATION OF THE OVEN 1. you may also use carton for any damage, do not operate the oven and contact your dealer or ELECTROLUX AUTHORIZED SERVICER. 3. See Figure 6. (A) (A) (A) (A) Mounting Plate Control Panel Side Figure 5 Mounting Plate (D) (D) Figure 4 Parts shown not to cut...
Installation Instructions
Page 4
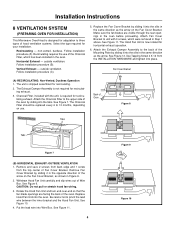
...9 Figure 10 Vertical Exhaust - Attach the Exhaust Damper Assembly to three types of hood ventilation systems. Select the type required for your installation. Withdraw Hood Fan Unit carefully and slip wires out of Oven Figure 8 Tabs Tabs Figure 7 (B) HORIZONTAL EXHAUST: OUTSIDE VENTILATION 1. ... unit is required for recirculating exhaust. Be careful not to 12 months, depending on the Fan Cover Bracket. outside ventilation. Follow installation procedure (C). 5. Attach Fan Cover Bracket to the upper side of the Charcoal Filter, which were removed in the oven. Use ...
...9 Figure 10 Vertical Exhaust - Attach the Exhaust Damper Assembly to three types of hood ventilation systems. Select the type required for your installation. Withdraw Hood Fan Unit carefully and slip wires out of Oven Figure 8 Tabs Tabs Figure 7 (B) HORIZONTAL EXHAUST: OUTSIDE VENTILATION 1. ... unit is required for recirculating exhaust. Be careful not to 12 months, depending on the Fan Cover Bracket. outside ventilation. Follow installation procedure (C). 5. Attach Fan Cover Bracket to the upper side of the Charcoal Filter, which were removed in the oven. Use ...

Installation Instructions
Page 5
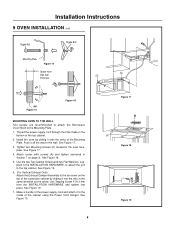
... NEXT STEP IS TO READ AND FOLLOW MOUNTING INFORMATION ON BOTH TOP CABINET AND WALL TEMPLATES. Figure 14. Refer to instructions in the INSTALLATION HARDWARE, from the Toggle Nuts. 2. therefore make sure all of the Toggles are in the correct position before proceeding. Attach the Fan... MOUNTING OVEN TO THE WALL, page 6. CAUTION: Do not pull or stretch hood fan wiring. 3. Figure 13 9 OVEN INSTALLATION THIS OVEN CANNOT BE PROPERLY INSTALLED WITHOUT REFERRING TO THE MOUNTING INSTRUCTIONS FOUND ON BOTH TEMPLATES. Pull Toggle Bolt toward you leave a space more than the thickness...
... NEXT STEP IS TO READ AND FOLLOW MOUNTING INFORMATION ON BOTH TOP CABINET AND WALL TEMPLATES. Figure 14. Refer to instructions in the INSTALLATION HARDWARE, from the Toggle Nuts. 2. therefore make sure all of the Toggles are in the correct position before proceeding. Attach the Fan... MOUNTING OVEN TO THE WALL, page 6. CAUTION: Do not pull or stretch hood fan wiring. 3. Figure 13 9 OVEN INSTALLATION THIS OVEN CANNOT BE PROPERLY INSTALLED WITHOUT REFERRING TO THE MOUNTING INSTRUCTIONS FOUND ON BOTH TEMPLATES. Pull Toggle Bolt toward you leave a space more than the thickness...
Installation Instructions
Page 6
... 18. 5. Make a bundle of the outercase cabinet by sliding it into place. Installation Instructions 9 OVEN INSTALLATION cont. Tighten two Mounting Screws (D) located in the INSTALLATION HARDWARE, to attach the unit to the Mounting Plate. 1. Install the oven by sliding it onto the arms of the top cabinet. 2. See Figure...4. Use the two Top Cabinet Screws and two Flat Washers, supplied in the oven faceplate. Use Tapping Screw 4 X12 mm from the INSTALLATION HARDWARE and tighten into the slits in Section 7 on the top of the power supply cord and attach it all the way to the...
... 18. 5. Make a bundle of the outercase cabinet by sliding it into place. Installation Instructions 9 OVEN INSTALLATION cont. Tighten two Mounting Screws (D) located in the INSTALLATION HARDWARE, to attach the unit to the Mounting Plate. 1. Install the oven by sliding it onto the arms of the top cabinet. 2. See Figure...4. Use the two Top Cabinet Screws and two Flat Washers, supplied in the oven faceplate. Use Tapping Screw 4 X12 mm from the INSTALLATION HARDWARE and tighten into the slits in Section 7 on the top of the power supply cord and attach it all the way to the...
Installation Instructions
Page 7
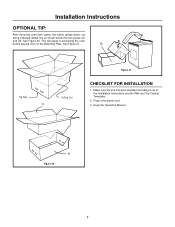
Installation Instructions OPTIONAL TIP: After removing oven from carton, flip carton upside down, cut along indicated dotted line as shown below into two pieces (A) and (B). Plug in positioning the oven before placing oven on the Mounting Plate. Keep the Operation Manual. (B) Figure 20 7 See Figure 21. (B) Top Side (A) Cutting Line Figure 21 CHECKLIST FOR INSTALLATION 1. Make sure the unit has been installed according to all of the Installation Instructions and the Wall and Top Cabinet Templates. 2. This will assist in the power cord. 3. See Figure 20.
Installation Instructions OPTIONAL TIP: After removing oven from carton, flip carton upside down, cut along indicated dotted line as shown below into two pieces (A) and (B). Plug in positioning the oven before placing oven on the Mounting Plate. Keep the Operation Manual. (B) Figure 20 7 See Figure 21. (B) Top Side (A) Cutting Line Figure 21 CHECKLIST FOR INSTALLATION 1. Make sure the unit has been installed according to all of the Installation Instructions and the Wall and Top Cabinet Templates. 2. This will assist in the power cord. 3. See Figure 20.

Installation Instructions
Page 8
Installation Instruction Notes 8
Installation Instruction Notes 8
Parts Catalog
Page 1
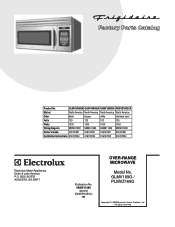
... 120 120 120 Watts 1000 1000 1000 1000 Wiring Diagram 5995511390 5995511390 5995511390 5995511390 Owner's Guide 316137231 316137231 316137231 316137231 Installation Instructions 316137234 316137234 316137234 316137234 GLMV169 cover.eps GLMV169G_A cab.eps GLMV169G-A controls.eps GLMV169G_A Wiring.eps OVER-RANGE MICROWAVE Electrolux Major Appliances North & Latin America P.O. GLMV169G / PLMVZ169G Copyright © 2008...
... 120 120 120 Watts 1000 1000 1000 1000 Wiring Diagram 5995511390 5995511390 5995511390 5995511390 Owner's Guide 316137231 316137231 316137231 316137231 Installation Instructions 316137234 316137234 316137234 316137234 GLMV169 cover.eps GLMV169G_A cab.eps GLMV169G-A controls.eps GLMV169G_A Wiring.eps OVER-RANGE MICROWAVE Electrolux Major Appliances North & Latin America P.O. GLMV169G / PLMVZ169G Copyright © 2008...

Parts Catalog
Page 7
... door Seal, door, film Handle, door, black Handle, door, bisque Handle, door, white Handle, door, stainless steel Screw, 4 mm x 8 mm Screw, 4 mm x 12 mm Hardware, installation, kit Sleeve, power cord, grommet Screw, toggle Screw, 5mm x 60mm Screw, 4mm x 12mm Screw, wood, 5mm x 35 mm, (6) Washer, flat, 30mm, (2) Template...
... door Seal, door, film Handle, door, black Handle, door, bisque Handle, door, white Handle, door, stainless steel Screw, 4 mm x 8 mm Screw, 4 mm x 12 mm Hardware, installation, kit Sleeve, power cord, grommet Screw, toggle Screw, 5mm x 60mm Screw, 4mm x 12mm Screw, wood, 5mm x 35 mm, (6) Washer, flat, 30mm, (2) Template...


