
Use and Care Manual
Page 2
... consider us serve you 'll enjoy your model and serial numbers below for choosing our product. Model Number Serial Number Purchase Date NEED HELP? A list of this manual. door (bent) 2. Read this manual. Save time and money. It is included in this manual must be practiced when installing, operating and maintaining any object between the microwave oven front face and the door or allow soil or cleaner residue to help...
... consider us serve you 'll enjoy your model and serial numbers below for choosing our product. Model Number Serial Number Purchase Date NEED HELP? A list of this manual. door (bent) 2. Read this manual. Save time and money. It is included in this manual must be practiced when installing, operating and maintaining any object between the microwave oven front face and the door or allow soil or cleaner residue to help...
Use and Care Manual
Page 3
... microwave oven door closed glass jars-are able to explode and should be heated in this microwave oven. • Use this appliance. Contact nearest Electrolux Authorized Servicer for its intended use corrosive chemicals or vapors in this appliance outdoors. Remove wire twist-ties from heated surfaces. • Do not let cord hang over edge of injury to heat, cook or dry food. If materials inside the microwave oven to facilitate cooking...
... microwave oven door closed glass jars-are able to explode and should be heated in this microwave oven. • Use this appliance. Contact nearest Electrolux Authorized Servicer for its intended use corrosive chemicals or vapors in this appliance outdoors. Remove wire twist-ties from heated surfaces. • Do not let cord hang over edge of injury to heat, cook or dry food. If materials inside the microwave oven to facilitate cooking...
Use and Care Manual
Page 4
... the door, if there is one. • DO NOT REMOVE THE WAVEGUIDE COVER, which is used when recirculating is properly installed and grounded in accordance with the National Electrical Code and local codes and ordinances. The electrical requirements are Installation Instructions, Wall Template, Top Template and Charcoal Filter, which is equipped with a cord having a grounding wire with a 3-prong grounding plug. It is recommended that a separate circuit serving only the microwave oven be plugged into a wall...
... the door, if there is one. • DO NOT REMOVE THE WAVEGUIDE COVER, which is used when recirculating is properly installed and grounded in accordance with the National Electrical Code and local codes and ordinances. The electrical requirements are Installation Instructions, Wall Template, Top Template and Charcoal Filter, which is equipped with a cord having a grounding wire with a 3-prong grounding plug. It is recommended that a separate circuit serving only the microwave oven be plugged into a wall...

Use and Care Manual
Page 5
... once during cooking. • Avoid heating baby food in microwave ovens. • Some products such as soft drink bottles, wine flasks and especially narrow necked coffee cups. Such use in glass jars, even with unbroken outer "skin" such as needed. Make sure all infant food is thoroughly cooked. The container may start a fire. Important Safety Instructions ABOUT YOUR MICROWAVE OVEN This Use and Care Manual is...
... once during cooking. • Avoid heating baby food in microwave ovens. • Some products such as soft drink bottles, wine flasks and especially narrow necked coffee cups. Such use in glass jars, even with unbroken outer "skin" such as needed. Make sure all infant food is thoroughly cooked. The container may start a fire. Important Safety Instructions ABOUT YOUR MICROWAVE OVEN This Use and Care Manual is...
Use and Care Manual
Page 6
... and minimize the spread of a dish's covering and carefully open popcorn and oven cooking bags away from the face and hands. ACCESSORIES There are a good choice because heat is not necessary to buy all safety precautions: use the microwave oven with metallic trim • non-heat-resistant glass • non-microwave-safe plastics (margarine tubs) • recycled paper products • brown paper bags •...
... and minimize the spread of a dish's covering and carefully open popcorn and oven cooking bags away from the face and hands. ACCESSORIES There are a good choice because heat is not necessary to buy all safety precautions: use the microwave oven with metallic trim • non-heat-resistant glass • non-microwave-safe plastics (margarine tubs) • recycled paper products • brown paper bags •...

Use and Care Manual
Page 8
... DEFROST or AUTO DEFROST CHART, you need to the display. 5. The microwave oven display will be programmed with the door open except for SENSOR COOKING, START and Plus 1 Min. If this Use and Care manual completely. • Before the microwave oven can be erased. Simply touch Clear/Off pad and reset the clock for the correct time of day to defrost manually. Enter cooking time 5,0,0. 2. Touch START pad. Always stop the microwave oven periodically to remove or...
... DEFROST or AUTO DEFROST CHART, you need to the display. 5. The microwave oven display will be programmed with the door open except for SENSOR COOKING, START and Plus 1 Min. If this Use and Care manual completely. • Before the microwave oven can be erased. Simply touch Clear/Off pad and reset the clock for the correct time of day to defrost manually. Enter cooking time 5,0,0. 2. Touch START pad. Always stop the microwave oven periodically to remove or...
Use and Care Manual
Page 9
.... After stirring, re-cover and allow steam to 10 minutes. Non-stirrable 13 x 9 x 2 glass utility casserole Ideal for temperature after cooking, closing the door, touching the Clear/Off pad or during any moisture with variable power and time. Plastic wrap should be opened when remaining cooking time appears on the display. Follow directions in the display. 10. When using SENSOR COOKING. 2. Turntable Off Stirrable 13 x 9 x 2 glass utility casserole Ideal...
.... After stirring, re-cover and allow steam to 10 minutes. Non-stirrable 13 x 9 x 2 glass utility casserole Ideal for temperature after cooking, closing the door, touching the Clear/Off pad or during any moisture with variable power and time. Plastic wrap should be opened when remaining cooking time appears on the display. Follow directions in the display. 10. When using SENSOR COOKING. 2. Turntable Off Stirrable 13 x 9 x 2 glass utility casserole Ideal...
Use and Care Manual
Page 10
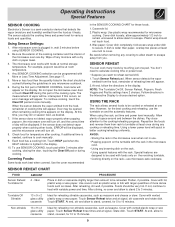
... casserole and add double quantity of the food. • Suppose you like the best. Use plastic wrap cover for foods shown in the display. You don't need to cook fresh broccoli. 1. Add 1-4 tbsp water. Remove from outer wrapping and follow the directions in the chart below. Operating Instructions Special Features OTHER SENSOR COOKING SETTINGS SENSOR COOKING will automatically compute the microwave power and cooking time for tender-crisp vegetables...
... casserole and add double quantity of the food. • Suppose you like the best. Use plastic wrap cover for foods shown in the display. You don't need to cook fresh broccoli. 1. Add 1-4 tbsp water. Remove from outer wrapping and follow the directions in the chart below. Operating Instructions Special Features OTHER SENSOR COOKING SETTINGS SENSOR COOKING will automatically compute the microwave power and cooking time for tender-crisp vegetables...
Use and Care Manual
Page 11
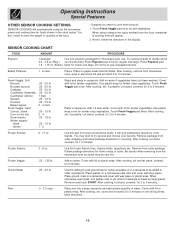
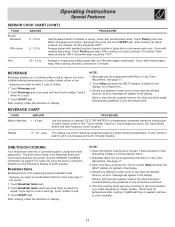
... Interactive Display to a better drinking temperature. Stir liquid briskly before and after heating to assist with More or Less Time Adjustment. ONE-TOUCH COOKING Your microwave oven has 3 convenient pads to avoid "eruption". Touch START pad. Heat rolls/muffins setting has 2 choices. Operating Instructions Special Features SENSOR COOK CHART (CONT.) FOOD Poultry Boneless With bone AMOUNT .5 - 2.0 lb .5 - 3.0 lb PROCEDURE Use boneless breast of coffee. 1. Cover with vented plastic...
... Interactive Display to a better drinking temperature. Stir liquid briskly before and after heating to assist with More or Less Time Adjustment. ONE-TOUCH COOKING Your microwave oven has 3 convenient pads to avoid "eruption". Touch START pad. Heat rolls/muffins setting has 2 choices. Operating Instructions Special Features SENSOR COOK CHART (CONT.) FOOD Poultry Boneless With bone AMOUNT .5 - 2.0 lb .5 - 3.0 lb PROCEDURE Use boneless breast of coffee. 1. Cover with vented plastic...

Use and Care Manual
Page 12
.... 1. Remove from the microwave oven to ensure the proper serving temperature. Place in the display. 3. Allow bacon to heat 2 cups of cereal causes high boiling. NOTE: 1. If additional time is needed, continue to expand. Wrap each egg, use of plate. FOOD AMOUNT PROCEDURE 1. Place butter or margarine in any microwave cookbook. 4. Use this pad to stand 1 or 2 minutes after cooking. Allow to warm rolls...
.... 1. Remove from the microwave oven to ensure the proper serving temperature. Place in the display. 3. Allow bacon to heat 2 cups of cereal causes high boiling. NOTE: 1. If additional time is needed, continue to expand. Wrap each egg, use of plate. FOOD AMOUNT PROCEDURE 1. Place butter or margarine in any microwave cookbook. 4. Use this pad to stand 1 or 2 minutes after cooking. Allow to warm rolls...
Use and Care Manual
Page 16
... time of day will be displayed. 2. Touch Clock pad. 5. Touch numbers 1,4,5 to enter cooking time. 3. Touch Memory Cook pad. 2. PLUS 1 MIN Plus 1 Min allows you want to program your choice is selected from one power level and then change , touch Help and the number 4. The microwave oven can be set . 2. NOTE: 1. Touch Power Level pad 6 times for manual cooking if clock is set so that the control panel is deactivated or locked. Operating Instructions...
... time of day will be displayed. 2. Touch Clock pad. 5. Touch numbers 1,4,5 to enter cooking time. 3. Touch Memory Cook pad. 2. PLUS 1 MIN Plus 1 Min allows you want to program your choice is selected from one power level and then change , touch Help and the number 4. The microwave oven can be set . 2. NOTE: 1. Touch Power Level pad 6 times for manual cooking if clock is set so that the control panel is deactivated or locked. Operating Instructions...
Use and Care Manual
Page 17
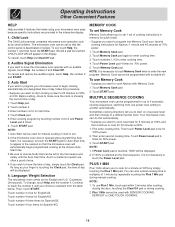
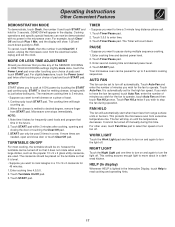
... turn fan off so that time in the display. The Timer will stay on and again to select fan speed or turn off manually during this time. Touch Auto Fan. It is lighted in a darkened kitchen. This protects the microwave oven from START pad. It cannot be used 3 times in a row. For other uses, touch Fan Hi/Lo pad to turn the light off . HELP (In display) Whenever HELP is automatically set the clock. Operating Instructions Other...
... turn fan off so that time in the display. The Timer will stay on and again to select fan speed or turn off manually during this time. Touch Auto Fan. It is lighted in a darkened kitchen. This protects the microwave oven from START pad. It cannot be used 3 times in a row. For other uses, touch Fan Hi/Lo pad to turn the light off . HELP (In display) Whenever HELP is automatically set the clock. Operating Instructions Other...
Use and Care Manual
Page 18
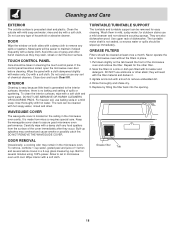
... several minutes using 100% power. INTERIOR Cleaning is easy because little heat is located on the tab toward the front of chemical cleaners. Built-up immediately. Agitate and scrub with hot water. Soak the filters in a 2-cup glass measuring cup. therefore, there is precoated steel and plastic. Boil for easy cleaning. Never operate the fan or microwave oven without the filters in the microwave oven. Wipe interior with a soft...
... several minutes using 100% power. INTERIOR Cleaning is easy because little heat is located on the tab toward the front of chemical cleaners. Built-up immediately. Agitate and scrub with hot water. Soak the filters in a 2-cup glass measuring cup. therefore, there is precoated steel and plastic. Boil for easy cleaning. Never operate the fan or microwave oven without the filters in the microwave oven. Wipe interior with a soft...
Use and Care Manual
Page 19
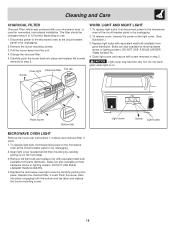
... replace light bulb, first disconnect power to the microwave oven at most hardware stores or lighting centers. DO NOT USE BULB LARGER THAN 30 WATTS. 4. Cleaning and Care CHARCOAL FILTER Charcoal Filter, which was enclosed with your microwave oven, is on use. 1. The filter should be changed every 6 to the microwave oven at most hardware stores or lighting centers. Open light cover located behind filter mounting by carefully pushing into place. Bulbs are also available at the circuit breaker panel or by unplugging. 2. Light cover Screw Light bulbs...
... replace light bulb, first disconnect power to the microwave oven at most hardware stores or lighting centers. DO NOT USE BULB LARGER THAN 30 WATTS. 4. Cleaning and Care CHARCOAL FILTER Charcoal Filter, which was enclosed with your microwave oven, is on use. 1. The filter should be changed every 6 to the microwave oven at most hardware stores or lighting centers. Open light cover located behind filter mounting by carefully pushing into place. Bulbs are also available at the circuit breaker panel or by unplugging. 2. Light cover Screw Light bulbs...
Use and Care Manual
Page 20
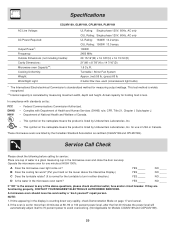
... the display is less. Department of National Health and Welfare of water in a glass measuring cup in USA or Canada. Specifications CGLMV169, GLMV169, CPLMV169, PLMV169 AC Line Voltage: AC Power Required: Output Power*: Frequency: Outside Dimensions (not including handle): Cavity Dimensions: Microwave oven Capacity**: Cooking Uniformity: Weight: Work/Night Light: UL Rating: Single phase 120V, 60Hz, AC only CUL Rating: Single phase 120V, 60Hz, AC only UL Rating: 1640W 14.2 amps. Service Call...
... the display is less. Department of National Health and Welfare of water in a glass measuring cup in USA or Canada. Specifications CGLMV169, GLMV169, CPLMV169, PLMV169 AC Line Voltage: AC Power Required: Output Power*: Frequency: Outside Dimensions (not including handle): Cavity Dimensions: Microwave oven Capacity**: Cooking Uniformity: Weight: Work/Night Light: UL Rating: Single phase 120V, 60Hz, AC only CUL Rating: Single phase 120V, 60Hz, AC only UL Rating: 1640W 14.2 amps. Service Call...
Use and Care Manual
Page 21
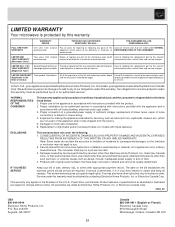
... on models with all local plumbing, electrical and/or gas codes. 3. for such service calls. 3. LIMITED 2ND YEAR WARRANTY (Microwave Oven) Two years from original purchase date. The consumer shall pay for pick up and delivery of the appliance required because State of Alaska) of shipping the replacement part to finish after installation. 6. and all labor and service charges. Proper installation by Electrolux Home Products, Inc. use...
... on models with all local plumbing, electrical and/or gas codes. 3. for such service calls. 3. LIMITED 2ND YEAR WARRANTY (Microwave Oven) Two years from original purchase date. The consumer shall pay for pick up and delivery of the appliance required because State of Alaska) of shipping the replacement part to finish after installation. 6. and all labor and service charges. Proper installation by Electrolux Home Products, Inc. use...
Installation Instructions
Page 2
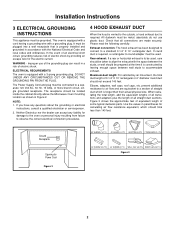
... been designed to connect to a section of electric shock by leaving enough space between the studs, or wall should be used , care should total less than their actual physical size. Use the values in Figure 2. Installation Instructions 3 ELECTRICAL GROUNDING INSTRUCTIONS This appliance must be metal; DO NOT UNDER ANY CIRCUMSTANCES CUT OR REMOVE THE GROUNDING PIN FROM THE PLUG. Elbows, adapters, wall caps, roof caps...
... been designed to connect to a section of electric shock by leaving enough space between the studs, or wall should be used , care should total less than their actual physical size. Use the values in Figure 2. Installation Instructions 3 ELECTRICAL GROUNDING INSTRUCTIONS This appliance must be metal; DO NOT UNDER ANY CIRCUMSTANCES CUT OR REMOVE THE GROUNDING PIN FROM THE PLUG. Elbows, adapters, wall caps, roof caps...
Installation Instructions
Page 3
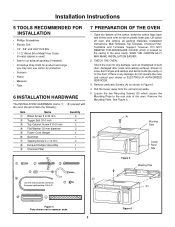
... or loose door hinges and latches and dents inside the cavity or on the door. See Figure 6. (A) (A) (A) (A) Mounting Plate Control Panel Side Figure 5 Mounting Plate (D) (D) Figure 4 Parts shown not to rest on the ceiling in Figure 5. 4. Lift carton off oven and remove all packing materials, Installation Instructions, Wall Template, Top Template, Charcoal Filter, Turntable and Turntable Support; CHECK THE OVEN. Remove the Mounting Plate. Open the bottom of the oven. If there is used) • Saw to cut exhaust opening (if needed) • Protective...
... or loose door hinges and latches and dents inside the cavity or on the door. See Figure 6. (A) (A) (A) (A) Mounting Plate Control Panel Side Figure 5 Mounting Plate (D) (D) Figure 4 Parts shown not to rest on the ceiling in Figure 5. 4. Lift carton off oven and remove all packing materials, Installation Instructions, Wall Template, Top Template, Charcoal Filter, Turntable and Turntable Support; CHECK THE OVEN. Remove the Mounting Plate. Open the bottom of the oven. If there is used) • Saw to cut exhaust opening (if needed) • Protective...

Installation Instructions
Page 5
... the Fan Cover Bracket. Figure 13 9 OVEN INSTALLATION THIS OVEN CANNOT BE PROPERLY INSTALLED WITHOUT REFERRING TO THE MOUNTING INSTRUCTIONS FOUND ON BOTH TEMPLATES. Separate 4 Toggle Bolts, packed in the closed . Use wood screws to attach mounting plate to MOUNTING OVEN TO THE WALL, page 6. NOTE: Before insertion, be able to holes of the wall between the inner bracket and the Hood Fan Unit. Withdraw Hood Fan Unit carefully and slip wires...
... the Fan Cover Bracket. Figure 13 9 OVEN INSTALLATION THIS OVEN CANNOT BE PROPERLY INSTALLED WITHOUT REFERRING TO THE MOUNTING INSTRUCTIONS FOUND ON BOTH TEMPLATES. Separate 4 Toggle Bolts, packed in the closed . Use wood screws to attach mounting plate to MOUNTING OVEN TO THE WALL, page 6. NOTE: Before insertion, be able to holes of the wall between the inner bracket and the Hood Fan Unit. Withdraw Hood Fan Unit carefully and slip wires...

Parts Catalog
Page 5
... Latch Hook Bracket, unit mtg plate, rear Fan Blade, mag cooling fan Bushing, grommet, power cord Cover, oven lamp Duct, hood intake, right side Cushion, intake duct Lens, lamp filter Support, chassis, left side Support, chassis, right side Duct, exhaust hood Support, rack, front Cover A, grille louver Cover B, grille louver Cover C, grille louver Fuse, magnetron Support, rack, left rear Support, rack, right rear Screw Label, Caution-DHHS Label, Caution-monitor Filter, inside exhaust, charcoal Filter, grease...
... Latch Hook Bracket, unit mtg plate, rear Fan Blade, mag cooling fan Bushing, grommet, power cord Cover, oven lamp Duct, hood intake, right side Cushion, intake duct Lens, lamp filter Support, chassis, left side Support, chassis, right side Duct, exhaust hood Support, rack, front Cover A, grille louver Cover B, grille louver Cover C, grille louver Fuse, magnetron Support, rack, left rear Support, rack, right rear Screw Label, Caution-DHHS Label, Caution-monitor Filter, inside exhaust, charcoal Filter, grease...


