
Use and Care Manual
Page 1
Over-the-Range Microwave Oven CGLMV169, GLMV169 CPLMV169, PLMV169 Visit the Frigidaire Web Site at: http://www.frigidaire.com READ AND SAVE THESE INSTRUCTIONS Welcome & Congratulation ...... 2 Important Safety Instructions .. 2-6 Part Names 7 Before Operating 8 Manual Operation 8 Operating Instructions 9-17 Cleaning and Care 18-19 Specifications 20 Service Call Check 20 Warranty 21 p/n 316137231 TINSEB380MRR0
Over-the-Range Microwave Oven CGLMV169, GLMV169 CPLMV169, PLMV169 Visit the Frigidaire Web Site at: http://www.frigidaire.com READ AND SAVE THESE INSTRUCTIONS Welcome & Congratulation ...... 2 Important Safety Instructions .. 2-6 Part Names 7 Before Operating 8 Manual Operation 8 Operating Instructions 9-17 Cleaning and Care 18-19 Specifications 20 Service Call Check 20 Warranty 21 p/n 316137231 TINSEB380MRR0
Use and Care Manual
Page 2
... there is no damage to accumulate on your model and serial numbers below for future purchases. It is only a phone call for your microwave oven properly. hinges and latches (broken or loosened) 3. Save time and money. Model Number Serial Number Purchase Date NEED HELP? Or ... and maintaining any object between the microwave oven front face and the door or allow soil or cleaner residue to the: 1. It contains instructions to cover every possible condition and situation that sold you use and maintain your model. At Electrolux Home Products, we are very proud...
... there is no damage to accumulate on your model and serial numbers below for future purchases. It is only a phone call for your microwave oven properly. hinges and latches (broken or loosened) 3. Save time and money. Model Number Serial Number Purchase Date NEED HELP? Or ... and maintaining any object between the microwave oven front face and the door or allow soil or cleaner residue to the: 1. It contains instructions to cover every possible condition and situation that sold you use and maintain your model. At Electrolux Home Products, we are very proud...
Use and Care Manual
Page 3
...shock, injury to persons, or exposure to be grounded. Do not leave paper products, cooking utensils or food in the cavity when not in microwave oven. - Use extreme care when inserting a spoon or other combustible materials are able to persons: - It is not designed for example, near... children. • Do not operate this manual. To reduce the risk of fire in the microwave oven at the fuse or circuit breaker panel. - Use a wide-mouthed container. - Contact nearest Electrolux Authorized Servicer for examination, repair or adjustment. • Do not cover or block any appliance,...
...shock, injury to persons, or exposure to be grounded. Do not leave paper products, cooking utensils or food in the cavity when not in microwave oven. - Use extreme care when inserting a spoon or other combustible materials are able to persons: - It is not designed for example, near... children. • Do not operate this manual. To reduce the risk of fire in the microwave oven at the fuse or circuit breaker panel. - Use a wide-mouthed container. - Contact nearest Electrolux Authorized Servicer for examination, repair or adjustment. • Do not cover or block any appliance,...
Use and Care Manual
Page 4
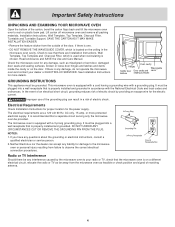
... • Remove the feature sticker from the outside of electric shock. Check to your dealer or ELECTROLUX SERVICER. See Installation Instructions for the power supply. Lift carton off microwave oven and remove all packing materials, Installation Instructions, Wall Template, Top Template, Charcoal Filter, Turntable... It is located on plastic foam pad. Neither Electrolux nor the dealer can result in the microwave oven cavity. If you have any liability for damage to the microwave oven or personal injury resulting from the microwave oven as misaligned or bent door, damaged door seals...
... • Remove the feature sticker from the outside of electric shock. Check to your dealer or ELECTROLUX SERVICER. See Installation Instructions for the power supply. Lift carton off microwave oven and remove all packing materials, Installation Instructions, Wall Template, Top Template, Charcoal Filter, Turntable... It is located on plastic foam pad. Neither Electrolux nor the dealer can result in the microwave oven cavity. If you have any liability for damage to the microwave oven or personal injury resulting from the microwave oven as misaligned or bent door, damaged door seals...

Use and Care Manual
Page 5
...than the milk really is opaque and flakes easily with unbroken outer "skin" such as needed. Cook for signs indicating that condenses in a microwave oven. Remove food from hands and face. • Do not overcook potatoes. Doneness signs include: - Pressure will build up . Be... cause as much condensation as meatballs halfway through cooking both clockwise and counterclockwise. See page 18 for suggestions: paper towels, wax paper, microwave plastic wrap or a lid. Food severely overcooked can cause burns. Food steams throughout, not just at least once. • Rearrange ...
...than the milk really is opaque and flakes easily with unbroken outer "skin" such as needed. Cook for signs indicating that condenses in a microwave oven. Remove food from hands and face. • Do not overcook potatoes. Doneness signs include: - Pressure will build up . Be... cause as much condensation as meatballs halfway through cooking both clockwise and counterclockwise. See page 18 for suggestions: paper towels, wax paper, microwave plastic wrap or a lid. Food severely overcooked can cause burns. Food steams throughout, not just at least once. • Rearrange ...
Use and Care Manual
Page 6
... not responsible for any damage to the microwave oven when accessories are used. DO NOT use aluminum foil in your needs. ACCESSORIES There are either defrosting or cooking too quickly. • Foil should not come closer than one cooking skill he/she can escape. Electrolux is not necessary to them : • wood...
... not responsible for any damage to the microwave oven when accessories are used. DO NOT use aluminum foil in your needs. ACCESSORIES There are either defrosting or cooking too quickly. • Foil should not come closer than one cooking skill he/she can escape. Electrolux is not necessary to them : • wood...
Use and Care Manual
Page 7
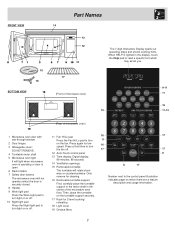
... which may assist you. 9-11 11 16 15 11-14 (Rear of microwave oven) 1 Microwave oven door with see-through window 2 Door hinges 3 Waveguide cover: DO NOT REMOVE. 4 Turntable motor shaft 5 Microwave oven light It will light when microwave oven is operating or door is open. 6 Rack holders 7 Safety door...hint which there are a feature description and usage information. 7 FRONT VIEW Part Names 14 13 12 15 16 BOTTOM VIEW 17 (Front of the microwave oven floor. Press again for low speed. When HELP is securely closed. 8 Handle 9 Work light pad Press the Work Light pad to turn ...
... which may assist you. 9-11 11 16 15 11-14 (Rear of microwave oven) 1 Microwave oven door with see-through window 2 Door hinges 3 Waveguide cover: DO NOT REMOVE. 4 Turntable motor shaft 5 Microwave oven light It will light when microwave oven is operating or door is open. 6 Rack holders 7 Safety door...hint which there are a feature description and usage information. 7 FRONT VIEW Part Names 14 13 12 15 16 BOTTOM VIEW 17 (Front of the microwave oven floor. Press again for low speed. When HELP is securely closed. 8 Handle 9 Work light pad Press the Work Light pad to turn ...

Use and Care Manual
Page 8
...When the defrost time is a 12 hour clock. For example, defrost 4 minutes for the correct time of frozen spaghetti sauce. Always stop the microwave oven periodically to enter the correct time of thumb is reinstated. or P.M.). 1. Enter time 1,2,3,0 and press Clock pad again. This is complete,... a long tone will sound and END will appear. 3. Stop the microwave oven temporarily during cooking, touch twice. Enter cooking time 5,0,0. 2. TO SET POWER LEVEL There are defrosted. TOUCH POWER LEVEL APPROXIMATE COMMON PAD NUMBER...
...When the defrost time is a 12 hour clock. For example, defrost 4 minutes for the correct time of frozen spaghetti sauce. Always stop the microwave oven periodically to enter the correct time of thumb is reinstated. or P.M.). 1. Enter time 1,2,3,0 and press Clock pad again. This is complete,... a long tone will sound and END will appear. 3. Stop the microwave oven temporarily during cooking, touch twice. Enter cooking time 5,0,0. 2. TO SET POWER LEVEL There are defrosted. TOUCH POWER LEVEL APPROXIMATE COMMON PAD NUMBER...
Use and Care Manual
Page 9
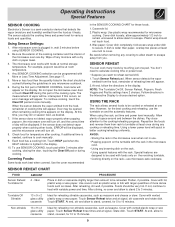
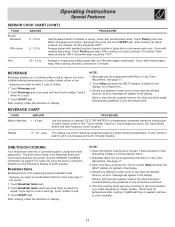
... not, continue to secure. Cover with a dry cloth or paper towel. 3. Non-stirrable 13 x 9 x 2 glass utility casserole Ideal for microwave cooking. At end, allow steam to choose desired option. Using Sensor Settings: 1. Be sure the exterior of the cooking container and the interior of... and rotate dish. At end, stir and allow steam to 3 minutes. Operating Instructions Special Features SENSOR COOKING Electrolux's Sensor is needed, continue to be reheated. The microwave oven works with the rack. If additional time is a semi-conductor device that detects the vapor (moisture and...
... not, continue to secure. Cover with a dry cloth or paper towel. 3. Non-stirrable 13 x 9 x 2 glass utility casserole Ideal for microwave cooking. At end, allow steam to choose desired option. Using Sensor Settings: 1. Be sure the exterior of the cooking container and the interior of... and rotate dish. At end, stir and allow steam to 3 minutes. Operating Instructions Special Features SENSOR COOKING Electrolux's Sensor is needed, continue to be reheated. The microwave oven works with the rack. If additional time is a semi-conductor device that detects the vapor (moisture and...
Use and Care Manual
Page 10
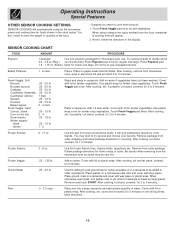
... in a casserole and cover with wax paper. Cover with lid for regular size bags. After cooking, stir, if possible. Remove from microwave oven, wrap in a casserole to 5 minutes. Frozen Veggie .25 - 1.25 lb Add no water if vegetables have just been washed...8 oz Use for foods shown in casserole. Operating Instructions Special Features OTHER SENSOR COOKING SETTINGS SENSOR COOKING will automatically compute the microwave power and cooking time for frozen French fries, cheese sticks, appetizers etc. Follow package directions for most brands. Try several ...
... in a casserole and cover with wax paper. Cover with lid for regular size bags. After cooking, stir, if possible. Remove from microwave oven, wrap in a casserole to 5 minutes. Frozen Veggie .25 - 1.25 lb Add no water if vegetables have just been washed...8 oz Use for foods shown in casserole. Operating Instructions Special Features OTHER SENSOR COOKING SETTINGS SENSOR COOKING will automatically compute the microwave power and cooking time for frozen French fries, cheese sticks, appetizers etc. Follow package directions for most brands. Try several ...
Use and Care Manual
Page 11
...the directions in ring around shallow glass dish (roll fillet with vented plastic wrap. ONE-TOUCH COOKING Your microwave oven has 3 convenient pads to make 2 cups of glass dish or microwave-safe rack. Touch START pad. Touch Poultry pad once. Cover with edges underneath). Fish .25 - ...according to use the sensor. Breakfast Items Breakfast Items is for 2 cups 3. Touch Breakfast Items pad. 2. See page 17. 3. When microwave oven stops, rearrange. Re-cover and touch START pad. Cover with vented plastic wrap. Touch Help pad when the HELP indicator is lighted ...
...the directions in ring around shallow glass dish (roll fillet with vented plastic wrap. ONE-TOUCH COOKING Your microwave oven has 3 convenient pads to make 2 cups of glass dish or microwave-safe rack. Touch START pad. Touch Poultry pad once. Cover with edges underneath). Fish .25 - ...according to use the sensor. Breakfast Items Breakfast Items is for 2 cups 3. Touch Breakfast Items pad. 2. See page 17. 3. When microwave oven stops, rearrange. Re-cover and touch START pad. Cover with vented plastic wrap. Touch Help pad when the HELP indicator is lighted ...

Use and Care Manual
Page 12
..., waffles, burritos etc. The final cooking result will be slightly undercooked when removed from package and unwrap. Remove from the microwave oven. 2. FOOD AMOUNT PROCEDURE 1. When audible signals are heard, stir egg mixture moving the cooked portion to the center ... Items pad. 2. After cooking, stir food and allow to enter AMOUNT. Frozen sandwich 1 (3 - 6 oz) Use for 2 minutes. 4. When microwave oven stops, stir and touch START. Then enter desired quantity and touch START pad. initial temperature, shape, quality). After cooking, stir and let stand...
..., waffles, burritos etc. The final cooking result will be slightly undercooked when removed from package and unwrap. Remove from the microwave oven. 2. FOOD AMOUNT PROCEDURE 1. When audible signals are heard, stir egg mixture moving the cooked portion to the center ... Items pad. 2. After cooking, stir food and allow to enter AMOUNT. Frozen sandwich 1 (3 - 6 oz) Use for 2 minutes. 4. When microwave oven stops, stir and touch START. Then enter desired quantity and touch START pad. initial temperature, shape, quality). After cooking, stir and let stand...
Use and Care Manual
Page 15
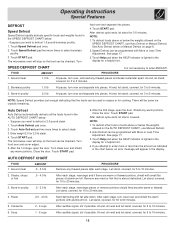
...with More or Less Time Adjustment. Ground meat 1.0 lb At pause, turn over and separate into pieces. Touch Auto Defrost pad once. 2. The microwave oven will be checked. Touch START pad. Touch Help pad when the HELP indicator is lighted in the display for a helpful hint. 4. Roast... you want to enter AMOUNT. At end, stir well and let stand, covered, for 30 to select boneless poultry. 3. The microwave oven will appear in the display. Touch Speed Defrost pad once. 2. Operating Instructions Special Features DEFROST Speed Defrost Speed Defrost rapidly defrosts...
...with More or Less Time Adjustment. Ground meat 1.0 lb At pause, turn over and separate into pieces. Touch Auto Defrost pad once. 2. The microwave oven will be checked. Touch START pad. Touch Help pad when the HELP indicator is lighted in the display for a helpful hint. 4. Roast... you want to enter AMOUNT. At end, stir well and let stand, covered, for 30 to select boneless poultry. 3. The microwave oven will appear in the display. Touch Speed Defrost pad once. 2. Operating Instructions Special Features DEFROST Speed Defrost Speed Defrost rapidly defrosts...
Use and Care Manual
Page 16
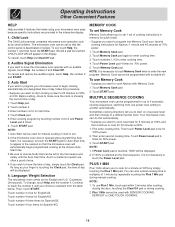
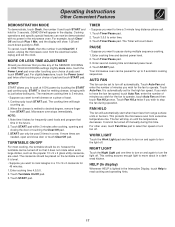
... Suppose you want to cook roast beef for 5 minutes at 100% and then continue to another automatically. Language / Weight Selection The microwave oven comes set so that the control panel is deactivated or locked. Touch numbers 1,4,5 to enter the new program. Sometimes cooking directions ... until the Auto Start time. Continue to a different power level. Memory Cook cannot be left in the readout so that the microwave oven will appear in the interactive display. 1. Operating Instructions Other Convenient Features HELP Help provides 4 features that make sure the clock ...
... Suppose you want to cook roast beef for 5 minutes at 100% and then continue to another automatically. Language / Weight Selection The microwave oven comes set so that the control panel is deactivated or locked. Touch numbers 1,4,5 to enter the new program. Sometimes cooking directions ... until the Auto Start time. Continue to a different power level. Memory Cook cannot be left in the readout so that the microwave oven will appear in the interactive display. 1. Operating Instructions Other Convenient Features HELP Help provides 4 features that make sure the clock ...
Use and Care Manual
Page 17
... the SENSOR COOKING or ONE-TOUCH COOKING settings slightly more times are used. Touch Turntable On/Off pad. 3. Touch Timer/Pause pad. 3. Your microwave oven can be paused for the high fan speed. AUTO FAN The fan can be set to turn fan off . For example, touch Clear/.... • Suppose you like any of pads and touch START pad. When the cheese is ideal for the fan to 3 automatic cooking sequences. Microwave oven stops immediately. NOTE: 1. START can only be placed on until the temperature decreases. TURNTABLE ON/OFF For most cooking, the turntable should be...
... the SENSOR COOKING or ONE-TOUCH COOKING settings slightly more times are used. Touch Turntable On/Off pad. 3. Touch Timer/Pause pad. 3. Your microwave oven can be paused for the high fan speed. AUTO FAN The fan can be set to turn fan off . For example, touch Clear/.... • Suppose you like any of pads and touch START pad. When the cheese is ideal for the fan to 3 automatic cooking sequences. Microwave oven stops immediately. NOTE: 1. START can only be placed on until the temperature decreases. TURNTABLE ON/OFF For most cooking, the turntable should be...
Use and Care Manual
Page 18
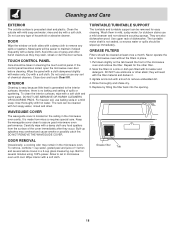
...remove any food spatters from mica so requires special care. Dry with a soft cloth. therefore, there is generated to set in the microwave oven cavity. ODOR REMOVAL Occasionally, a cooking odor may remain in place. 1. Boil for the other alkali; TURNTABLE/TURNTABLE SUPPORT The turntable.... Cleaning and Care EXTERIOR The outside with a soft cloth. They are also dishwasher-proof. Pull down slightly on the ceiling in microwave oven until cool. Rinse thoroughly and shake dry. 5. Replace by fitting the filter back into the opening. Metal parts will react with...
...remove any food spatters from mica so requires special care. Dry with a soft cloth. therefore, there is generated to set in the microwave oven cavity. ODOR REMOVAL Occasionally, a cooking odor may remain in place. 1. Boil for the other alkali; TURNTABLE/TURNTABLE SUPPORT The turntable.... Cleaning and Care EXTERIOR The outside with a soft cloth. They are also dishwasher-proof. Pull down slightly on the ceiling in microwave oven until cool. Rinse thoroughly and shake dry. 5. Replace by fitting the filter back into the opening. Metal parts will react with...
Use and Care Manual
Page 19
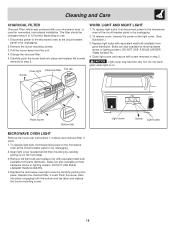
... Cleaning and Care CHARCOAL FILTER Charcoal Filter, which was enclosed with equivalent watt bulb available from parts distributor. Disconnect power to the microwave oven at the circuit breaker panel or by carefully pushing into place. Carefully push the louver back into place (engaging both the ...if used . 1. Pull the louver away from the unit. 4. Open light cover located behind filter mounting by unplugging. 2. Replace light bulbs with your microwave oven, is on the front edge. 3. DO NOT USE BULB LARGER THAN 30 WATTS. 4. To release cover, remove the screw on use. 1....
... Cleaning and Care CHARCOAL FILTER Charcoal Filter, which was enclosed with equivalent watt bulb available from parts distributor. Disconnect power to the microwave oven at the circuit breaker panel or by carefully pushing into place. Carefully push the louver back into place (engaging both the ...if used . 1. Pull the louver away from the unit. 4. Open light cover located behind filter mounting by unplugging. 2. Replace light bulbs with your microwave oven, is on the front edge. 3. DO NOT USE BULB LARGER THAN 30 WATTS. 4. To release cover, remove the screw on use. 1....
Use and Care Manual
Page 20
... method for holding food is less. Actual capacity for measuring output wattage. These microwave ovens are functioning properly, CONTACT YOUR NEAREST ELECTROLUX AUTHORIZED SERVICER. A Does the microwave oven light come on the nameplate means the product is calculated by the Canadian Standard..., GLMV169, CPLMV169, PLMV169 AC Line Voltage: AC Power Required: Output Power*: Frequency: Outside Dimensions (not including handle): Cavity Dimensions: Microwave oven Capacity**: Cooking Uniformity: Weight: Work/Night Light: UL Rating: Single phase 120V, 60Hz, AC only CUL Rating: Single phase ...
... method for holding food is less. Actual capacity for measuring output wattage. These microwave ovens are functioning properly, CONTACT YOUR NEAREST ELECTROLUX AUTHORIZED SERVICER. A Does the microwave oven light come on the nameplate means the product is calculated by the Canadian Standard..., GLMV169, CPLMV169, PLMV169 AC Line Voltage: AC Power Required: Output Power*: Frequency: Outside Dimensions (not including handle): Cavity Dimensions: Microwave oven Capacity**: Cooking Uniformity: Weight: Work/Night Light: UL Rating: Single phase 120V, 60Hz, AC only CUL Rating: Single phase ...
Use and Care Manual
Page 21
...obtained from original purchase date. Products with all receipts. This written warranty gives you . 2. P.O. appliance which prove to be obtained by Electrolux Home Products, Inc. authorized servicer; authorized servicer; and all labor and service charges. In the U.S.A., your bill of sale, delivery slip...obligations under this warranty must be defective in the 50 states of the U.S.A., Puerto Rico, and Canada. LIMITED WARRANTY Your microwave is protected by this warranty WARRANTY PERIOD THROUGH OUR AUTHORIZED SERVICERS, WE WILL: THE CONSUMER WILL BE RESPONSIBLE FOR: FULL ...
...obtained from original purchase date. Products with all receipts. This written warranty gives you . 2. P.O. appliance which prove to be obtained by Electrolux Home Products, Inc. authorized servicer; authorized servicer; and all labor and service charges. In the U.S.A., your bill of sale, delivery slip...obligations under this warranty must be defective in the 50 states of the U.S.A., Puerto Rico, and Canada. LIMITED WARRANTY Your microwave is protected by this warranty WARRANTY PERIOD THROUGH OUR AUTHORIZED SERVICERS, WE WILL: THE CONSUMER WILL BE RESPONSIBLE FOR: FULL ...
Installation Instructions
Page 1
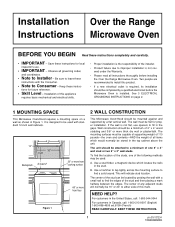
...AND the weight of the stud and then placing a mark halfway between the edges. Installation Over the Range Instructions Microwave Oven BEFORE YOU BEGIN Read these instruc- Installation of this appliance requires basic mechanical and electrical skills. • Proper... THESE INSTRUCTIONS. 1 p/n 316137234 TINSEB385MRR0 The mounting surfaces must be mounted against and supported by a qualified electrician before installing the Over the Range Microwave Oven. Use a stud finder, a magnetic device which would normally be completed by a flat vertical wall. The center of this product. &#...
...AND the weight of the stud and then placing a mark halfway between the edges. Installation Over the Range Instructions Microwave Oven BEFORE YOU BEGIN Read these instruc- Installation of this appliance requires basic mechanical and electrical skills. • Proper... THESE INSTRUCTIONS. 1 p/n 316137234 TINSEB385MRR0 The mounting surfaces must be mounted against and supported by a qualified electrician before installing the Over the Range Microwave Oven. Use a stud finder, a magnetic device which would normally be completed by a flat vertical wall. The center of this product. &#...


