
Use and Care Manual
Page 1
Over-the-Range Microwave Oven CGLMV169, GLMV169 CPLMV169, PLMV169 Visit the Frigidaire Web Site at: http://www.frigidaire.com READ AND SAVE THESE INSTRUCTIONS Welcome & Congratulation ...... 2 Important Safety Instructions .. 2-6 Part Names 7 Before Operating 8 Manual Operation 8 Operating Instructions 9-17 Cleaning and Care 18-19 Specifications 20 Service Call Check 20 Warranty 21 p/n 316137231 TINSEB380MRR0
Over-the-Range Microwave Oven CGLMV169, GLMV169 CPLMV169, PLMV169 Visit the Frigidaire Web Site at: http://www.frigidaire.com READ AND SAVE THESE INSTRUCTIONS Welcome & Congratulation ...... 2 Important Safety Instructions .. 2-6 Part Names 7 Before Operating 8 Manual Operation 8 Operating Instructions 9-17 Cleaning and Care 18-19 Specifications 20 Service Call Check 20 Warranty 21 p/n 316137231 TINSEB380MRR0

Use and Care Manual
Page 5
Condensation is a normal part of moisture that condenses in narrow-necked bottles (especially carbonated beverages). Ventilation openings must be placed in microwave ovens. • Some products such as chicken ...
Condensation is a normal part of moisture that condenses in narrow-necked bottles (especially carbonated beverages). Ventilation openings must be placed in microwave ovens. • Some products such as chicken ...
Use and Care Manual
Page 7
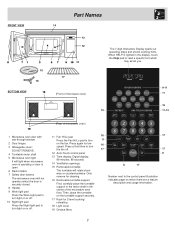
... pad to turn light on or off. 11 Fan Hi/Lo pad Press the Fan Hi/Lo pad to turn on the fan. FRONT VIEW Part Names 14 13 12 15 16 BOTTOM VIEW 17 (Front of microwave oven) 1 Microwave oven door with see-through window 2 Door hinges 3 Waveguide cover: DO...
... pad to turn light on or off. 11 Fan Hi/Lo pad Press the Fan Hi/Lo pad to turn on the fan. FRONT VIEW Part Names 14 13 12 15 16 BOTTOM VIEW 17 (Front of microwave oven) 1 Microwave oven door with see-through window 2 Door hinges 3 Waveguide cover: DO...
Use and Care Manual
Page 9
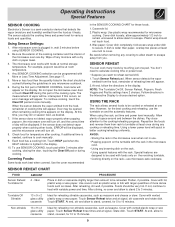
... be opened when remaining cooking time appears on and the automatic features. Touch Sensor Reheat twice and at least once during this part of space around and between the dishes. Touch HELP pad when the HELP indicator is plugged in any moisture with vented plastic wrap...and allow steam to reheat canned chili. 1. Touch Sensor Reheat three times and at signal, rotate dish. Operating Instructions Special Features SENSOR COOKING Electrolux's Sensor is a semi-conductor device that detects the vapor (moisture and humidity) emitted from you. If the sensor does not detect vapor ...
... be opened when remaining cooking time appears on and the automatic features. Touch Sensor Reheat twice and at least once during this part of space around and between the dishes. Touch HELP pad when the HELP indicator is plugged in any moisture with vented plastic wrap...and allow steam to reheat canned chili. 1. Touch Sensor Reheat three times and at signal, rotate dish. Operating Instructions Special Features SENSOR COOKING Electrolux's Sensor is a semi-conductor device that detects the vapor (moisture and humidity) emitted from you. If the sensor does not detect vapor ...
Use and Care Manual
Page 18
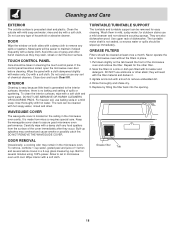
... non-abrasive scouring sponge. To remove, combine 1 cup water, grated peel and juice of dishwasher. Replace by fitting the filter back into the opening. Metal parts will react with a soft cloth. therefore, there is precoated steel and plastic. Carefully wipe with hot water and detergent. The turntable motor shaft is located...
... non-abrasive scouring sponge. To remove, combine 1 cup water, grated peel and juice of dishwasher. Replace by fitting the filter back into the opening. Metal parts will react with a soft cloth. therefore, there is precoated steel and plastic. Carefully wipe with hot water and detergent. The turntable motor shaft is located...
Use and Care Manual
Page 19
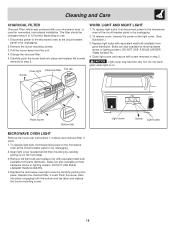
...step 2. Close light cover and secure with screw removed in step 2. Remove old light bulb and replace only with equivalent watt bulb available from parts distributor. DO NOT USE BULB LARGER THAN 30 WATTS. 4. Replace the microwave oven light cover by carefully pulling up on use. 1. Replace...filter, if used . Cleaning and Care CHARCOAL FILTER Charcoal Filter, which was enclosed with your microwave oven, is on. Pull the louver away from parts distributor. To release cover, remove the screw on the light cover. (See illustration.) 3. To replace light bulb, first disconnect power to 12 ...
...step 2. Close light cover and secure with screw removed in step 2. Remove old light bulb and replace only with equivalent watt bulb available from parts distributor. DO NOT USE BULB LARGER THAN 30 WATTS. 4. Replace the microwave oven light cover by carefully pulling up on use. 1. Replace...filter, if used . Cleaning and Care CHARCOAL FILTER Charcoal Filter, which was enclosed with your microwave oven, is on. Pull the louver away from parts distributor. To release cover, remove the screw on the light cover. (See illustration.) 3. To replace light bulb, first disconnect power to 12 ...
Use and Care Manual
Page 21
...the and the exclusions listed below : 1. The date on models with original serial numbers that have other than genuine Electrolux parts; Service under NORMAL purchase date. All warranties are subject to change or to add to obtain and keep all receipts... bill of our obligations under this warranty must be obtained by servicers other than Electrolux Home Products, Inc., Electrolux Canada Corp., or their authorized servicers; or Electrolux Canada Corp. Our obligations for service and parts under this warranty. All of the provisions of the full and limited warranties above...
...the and the exclusions listed below : 1. The date on models with original serial numbers that have other than genuine Electrolux parts; Service under NORMAL purchase date. All warranties are subject to change or to add to obtain and keep all receipts... bill of our obligations under this warranty must be obtained by servicers other than Electrolux Home Products, Inc., Electrolux Canada Corp., or their authorized servicers; or Electrolux Canada Corp. Our obligations for service and parts under this warranty. All of the provisions of the full and limited warranties above...
Installation Instructions
Page 2
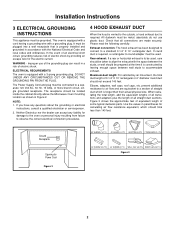
...providing an escape wire for the electric current. In the event of an electrical short circuit, grounding reduces risk of some typical ductwork parts. If you have any liability for Power Cord Figure 2 Figure 3 2 Please read the following carefully: Exhaust connection: The hood ..., care should be grounded. All ductwork must be metal; If round duct is to a standard 3-1/4" X 10" rectangular duct. Neither Electrolux nor the dealer can result in Figure 2. Ground Receptacle Opening for damage to the oven or personal injury resulting from failure to observe the ...
...providing an escape wire for the electric current. In the event of an electrical short circuit, grounding reduces risk of some typical ductwork parts. If you have any liability for Power Cord Figure 2 Figure 3 2 Please read the following carefully: Exhaust connection: The hood ..., care should be grounded. All ductwork must be metal; If round duct is to a standard 3-1/4" X 10" rectangular duct. Neither Electrolux nor the dealer can result in Figure 2. Ground Receptacle Opening for damage to the oven or personal injury resulting from failure to observe the ...
Installation Instructions
Page 3
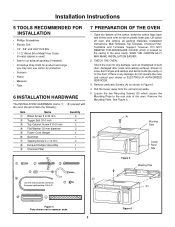
...the oven over to common scale. 3 Figure 6 Check the oven for any damage, do not operate the oven and contact your dealer or ELECTROLUX AUTHORIZED SERVICER. 3. Loosen the two Mounting Screws (D) which is any damage, such as shown in the oven cavity. you may also use... is located on the door. Remove the Mounting Plate. See Figure 6. (A) (A) (A) (A) Mounting Plate Control Panel Side Figure 5 Mounting Plate (D) (D) Figure 4 Parts shown not to rest on plastic foam pad. however, DO NOT REMOVE THE WAVEGUIDE COVER, which secure the Mounting Plate to cut exhaust opening (if...
...the oven over to common scale. 3 Figure 6 Check the oven for any damage, do not operate the oven and contact your dealer or ELECTROLUX AUTHORIZED SERVICER. 3. Loosen the two Mounting Screws (D) which is any damage, such as shown in the oven cavity. you may also use... is located on the door. Remove the Mounting Plate. See Figure 6. (A) (A) (A) (A) Mounting Plate Control Panel Side Figure 5 Mounting Plate (D) (D) Figure 4 Parts shown not to rest on plastic foam pad. however, DO NOT REMOVE THE WAVEGUIDE COVER, which secure the Mounting Plate to cut exhaust opening (if...
Parts Catalog
Page 3
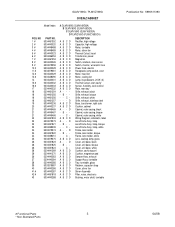
... 23 23 23 24 24 24 25 26 26 26 28 29 36 37 38 39 40 41 # 42 # 43 PART NO. 5304461352 5304440020 5304448488 5304448489 5304440023 5304456053 5304461353 5304440026 5303319559 5304440028 5303319561 5304440029 5304448490 5304440031 5304440032 5304440033 5304440232 5304461354 5304461355 5304461356 5304461357..., capacitor strap Cover, stirrer fan Stirrer Assembly Filter, noise, electronic Bushing, motor shaft, turntable Publication No: 5995511390 # Functional Parts 3 * Non-Illustrated Parts 04/08 B- - - GLMV169G / PLMVZ169G OVEN,CABINET Model Index: POS. D - D - CA B C D A- -
... 23 23 23 24 24 24 25 26 26 26 28 29 36 37 38 39 40 41 # 42 # 43 PART NO. 5304461352 5304440020 5304448488 5304448489 5304440023 5304456053 5304461353 5304440026 5303319559 5304440028 5303319561 5304440029 5304448490 5304440031 5304440032 5304440033 5304440232 5304461354 5304461355 5304461356 5304461357..., capacitor strap Cover, stirrer fan Stirrer Assembly Filter, noise, electronic Bushing, motor shaft, turntable Publication No: 5995511390 # Functional Parts 3 * Non-Illustrated Parts 04/08 B- - - GLMV169G / PLMVZ169G OVEN,CABINET Model Index: POS. D - D - CA B C D A- -

Parts Catalog
Page 5
...4mm x 8mm Screw, wrapper, back Screw Screw, unit mounting Screw, 3mm x 8mm Screw, black Screw, bisque Screw, white Publication No: 5995511390 # Functional Parts 5 * Non-Illustrated Parts 04/08 D A- - D A- - NO 44 45 46 # 47 48 49 50 51 52 53 54 55 57 58 59 60 # 61 62... 83 90 91 92 93 94 96 # 97 98 99 100 101 102 103 103 103 PART NO. 5304440289 5304440290 5304440291 5303319605 5304440292 5304440293 5304440294 5304440295 5304461366 5304461367 5304451828 5304440299 5304440301 5304440302 5304440303 5304458211 5304441371 5304441372 5303319636 5304440333 5304440334 5304440335...
...4mm x 8mm Screw, wrapper, back Screw Screw, unit mounting Screw, 3mm x 8mm Screw, black Screw, bisque Screw, white Publication No: 5995511390 # Functional Parts 5 * Non-Illustrated Parts 04/08 D A- - D A- - NO 44 45 46 # 47 48 49 50 51 52 53 54 55 57 58 59 60 # 61 62... 83 90 91 92 93 94 96 # 97 98 99 100 101 102 103 103 103 PART NO. 5304440289 5304440290 5304440291 5303319605 5304440292 5304440293 5304440294 5304440295 5304461366 5304461367 5304451828 5304440299 5304440301 5304440302 5304440303 5304458211 5304441371 5304441372 5303319636 5304440333 5304440334 5304440335...

Parts Catalog
Page 7
...69 71 72 73 73 73 73 74 75 76 77 78 79 80 81 82 86 86 88 # 89 # 95 97 PART NO. 5304440245 5304461358 5304461359 5304461360 5304461361 5304443989 5304461363 5304461364 5304461365 5304458568 5304456930 5304440300 5304461368 5304461369 5304461370 5304461371 5304461372 5304461373 5304461374 5304466769 5304440314 5304440316 5304440320..., 30mm, (2) Template, installation, top Template, installation, wall Wire, high voltage-A Wiring Harness, main-A Rack, microwave oven, wire Screw, 4 mm x 12 mm # Functional Parts 7 * Non-Illustrated Parts 04/08 Publication No: 5995511390 Model Index: POS.
...69 71 72 73 73 73 73 74 75 76 77 78 79 80 81 82 86 86 88 # 89 # 95 97 PART NO. 5304440245 5304461358 5304461359 5304461360 5304461361 5304443989 5304461363 5304461364 5304461365 5304458568 5304456930 5304440300 5304461368 5304461369 5304461370 5304461371 5304461372 5304461373 5304461374 5304466769 5304440314 5304440316 5304440320..., 30mm, (2) Template, installation, top Template, installation, wall Wire, high voltage-A Wiring Harness, main-A Rack, microwave oven, wire Screw, 4 mm x 12 mm # Functional Parts 7 * Non-Illustrated Parts 04/08 Publication No: 5995511390 Model Index: POS.


