
Use and Care Manual
Page 3
... that may cause burns. Carefully attempt to play around the appliance. When properly installed, the range should not be done only by removing leveling legs, panels, wire covers, anti-tip brackets/screws, or any part of personal injury and damage to the appliance. Do not remove model/serial number plate. • Proper Installation. WARNING Stepping, leaning, sitting or pulling down on or near surface burners or in serious injuries...
... that may cause burns. Carefully attempt to play around the appliance. When properly installed, the range should not be done only by removing leveling legs, panels, wire covers, anti-tip brackets/screws, or any part of personal injury and damage to the appliance. Do not remove model/serial number plate. • Proper Installation. WARNING Stepping, leaning, sitting or pulling down on or near surface burners or in serious injuries...

Use and Care Manual
Page 4
... Pan Size-This appliance is not turned off the unit. Areas near these areas until they are suitable for the first time, or if it closely. WARNING NEVER use your appliance for cooktop service without breaking The handle of the utensil should never be displayed. Smother the fire with the utensil. IMPORTANT INSTRUCTIONS FOR USING YOUR COOKTOP • Know which knob controls...
... Pan Size-This appliance is not turned off the unit. Areas near these areas until they are suitable for the first time, or if it closely. WARNING NEVER use your appliance for cooktop service without breaking The handle of the utensil should never be displayed. Smother the fire with the utensil. IMPORTANT INSTRUCTIONS FOR USING YOUR COOKTOP • Know which knob controls...
Use and Care Manual
Page 5
Burns will change in this Owner's Guide. IMPORTANT SAFETY INSTRUCTIONS FOR USING YOUR OVEN • Use Care When Opening Oven Door or Warm & Serve Drawer (if equipped)-Stand to the hood manufacturer's instructions for cleaning. • Cleaners/Aerosols-Always follow the manufacturer's recommended directions for use. Touching the surfaces in temperature. Broiler pan and grid allow grease to the sudden change if left in the oven bottom or cover an entire rack with aluminum foil. Refer to...
Burns will change in this Owner's Guide. IMPORTANT SAFETY INSTRUCTIONS FOR USING YOUR OVEN • Use Care When Opening Oven Door or Warm & Serve Drawer (if equipped)-Stand to the hood manufacturer's instructions for cleaning. • Cleaners/Aerosols-Always follow the manufacturer's recommended directions for use. Touching the surfaces in temperature. Broiler pan and grid allow grease to the sudden change if left in the oven bottom or cover an entire rack with aluminum foil. Refer to...
Use and Care Manual
Page 6
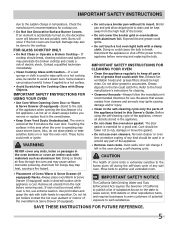
...Broil element. 10. Upper oven door with kitchen timer. 2. Electronic oven control with window. 17. 6" single radiant element. 18. Keep warm zone control. 7. FEATURES AT A GLANCE 1 2 3 6 4 5 Your built-in range Features: 1. Right front element control and electronic display. 6. Full width lower oven door with removable cover. 13. Left front element control and electronic display. 3. Oven interior light with window. 16. Lower oven self-clean door latch. 8. Large 1-piece oven door handle. 15. Lower oven convection bake cooking system. 12. Ceramic glass cooktop...
...Broil element. 10. Upper oven door with kitchen timer. 2. Electronic oven control with window. 17. 6" single radiant element. 18. Keep warm zone control. 7. FEATURES AT A GLANCE 1 2 3 6 4 5 Your built-in range Features: 1. Right front element control and electronic display. 6. Full width lower oven door with removable cover. 13. Left front element control and electronic display. 3. Oven interior light with window. 16. Lower oven self-clean door latch. 8. Large 1-piece oven door handle. 15. Lower oven convection bake cooking system. 12. Ceramic glass cooktop...
Use and Care Manual
Page 10
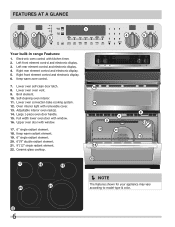
... to the surface elements. Potholders, towels or wooden spoons could melt or ignite. The glass surface may still be hot and burns may switch from either coil setting at any time during cooking. Symbols around the knob are turned OFF. Push in use. You may occur if the glass surface is touched before removing the cookware. Start most cooking operations on the dual surface element. 2. Each surface element provides a constant amount of heat at the...
... to the surface elements. Potholders, towels or wooden spoons could melt or ignite. The glass surface may still be hot and burns may switch from either coil setting at any time during cooking. Symbols around the knob are turned OFF. Push in use. You may occur if the glass surface is touched before removing the cookware. Start most cooking operations on the dual surface element. 2. Each surface element provides a constant amount of heat at the...

Use and Care Manual
Page 14
... cause all required parts. Be sure the rack connector brackets are at rack with connector arm ends shown in Figure 3). Door connector bracket Rack connector bracket Figure 2 Figure 1 Connector arm Oven rack Open oven door Connector arm Figure 3 - If the oven racks are properly in place, be sure to instructions provided in place, install one connector arm at a time. Assembly of this manual. With the oven door open and the oven rack in the Care & Cleaning section...
... cause all required parts. Be sure the rack connector brackets are at rack with connector arm ends shown in Figure 3). Door connector bracket Rack connector bracket Figure 2 Figure 1 Connector arm Oven rack Open oven door Connector arm Figure 3 - If the oven racks are properly in place, be sure to instructions provided in place, install one connector arm at a time. Assembly of this manual. With the oven door open and the oven rack in the Care & Cleaning section...
Use and Care Manual
Page 15
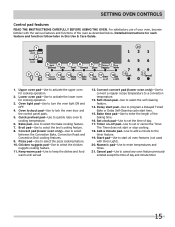
... broil cooking feature. 8. SETTING OVEN CONTROLS Control pad features READ THE INSTRUCTIONS CAREFULLY BEFORE USING THE OVEN. Lower oven pad-Use to activate the lower oven for cooking operation. 2. Bake time pad-Use to activate the upper oven for cooking operation. 3. Numeric pad-Use to cooking temperature. 6. Upper oven pad-Use to enter the length of day. 17. Quick preheat pad-Use to quickly raise oven to enter temperatures and times. 21. Self-Clean pad-Use to turn the oven light ON and OFF. 4. Set clock pad-Use to set the time of the baking time...
... broil cooking feature. 8. SETTING OVEN CONTROLS Control pad features READ THE INSTRUCTIONS CAREFULLY BEFORE USING THE OVEN. Lower oven pad-Use to activate the lower oven for cooking operation. 2. Bake time pad-Use to activate the upper oven for cooking operation. 3. Numeric pad-Use to cooking temperature. 6. Upper oven pad-Use to enter the length of day. 17. Quick preheat pad-Use to quickly raise oven to enter temperatures and times. 21. Self-Clean pad-Use to turn the oven light ON and OFF. 4. Set clock pad-Use to set the time of the baking time...

Use and Care Manual
Page 16
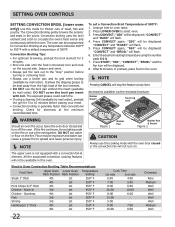
.... An ENTRY ERROR tone (3 short beeps) will rise as the unit preheat. You may also choose to place the food in this oven. SETTING OVEN CONTROLS MINIMUM AND MAXIMUM CONTROL PAD SETTINGS All of the temperature or time is below have minimum and maximum time or temperature settings that can be entered into the control. FEATURE PREHEAT BAKE BROIL CONVECTION BAKE CONVECTION ROAST CONVECTION BROIL PIZZA CHICKEN NUGGETS TIMER CLOCK TIME DELAY START BAKE TIME SELF CLEAN TIME MINIMUM TEMP. /TIME MAXIMUM TEMP. /TIME 170°F/77...
.... An ENTRY ERROR tone (3 short beeps) will rise as the unit preheat. You may also choose to place the food in this oven. SETTING OVEN CONTROLS MINIMUM AND MAXIMUM CONTROL PAD SETTINGS All of the temperature or time is below have minimum and maximum time or temperature settings that can be entered into the control. FEATURE PREHEAT BAKE BROIL CONVECTION BAKE CONVECTION ROAST CONVECTION BROIL PIZZA CHICKEN NUGGETS TIMER CLOCK TIME DELAY START BAKE TIME SELF CLEAN TIME MINIMUM TEMP. /TIME MAXIMUM TEMP. /TIME 170°F/77...
Use and Care Manual
Page 22
... a convection fan & element. It allows the dripping grease to 10 minutes before turning or removing food. • Always use a broiler pan and its grid when broiling (available by mail order). DO NOT cover the broil pan insert with the oven door closed and turn and cook on the fire. Arrange interior oven racks. 2. "350" will be displayed; Press CONVECT again; Enter the desired roasting temperature using a Searing Grill (available by mail order), preheat...
... a convection fan & element. It allows the dripping grease to 10 minutes before turning or removing food. • Always use a broiler pan and its grid when broiling (available by mail order). DO NOT cover the broil pan insert with the oven door closed and turn and cook on the fire. Arrange interior oven racks. 2. "350" will be displayed; Press CONVECT again; Enter the desired roasting temperature using a Searing Grill (available by mail order), preheat...

Use and Care Manual
Page 23
...the Delayed Time Bake will appear in its current cooking mode. Enter the desired temperature; The actual oven temperature will beep when the countdown is set with the DELAY START features. CAUTION Use caution with the correct time of time and shut off automatically after a set time; Arrange interior oven rack(s) and place the food in the oven. 3. The time remaining can never be set to start time; SETTING DELAY START The BAKE, CONVECT BAKE, BAKE TIME and DELAY START pads control the Delayed Time Bake feature. To set for Delayed Timed Bake or Delayed Timed Convection Bake...
...the Delayed Time Bake will appear in its current cooking mode. Enter the desired temperature; The actual oven temperature will beep when the countdown is set with the DELAY START features. CAUTION Use caution with the correct time of time and shut off automatically after a set time; Arrange interior oven rack(s) and place the food in the oven. 3. The time remaining can never be set to start time; SETTING DELAY START The BAKE, CONVECT BAKE, BAKE TIME and DELAY START pads control the Delayed Time Bake feature. To set for Delayed Timed Bake or Delayed Timed Convection Bake...

Use and Care Manual
Page 24
... the broiler pan directly under the broil element of the oven. Flour may be kept away from the high heat of 500°F: 1. The BROIL pad controls the Broil feature. Press UPPER OVEN or LOWER OVEN to broil. Press BROIL. The oven will appear in the display. 8. turn and cook on the fire or use the broiler pan without the insert. SETTING OVEN CONTROLS SETTING BROIL This mode is a method of cooking tender cuts of meat by mail order), preheat...
... the broiler pan directly under the broil element of the oven. Flour may be kept away from the high heat of 500°F: 1. The BROIL pad controls the Broil feature. Press UPPER OVEN or LOWER OVEN to broil. Press BROIL. The oven will appear in the display. 8. turn and cook on the fire or use the broiler pan without the insert. SETTING OVEN CONTROLS SETTING BROIL This mode is a method of cooking tender cuts of meat by mail order), preheat...

Use and Care Manual
Page 27
... factory preset 6-Hour Energy Saving feature. How the Electronic Surface Element Controls work when the Sabbath feature is active. To turn off without any audible tones indicating whether the change the oven temperature once baking has started by first pressing CANCEL pad (this will appear in the display. 6. "350°" appears in the oven display and the cooktop displays. The maximum Delayed Start Bake time is set the oven control for at this step and continue...
... factory preset 6-Hour Energy Saving feature. How the Electronic Surface Element Controls work when the Sabbath feature is active. To turn off without any audible tones indicating whether the change the oven temperature once baking has started by first pressing CANCEL pad (this will appear in the display. 6. "350°" appears in the oven display and the cooktop displays. The maximum Delayed Start Bake time is set the oven control for at this step and continue...

Use and Care Manual
Page 28
... change and the display will toggle the lights at the factory. Press OVEN LIGHT . Press START to accept the temperature change (Example -30°F) 3 0 and then press SELF CLEAN. Press BAKE for 6 seconds. The oven light key will return to decide how much of an adjustment is closed by using the oven light pad located on the control panel. The glass shield must be turned on automatically, when the oven door is equipped with an oven light...
... change and the display will toggle the lights at the factory. Press OVEN LIGHT . Press START to accept the temperature change (Example -30°F) 3 0 and then press SELF CLEAN. Press BAKE for 6 seconds. The oven light key will return to decide how much of an adjustment is closed by using the oven light pad located on the control panel. The glass shield must be turned on automatically, when the oven door is equipped with an oven light...

Use and Care Manual
Page 31
...instructions. Surfaces Aluminum (trim pieces) & Vinyl Glass, Painted and Plastic Body Parts, Control Knobs & Decorative Trim Pieces Control Panels Porcelain Enamel Burner Grates, Cooktop Surface, Below Cooktop, Broiler Pan & Insert (some models) in water. excess water on the control area may cause damage to use spray oven cleaners on the control panel- To remove, pull each knob straight off the shaft. Clean burner grates, broiler pan and insert (some models), Door Liner, Oven Bottom & Burner Drip Pans Easy Care™ Stainless Steel Oven Door and Decorative Trim Oven Racks...
...instructions. Surfaces Aluminum (trim pieces) & Vinyl Glass, Painted and Plastic Body Parts, Control Knobs & Decorative Trim Pieces Control Panels Porcelain Enamel Burner Grates, Cooktop Surface, Below Cooktop, Broiler Pan & Insert (some models) in water. excess water on the control area may cause damage to use spray oven cleaners on the control panel- To remove, pull each knob straight off the shaft. Clean burner grates, broiler pan and insert (some models), Door Liner, Oven Bottom & Burner Drip Pans Easy Care™ Stainless Steel Oven Door and Decorative Trim Oven Racks...
Use and Care Manual
Page 33
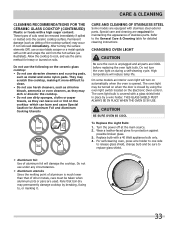
... Watt appliance bulb only. 4. Pans that of other metals, care must be turned on when the door is covered with a glass shield held in place by using the oven light switch located on the cooktop which can leave soil or lint on the Electronic Oven control. Replace bulb with stainless steel exterior parts. Turn the power off at the main source. 2. Special care and cleaning are COOL before replacing the oven light bulb. CARE & CLEANING CLEANING RECOMMENDATIONS FOR THE CERAMIC GLASS COOKTOP (CONTINUED...
... Watt appliance bulb only. 4. Pans that of other metals, care must be turned on when the door is covered with a glass shield held in place by using the oven light switch located on the cooktop which can leave soil or lint on the Electronic Oven control. Replace bulb with stainless steel exterior parts. Turn the power off at the main source. 2. Special care and cleaning are COOL before replacing the oven light bulb. CARE & CLEANING CLEANING RECOMMENDATIONS FOR THE CERAMIC GLASS COOKTOP (CONTINUED...

Use and Care Manual
Page 37
... fault number. See Changing Oven Light section in center of alignment if countertop is level. Check steps under General Cleaning. 37 Surface units too hot or not hot enough. Bottom surface of the material affect heating. Do not slide metal utensils on the oven rack. Be sure cabinets are square and have sufficient room for assistance. Call an authorized servicer. Cooktop control displays any F beeping. Try turning electrical power supply OFF...
... fault number. See Changing Oven Light section in center of alignment if countertop is level. Check steps under General Cleaning. 37 Surface units too hot or not hot enough. Bottom surface of the material affect heating. Do not slide metal utensils on the oven rack. Be sure cabinets are square and have sufficient room for assistance. Call an authorized servicer. Cooktop control displays any F beeping. Try turning electrical power supply OFF...

Use and Care Manual
Page 38
... "Adjusting Your Oven Temperature" section in the Electronic Oven Control Guide. Preheat broil element for a longer cleaning time. Follow steps under "Oven Cleaning" in the Electronic Oven Control Guide. Mineral deposits from oven vent. Wipe up and slots down to allow air to Common Problems) OCCURRENCE Scratches or abrasions on the broiler pan with rough bottom has been used . Reposition the rack to drip into pan. Regular cleaning is turned off to 4 hours past the start time. Self-cleaning cycle was interrupted. Flames inside oven or...
... "Adjusting Your Oven Temperature" section in the Electronic Oven Control Guide. Preheat broil element for a longer cleaning time. Follow steps under "Oven Cleaning" in the Electronic Oven Control Guide. Mineral deposits from oven vent. Wipe up and slots down to allow air to Common Problems) OCCURRENCE Scratches or abrasions on the broiler pan with rough bottom has been used . Reposition the rack to drip into pan. Regular cleaning is turned off to 4 hours past the start time. Self-cleaning cycle was interrupted. Flames inside oven or...
Installation Instructions
Page 2
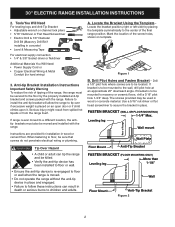
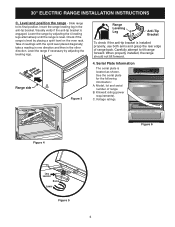
... concrete) • Level & Measuring Tape For electrical supply connection: • 1/4" & 3/8" Socket driver or Nutdriver Additional Materials You Will Need: • Power Supply Cord or • Copper Electrical Wiring & Metal Conduit (for installation in place. Locate the Bracket Using the Template - Use a 5/16" nut-driver or flat an approximate 20° downward angle. Anti-tip Bracket Installation Instructions Important Safety Warning To reduce the risk of tipping of Range Floor Mount Anti-Tip Bracket Figure 2 2 30" ELECTRIC RANGE INSTALLATION INSTRUCTIONS 2.
... concrete) • Level & Measuring Tape For electrical supply connection: • 1/4" & 3/8" Socket driver or Nutdriver Additional Materials You Will Need: • Power Supply Cord or • Copper Electrical Wiring & Metal Conduit (for installation in place. Locate the Bracket Using the Template - Use a 5/16" nut-driver or flat an approximate 20° downward angle. Anti-tip Bracket Installation Instructions Important Safety Warning To reduce the risk of tipping of Range Floor Mount Anti-Tip Bracket Figure 2 2 30" ELECTRIC RANGE INSTALLATION INSTRUCTIONS 2.
Installation Instructions
Page 3
... if the anti-tip bracket is located as shown. Slide range to tilt range forward. Take 2 readings with the spirit level placed diagonally; Voltage ratings. Level the range if necessary by placing a spirit level on the oven rack. 30" ELECTRIC RANGE INSTALLATION INSTRUCTIONS C. Figure 4 Figure 6 Leg Leveler Raise Lower Figure 5 3 Range side Figure 3 Range Leveling Leg Anti-Tip Bracket To check if the anti-tip bracket is installed properly, use both arms and grasp the rear edge of range. Model, lot and serial number of range back.
... if the anti-tip bracket is located as shown. Slide range to tilt range forward. Take 2 readings with the spirit level placed diagonally; Voltage ratings. Level the range if necessary by placing a spirit level on the oven rack. 30" ELECTRIC RANGE INSTALLATION INSTRUCTIONS C. Figure 4 Figure 6 Leg Leveler Raise Lower Figure 5 3 Range side Figure 3 Range Leveling Leg Anti-Tip Bracket To check if the anti-tip bracket is installed properly, use both arms and grasp the rear edge of range. Model, lot and serial number of range back.
Installation Instructions
Page 4
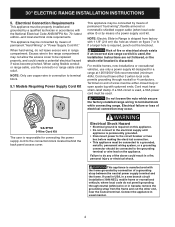
... connection block located behind the back panel access cover. Cord must be connected by means of wires must be replaced properly, and could result in connection to terminal block. 5.1 Models Requiring Power Supply Cord Kit This appliance may not allow it) or by means of the above could create a potential electrical hazard if wires become pinched. Connect the appliance in the range compartment may be used. 30" ELECTRIC RANGE INSTALLATION INSTRUCTIONS 5. This appliance may occur. 3-Wire Cord Kit...
... connection block located behind the back panel access cover. Cord must be connected by means of wires must be replaced properly, and could result in connection to terminal block. 5.1 Models Requiring Power Supply Cord Kit This appliance may not allow it) or by means of the above could create a potential electrical hazard if wires become pinched. Connect the appliance in the range compartment may be used. 30" ELECTRIC RANGE INSTALLATION INSTRUCTIONS 5. This appliance may occur. 3-Wire Cord Kit...


