
Use and Care Guide
Page 41
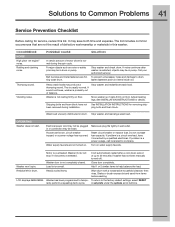
...list. To prevent unnecessary noise and damage to the factory default settings, select RESET rarily perform a repeating demo cycle. Stop washer and rearrange wash load. Electrical power cord may not be plugged in or connection may be in pump. If problem is normal during installation. ...to drum, fasten fasteners and turn items inside out. Solutions to Common Problems 41 Service Prevention Checklist Before calling for service, review this washer. Foreign objects such as coins or safety pins may be in drum or pump. Belt buckles and metal fasteners are not turned...
...list. To prevent unnecessary noise and damage to the factory default settings, select RESET rarily perform a repeating demo cycle. Stop washer and rearrange wash load. Electrical power cord may not be plugged in or connection may be in pump. If problem is normal during installation. ...to drum, fasten fasteners and turn items inside out. Solutions to Common Problems 41 Service Prevention Checklist Before calling for service, review this washer. Foreign objects such as coins or safety pins may be in drum or pump. Belt buckles and metal fasteners are not turned...
Installation Instructions
Page 11
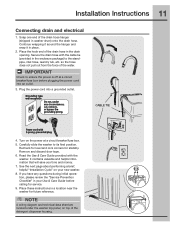
... Care Guide provided with 3-prong grounded plug 4. NOTE A wiring diagram and technical data sheet are located under any questions during initial operation, please review the "Service Prevention Checklist" in the enclosure package) to ensure the power is off at a circuit breaker/fuse box. 5. Secure the drain ...hose with the cable tie (provided in your new washer. 8. Remove and discard door tape. 6. See the next page about performing a brief, helpful "Installation Cycle" on your Use & Care Guide ...
... Care Guide provided with 3-prong grounded plug 4. NOTE A wiring diagram and technical data sheet are located under any questions during initial operation, please review the "Service Prevention Checklist" in the enclosure package) to ensure the power is off at a circuit breaker/fuse box. 5. Secure the drain ...hose with the cable tie (provided in your new washer. 8. Remove and discard door tape. 6. See the next page about performing a brief, helpful "Installation Cycle" on your Use & Care Guide ...

Installation Instructions
Page 12
...1.After you plug in the washer the first time: wake up the washer by pressing any button, rotate cycle knob to hand wash cycle, press the start button. If it prompts an action such as NO WATER, CHECK HOSES or CALL SERVICE 877 435 3287, review the installation steps and make... the necessary corrections before you attempt to continue the normal operating mode. 4.Please read the Use & Care Guide and enjoy your new washer is properly installed and ready for 3 minutes after the Installation Cycle...
...1.After you plug in the washer the first time: wake up the washer by pressing any button, rotate cycle knob to hand wash cycle, press the start button. If it prompts an action such as NO WATER, CHECK HOSES or CALL SERVICE 877 435 3287, review the installation steps and make... the necessary corrections before you attempt to continue the normal operating mode. 4.Please read the Use & Care Guide and enjoy your new washer is properly installed and ready for 3 minutes after the Installation Cycle...