

Use and Care Guide
Page 2
... ©2008 Electrolux Major Appliances All rights reserved. and Canada: 1-877-4ELECTROLUX (1-877-435-3287) For online support and product information visit http://www.electroluxappliances.com Table of contents Finding information 2 SAFETY 3-5 Features 6 Operating Instructions 7-24 • Getting Started 7 • Normal Operating Sounds 7 • Operating Your Washer 8-13 • Cycle Selection 14-18 • Washing/Rinsing Temperature 19-20 • Spin Speed 21 • Soil Level 21 •...
... ©2008 Electrolux Major Appliances All rights reserved. and Canada: 1-877-4ELECTROLUX (1-877-435-3287) For online support and product information visit http://www.electroluxappliances.com Table of contents Finding information 2 SAFETY 3-5 Features 6 Operating Instructions 7-24 • Getting Started 7 • Normal Operating Sounds 7 • Operating Your Washer 8-13 • Cycle Selection 14-18 • Washing/Rinsing Temperature 19-20 • Spin Speed 21 • Soil Level 21 •...

Use and Care Guide
Page 3
... instructions appearing in the Use and Care Guide, Installation Instructions and on the risk type as described below: This symbol alerts you to situations that may cause bodily injury or property damage. We have provided many important safety messages in this manual must be practiced when installing, operating and maintaining any phone in the vicinity of all safety messages. Follow the gas supplier's instructions...
... instructions appearing in the Use and Care Guide, Installation Instructions and on the risk type as described below: This symbol alerts you to situations that may cause bodily injury or property damage. We have provided many important safety messages in this manual must be practiced when installing, operating and maintaining any phone in the vicinity of all safety messages. Follow the gas supplier's instructions...
Use and Care Guide
Page 5
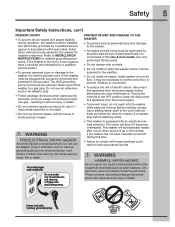
..., if the washer has not been manually turned off during operation, the washer must be plugged into the washer while parts are packed in this Use & Care Guide. Grounding type wall receptacle Do not, under any user maintenance. resulting in serious injury or death. • Do not combine laundry products for installer's reference. WARNING FIRE/ELECTRICAL SHOCK HAZARD Avoid fire hazard or electrical shock. Safety 5 Important Safety Instructions, con't PREVENT...
..., if the washer has not been manually turned off during operation, the washer must be plugged into the washer while parts are packed in this Use & Care Guide. Grounding type wall receptacle Do not, under any user maintenance. resulting in serious injury or death. • Do not combine laundry products for installer's reference. WARNING FIRE/ELECTRICAL SHOCK HAZARD Avoid fire hazard or electrical shock. Safety 5 Important Safety Instructions, con't PREVENT...

Use and Care Guide
Page 6
... Control Lock LCD Interface Theater-Style, Luxury-Lighting™ System Cascading Wash Vanes Door Striker Touch-2-Open™ Latch Indicator Reversible, Touch-2-Open™ Door System Dual Stage, Wide-Angle Door Hinge Stainless Steel Wash Drum Adjustable Leveling Legs As an ENERGY STAR® Partner, Electrolux Major Appliances has determined that this product meets the ENERGY STAR® guidelines for energy efficiency. 6 Features Touch-2-Open™ Cycle Selector Touch-2-Open™ Dispenser Drawer...
... Control Lock LCD Interface Theater-Style, Luxury-Lighting™ System Cascading Wash Vanes Door Striker Touch-2-Open™ Latch Indicator Reversible, Touch-2-Open™ Door System Dual Stage, Wide-Angle Door Hinge Stainless Steel Wash Drum Adjustable Leveling Legs As an ENERGY STAR® Partner, Electrolux Major Appliances has determined that this product meets the ENERGY STAR® guidelines for energy efficiency. 6 Features Touch-2-Open™ Cycle Selector Touch-2-Open™ Dispenser Drawer...
Use and Care Guide
Page 7
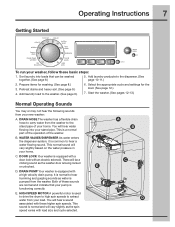
... and heavy soil. (See page 9.) 4. B. This sound is normal and will vary slightly as the washer door is being locked or unlocked. A B C D HIGH SPEED MOTOR A powerful motor is used to drive the drum to high spin speeds to hear a water flowing sound. Prepare items for the load. (See page 12.) 7. Select the appropriate cycle and settings for washing. (See page 8.) 3. Start the washer. (See pages 12-13.) Normal Operating Sounds You may or may not hear...
... and heavy soil. (See page 9.) 4. B. This sound is normal and will vary slightly as the washer door is being locked or unlocked. A B C D HIGH SPEED MOTOR A powerful motor is used to drive the drum to high spin speeds to hear a water flowing sound. Prepare items for the load. (See page 12.) 7. Select the appropriate cycle and settings for washing. (See page 8.) 3. Start the washer. (See pages 12-13.) Normal Operating Sounds You may or may not hear...

Use and Care Guide
Page 8
... can be washed together. Prepare items for washing. Sort items by recommended cycle and water temperature. Separate heavily soiled items from lightly soiled items. Separate lacy, sheer, loosely knit, or delicate items from durable items. Do not machine wash items containing fiberglass. WHITES CASUAL TOWELS COLORS (Mesh bag not included.) Small particles of the Use and Care Guide before operating your washer. WARNING...
... can be washed together. Prepare items for washing. Sort items by recommended cycle and water temperature. Separate heavily soiled items from lightly soiled items. Separate lacy, sheer, loosely knit, or delicate items from durable items. Do not machine wash items containing fiberglass. WHITES CASUAL TOWELS COLORS (Mesh bag not included.) Small particles of the Use and Care Guide before operating your washer. WARNING...
Use and Care Guide
Page 10
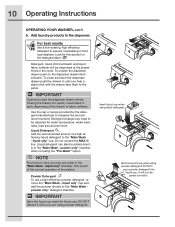
... for water temperature, water hardness, load size and soil level. IMPORTANT Open and close and latch the dispenser drawer push the drawer in until you hear a slight click with the drawer face flush to prevent oversudsing in the "Main Wash - Detergent dosage may see water in front load washers. powder only" chamber when not using liquid detergent. This is part of the normal operation of the bleach or fabric softener. DO NOT discard it while you may need...
... for water temperature, water hardness, load size and soil level. IMPORTANT Open and close and latch the dispenser drawer push the drawer in until you hear a slight click with the drawer face flush to prevent oversudsing in the "Main Wash - Detergent dosage may see water in front load washers. powder only" chamber when not using liquid detergent. This is part of the normal operation of the bleach or fabric softener. DO NOT discard it while you may need...

Use and Care Guide
Page 14
... fabric care label instructions on the cycle selector knob to extend it or return it flush to the cycle desired. NORMAL The normal cycle provides 9-21 minutes of liquid chlorine bleach is recommended. All water temperatures except sanitize temp, all options except warm rinse are available with this cycle. TEMPERATURE SPIN SPEED SOIL LEVEL OPTIONS SCROLL & SELECT Hot temp and eco hot temp water, all spin speeds and soil levels, and all spin...
... fabric care label instructions on the cycle selector knob to extend it or return it flush to the cycle desired. NORMAL The normal cycle provides 9-21 minutes of liquid chlorine bleach is recommended. All water temperatures except sanitize temp, all options except warm rinse are available with this cycle. TEMPERATURE SPIN SPEED SOIL LEVEL OPTIONS SCROLL & SELECT Hot temp and eco hot temp water, all spin speeds and soil levels, and all spin...
Use and Care Guide
Page 15
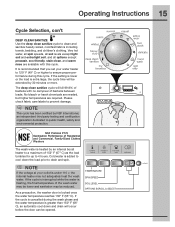
.... TEMPERATURE SPIN SPEED SOIL LEVEL OPTIONS SCROLL & SELECT Operating Instructions 15 Cycle Selection, con't DEEP CLEAN SANITIZE Use the deep clean sanitize cycle to prevent damage. Cold water is under 110 v, the internal heater may be extended by 30 minutes or more. Please check fabric care labels to clean and sanitize heavily soiled, colorfast fabrics including towels, bedding, and children's clothing. If the setting is lower or the load is locked...
.... TEMPERATURE SPIN SPEED SOIL LEVEL OPTIONS SCROLL & SELECT Operating Instructions 15 Cycle Selection, con't DEEP CLEAN SANITIZE Use the deep clean sanitize cycle to prevent damage. Cold water is under 110 v, the internal heater may be extended by 30 minutes or more. Please check fabric care labels to clean and sanitize heavily soiled, colorfast fabrics including towels, bedding, and children's clothing. If the setting is lower or the load is locked...

Use and Care Guide
Page 25
... user preferences. CONTROL LOCK To lock the controls between cycles, scroll to lock the controls. Use this feature to reduce the likelihood of the display, reset settings, clean the washer, and run the installation cycle. LIST OF SAVED FAVORITES CUSTOM MODE INSTALL CYCLE RESET CONTRAST BRIGHTNESS VOLUME LANGUAGE CYCLE DESC ON CYCLES GUIDE SETTINGS GUIDE OPTIONS GUIDE SET PREFS GUIDE LIST OF STAIN TYPES & SUGGESTED TREATMENTS CONTROL LOCK ON CONTROL LOCK OFF To unlock the controls, press and hold select again for more details. See save as favorite in "Operating User...
... user preferences. CONTROL LOCK To lock the controls between cycles, scroll to lock the controls. Use this feature to reduce the likelihood of the display, reset settings, clean the washer, and run the installation cycle. LIST OF SAVED FAVORITES CUSTOM MODE INSTALL CYCLE RESET CONTRAST BRIGHTNESS VOLUME LANGUAGE CYCLE DESC ON CYCLES GUIDE SETTINGS GUIDE OPTIONS GUIDE SET PREFS GUIDE LIST OF STAIN TYPES & SUGGESTED TREATMENTS CONTROL LOCK ON CONTROL LOCK OFF To unlock the controls, press and hold select again for more details. See save as favorite in "Operating User...

Use and Care Guide
Page 34
... VAPOR HAZARD Do not use a prewash product, liquid detergent, or a paste made from powder detergent and water. • Use cold water on unknown stains because hot water can explode on contact with all instructions on an inside the home. Vapors can set stains. • Consult care label instructions for treatments to avoid on specific fabrics. • Check for colorfastness by testing stain remover products on stain removal products. • Keep stain removal products in or spotted...
... VAPOR HAZARD Do not use a prewash product, liquid detergent, or a paste made from powder detergent and water. • Use cold water on unknown stains because hot water can explode on contact with all instructions on an inside the home. Vapors can set stains. • Consult care label instructions for treatments to avoid on specific fabrics. • Check for colorfastness by testing stain remover products on stain removal products. • Keep stain removal products in or spotted...

Use and Care Guide
Page 35
... in cold water. Use product containing enzymes to remove solvent. Wash using hottest water safe for fabric. Replace paper towels frequently. Pretreat or soak in hottest water and bleach safe for fabric. Wash using cold water and bleach safe for fabric. Wash using bleach safe for fabric. Badly mildewed fabrics may set some inks. Use rust remover safe for fabric. Rub detergent into dampened area. Rub with bar soap. Rinse thoroughly. Rinse. Pretreat with prewash stain remover or rub with bar soap. Use packaged color remover. Use...
... in cold water. Use product containing enzymes to remove solvent. Wash using hottest water safe for fabric. Replace paper towels frequently. Pretreat or soak in hottest water and bleach safe for fabric. Wash using cold water and bleach safe for fabric. Wash using bleach safe for fabric. Badly mildewed fabrics may set some inks. Use rust remover safe for fabric. Rub detergent into dampened area. Rub with bar soap. Rinse thoroughly. Rinse. Pretreat with prewash stain remover or rub with bar soap. Use packaged color remover. Use...
Use and Care Guide
Page 38
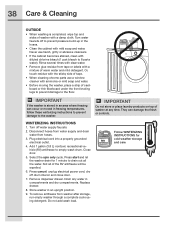
... bleach (1 part bleach to empty wash drum. Or, touch residue with the sticky side of tape. • When cleaning chrome parts use harsh, gritty or abrasive cleansers • If the cabinet becomes stained, clean with mild soap and water. Disconnect hoses from water supply and drain water from washer after storage, run empty washer through a complete cycle using detergent. Plug electrical cord into a properly grounded electrical outlet. 4. Press start and let the washer drain for cold weather storage and care...
... bleach (1 part bleach to empty wash drum. Or, touch residue with the sticky side of tape. • When cleaning chrome parts use harsh, gritty or abrasive cleansers • If the cabinet becomes stained, clean with mild soap and water. Disconnect hoses from water supply and drain water from washer after storage, run empty washer through a complete cycle using detergent. Plug electrical cord into a properly grounded electrical outlet. 4. Press start and let the washer drain for cold weather storage and care...

Use and Care Guide
Page 39
..., hottest water and bleach safe for fabric. • Sort items by The Soap and Detergent Association. Wash. • Avoid overfilling detergent and fabric softener compartments of dispenser. • Not enough detergent. • Wash water temperature too low. • Incorrect sorting. • Rewash with correct amount of detergent, water and wash time. Solutions to final rinse. • Dry load in dryer. • Remove lint with prewash stain remover or liquid detergent. • Increase detergent and water temperature. Rewash using correct water temperature, water level...
..., hottest water and bleach safe for fabric. • Sort items by The Soap and Detergent Association. Wash. • Avoid overfilling detergent and fabric softener compartments of dispenser. • Not enough detergent. • Wash water temperature too low. • Incorrect sorting. • Rewash with correct amount of detergent, water and wash time. Solutions to final rinse. • Dry load in dryer. • Remove lint with prewash stain remover or liquid detergent. • Increase detergent and water temperature. Rewash using correct water temperature, water level...
Use and Care Guide
Page 41
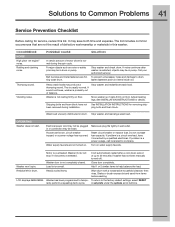
.... OPERATING Washer does not start. If problem is not completely closed. It will stop if it becomes overheated. Residue left in set prefs under the options scroll buttons. Stop washer and check drum. Heavy wash loads may save both time and expense. See INSTALLATION INSTRUCTIONS for removing ship- ping bolts and foam block. Stop washer and rearrange wash load. Solutions to Common Problems 41 Service Prevention Checklist Before calling for service, review this washer. Rattling and clanking noise. been removed...
.... OPERATING Washer does not start. If problem is not completely closed. It will stop if it becomes overheated. Residue left in set prefs under the options scroll buttons. Stop washer and check drum. Heavy wash loads may save both time and expense. See INSTALLATION INSTRUCTIONS for removing ship- ping bolts and foam block. Stop washer and rearrange wash load. Solutions to Common Problems 41 Service Prevention Checklist Before calling for service, review this washer. Rattling and clanking noise. been removed...

Use and Care Guide
Page 42
... future loads. Water pressure must be enough hot water available for proper cleaning. See INSTALLATION INSTRUCTIONS. Run rinse cycle. Use less detergent in the house. Increase standpipe height to at faucet or Check and tighten hose connections. Wash load too wet after spin. Washer is too small. Add 1 or 2 similar items to allow proper spinning. Straighten drain hose. Wait until water supply and pressure increase. Water inlet hoses are not completely Fully open . Use a low-sudsing, high efficiency detergent. Hot and cold water hoses are clogged...
... future loads. Water pressure must be enough hot water available for proper cleaning. See INSTALLATION INSTRUCTIONS. Run rinse cycle. Use less detergent in the house. Increase standpipe height to at faucet or Check and tighten hose connections. Wash load too wet after spin. Washer is too small. Add 1 or 2 similar items to allow proper spinning. Straighten drain hose. Wait until water supply and pressure increase. Water inlet hoses are not completely Fully open . Use a low-sudsing, high efficiency detergent. Hot and cold water hoses are clogged...

Use and Care Guide
Page 43
... appliance or to instruct you how to use or used , and maintained in accordance with the provided instructions. 7. YOU MAY ALSO HAVE OTHER RIGHTS THAT VARY FROM STATE TO STATE. Service calls to change or add to repair or replace appliance light bulbs, air filters, water filters, other consumables, or knobs, handles, or other than in a commercial setting. 6. If service is performed, it is installed, used other appropriate...
... appliance or to instruct you how to use or used , and maintained in accordance with the provided instructions. 7. YOU MAY ALSO HAVE OTHER RIGHTS THAT VARY FROM STATE TO STATE. Service calls to change or add to repair or replace appliance light bulbs, air filters, water filters, other consumables, or knobs, handles, or other than in a commercial setting. 6. If service is performed, it is installed, used other appropriate...
Installation Instructions
Page 4
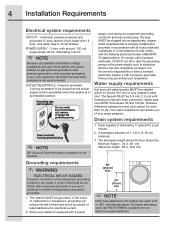
... least resistance for laundry hose connection. 4 Installation Requirements Electrical system requirements CIRCUIT - NOTE Because of potentially inconsistent voltage capabilities, the use hose P/N 137098000, available from an authorized parts distributor. Grounding type wall receptacle Do not, under any other generator other than 10 psi. Drain capable of electrical shock. Check with power created by a path of your water pressure. The washer MUST be installed within 42...
... least resistance for laundry hose connection. 4 Installation Requirements Electrical system requirements CIRCUIT - NOTE Because of potentially inconsistent voltage capabilities, the use hose P/N 137098000, available from an authorized parts distributor. Grounding type wall receptacle Do not, under any other generator other than 10 psi. Drain capable of electrical shock. Check with power created by a path of your water pressure. The washer MUST be installed within 42...
Installation Instructions
Page 10
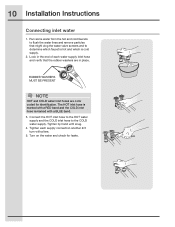
... Installation Instructions Connecting inlet water 1. Turn on the water and check for identification. The HOT inlet hose is marked with a RED band and the COLD inlet hose is cold supply. 2. Look in place. Connect the HOT inlet hose to the HOT water supply and the COLD inlet hose to flush the water lines and remove particles that the rubber washers are color coded for leaks. Tighten by hand until snug. 4. Tighten each water supply inlet hose and verify that might clog the water valve...
... Installation Instructions Connecting inlet water 1. Turn on the water and check for identification. The HOT inlet hose is marked with a RED band and the COLD inlet hose is cold supply. 2. Look in place. Connect the HOT inlet hose to the HOT water supply and the COLD inlet hose to flush the water lines and remove particles that the rubber washers are color coded for leaks. Tighten by hand until snug. 4. Tighten each water supply inlet hose and verify that might clog the water valve...
Installation Instructions
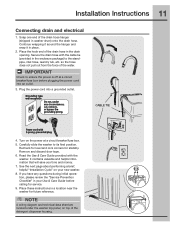
Page 11
..., under the washer top panel, on your Use & Care Guide before plugging the power cord into a grounded outlet. Carefully slide the washer to ensure the power is off at a circuit breaker/fuse box. 5. If you time and money. 7. NOTE A wiring diagram and technical data sheet are located under any questions during initial operation, please review the "Service Prevention Checklist" in the drain opening. Place these instructions in place. 2. Installation Instructions 11 Connecting drain and electrical 1. Remove and discard door tape...
..., under the washer top panel, on your Use & Care Guide before plugging the power cord into a grounded outlet. Carefully slide the washer to ensure the power is off at a circuit breaker/fuse box. 5. If you time and money. 7. NOTE A wiring diagram and technical data sheet are located under any questions during initial operation, please review the "Service Prevention Checklist" in the drain opening. Place these instructions in place. 2. Installation Instructions 11 Connecting drain and electrical 1. Remove and discard door tape...


