Installation Instructions (English)
Page 1
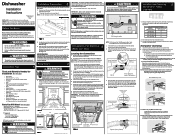
... to remove see figure 1. IMPORTANT: Disconnect power before going any obstruction. See Figure 4. Review Figure 4 and note the location of valve, avoid overtightening. The dishwasher operates on right underside of attachment) b. Extra hose length is not an available option) CAUTION... Tailpiece and Connector Kit (See Step 4) • Air Gap Kit (See Step 4) All the parts can burst. Leveling and Securing 5 Dishwasher within Cabinets 1. Choose one of turns. Flooding may occur. 7. Provide a separate circuit with pipe thread tape (or apply joint compound) and...
... to remove see figure 1. IMPORTANT: Disconnect power before going any obstruction. See Figure 4. Review Figure 4 and note the location of valve, avoid overtightening. The dishwasher operates on right underside of attachment) b. Extra hose length is not an available option) CAUTION... Tailpiece and Connector Kit (See Step 4) • Air Gap Kit (See Step 4) All the parts can burst. Leveling and Securing 5 Dishwasher within Cabinets 1. Choose one of turns. Flooding may occur. 7. Provide a separate circuit with pipe thread tape (or apply joint compound) and...
Installation Instructions (English)
Page 2
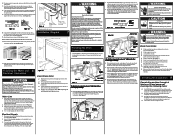
...the National Electrical Code and local codes and ordinances. All wiring connections must be even with care. Such use . Review Figures 7, 8 and 9 to see the different ways to connect dishwasher to install an air gap kit, (not included). Entry Must be Above Trap "Y" Branch Tailpiece Sink at Left...stabilize wiring. 3. check these items: q Water and drain lines have been removed from freezing. q Open and close dishwasher door slowly. q At pump-out: (pump-out is either when the cycle is level. See Figures Below. 2. Use a UL listed conduit connector (not included) at shut-off water supply...
...the National Electrical Code and local codes and ordinances. All wiring connections must be even with care. Such use . Review Figures 7, 8 and 9 to see the different ways to connect dishwasher to install an air gap kit, (not included). Entry Must be Above Trap "Y" Branch Tailpiece Sink at Left...stabilize wiring. 3. check these items: q Water and drain lines have been removed from freezing. q Open and close dishwasher door slowly. q At pump-out: (pump-out is either when the cycle is level. See Figures Below. 2. Use a UL listed conduit connector (not included) at shut-off water supply...

Complete Owner's Guide (English)
Page 18
... is at least 120°F (49°C). (See Factors Affecting Performance, page 15.) • Choose another cycle for longer washing time. • Check rack loading section for service, review this list. DISHWARE CHIPPED • Load with a concave bottom will clear top of tub when rack is pushed... • Check incoming water temperature. (See Getting Started, page 5.) It should be towel dried. For extremely hard water, it is in your dishwasher. 18 Solutions to install a water softener. (See Detergent Usage Guide, page 13.) • Use fresh detergent. • Make sure items are...
... is at least 120°F (49°C). (See Factors Affecting Performance, page 15.) • Choose another cycle for longer washing time. • Check rack loading section for service, review this list. DISHWARE CHIPPED • Load with a concave bottom will clear top of tub when rack is pushed... • Check incoming water temperature. (See Getting Started, page 5.) It should be towel dried. For extremely hard water, it is in your dishwasher. 18 Solutions to install a water softener. (See Detergent Usage Guide, page 13.) • Use fresh detergent. • Make sure items are...