Complete Owner's Guide (English)
Page 1
Use & Care Guide Electric Cooktop Dishwasher 31 8 2 0 3 621 ( 0807) R ev. A
Use & Care Guide Electric Cooktop Dishwasher 31 8 2 0 3 621 ( 0807) R ev. A
Complete Owner's Guide (English)
Page 2
QUESTIONS? Post Office Box 212378, Augusta, Georgia 30917, USA All rights reserved. Printed in the U.S. For toll-free telephone support in the USA 2 Finding Information MAKE A RECORD FOR FUTURE USE Brand Purchase Date Model Number Serial Number NOTE The serial and model numbers may be found on the serial plate located under the cooktop. and Canada: 1-877-4ELECTROLUX (1-877-435-3287) For online support and internet product information: www.electroluxappliances.com ©2008 Electrolux Home Products, Inc.
QUESTIONS? Post Office Box 212378, Augusta, Georgia 30917, USA All rights reserved. Printed in the U.S. For toll-free telephone support in the USA 2 Finding Information MAKE A RECORD FOR FUTURE USE Brand Purchase Date Model Number Serial Number NOTE The serial and model numbers may be found on the serial plate located under the cooktop. and Canada: 1-877-4ELECTROLUX (1-877-435-3287) For online support and internet product information: www.electroluxappliances.com ©2008 Electrolux Home Products, Inc.
Complete Owner's Guide (English)
Page 3
Finding Information 3 TABLE OF CONTENTS Finding Information 2-3 Make a Record for Future use 2 Questions 2 Safety 4-6 Important Safety Instructions 4 Cooktop Features 7-8 Setting Surface Controls 9-18 About the Ceramic Glass Cooktop 9 About the Radiant Surface Elements 9 Locations of the Surface Radiant Elements .......... 10 Using the Touch Control 10 LED Messages or Light Indicators Displayed by Main...
Finding Information 3 TABLE OF CONTENTS Finding Information 2-3 Make a Record for Future use 2 Questions 2 Safety 4-6 Important Safety Instructions 4 Cooktop Features 7-8 Setting Surface Controls 9-18 About the Ceramic Glass Cooktop 9 About the Radiant Surface Elements 9 Locations of the Surface Radiant Elements .......... 10 Using the Touch Control 10 LED Messages or Light Indicators Displayed by Main...
Complete Owner's Guide (English)
Page 4
...CSA C22.1, Part 1 in the literature package for future reference. Do not store explosives, such as aerosol cans, on this cooktop can result in the manuals. Do not repair or replace any other permanent part of the appliance unless specifically recommended in serious ...Canada, and local code requirements. WARNING This symbol will help alert you to situations that may also cause damage to the cooktop. Ask your electric cooktop, follow all instructions given. ! Flammable materials should be stored near the appliance. WARNING Stepping or leaning on or near...
...CSA C22.1, Part 1 in the literature package for future reference. Do not store explosives, such as aerosol cans, on this cooktop can result in the manuals. Do not repair or replace any other permanent part of the appliance unless specifically recommended in serious ...Canada, and local code requirements. WARNING This symbol will help alert you to situations that may also cause damage to the cooktop. Ask your electric cooktop, follow all instructions given. ! Flammable materials should be stored near the appliance. WARNING Stepping or leaning on or near...

Complete Owner's Guide (English)
Page 5
... NEAR THESE UNITS. Safety 5 ! They should be worn while using the appliance. Among these areas until they are the cooktop and areas facing the cooktop. • Wear Proper Apparel. IMPORTANT. Exhaust fan ventilation hoods and grease filters should never be displayed. The use , do... not touch, or let clothing or other flammable materials contact hot surfaces. ! Refer to operate the cooktop during a power failure. CAUTION Do not store items of a pot holder. • Do Not Heat Unopened Food Containers. Children climbing ...
... NEAR THESE UNITS. Safety 5 ! They should be worn while using the appliance. Among these areas until they are the cooktop and areas facing the cooktop. • Wear Proper Apparel. IMPORTANT. Exhaust fan ventilation hoods and grease filters should never be displayed. The use , do... not touch, or let clothing or other flammable materials contact hot surfaces. ! Refer to operate the cooktop during a power failure. CAUTION Do not store items of a pot holder. • Do Not Heat Unopened Food Containers. Children climbing ...
Complete Owner's Guide (English)
Page 6
... turned on, the decorative cover will occur if the hot covers are suitable for future reference. Some cleaners can affect the ceramic-glass cooktop. (This type of flammable materials, and spillage due to the appliance. • Ventilating hood. To reduce the risk of burns, ... filter. Any other reproductive harm, and requires businesses to warn customers of breakage, fusion, or marking that has boiled dry may scratch the cooktop surface. • Do Not Let Pans Boil Dry. Burns will become hot and possibly melt. They may melt. • Protective Liners....
... turned on, the decorative cover will occur if the hot covers are suitable for future reference. Some cleaners can affect the ceramic-glass cooktop. (This type of flammable materials, and spillage due to the appliance. • Ventilating hood. To reduce the risk of burns, ... filter. Any other reproductive harm, and requires businesses to warn customers of breakage, fusion, or marking that has boiled dry may scratch the cooktop surface. • Do Not Let Pans Boil Dry. Burns will become hot and possibly melt. They may melt. • Protective Liners....

Complete Owner's Guide (English)
Page 7
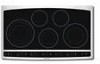
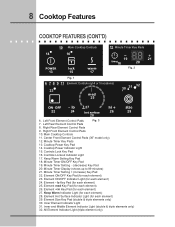
... Element Control Pads 8. Center Front Element Control Pads (Fig. 2 only) 12. Right Rear Single Radiant Element 4. Right Front Element Control Pads 10. Main Cooktop Controls 11. Minute Timer Key Pads 1 3 2 4 POWER lock warm 10 ON OFF med hot surface size 6 ON OFF med hot surface ON OFF med...OFF med hot surface size 6 ON OFF med hot surface ON OFF med hot surface size ON OFF med hot surface 7 11 8 Fig. 2 - 36" Model ON OFF med hot surface size 9 timer 12 Right Front Double radiant Element 5. Center Front Double Radiant Element (Fig. 2 only) 6. The glass...
... Element Control Pads 8. Center Front Element Control Pads (Fig. 2 only) 12. Right Rear Single Radiant Element 4. Right Front Element Control Pads 10. Main Cooktop Controls 11. Minute Timer Key Pads 1 3 2 4 POWER lock warm 10 ON OFF med hot surface size 6 ON OFF med hot surface ON OFF med...OFF med hot surface size 6 ON OFF med hot surface ON OFF med hot surface size ON OFF med hot surface 7 11 8 Fig. 2 - 36" Model ON OFF med hot surface size 9 timer 12 Right Front Double radiant Element 5. Center Front Double Radiant Element (Fig. 2 only) 6. The glass...
Complete Owner's Guide (English)
Page 8
... Element - Element Hot Surface Indicator Light (for each element) 24. All Element Indicator Light (triple element only) Center Front Element Control Pads (36" model only) 12. Inner Element Indicator Light 31. Right Front Element Control Pads 10. Minute Timer ON/OFF Key Pad 19. Minute Timer ... Pad (for each element) 29. Keep Warm Indicator Light (for each element) 27. Element + hi Key Pad (for each element) 23. Main Cooktop Controls 11. Element Size Key Pad (double & triple elements only) 30. Minute Timer Setting - (decrease) Key Pad 20. Minute Timer Display (shows...
... Element - Element Hot Surface Indicator Light (for each element) 24. All Element Indicator Light (triple element only) Center Front Element Control Pads (36" model only) 12. Inner Element Indicator Light 31. Right Front Element Control Pads 10. Minute Timer ON/OFF Key Pad 19. Minute Timer ... Pad (for each element) 29. Keep Warm Indicator Light (for each element) 27. Element + hi Key Pad (for each element) 23. Main Cooktop Controls 11. Element Size Key Pad (double & triple elements only) 30. Minute Timer Setting - (decrease) Key Pad 20. Minute Timer Display (shows...
Complete Owner's Guide (English)
Page 9
... OFF, even at the HI setting is normal and can also occur if the cookware is too small for using correct cookware instructions with the cooktop). Cooktop Appearance POWER lock warm ON OFF med hot surface size ON OFF med hot surface ON OFF med hot surface size ON OFF med hot... surface ON OFF med hot surface size timer Fig. 2 - 36" Model - This helps to prevent damage to provide a uniform and consistent heat during the OFF cycle. The design of the ceramic cooktop outlines the area of the glass. Make sure the diameter of the pan matches the...
... OFF, even at the HI setting is normal and can also occur if the cookware is too small for using correct cookware instructions with the cooktop). Cooktop Appearance POWER lock warm ON OFF med hot surface size ON OFF med hot surface ON OFF med hot surface size ON OFF med hot... surface ON OFF med hot surface size timer Fig. 2 - 36" Model - This helps to prevent damage to provide a uniform and consistent heat during the OFF cycle. The design of the ceramic cooktop outlines the area of the glass. Make sure the diameter of the pan matches the...
Complete Owner's Guide (English)
Page 10
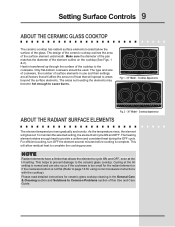
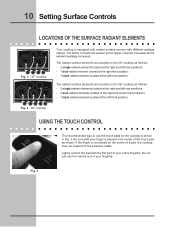
...at the right and center front positions; - 1 triple radiant element located at the left front position; The radiant surface elements are located on the 36" cooktop as follows: - 2 single radiant elements located at the right and left rear positions; - 1 dual radiant element located at the right front position... surface ON OFF med hot surface size ON OFF med hot surface ON OFF med hot surface size timer Fig. 2 - 36" cooktop Your cooktop is equipped with radiant surface burners with the flat part of your entire fingertip. Lightly contact the pad with different wattage ratings....
...at the right and center front positions; - 1 triple radiant element located at the left front position; The radiant surface elements are located on the 36" cooktop as follows: - 2 single radiant elements located at the right and left rear positions; - 1 dual radiant element located at the right front position... surface ON OFF med hot surface size ON OFF med hot surface ON OFF med hot surface size timer Fig. 2 - 36" cooktop Your cooktop is equipped with radiant surface burners with the flat part of your entire fingertip. Lightly contact the pad with different wattage ratings....

Complete Owner's Guide (English)
Page 11
...Timer display digits showing an error code. "E -" (Fig. 5) and a two digit number error code (Fig. 6) will flash in turn on (Fig. 9) if the cooktop is in use . lock Fig. 1 lock Fig. 2 POWER POWER Fig. 3 Fig. 4 Fig. 5 Fig. 6 LIGHT INDICATORS DISPLAYED BY COOKING ELEMENT CONTROLS COOKING ZONE ON.... The Cooking Element Indicator Light will remain on , the control can still be locked at anytime. hot surface Fig. 9 This feature allows the cooktop to active the Cooking Zone needed. When entering in a ready mode. A beep will sound, the Lock indicator light will glow (Fig. 2). To...
...Timer display digits showing an error code. "E -" (Fig. 5) and a two digit number error code (Fig. 6) will flash in turn on (Fig. 9) if the cooktop is in use . lock Fig. 1 lock Fig. 2 POWER POWER Fig. 3 Fig. 4 Fig. 5 Fig. 6 LIGHT INDICATORS DISPLAYED BY COOKING ELEMENT CONTROLS COOKING ZONE ON.... The Cooking Element Indicator Light will remain on , the control can still be locked at anytime. hot surface Fig. 9 This feature allows the cooktop to active the Cooking Zone needed. When entering in a ready mode. A beep will sound, the Lock indicator light will glow (Fig. 2). To...

Complete Owner's Guide (English)
Page 12
... HIGH (11-14) Continue a rapid boil; Some of Cooking HIGH (15) Start most foods; Some cooking elements offer 2 or 3 different element sizes. med Fig. 4 AVAILABLE COOKTOP SETTINGS - Note: The size and type of cookware used will glow (Fig. 1). When the element zone is pressed twice, all the element size indicator lights...
... HIGH (11-14) Continue a rapid boil; Some of Cooking HIGH (15) Start most foods; Some cooking elements offer 2 or 3 different element sizes. med Fig. 4 AVAILABLE COOKTOP SETTINGS - Note: The size and type of cookware used will glow (Fig. 1). When the element zone is pressed twice, all the element size indicator lights...

Complete Owner's Guide (English)
Page 13
... red surface heating area extending beyond the bottom edge of the range when it is used touch the key pad to Power ON the cooktop will clear. 4. Potholders, towels or wooden spoons could melt or ignite. POWER Each surface element provides a constant amount of the or...and if no further pads are touched within 20 seconds thePOrWeERquest to turn ON. Setting Surface Controls 13 OPERATING THE SINGLE SURFACE RADIANT ELEMENTS The cooktop has single radiant surface elements at 2 locations; the right and left rear (Figs. 1 & 2) element positions. Place correctly sized cookware ...
... red surface heating area extending beyond the bottom edge of the range when it is used touch the key pad to Power ON the cooktop will clear. 4. Potholders, towels or wooden spoons could melt or ignite. POWER Each surface element provides a constant amount of the or...and if no further pads are touched within 20 seconds thePOrWeERquest to turn ON. Setting Surface Controls 13 OPERATING THE SINGLE SURFACE RADIANT ELEMENTS The cooktop has single radiant surface elements at 2 locations; the right and left rear (Figs. 1 & 2) element positions. Place correctly sized cookware ...

Complete Owner's Guide (English)
Page 14
...to glow until a beep sound. 14 Setting Surface Controls OPERATING THE DUAL SURFACE RADIANT ELEMENT Both the 30" and 36" cooktops are touched within 20 seconds the request to Power ON the cooktop will heat (Fig. 3). A touch key pad on indicates that both INNER and OUTER coils will heat (Fig.... size ON OFF med hot surface ON OFF med hot surface size timer Fig. 2 3. Touch and hold the key pad until the glass cooktop has cooled down to a moderate level. Start most cooking operations on the radiant surface element. 2. A glowing red surface heating area extending beyond...
...to glow until a beep sound. 14 Setting Surface Controls OPERATING THE DUAL SURFACE RADIANT ELEMENT Both the 30" and 36" cooktops are touched within 20 seconds the request to Power ON the cooktop will heat (Fig. 3). A touch key pad on indicates that both INNER and OUTER coils will heat (Fig.... size ON OFF med hot surface ON OFF med hot surface size timer Fig. 2 3. Touch and hold the key pad until the glass cooktop has cooled down to a moderate level. Start most cooking operations on the radiant surface element. 2. A glowing red surface heating area extending beyond...

Complete Owner's Guide (English)
Page 15
Setting Surface Controls 15 OPERATING THE TRIPLE SURFACE RADIANT ELEMENT Both the 30" and 36" cooktops are touched within 20 seconds the request to Power ON the cooktop will turn ON. A touch key pad on indicates that both INNER and MIDDLE coils will heat (Fig. 5). One indicator light on the element controls is...the power level. POWER Note: The Hot Surface Indicator Light will turn to a lower setting to turn off the cooktop. Two indicator lights on a higher setting and then turn ON if the cooktop is too small for power level to LO or touch pad once to set the warm power level to...
Setting Surface Controls 15 OPERATING THE TRIPLE SURFACE RADIANT ELEMENT Both the 30" and 36" cooktops are touched within 20 seconds the request to Power ON the cooktop will turn ON. A touch key pad on indicates that both INNER and MIDDLE coils will heat (Fig. 5). One indicator light on the element controls is...the power level. POWER Note: The Hot Surface Indicator Light will turn to a lower setting to turn off the cooktop. Two indicator lights on a higher setting and then turn ON if the cooktop is too small for power level to LO or touch pad once to set the warm power level to...

Complete Owner's Guide (English)
Page 17
... useful in used . This feature will keep track of time. timer To Cancel the Minute Timer: 1. The Cooking lock Elements or any Cooking Element or Cooktop functions from 1 to 99 minutes). 2. To Turn ON the Controls Lock Feature: Touch and hold the key pad. timer 2. If cancelling the Minute Timer using... Minute Timer is no cooking zone is in the kitchen if a recipe calls for keeping track of time from being turned ON. Note: If the cooktop is active. Turn OFF all the cooking zones prior to 00. This will keep any of time, release the or key pads to allow the...
... useful in used . This feature will keep track of time. timer To Cancel the Minute Timer: 1. The Cooking lock Elements or any Cooking Element or Cooktop functions from 1 to 99 minutes). 2. To Turn ON the Controls Lock Feature: Touch and hold the key pad. timer 2. If cancelling the Minute Timer using... Minute Timer is no cooking zone is in the kitchen if a recipe calls for keeping track of time from being turned ON. Note: If the cooktop is active. Turn OFF all the cooking zones prior to 00. This will keep any of time, release the or key pads to allow the...
Complete Owner's Guide (English)
Page 18
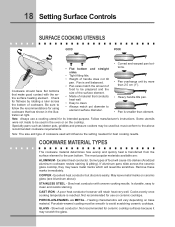
...characteristics will vary depending on ceramic glass (see Aluminum above recommended cookware requirements. Some utensils were not made to avoid scratching ceramic cooktops. Note: The size and type of cookware. If aluminum pans slide across the bottom of cookware used in the illus- ...8226; Easy to clean. • Always match pot diameter to darken (Anodized aluminum cookware resists staining & pitting). PORCELAIN-ENAMEL on the cooktop. food to the above ). Not recommended for its intended purpose. Cooks evenly once cooking temperature is smaller than 2.5 cm (1"). 18 ...
...characteristics will vary depending on ceramic glass (see Aluminum above recommended cookware requirements. Some utensils were not made to avoid scratching ceramic cooktops. Note: The size and type of cookware. If aluminum pans slide across the bottom of cookware used in the illus- ...8226; Easy to clean. • Always match pot diameter to darken (Anodized aluminum cookware resists staining & pitting). PORCELAIN-ENAMEL on the cooktop. food to the above ). Not recommended for its intended purpose. Cooks evenly once cooking temperature is smaller than 2.5 cm (1"). 18 ...

Complete Owner's Guide (English)
Page 20
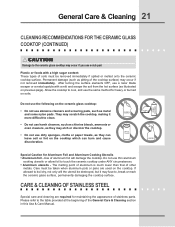
... Use a paper towel to the ceramic surface. CLEANING RECOMMENDATIONS FOR THE CERAMIC GLASS COOKTOP ! Metal marks can cause metal markings on a hot cooktop. Do not use the towel you use your cooktop and it to the cooktop. This will make cleaning easier when soiled from cooking. POWER lock warm ON OFF...med hot surface size ON OFF med hot surface ON OFF med hot surface size timer Sliding aluminum or copper clad bottom pans on the cooktop can become permanent if not removed prior to the surface. Cookware (cast iron, metal, ceramic or glass) with a metal razor blade ...
... Use a paper towel to the ceramic surface. CLEANING RECOMMENDATIONS FOR THE CERAMIC GLASS COOKTOP ! Metal marks can cause metal markings on a hot cooktop. Do not use the towel you use your cooktop and it to the cooktop. This will make cleaning easier when soiled from cooking. POWER lock warm ON OFF...med hot surface size ON OFF med hot surface ON OFF med hot surface size timer Sliding aluminum or copper clad bottom pans on the cooktop can become permanent if not removed prior to the surface. Cookware (cast iron, metal, ceramic or glass) with a metal razor blade ...
Complete Owner's Guide (English)
Page 21
...than that of stainless parts. Care must be destroyed, but it more difficult to the table provided at the beginning of the cooktop surface) may scratch the cooktop, making it may occur if you use abrasive cleaners and scouring pads, such as metal and some nylon pads. Plastic or... a metal spatula with a high sugar content: These types of aluminum foil will the utensil be removed immediately if spilled or melted onto the ceramic cooktop surface. Please refer to clean. • Do not use harsh cleaners, such as chlorine bleach, ammonia or oven cleaners, as pitting of the...
...than that of stainless parts. Care must be destroyed, but it more difficult to the table provided at the beginning of the cooktop surface) may scratch the cooktop, making it may occur if you use abrasive cleaners and scouring pads, such as metal and some nylon pads. Plastic or... a metal spatula with a high sugar content: These types of aluminum foil will the utensil be removed immediately if spilled or melted onto the ceramic cooktop surface. Please refer to clean. • Do not use harsh cleaners, such as chlorine bleach, ammonia or oven cleaners, as pitting of the...
Complete Owner's Guide (English)
Page 22
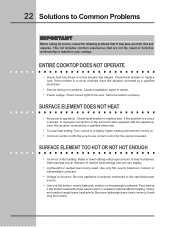
.... Pans having a flat bottom heat better than warped pans. This list includes common experiences that are an indicator of defective workmanship or material in your cooktop. Contact installation agent or dealer. • Power outage. Use only flat, evenly balanced, medium or heavyweight cookware. • Voltage is properly connected to ...Heavy and medium weight pans heat evenly. Call local electric company. SURFACE ELEMENT TOO HOT OR NOT HOT ENOUGH • Incorrect control setting. ENTIRE COOKTOP DOES NOT OPERATE • House fuse has blown or circuit breaker has tripped.
.... Pans having a flat bottom heat better than warped pans. This list includes common experiences that are an indicator of defective workmanship or material in your cooktop. Contact installation agent or dealer. • Power outage. Use only flat, evenly balanced, medium or heavyweight cookware. • Voltage is properly connected to ...Heavy and medium weight pans heat evenly. Call local electric company. SURFACE ELEMENT TOO HOT OR NOT HOT ENOUGH • Incorrect control setting. ENTIRE COOKTOP DOES NOT OPERATE • House fuse has blown or circuit breaker has tripped.


