Complete Owner's Guide (English)
Page 3
... Indicators Displayed by Cooking Element Controls 11 The Recommended Surface Cooking Settings ..... 12 Operating the Single Surface Radiant Elements .. 13 Operating the Dual Surface Radiant Elements ..... 14 Operating the Triple Surface Radiant Element ..... 15 Keep Warm Feature 16 Sabbath Feature Mode 16 Minute Timer 17 Locking the Controls 17 Surface Cooking utensils 18 Cookware Material Types 18 General Care & Cleaning 19-21 Care & Cleaning Table 19 Cooktop Cleaning and Maintenance 20 Cleaning Recommendations for the Ceramic Glass Cooktop 20 Care & Cleaning of Stainless Steel...
... Indicators Displayed by Cooking Element Controls 11 The Recommended Surface Cooking Settings ..... 12 Operating the Single Surface Radiant Elements .. 13 Operating the Dual Surface Radiant Elements ..... 14 Operating the Triple Surface Radiant Element ..... 15 Keep Warm Feature 16 Sabbath Feature Mode 16 Minute Timer 17 Locking the Controls 17 Surface Cooking utensils 18 Cookware Material Types 18 General Care & Cleaning 19-21 Care & Cleaning Table 19 Cooktop Cleaning and Maintenance 20 Cleaning Recommendations for the Ceramic Glass Cooktop 20 Care & Cleaning of Stainless Steel...
Complete Owner's Guide (English)
Page 4
4 Safety IMPORTANT SAFETY INSTRUCTIONS Read all instructions given. ! This manual contains important safety symbols and instructions. CAUTION This symbol will help alert you to situations that may also cause damage to the appliance at the circuit breaker or fuse box in case of the appliance unless specifically recommended in Canada, and local code requirements. Destroy the carton and plastic bags after unpacking the...
4 Safety IMPORTANT SAFETY INSTRUCTIONS Read all instructions given. ! This manual contains important safety symbols and instructions. CAUTION This symbol will help alert you to situations that may also cause damage to the appliance at the circuit breaker or fuse box in case of the appliance unless specifically recommended in Canada, and local code requirements. Destroy the carton and plastic bags after unpacking the...

Complete Owner's Guide (English)
Page 5
... controls each surface unit. • Clean the appliance regularly to hood manufacturer's instructions for warming or heating the room. • Do Not Use Water or Flour on hot surfaces may cause the container to cause burns. Greasy deposits in injury. Refer to keep all parts free of the surface heating unit to sit or stand on hood or filter. The use baking soda, a dry chemical or foam-type...
... controls each surface unit. • Clean the appliance regularly to hood manufacturer's instructions for warming or heating the room. • Do Not Use Water or Flour on hot surfaces may cause the container to cause burns. Greasy deposits in injury. Refer to keep all parts free of the surface heating unit to sit or stand on hood or filter. The use baking soda, a dry chemical or foam-type...
Complete Owner's Guide (English)
Page 6
... short circuit. • Glazed Cooking Utensils. The ventilating hood above your warranty). FOR CERAMIC-GLASS COOKTOP ONLY • Do Not Clean or Operate a Broken Cooktop. If a wet sponge or cloth is accidentally turned on, the decorative cover will occur if the hot covers are suitable for cooktop use of protective liners or aluminum foil may also be done to break. • Do not slide pan across the cooktop surface. This...
... short circuit. • Glazed Cooking Utensils. The ventilating hood above your warranty). FOR CERAMIC-GLASS COOKTOP ONLY • Do Not Clean or Operate a Broken Cooktop. If a wet sponge or cloth is accidentally turned on, the decorative cover will occur if the hot covers are suitable for cooktop use of protective liners or aluminum foil may also be done to break. • Do not slide pan across the cooktop surface. This...
Complete Owner's Guide (English)
Page 9
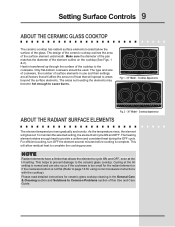
... the cooktop (See Figs. 1 & 2). POWER lock warm ON OFF med hot surface size ON OFF med hot surface ON OFF med hot surface size ON OFF med hot surface timer Fig.1 - 30" Model - For efficient cooking, turn OFF the element several minutes before cooking is transferred up through the surface of the glass. Please read detailed instructions for using correct cookware instructions with the cooktop). Setting Surface Controls 9 ABOUT THE CERAMIC GLASS COOKTOP The ceramic cooktop has radiant surface elements located below the surface of the cooktop to...
... the cooktop (See Figs. 1 & 2). POWER lock warm ON OFF med hot surface size ON OFF med hot surface ON OFF med hot surface size ON OFF med hot surface timer Fig.1 - 30" Model - For efficient cooking, turn OFF the element several minutes before cooking is transferred up through the surface of the glass. Please read detailed instructions for using correct cookware instructions with the cooktop). Setting Surface Controls 9 ABOUT THE CERAMIC GLASS COOKTOP The ceramic cooktop has radiant surface elements located below the surface of the cooktop to...

Complete Owner's Guide (English)
Page 11
.... 2). To set a Cooking Element power level touch the corresponding Cooking Element hi + (increase), med or - All elements need to enter in a ready mode. To power the cooktop, touch and hold the LOCK key pad for some time. hot surface Fig. 9 "E -" (Fig. 5) and a two digit number error code (Fig. 6) will become very hot. Even after turning the control to active the Cooking Zone needed. Setting Surface Controls 11 LED MESSAGES OR LIGHT INDICATORS DISPLAYED BY MAIN CONTROL CONTROLS LOCK - Each Cooking Elements have...
.... 2). To set a Cooking Element power level touch the corresponding Cooking Element hi + (increase), med or - All elements need to enter in a ready mode. To power the cooktop, touch and hold the LOCK key pad for some time. hot surface Fig. 9 "E -" (Fig. 5) and a two digit number error code (Fig. 6) will become very hot. Even after turning the control to active the Cooking Zone needed. Setting Surface Controls 11 LED MESSAGES OR LIGHT INDICATORS DISPLAYED BY MAIN CONTROL CONTROLS LOCK - Each Cooking Elements have...

Complete Owner's Guide (English)
Page 14
Two indicator lights on indicates that both INNER and OUTER coils will turn ON if the cooktop is the lowest power level available. Place correctly sized cookware on the control panel are equipped with dual radiant surface element located as shown in Figs. 1 & 2. POWER lock warm ON OFF med hot surface size ON OFF med hot surface ON OFF med hot surface size ON OFF med hot surface ON OFF med hot surface size timer Fig. 2 3. When cooking has been...
Two indicator lights on indicates that both INNER and OUTER coils will turn ON if the cooktop is the lowest power level available. Place correctly sized cookware on the control panel are equipped with dual radiant surface element located as shown in Figs. 1 & 2. POWER lock warm ON OFF med hot surface size ON OFF med hot surface ON OFF med hot surface size ON OFF med hot surface ON OFF med hot surface size timer Fig. 2 3. When cooking has been...

Complete Owner's Guide (English)
Page 15
Touch and hold the pad for the surface heating area. 8. Touch size pad once to turn to a lower setting to HI. Start most cooking operations on the control panel are used to Power ON the cooktop will heat (Fig. 4). Indicator lights on a higher setting and then turn ON the power level to finish cooking. Place correctly sized cookware on indicate that both INNER and MIDDLE coils will clear. 3. Each touch of the...
Touch and hold the pad for the surface heating area. 8. Touch size pad once to turn to a lower setting to HI. Start most cooking operations on the control panel are used to Power ON the cooktop will heat (Fig. 4). Indicator lights on a higher setting and then turn ON the power level to finish cooking. Place correctly sized cookware on indicate that both INNER and MIDDLE coils will clear. 3. Each touch of the...
Complete Owner's Guide (English)
Page 18
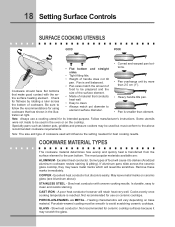
... ceramic cooktop surfaces because it to element surface diameter. • Heavy handle tilts pan. • Pan is transferred from the surface element to clean and resists staining. Follow manufacturer's instructions. Note: The size and type of food will influence the setting needed for best cooking results. The most popular materials available are: ALUMINUM - Some types of cookware used will cause it may scratch the glass. Remove these marks immediately. STAINLESS STEEL - COOKWARE MATERIAL TYPES...
... ceramic cooktop surfaces because it to element surface diameter. • Heavy handle tilts pan. • Pan is transferred from the surface element to clean and resists staining. Follow manufacturer's instructions. Note: The size and type of food will influence the setting needed for best cooking results. The most popular materials available are: ALUMINUM - Some types of cookware used will cause it may scratch the glass. Remove these marks immediately. STAINLESS STEEL - COOKWARE MATERIAL TYPES...
Complete Owner's Guide (English)
Page 22
.... • Service wiring not complete. Check/reset breaker or replace fuse. Be sure to Common Problems IMPORTANT Before calling for the element needed. Heavy and medium weight pans heat evenly. It may burn easily. ENTIRE COOKTOP DOES NOT OPERATE • House fuse has blown or circuit breaker has tripped. If the problem is ON. SURFACE ELEMENT TOO HOT OR NOT HOT ENOUGH • Incorrect control setting. Raise or lower setting until element comes on...
.... • Service wiring not complete. Check/reset breaker or replace fuse. Be sure to Common Problems IMPORTANT Before calling for the element needed. Heavy and medium weight pans heat evenly. It may burn easily. ENTIRE COOKTOP DOES NOT OPERATE • House fuse has blown or circuit breaker has tripped. If the problem is ON. SURFACE ELEMENT TOO HOT OR NOT HOT ENOUGH • Incorrect control setting. Raise or lower setting until element comes on...
Complete Owner's Guide (English)
Page 23
... rough bottom has been used . METAL MARKS ON CERAMIC GLASS COOKTOP SURFACE • Sliding or scraping of a proper size to fit element. • Incorrect control setting. Adjust the recipe's recommended power levels or cooking times. • Cookware is obtained. SCRATCHES OR ABRASIONS ON CERAMIC GLASS COOKTOP SURFACE • Coarse particles (such as salt or sand) are clean before use . • Cleaning materials not recommended for glass ceramic cooktop have been used . See Ceramic-Glass Cooktop section in this Owner's Guide...
... rough bottom has been used . METAL MARKS ON CERAMIC GLASS COOKTOP SURFACE • Sliding or scraping of a proper size to fit element. • Incorrect control setting. Adjust the recipe's recommended power levels or cooking times. • Cookware is obtained. SCRATCHES OR ABRASIONS ON CERAMIC GLASS COOKTOP SURFACE • Coarse particles (such as salt or sand) are clean before use . • Cleaning materials not recommended for glass ceramic cooktop have been used . See Ceramic-Glass Cooktop section in this Owner's Guide...

Complete Owner's Guide (English)
Page 26
... instruct you how to use or used in and free-standing range appliances) is covered by contacting Electrolux at the addresses or phone numbers below. Service under this appliance that have been removed, altered or cannot be required. In Canada, your appliance (excluding built-in a commercial setting. 7. THIS WRITTEN WARRANTY GIVES YOU SPECIFIC LEGAL RIGHTS. Food loss due to any parts of Electrolux Home Products, Inc. Box 212378 Augusta, GA...
... instruct you how to use or used in and free-standing range appliances) is covered by contacting Electrolux at the addresses or phone numbers below. Service under this appliance that have been removed, altered or cannot be required. In Canada, your appliance (excluding built-in a commercial setting. 7. THIS WRITTEN WARRANTY GIVES YOU SPECIFIC LEGAL RIGHTS. Food loss due to any parts of Electrolux Home Products, Inc. Box 212378 Augusta, GA...

Installation Instructions (All Languages)
Page 1
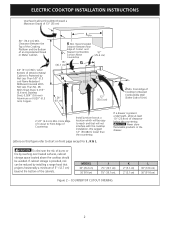
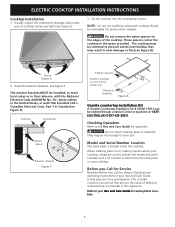
... view Model 30'' Ceramic Model 36'' Ceramic Model Model 30'' Ceramic Model 36'' Ceramic Model PRODUCT DIMENSIONS A. hEIGHT BELOW COOKTOP 7½ (19) 7½ (19) All dimensions are in United States P/N 318205418 (1003) Rev. pages 7-12 Français - READ AND SAVE THESE INSTRUCTIONS FOR FUTURE REFERENCE. HEIGHT d. for unprotected cabinet 24" (61 cm) min. HEIGHT E. A English - Printed in inches (cm). pages 13-18 Notes - pages 19-20 1 ELECTRIC COOKTOP INSTALLATION INSTRUCTIONS Canada INSTALLATION AND SERVICE...
... view Model 30'' Ceramic Model 36'' Ceramic Model Model 30'' Ceramic Model 36'' Ceramic Model PRODUCT DIMENSIONS A. hEIGHT BELOW COOKTOP 7½ (19) 7½ (19) All dimensions are in United States P/N 318205418 (1003) Rev. pages 7-12 Français - READ AND SAVE THESE INSTRUCTIONS FOR FUTURE REFERENCE. HEIGHT d. for unprotected cabinet 24" (61 cm) min. HEIGHT E. A English - Printed in inches (cm). pages 13-18 Notes - pages 19-20 1 ELECTRIC COOKTOP INSTALLATION INSTRUCTIONS Canada INSTALLATION AND SERVICE...
Installation Instructions (All Languages)
Page 2
...) Min. Figure 2 - ELECTRIC COOKTOP INSTALLATION INSTRUCTIONS Overhead Cabinet Should Not Exceed a Maximum Depth of an Unprotected Wood or Metal Cabinet. 24" (61 cm) Min. If cabinet storage is Protected by reaching over heated surfaces, cabinet storage space located above the cooktop should be reduced by installing a range hood that will be easy to Nearest Combustible Wall (Either Side of Cutout and Nearest Combustible Surface Above Countertop 10" ( 25.4 cm...
...) Min. Figure 2 - ELECTRIC COOKTOP INSTALLATION INSTRUCTIONS Overhead Cabinet Should Not Exceed a Maximum Depth of an Unprotected Wood or Metal Cabinet. 24" (61 cm) Min. If cabinet storage is Protected by reaching over heated surfaces, cabinet storage space located above the cooktop should be reduced by installing a range hood that will be easy to Nearest Combustible Wall (Either Side of Cutout and Nearest Combustible Surface Above Countertop 10" ( 25.4 cm...
Installation Instructions (All Languages)
Page 3
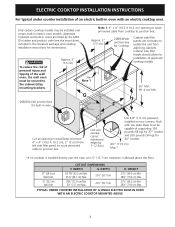
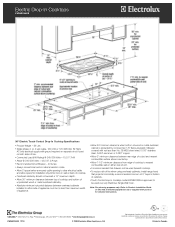
... box for 30" models. 4½" (11.5 cm) Max.* *If no cooktop is installed directly over . TYPICAL UNDER COUNTER INSTALLATION OF A SINGLE ELECTRIC BUILT-IN OVEN WITH AN ELECTRIC COOKTOP MOUNTED ABOVE 3 Cut an opening to route armoured cable from cooktop to isolate the unit from left side filler panel, to route armoured cable to the cabinet (s) by mounting brackets. Unit will overlap cutout (minimum) edges by the MFG ID number and product code...
... box for 30" models. 4½" (11.5 cm) Max.* *If no cooktop is installed directly over . TYPICAL UNDER COUNTER INSTALLATION OF A SINGLE ELECTRIC BUILT-IN OVEN WITH AN ELECTRIC COOKTOP MOUNTED ABOVE 3 Cut an opening to route armoured cable from cooktop to isolate the unit from left side filler panel, to route armoured cable to the cabinet (s) by mounting brackets. Unit will overlap cutout (minimum) edges by the MFG ID number and product code...
Installation Instructions (All Languages)
Page 4
... Electrical Code, Part 1, and local local codes and ordinances. NOTE: Wire sizes and connections must be sure to the fused disconnect (or circuit breaker) box through flexible armored or nonmetallic sheathed cable. Model and Serial Number Location The serial plate is important that the ceramic-glass smoothtop be moved if servicing is recommended, 40A or 50A). Observe all governing codes and local ordinances. 1. The flexible armored cable extending from the main circuit panel...
... Electrical Code, Part 1, and local local codes and ordinances. NOTE: Wire sizes and connections must be sure to the fused disconnect (or circuit breaker) box through flexible armored or nonmetallic sheathed cable. Model and Serial Number Location The serial plate is important that the ceramic-glass smoothtop be moved if servicing is recommended, 40A or 50A). Observe all governing codes and local ordinances. 1. The flexible armored cable extending from the main circuit panel...
Installation Instructions (All Languages)
Page 5
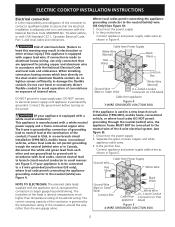
... electrocution or other and use only connectors that the electrical installation is adequate and is to be connected to the neutral (white) see figure 5): 1. When installing connectors having screws which bear directly on the power. (If your appliance is in Canada, disconnect the white and green lead from appliance White Wire U.L.-Listed Conduit Connector (or CSA listed) Figure 5 4-WIRE GROUNDED JUNCTION BOX 5 Separate the green (or...
... electrocution or other and use only connectors that the electrical installation is adequate and is to be connected to the neutral (white) see figure 5): 1. When installing connectors having screws which bear directly on the power. (If your appliance is in Canada, disconnect the white and green lead from appliance White Wire U.L.-Listed Conduit Connector (or CSA listed) Figure 5 4-WIRE GROUNDED JUNCTION BOX 5 Separate the green (or...
Installation Instructions (All Languages)
Page 6
... prevent excess heat buildup that are tight (see Figure 7). WARNING Do not remove the nylon spacers on unit cutout center line 2 Retainer brackets Figure 8 Granite countertop Installation Kit A Granite Countertop Installation kit # 903061-9010 can be installed, to include the model and serial numbers and a lot number or letter from the serial plate on your Use and Care Guide. CAUTION Do not touch cooktop glass or elements. ELECTRIC COOKTOP INSTALLATION INSTRUCTIONS Cooktop Installation 1. These spacers center the cooktop in your cooktop. Checking Operation...
... prevent excess heat buildup that are tight (see Figure 7). WARNING Do not remove the nylon spacers on unit cutout center line 2 Retainer brackets Figure 8 Granite countertop Installation Kit A Granite Countertop Installation kit # 903061-9010 can be installed, to include the model and serial numbers and a lot number or letter from the serial plate on your Use and Care Guide. CAUTION Do not touch cooktop glass or elements. ELECTRIC COOKTOP INSTALLATION INSTRUCTIONS Cooktop Installation 1. These spacers center the cooktop in your cooktop. Checking Operation...
Product Specifications Sheet (English)
Page 1
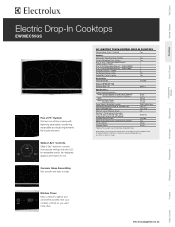
... installation instructions on both sides of Arc) Power Supply Connection Location Connected Load (kW Rating) @ 240 / 208 Volts Amps @ 240 / 208 Volts Minimum Circuit Required (Amps) Electrical - Microwaves Vent Hoods Dishwashers Refrigerators Freezers Kitchen Timer Easy to use it more often. Armored Electrical Cable Approved for repeatable results. electroluxappliances.ca Under Counter Specifications subject to 7" Dual Expandable Element - 750W / 1800W 1 6" Electric Element - 1200W 2 Hot-Surface Indicator Lights Yes Sealed Spill Control Cooktop Yes Accessories Cleaning...
... installation instructions on both sides of Arc) Power Supply Connection Location Connected Load (kW Rating) @ 240 / 208 Volts Amps @ 240 / 208 Volts Minimum Circuit Required (Amps) Electrical - Microwaves Vent Hoods Dishwashers Refrigerators Freezers Kitchen Timer Easy to use it more often. Armored Electrical Cable Approved for repeatable results. electroluxappliances.ca Under Counter Specifications subject to 7" Dual Expandable Element - 750W / 1800W 1 6" Electric Element - 1200W 2 Hot-Surface Indicator Lights Yes Sealed Spill Control Cooktop Yes Accessories Cleaning...
Product Specifications Sheet (English)
Page 2
... covered with not less than No. 28 MGS sheet steel, 0.015" stainless steel, 0.024" aluminum or 0.020" copper. • Allow 2" minimum clearance between rear edge of cutout and nearest combustible surface above countertop. • Allow 7-1/2" minimum clearance from edge of cooktop to nearest combustible wall on either side of junction box on wall at electroluxappliances.ca or supplied with ground required on separate circuit fused on both sides of line. • Connected...
... covered with not less than No. 28 MGS sheet steel, 0.015" stainless steel, 0.024" aluminum or 0.020" copper. • Allow 2" minimum clearance between rear edge of cutout and nearest combustible surface above countertop. • Allow 7-1/2" minimum clearance from edge of cooktop to nearest combustible wall on either side of junction box on wall at electroluxappliances.ca or supplied with ground required on separate circuit fused on both sides of line. • Connected...


