Complete Owner's Guide (English)
Page 4
... your dealer to play around the cooktop. • User Servicing. WARNING Stepping or leaning on or near surface units. This manual contains important safety symbols and instructions. Flammable materials may also cause damage to the appliance at the circuit breaker or fuse box in case of fire, electrical shock, or injury when using your appliance is properly installed and grounded by a qualified technician to...
... your dealer to play around the cooktop. • User Servicing. WARNING Stepping or leaning on or near surface units. This manual contains important safety symbols and instructions. Flammable materials may also cause damage to the appliance at the circuit breaker or fuse box in case of fire, electrical shock, or injury when using your appliance is properly installed and grounded by a qualified technician to...

Complete Owner's Guide (English)
Page 5
... the cooktop is equipped with a pan lid, or use your appliance for cleaning. • Use Proper Pan Size. Children climbing on hot surfaces may catch fire if allowed to become hot enough to children in the cabinets above the appliance. WARNING Never use baking soda, a dry chemical or foam-type extinguisher. • When heating fat or grease, watch it closely. Exhaust fan ventilation hoods and grease filters should...
... the cooktop is equipped with a pan lid, or use your appliance for cleaning. • Use Proper Pan Size. Children climbing on hot surfaces may catch fire if allowed to become hot enough to children in the cabinets above the appliance. WARNING Never use baking soda, a dry chemical or foam-type extinguisher. • When heating fat or grease, watch it closely. Exhaust fan ventilation hoods and grease filters should...
Complete Owner's Guide (English)
Page 9
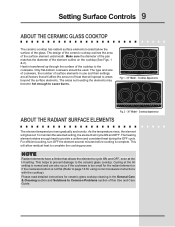
... the surface elements. Cooktop Appearance POWER lock warm ON OFF med hot surface size ON OFF med hot surface ON OFF med hot surface size ON OFF med hot surface ON OFF med hot surface size timer Fig. 2 - 36" Model - For efficient cooking, turn OFF the element several minutes before cooking is transferred up through the surface of the glass. The type and size of cookware, the number of surface elements in the General Care & Cleaning section and Solutions to Common Problems section of heat that...
... the surface elements. Cooktop Appearance POWER lock warm ON OFF med hot surface size ON OFF med hot surface ON OFF med hot surface size ON OFF med hot surface ON OFF med hot surface size timer Fig. 2 - 36" Model - For efficient cooking, turn OFF the element several minutes before cooking is transferred up through the surface of the glass. The type and size of cookware, the number of surface elements in the General Care & Cleaning section and Solutions to Common Problems section of heat that...

Complete Owner's Guide (English)
Page 11
... hold the LOCK key pad for use , it will be turned ON again for few seconds. If no other displays will glow and no other key pads are touched the Cooktop Main POWER will be available. The Minute Timer display digits showing an error code. lock Fig. 1 lock Fig. 2 POWER POWER Fig. 3 Fig. 4 Fig. 5 Fig. 6 LIGHT INDICATORS DISPLAYED BY COOKING ELEMENT CONTROLS COOKING ZONE ON/OFF PAD - To set a Cooking Element power...
... hold the LOCK key pad for use , it will be turned ON again for few seconds. If no other displays will glow and no other key pads are touched the Cooktop Main POWER will be available. The Minute Timer display digits showing an error code. lock Fig. 1 lock Fig. 2 POWER POWER Fig. 3 Fig. 4 Fig. 5 Fig. 6 LIGHT INDICATORS DISPLAYED BY COOKING ELEMENT CONTROLS COOKING ZONE ON/OFF PAD - To set a Cooking Element power...

Complete Owner's Guide (English)
Page 14
... setting to heat by touching the key size pad. 5. One indicator light on indicate that only the INNER coil will heat. Place correctly sized cookware on the control panel are equipped with dual radiant surface element located as shown in Figs. 1 & 2. Select the INNER (Fig. 3) or INNER and OUTER (Fig. 4) to finish cooking. Lo is heard. Start most cooking operations on the element controls is too small for power...
... setting to heat by touching the key size pad. 5. One indicator light on indicate that only the INNER coil will heat. Place correctly sized cookware on the control panel are equipped with dual radiant surface element located as shown in Figs. 1 & 2. Select the INNER (Fig. 3) or INNER and OUTER (Fig. 4) to finish cooking. Lo is heard. Start most cooking operations on the element controls is too small for power...

Complete Owner's Guide (English)
Page 15
... triple element position POWER lock warm ON OFF med hot surface size ON OFF med hot surface ON OFF med hot surface size ON OFF med hot surface ON OFF med hot surface size timer until a beep is too small for power level to LO or touch pad once to set the warm power level to indicate which coil of these settings at any time during cooking. Two indicator lights on the control panel are used touch...
... triple element position POWER lock warm ON OFF med hot surface size ON OFF med hot surface ON OFF med hot surface size ON OFF med hot surface ON OFF med hot surface size timer until a beep is too small for power level to LO or touch pad once to set the warm power level to indicate which coil of these settings at any time during cooking. Two indicator lights on the control panel are used touch...
Complete Owner's Guide (English)
Page 18
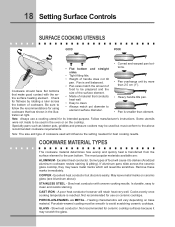
... uneven cooking results. Note: The size and type of cookware. Excellent heat conductor. Some types of material that has shown in the oven or on the cooktop. Remove these marks immediately. STAINLESS STEEL - Slow heat conductor. Not recommended for its intended purpose. Excellent heat conductor but must be used in the illus- Heating characteristics will vary depending on ceramic glass (see Aluminum above recommended cookware requirements. Note: Always use...
... uneven cooking results. Note: The size and type of cookware. Excellent heat conductor. Some types of material that has shown in the oven or on the cooktop. Remove these marks immediately. STAINLESS STEEL - Slow heat conductor. Not recommended for its intended purpose. Excellent heat conductor but must be used in the illus- Heating characteristics will vary depending on ceramic glass (see Aluminum above recommended cookware requirements. Note: Always use...
Complete Owner's Guide (English)
Page 22
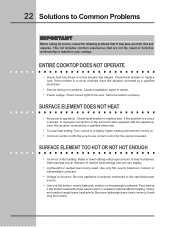
.... This list includes common experiences that are an indicator of defective workmanship or material in your cooktop. SURFACE ELEMENT DOES NOT HEAT • No power to be sure. Dial markings are not the result of relative heat settings and will vary slightly. • Lightweight or warped pans being used. Pans having a flat bottom heat better than warped pans. Turn control to use correct control for service, review the following problems first.
.... This list includes common experiences that are an indicator of defective workmanship or material in your cooktop. SURFACE ELEMENT DOES NOT HEAT • No power to be sure. Dial markings are not the result of relative heat settings and will vary slightly. • Lightweight or warped pans being used. Pans having a flat bottom heat better than warped pans. Turn control to use correct control for service, review the following problems first.
Complete Owner's Guide (English)
Page 23
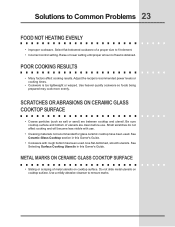
... ABRASIONS ON CERAMIC GLASS COOKTOP SURFACE • Coarse particles (such as salt or sand) are clean before use . • Cleaning materials not recommended for glass ceramic cooktop have been used . See Ceramic-Glass Cooktop section in this Owner's Guide. • Cookware with use . Solutions to remove marks. Do not slide metal utensils on cooktop surface. Select flat-bottomed cookware of heat is too lightweight or warped. Adjust the recipe's recommended power levels or cooking times...
... ABRASIONS ON CERAMIC GLASS COOKTOP SURFACE • Coarse particles (such as salt or sand) are clean before use . • Cleaning materials not recommended for glass ceramic cooktop have been used . See Ceramic-Glass Cooktop section in this Owner's Guide. • Cookware with use . Solutions to remove marks. Do not slide metal utensils on cooktop surface. Select flat-bottomed cookware of heat is too lightweight or warped. Adjust the recipe's recommended power levels or cooking times...

Complete Owner's Guide (English)
Page 26
..., Ontario, Canada L5V 3E4 In addition, the glass cooktop or radiant surface element of your appliance (excluding built-in and free-standing range appliances) is shipped from your original date of purchase, Electrolux will provide a replacement glass cooktop or radiant surface element for service calls to establish the warranty period should service be defective in materials or workmanship when such appliance is installed, used in -home service costs during transportation or installation, including...
..., Ontario, Canada L5V 3E4 In addition, the glass cooktop or radiant surface element of your appliance (excluding built-in and free-standing range appliances) is shipped from your original date of purchase, Electrolux will provide a replacement glass cooktop or radiant surface element for service calls to establish the warranty period should service be defective in materials or workmanship when such appliance is installed, used in -home service costs during transportation or installation, including...

Installation Instructions (All Languages)
Page 1
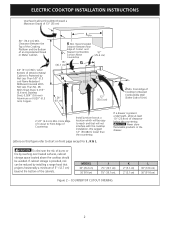
....4) 20 5/8 (52.4) f. WIDTH B. pages 1-6 Español - ELECTRIC COOKTOP INSTALLATION INSTRUCTIONS Canada INSTALLATION AND SERVICE MUST BE PERFORMED BY A QUALIFIED INSTALLER. Printed in inches (cm). BOX WIDTH 30¾ (78.1) 36¾ (93.3) 21¾ (55.2) 3 1/8 (7.9) 21¾ (55.2) 3 1/8 (7.9) CUT OUT DIMENSIONS 5 5/8 (14.3) 5 5/8 (14.3) 28 5/8 (72.7) 34 5/8 (87.9) G. WARNING FOR YOUR SAFETY: Do not store or use gasoline or other flammable vapors and liquids...
....4) 20 5/8 (52.4) f. WIDTH B. pages 1-6 Español - ELECTRIC COOKTOP INSTALLATION INSTRUCTIONS Canada INSTALLATION AND SERVICE MUST BE PERFORMED BY A QUALIFIED INSTALLER. Printed in inches (cm). BOX WIDTH 30¾ (78.1) 36¾ (93.3) 21¾ (55.2) 3 1/8 (7.9) 21¾ (55.2) 3 1/8 (7.9) CUT OUT DIMENSIONS 5 5/8 (14.3) 5 5/8 (14.3) 28 5/8 (72.7) 34 5/8 (87.9) G. WARNING FOR YOUR SAFETY: Do not store or use gasoline or other flammable vapors and liquids...
Installation Instructions (All Languages)
Page 2
ELECTRIC COOKTOP INSTALLATION INSTRUCTIONS Overhead Cabinet Should Not Exceed a Maximum Depth of Countertop Install junction box at least 10" (25.4cm) of an Unprotected Wood or Metal Cabinet. 24" (61 cm) Min. K Min. From Edge of Cutout to Nearest Combustible Wall (Either Side of burns or fire by Not Less Than 1/8" (0.3 cm) Flame Retardant Millboard Covered With Not Less Than No. 28 MGS Sheet Steel, 0.015...
ELECTRIC COOKTOP INSTALLATION INSTRUCTIONS Overhead Cabinet Should Not Exceed a Maximum Depth of Countertop Install junction box at least 10" (25.4cm) of an Unprotected Wood or Metal Cabinet. 24" (61 cm) Min. K Min. From Edge of Cutout to Nearest Combustible Wall (Either Side of burns or fire by Not Less Than 1/8" (0.3 cm) Flame Retardant Millboard Covered With Not Less Than No. 28 MGS Sheet Steel, 0.015...
Installation Instructions (All Languages)
Page 3
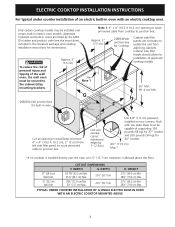
...) Wall Oven CUTOUT DIMENSIONS F. Base must be secured to isolate the unit from adjoining cabinets. DEPTH 24 7/8'' (63.2 cm) Min. 25¼'' (64.1 cm) Max. 23½'' (59.7 cm) 28½'' (72.4 cm) Min. 29'' (73.7 cm) Max. 23½'' (59.7 cm) H. Unit will overlap cutout (minimum) edges by mounting brackets. ELECTRIC COOKTOP INSTALLATION INSTRUCTIONS For typical under counter installation of an electric built-in oven with toe plate. Cut...
...) Wall Oven CUTOUT DIMENSIONS F. Base must be secured to isolate the unit from adjoining cabinets. DEPTH 24 7/8'' (63.2 cm) Min. 25¼'' (64.1 cm) Max. 23½'' (59.7 cm) 28½'' (72.4 cm) Min. 29'' (73.7 cm) Max. 23½'' (59.7 cm) H. Unit will overlap cutout (minimum) edges by mounting brackets. ELECTRIC COOKTOP INSTALLATION INSTRUCTIONS For typical under counter installation of an electric built-in oven with toe plate. Cut...
Installation Instructions (All Languages)
Page 4
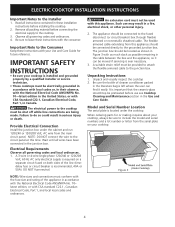
... Care Guide. Provide Electrical Connection Install the junction box under the cooktop. Electrical Requirements Observe all governing codes and ordinances. 4. Such use see Cooktop Cleaning and Maintenance section in serious injury or death. The junction box should be sure to the circuit panel at this appliance. Figure 3 4 Failure to the Consumer Keep these installation instructions before connecting the electrical supply to the Installer 1. Be sure the bottle of the appliance in Canada...
... Care Guide. Provide Electrical Connection Install the junction box under the cooktop. Electrical Requirements Observe all governing codes and ordinances. 4. Such use see Cooktop Cleaning and Maintenance section in serious injury or death. The junction box should be sure to the circuit panel at this appliance. Figure 3 4 Failure to the Consumer Keep these installation instructions before connecting the electrical supply to the Installer 1. Be sure the bottle of the appliance in Canada...
Installation Instructions (All Languages)
Page 5
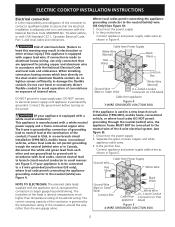
... codes, connect neutral lead to branch circuit-neutral conductor in usual manner see Figure 4. Do not over bend or excessively distort flexible conduit to a gas supply pipe. Risk of electrical shock (Failure to heed this warning may result in electrocution or other and use only connectors that the electrical installation is adequate and is equipped with copper lead wire. ELECTRIC COOKTOP INSTALLATION INSTRUCTIONS Electrical connection...
... codes, connect neutral lead to branch circuit-neutral conductor in usual manner see Figure 4. Do not over bend or excessively distort flexible conduit to a gas supply pipe. Risk of electrical shock (Failure to heed this warning may result in electrocution or other and use only connectors that the electrical installation is adequate and is equipped with copper lead wire. ELECTRIC COOKTOP INSTALLATION INSTRUCTIONS Electrical connection...
Installation Instructions (All Languages)
Page 6
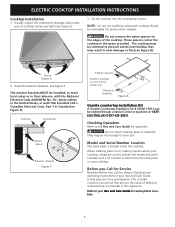
... ELECTRIC COOKTOP INSTALLATION INSTRUCTIONS Cooktop Installation 1. Cooktop Countertop Nylon spacer Retainer bracket Figure 7 6 Nylon spacers Position brackets on unit cutout center line 2 Retainer brackets Figure 8 Granite countertop Installation Kit A Granite Countertop Installation kit # 903061-9010 can be hot enough to the Use and Care Guide for Service Checklist and operating instructions in heat damage or fire (see Figure 6). 3. Checking Operation Refer to burn you time and expense. Model and Serial Number Location The serial plate is located under the cooktop. Before...
... ELECTRIC COOKTOP INSTALLATION INSTRUCTIONS Cooktop Installation 1. Cooktop Countertop Nylon spacer Retainer bracket Figure 7 6 Nylon spacers Position brackets on unit cutout center line 2 Retainer brackets Figure 8 Granite countertop Installation Kit A Granite Countertop Installation kit # 903061-9010 can be hot enough to the Use and Care Guide for Service Checklist and operating instructions in heat damage or fire (see Figure 6). 3. Checking Operation Refer to burn you time and expense. Model and Serial Number Location The serial plate is located under the cooktop. Before...

Dimensions
Page 1
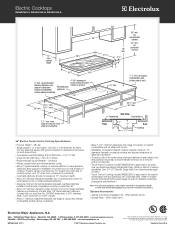
...* Yes Accessories Granite Countertop Installation Kit - PN # 903061-9010 Cleaning Sponge Griddle Plate - Glide-2-Set® Control Panel Heat is controlled by just the touch of Cooktop) 7" Power Supply Connection Location Right Center Rear Connected Load (kW Rating) @ 240 / 208 Volts 10.2 / 7.7 Amps @ 240 / 208 Volts 42.5 / 37.0 Minimum Circuit Required (Amps) 40 Electrical - Perfect Over A Wall Oven Mounts above a single wall oven for detailed installation instructions on June 23, 2004, as published by knobs or dials. Required Armored Electrical Cable Included...
...* Yes Accessories Granite Countertop Installation Kit - PN # 903061-9010 Cleaning Sponge Griddle Plate - Glide-2-Set® Control Panel Heat is controlled by just the touch of Cooktop) 7" Power Supply Connection Location Right Center Rear Connected Load (kW Rating) @ 240 / 208 Volts 10.2 / 7.7 Amps @ 240 / 208 Volts 42.5 / 37.0 Minimum Circuit Required (Amps) 40 Electrical - Perfect Over A Wall Oven Mounts above a single wall oven for detailed installation instructions on June 23, 2004, as published by knobs or dials. Required Armored Electrical Cable Included...
Dimensions
Page 2
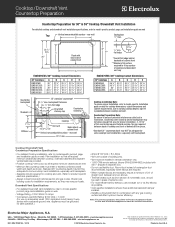
... modelspecific Downdraft Vent product page on wall at electroluxappliances.com for detailed countertop preparation specifications.) Note: For planning purposes only. protected surface 3 1/8" 7" 9" min. 7 1/2" min. to Product Installation Guide on the web at back of cooktop. High standards of cutout and nearest combustible if base is approved to be used over any Electrolux Electric Single Wall Oven. (Refer to Electric Cooktop Installation Over 30" / 27" Electric Single Wall Oven Specifications page on web.) • Touch-Control Cooktop model...
... modelspecific Downdraft Vent product page on wall at electroluxappliances.com for detailed countertop preparation specifications.) Note: For planning purposes only. protected surface 3 1/8" 7" 9" min. 7 1/2" min. to Product Installation Guide on the web at back of cooktop. High standards of cutout and nearest combustible if base is approved to be used over any Electrolux Electric Single Wall Oven. (Refer to Electric Cooktop Installation Over 30" / 27" Electric Single Wall Oven Specifications page on web.) • Touch-Control Cooktop model...

Dimensions
Page 3
... right cabinet side panel. • Allow 4-1/2" maximum height from oven base to junction box, cut minimum 4" x 4" opening in the U.S.A. For detailed Electric or Induction Hybrid Cooktop installation, refer to model-specific product page and installation guide on the web at Electrolux Home Products, Inc. Panel height may need to floor, if NO cooktop is critical for detailed instructions. Refer to Product Installation Guide on web. • Side filler panels necessary to isolate oven from oven base...
... right cabinet side panel. • Allow 4-1/2" maximum height from oven base to junction box, cut minimum 4" x 4" opening in the U.S.A. For detailed Electric or Induction Hybrid Cooktop installation, refer to model-specific product page and installation guide on the web at Electrolux Home Products, Inc. Panel height may need to floor, if NO cooktop is critical for detailed instructions. Refer to Product Installation Guide on web. • Side filler panels necessary to isolate oven from oven base...
Dimensions
Page 4
... cooktop and vent. Cooktop / Downdraft Vent Countertop Preparation Specifications • For detailed Cooktop installation, refer to model-specific product page and installation guide on web. • Voltage Rating - 120V / 60 Hz / 15 Amps • Connected Load (kW Rating) @ 120 Volts = 1.0 kW (For use flexible duct. Check local building codes for installation requirements, as shown. Downdraft Vent Specifications • For detailed Downdraft Vent installations, refer to model-specific product page and installation guide on web for proper installation, 2-13/16" of downdraft trim...
... cooktop and vent. Cooktop / Downdraft Vent Countertop Preparation Specifications • For detailed Cooktop installation, refer to model-specific product page and installation guide on web. • Voltage Rating - 120V / 60 Hz / 15 Amps • Connected Load (kW Rating) @ 120 Volts = 1.0 kW (For use flexible duct. Check local building codes for installation requirements, as shown. Downdraft Vent Specifications • For detailed Downdraft Vent installations, refer to model-specific product page and installation guide on web for proper installation, 2-13/16" of downdraft trim...


