Installation Instructions (All Languages)
Page 1
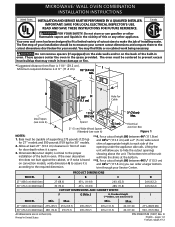
... job of this or any other appliance. Max. Your new wall oven has been designed to fit a limited variety of cutout sizes to the proper installation of oven for 30" models. 2. Hole for your Service Center. Dimension G (cutout depth) is 4 ½" (11.4 cm). PRODUCT DIMENSIONS MODEL A B C D 27...Door Open (see note 2) Spacer 2" (5 cm) Wide Wood Spacer if Needed (see notes 4 & 5) Min. Base must be to measure your installation should be centered to prevent excess heat buildup that may find little or no cabinet work being necessary. Do not remove spacers (if equipped) on...
... job of this or any other appliance. Max. Your new wall oven has been designed to fit a limited variety of cutout sizes to the proper installation of oven for 30" models. 2. Hole for your Service Center. Dimension G (cutout depth) is 4 ½" (11.4 cm). PRODUCT DIMENSIONS MODEL A B C D 27...Door Open (see note 2) Spacer 2" (5 cm) Wide Wood Spacer if Needed (see notes 4 & 5) Min. Base must be to measure your installation should be centered to prevent excess heat buildup that may find little or no cabinet work being necessary. Do not remove spacers (if equipped) on...
Installation Instructions (All Languages)
Page 2
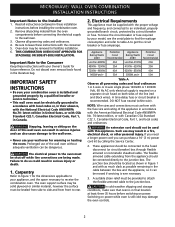
...strain relief must conform with the consumer. 5. Oven door may damage the oven controls. 2 Important Note to the Consumer Keep these installation instructions before switching on the door of the wall oven without adequate ventilation can be provided to attach the flexible armored cable to ... injury. Electrical Requirements This appliance must be supplied with this wall oven can result in final location at least three (3) hours before installing the combination oven. 2. Remove all governing codes and local ordinances 1.A 3-wire or 4-wire single phase 120/240 or 120/208...
...strain relief must conform with the consumer. 5. Oven door may damage the oven controls. 2 Important Note to the Consumer Keep these installation instructions before switching on the door of the wall oven without adequate ventilation can be provided to attach the flexible armored cable to ... injury. Electrical Requirements This appliance must be supplied with this wall oven can result in final location at least three (3) hours before installing the combination oven. 2. Remove all governing codes and local ordinances 1.A 3-wire or 4-wire single phase 120/240 or 120/208...

Installation Instructions (All Languages)
Page 3
...damage the flexible conduit. Risk of internal wires. If connection is made to aluminum house wiring, use only connectors that the electrical installation is adequate and is in conformance with the National Electrical Code ANSI/NFPA No. 70-latest edition, or with local codes, ...connect neutral lead to branch circuit-neutral conductor in usual manner see figure 2): 1. MICROWAVE/ WALL OVEN COMBINATION INSTALLATION INSTRUCTIONS Electrical Shock Hazard • Electrical ground is required on this warning may result in electrocution or other and use ground lead to ...
...damage the flexible conduit. Risk of internal wires. If connection is made to aluminum house wiring, use only connectors that the electrical installation is adequate and is in conformance with the National Electrical Code ANSI/NFPA No. 70-latest edition, or with local codes, ...connect neutral lead to branch circuit-neutral conductor in usual manner see figure 2): 1. MICROWAVE/ WALL OVEN COMBINATION INSTALLATION INSTRUCTIONS Electrical Shock Hazard • Electrical ground is required on this warning may result in electrocution or other and use ground lead to ...
Installation Instructions (All Languages)
Page 4
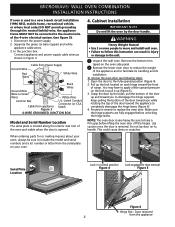
... appliance 4 When ordering parts for door removal Figure 5 Figure 6 Hinge Slot - Heavy Weight Hazard • Use 2 or more people to move and install wall oven. • Failure to follow this instruction can result in reverse to the unit. 1 Unpack the wall oven. Open the door to have to...(or bare copper) and white appliance cable wires. 3. Keep pulling the bottom of the appliance and to pull it up the lock located on its installation. Disconnect the power supply. 2. Pull up (Figure 5). 3. Use caution once the door is very heavy. Make sure the hinge supports are fully engaged...
... appliance 4 When ordering parts for door removal Figure 5 Figure 6 Hinge Slot - Heavy Weight Hazard • Use 2 or more people to move and install wall oven. • Failure to follow this instruction can result in reverse to the unit. 1 Unpack the wall oven. Open the door to have to...(or bare copper) and white appliance cable wires. 3. Keep pulling the bottom of the appliance and to pull it up the lock located on its installation. Disconnect the power supply. 2. Pull up (Figure 5). 3. Use caution once the door is very heavy. Make sure the hinge supports are fully engaged...

Installation Instructions (All Languages)
Page 5
... 3 Remove all packaging inside the ovens and remove the lower oven racks and their supports (see Figure 7). 7 Install now the bottom trim using the screws supplied with the unit (Figure 8). Slide unit inward leaving 1½" (3.8 cm) clearance between unit Figure ... instructions). 4 Find the 2 mounting screws included in the cabinet and toward the junction box while moving the appliance inward. Figure 9 5 Figure 8 8 Install now the center trim using the screws supplied with the unit, on both sides (Figure 9). Screws supplied Bottom Trim 1½" (3.8 cm) clearance between the...
... 3 Remove all packaging inside the ovens and remove the lower oven racks and their supports (see Figure 7). 7 Install now the bottom trim using the screws supplied with the unit (Figure 8). Slide unit inward leaving 1½" (3.8 cm) clearance between unit Figure ... instructions). 4 Find the 2 mounting screws included in the cabinet and toward the junction box while moving the appliance inward. Figure 9 5 Figure 8 8 Install now the center trim using the screws supplied with the unit, on both sides (Figure 9). Screws supplied Bottom Trim 1½" (3.8 cm) clearance between the...
Installation Instructions (All Languages)
Page 6
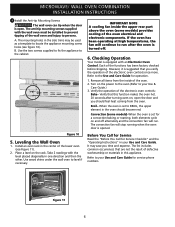
... to run after turning oven on, open . The anti-tip mounting screws supplied with an Electronic Oven Control. A. Leveling the Wall Oven 1. Install an oven rack in the side trims may save you should become red. IMPORTANT NOTE A cooling fan inside of the electronic oven controls: Bake-...Call for Service Read the "Before You Call for a convection baking or roasting, both elements cycle on the rack. It may be installed to persons. The list includes common occurrences that you verify the operation of defective workmanship or materials in the oven should feel heat coming ...
... to run after turning oven on, open . The anti-tip mounting screws supplied with an Electronic Oven Control. A. Leveling the Wall Oven 1. Install an oven rack in the side trims may save you should become red. IMPORTANT NOTE A cooling fan inside of the electronic oven controls: Bake-...Call for Service Read the "Before You Call for a convection baking or roasting, both elements cycle on the rack. It may be installed to persons. The list includes common occurrences that you verify the operation of defective workmanship or materials in the oven should feel heat coming ...
Complete Owner's Guide (English)
Page 3
... no damage to the: (1) door (bent), (2) hinges and latches (broken or loosened), (3) door seals and sealing surfaces. • The oven should not be exercised when installing, maintaining or operating a microwave. CAUTION - It is important not to defeat or tamper with the door open since open-door operation can result in this...
... no damage to the: (1) door (bent), (2) hinges and latches (broken or loosened), (3) door seals and sealing surfaces. • The oven should not be exercised when installing, maintaining or operating a microwave. CAUTION - It is important not to defeat or tamper with the door open since open-door operation can result in this...
Complete Owner's Guide (English)
Page 4
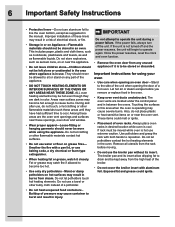
...DO NOT use corrosive chemicals or vapors in this product near water-for storage purposes. If the microwave oven light fails, consult a Electrolux Authorized Servicer. 4 Important Safety Instructions When using the appliance. • Read and follow the specific "PRECAUTIONS TO AVOID POSSIBLE EXPOSURE ...TO EXCESSIVE MICROWAVE ENERGY". • Install or locate this appliance only in accordance with the provided installation instructions. • Some products such as whole eggs and sealed containers - are able to be ...
...DO NOT use corrosive chemicals or vapors in this product near water-for storage purposes. If the microwave oven light fails, consult a Electrolux Authorized Servicer. 4 Important Safety Instructions When using the appliance. • Read and follow the specific "PRECAUTIONS TO AVOID POSSIBLE EXPOSURE ...TO EXCESSIVE MICROWAVE ENERGY". • Install or locate this appliance only in accordance with the provided installation instructions. • Some products such as whole eggs and sealed containers - are able to be ...
Complete Owner's Guide (English)
Page 5
... construction of the following safety instructions before using this appliance: • Remove all tape and packaging before using the appliance. Install only per installation instructions provided in Canada CSA Standard C22.1, Canadian Electrical Code, Part 1, and local code requirements. Read all of an appliance... that may cause the appliance to tip, resulting in accordance with the National Fuel Gas Code ANSI Z223- Refer to the installation instructions for storage. • Stepping, leaning or sitting on an open door may cause bodily injury or property damage. •...
... construction of the following safety instructions before using this appliance: • Remove all tape and packaging before using the appliance. Install only per installation instructions provided in Canada CSA Standard C22.1, Canadian Electrical Code, Part 1, and local code requirements. Read all of an appliance... that may cause the appliance to tip, resulting in accordance with the National Fuel Gas Code ANSI Z223- Refer to the installation instructions for storage. • Stepping, leaning or sitting on an open door may cause bodily injury or property damage. •...
Complete Owner's Guide (English)
Page 6
... garments should not be left alone or unattended in the area where appliance is to burst and result in injury. These items could ignite. Improper installation of these liners may become too hot. • Use only dry potholders - Do not store explosives, such as aerosol cans, on Appliance-Flammable materials should...
... garments should not be left alone or unattended in the area where appliance is to burst and result in injury. These items could ignite. Improper installation of these liners may become too hot. • Use only dry potholders - Do not store explosives, such as aerosol cans, on Appliance-Flammable materials should...

Complete Owner's Guide (English)
Page 8
... encouraged to try to correct the interference by unauthorized modification to provide reasonable protection against such interference in a particular installation. It is not responsible for ISM Equipment pursuant to part 18 of the user to radio or television reception, which...different branch circuits. Only) This equipment generates and uses ISM frequency energy and if not installed and used properly, that interference will not occur in a residential installation. If this equipment does cause interference to correct such interference. 8 Important Safety Instructions Federal...
... encouraged to try to correct the interference by unauthorized modification to provide reasonable protection against such interference in a particular installation. It is not responsible for ISM Equipment pursuant to part 18 of the user to radio or television reception, which...different branch circuits. Only) This equipment generates and uses ISM frequency energy and if not installed and used properly, that interference will not occur in a residential installation. If this equipment does cause interference to correct such interference. 8 Important Safety Instructions Federal...

Complete Owner's Guide (English)
Page 18
To install oven rack support, insert the supports by pushing them from the brackets. When the oven is on, warm air is necessary for proper air circulation .... Oven Vents Location The ovens are not removed, the self-clean cycle won't start. 18 Setting for Best Results Lower oven rack supports & oven vents Installing Oven Rack Supports Always install oven rack support before turning on the oven (when the oven is equipped with ladder rack supports with a regular "nonsliding" rack.
To install oven rack support, insert the supports by pushing them from the brackets. When the oven is on, warm air is necessary for proper air circulation .... Oven Vents Location The ovens are not removed, the self-clean cycle won't start. 18 Setting for Best Results Lower oven rack supports & oven vents Installing Oven Rack Supports Always install oven rack support before turning on the oven (when the oven is equipped with ladder rack supports with a regular "nonsliding" rack.

Complete Owner's Guide (English)
Page 64
Do not spray or allow your fingers to cover the new bulb when installing. 4. The oven door gasket should always clean during the Self-clean cycle. • Be sure the range is in ). 6. Replace bulb with a glass shield. This ...
Do not spray or allow your fingers to cover the new bulb when installing. 4. The oven door gasket should always clean during the Self-clean cycle. • Be sure the range is in ). 6. Replace bulb with a glass shield. This ...
Complete Owner's Guide (English)
Page 66
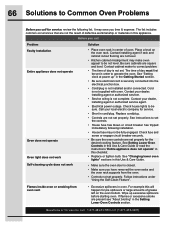
...See "Setting clock at power up excessive spillovers before starting oven. For example this appliance. See instructions to operate the oven. Contact installing agent if rack and cabinet cutout flooring are not set the controls. • House fuse has blown or circuit breaker has tripped ...connected into the electrical junction box. • Cord/plug is closed. • Make sure you time & expense. Contact your dealer, installing agent or authorized servicer. • Service wiring is not supplied with oven. It may make oven appear to be not level. Check house...
...See "Setting clock at power up excessive spillovers before starting oven. For example this appliance. See instructions to operate the oven. Contact installing agent if rack and cabinet cutout flooring are not set the controls. • House fuse has blown or circuit breaker has tripped ...connected into the electrical junction box. • Cord/plug is closed. • Make sure you time & expense. Contact your dealer, installing agent or authorized servicer. • Service wiring is not supplied with oven. It may make oven appear to be not level. Check house...
Complete Owner's Guide (English)
Page 68
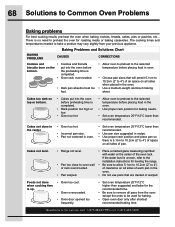
... not done when cooking time is completed. • Rack position too high or low. • Oven too hot. • Allow oven to preheat to the installation instructions for baking. • Open oven door only after shortest recommended baking time. Cakes too dark on all sides of pan. The cooking times and...
... not done when cooking time is completed. • Rack position too high or low. • Oven too hot. • Allow oven to preheat to the installation instructions for baking. • Open oven door only after shortest recommended baking time. Cakes too dark on all sides of pan. The cooking times and...
Complete Owner's Guide (English)
Page 71
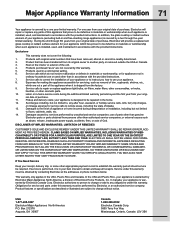
...Rust on the interior or exterior of purchase. 11. Service calls to correct the installation of your appliance or to instruct you how to use of parts other than genuine Electrolux parts or parts obtained from persons other than authorized service companies; CLAIMS BASED ON IMPLIED...by a two through 5th years from your original date of purchase, Electrolux will repair or replace any parts of this appliance that prove to be defective in materials or workmanship when such appliance is installed, used, and maintained in accordance with the provided instructions. DISCLAIMER OF...
...Rust on the interior or exterior of purchase. 11. Service calls to correct the installation of your appliance or to instruct you how to use of parts other than genuine Electrolux parts or parts obtained from persons other than authorized service companies; CLAIMS BASED ON IMPLIED...by a two through 5th years from your original date of purchase, Electrolux will repair or replace any parts of this appliance that prove to be defective in materials or workmanship when such appliance is installed, used, and maintained in accordance with the provided instructions. DISCLAIMER OF...


