
Use and Care Manual
Page 2
2 Finding Information MAKE A RECORD FOR FUTURE USE Brand Purchase Date Model Number Serial Number MODEL AND SERIAL NUMBER LOCATION NOTE The serial plate is located along the interior side trim of the oven and visible when the door is opened. For toll-free telephone support in Canada and Canada: 1-877-4ELECTROLUX (1-877-435-3287) For online support and internet product information: www.electroluxappliances.com ©2010 Electrolux Home Products, Inc. 10200 David Taylor Drive, Charlotte, NC 28262, USA All rights reserved. Printed in the U.S. See picture below. QUESTIONS?
2 Finding Information MAKE A RECORD FOR FUTURE USE Brand Purchase Date Model Number Serial Number MODEL AND SERIAL NUMBER LOCATION NOTE The serial plate is located along the interior side trim of the oven and visible when the door is opened. For toll-free telephone support in Canada and Canada: 1-877-4ELECTROLUX (1-877-435-3287) For online support and internet product information: www.electroluxappliances.com ©2010 Electrolux Home Products, Inc. 10200 David Taylor Drive, Charlotte, NC 28262, USA All rights reserved. Printed in the U.S. See picture below. QUESTIONS?
Use and Care Manual
Page 3
... Location 2 Questions 2 Table of Contents 3 Safety 4 Important Safety Instructions 4-7 Feature Overview 8 Your Slide-In Range 8-9 Oven Rack Supports and Oven Vents 10 Removing and Replacing Oven Racks 11 Control Pad Functions 12-14 Getting Started 15 Setting Clock at Power Up 15 Control Panel Display Modes 15... ....... 19 Setting the Cooktop 20-21 Setting Power Boost Feature 22 Power Sharing 22 Operational Noises 22 Setting the Lower Oven 23 Lower Oven Operation 23 Cooking Modes 24 Baking 24 Cook Time 25 End Time 25 Broiling 26 Convection Baking 27 Convection Convert 28...
... Location 2 Questions 2 Table of Contents 3 Safety 4 Important Safety Instructions 4-7 Feature Overview 8 Your Slide-In Range 8-9 Oven Rack Supports and Oven Vents 10 Removing and Replacing Oven Racks 11 Control Pad Functions 12-14 Getting Started 15 Setting Clock at Power Up 15 Control Panel Display Modes 15... ....... 19 Setting the Cooktop 20-21 Setting Power Boost Feature 22 Power Sharing 22 Operational Noises 22 Setting the Lower Oven 23 Lower Oven Operation 23 Cooking Modes 24 Baking 24 Cook Time 25 End Time 25 Broiling 26 Convection Baking 27 Convection Convert 28...

Use and Care Manual
Page 5
.... • Storage in or on Appliance-Flammable materials should never be stored or discarded. • IMPORTANT-Do not attempt to operate the oven during a power failure. Electronic controllers can result in serious injuries and may be hot even though they have had sufficient time to...items could catch fire or spoil. Areas near the appliance. Do not let clothing or other flammable materials touch these openings, oven door and window. • Wear Proper Apparel-Loose-fitting or hanging garments should not be damaged by cold temperatures. Do not use ....
.... • Storage in or on Appliance-Flammable materials should never be stored or discarded. • IMPORTANT-Do not attempt to operate the oven during a power failure. Electronic controllers can result in serious injuries and may be hot even though they have had sufficient time to...items could catch fire or spoil. Areas near the appliance. Do not let clothing or other flammable materials touch these openings, oven door and window. • Wear Proper Apparel-Loose-fitting or hanging garments should not be damaged by cold temperatures. Do not use ....
Use and Care Manual
Page 6
...Touching the surfaces in temperature. Also, do not place plastic or heat-sensitive items on the food. Do not let potholders contact the hot oven element or interior of flammable materials, and spillage due to cover the surface unit. The handle of the utensil should break, cleaning ...the cooktop. If rack must be done to reposition. Proper relationship of utensil to the side of the appliance when opening the door of Oven/Warmer Drawer (if equipped) Racks. Any other used as recommended for cooktop service without breaking due to the sudden change in this area...
...Touching the surfaces in temperature. Also, do not place plastic or heat-sensitive items on the food. Do not let potholders contact the hot oven element or interior of flammable materials, and spillage due to cover the surface unit. The handle of the utensil should break, cleaning ...the cooktop. If rack must be done to reposition. Proper relationship of utensil to the side of the appliance when opening the door of Oven/Warmer Drawer (if equipped) Racks. Any other used as recommended for cooktop service without breaking due to the sudden change in this area...
Use and Care Manual
Page 7
... or turn off during a self-cleaning cycle. Exhaust fan ventilation hoods and grease filters should be used in the oven. • Do not clean the oven door gasket. Care should be kept clean. Exposed fat and grease could catch fire. Refer to the hood manufacturer's...to cause cancer, birth defects or other reproductive harm, and requires businesses to such substances. Doing so could catch fire. No oven cleaner or oven liner protective coating of any range. The health of some birds is essential for future reference. Safety 7 • Do not use a...
... or turn off during a self-cleaning cycle. Exhaust fan ventilation hoods and grease filters should be used in the oven. • Do not clean the oven door gasket. Care should be kept clean. Exposed fat and grease could catch fire. Refer to the hood manufacturer's...to cause cancer, birth defects or other reproductive harm, and requires businesses to such substances. Doing so could catch fire. No oven cleaner or oven liner protective coating of any range. The health of some birds is essential for future reference. Safety 7 • Do not use a...
Use and Care Manual
Page 8
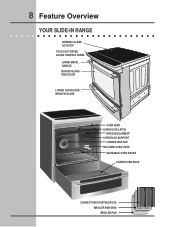
8 Feature Overview YOUR SLIDE-IN RANGE CERAMIC GLASS COOKTOP TOUCH ACTIVATED GLASS CONTROL PANEL LARGE METAL HANDLE CURVED GLASS OVEN DOOR LOWER OVEN DOOR WINDOW GLASS OVEN VENT OVEN DOOR LATCH BROILING ELEMENT OVEN RACK SUPPORT CONVECTION FAN HALOGEN OVEN LIGHT SLIDEABLE OVEN RACKS LOWER OVEN RACK CONVECTION ROASTING RACK BROILER PAN GRID BROILER PAN
8 Feature Overview YOUR SLIDE-IN RANGE CERAMIC GLASS COOKTOP TOUCH ACTIVATED GLASS CONTROL PANEL LARGE METAL HANDLE CURVED GLASS OVEN DOOR LOWER OVEN DOOR WINDOW GLASS OVEN VENT OVEN DOOR LATCH BROILING ELEMENT OVEN RACK SUPPORT CONVECTION FAN HALOGEN OVEN LIGHT SLIDEABLE OVEN RACKS LOWER OVEN RACK CONVECTION ROASTING RACK BROILER PAN GRID BROILER PAN
Use and Care Manual
Page 9
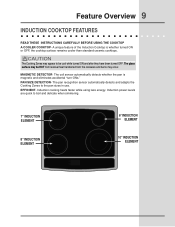
... to be HOT from residual heat transferred from the cookware and burns may appear to boil and delicate when simmering. 7" INDUCTION ELEMENT 8" INDUCTION ELEMENT UPPER OVEN LOW E R OVEN 6" INDUCTION ELEMENT 10" INDUCTION ELEMENT CAUTION The Cooking Zones may occur. EFFICIENT- Induction cooking heats faster while using less energy. The glass surface may...
... to be HOT from residual heat transferred from the cookware and burns may appear to boil and delicate when simmering. 7" INDUCTION ELEMENT 8" INDUCTION ELEMENT UPPER OVEN LOW E R OVEN 6" INDUCTION ELEMENT 10" INDUCTION ELEMENT CAUTION The Cooking Zones may occur. EFFICIENT- Induction cooking heats faster while using less energy. The glass surface may...

Use and Care Manual
Page 10
10 Feature Overview OVEN RACK SUPPORTS & OVEN VENTS Installing Oven Rack Supports ALWAYS INSTALL OVEN RACK SUPPORT BEFORE TURNING ON THE OVEN (WHEN THE OVEN IS COOL). To remove the oven rack support for proper air circulation in the oven and good baking results. When the oven is on each door. Oven Rack Positions This oven is necessary for a self-clean cycle...
10 Feature Overview OVEN RACK SUPPORTS & OVEN VENTS Installing Oven Rack Supports ALWAYS INSTALL OVEN RACK SUPPORT BEFORE TURNING ON THE OVEN (WHEN THE OVEN IS COOL). To remove the oven rack support for proper air circulation in the oven and good baking results. When the oven is on each door. Oven Rack Positions This oven is necessary for a self-clean cycle...

Use and Care Manual
Page 11
... 1. Lift the rack and sliders and carefully remove them from the oven. TOWARD FRONT OF OVEN TOWARD BACK OF OVEN 1st Bracket 2nd Bracket Oven Rack Oven Rack Slider Oven Rack Support Removing Non-Sliding Oven Rack Simply pull the rack and slightly tilt it to clean the racks. Slightly lift... the openings into the rack supports. Be sure the rack is cool (prior to operating the oven). Always use oven mitts when using the oven. Replacing Sliding Oven Racks To replace the oven racks, follow the instructions above in its stop position. Pull the rack and sliders until the ...
... 1. Lift the rack and sliders and carefully remove them from the oven. TOWARD FRONT OF OVEN TOWARD BACK OF OVEN 1st Bracket 2nd Bracket Oven Rack Oven Rack Slider Oven Rack Support Removing Non-Sliding Oven Rack Simply pull the rack and slightly tilt it to clean the racks. Slightly lift... the openings into the rack supports. Be sure the rack is cool (prior to operating the oven). Always use oven mitts when using the oven. Replacing Sliding Oven Racks To replace the oven racks, follow the instructions above in its stop position. Pull the rack and sliders until the ...

Use and Care Manual
Page 12
... time at which the cooking will end. 15 Probe Pad- Used to disable all oven function. 11 Multi Stage Pad- Used to select the convection baking mode. 5 Convection Roast Pad- Used to preheat the...Pad- Used to activate the meat probe mode. 16 Rapid Preheat Pad- Used to turn the oven light on and off. 2 Bake Pad- Used to select the perfect turkey cooking mode. 10 Control Lock Pad- 12 Feature... Overview OVEN CONTROL PAD FUNCTIONS 1 2 34 56 7 89 10 11 12 13 14 15 16 17 1 Light Pad-...
... time at which the cooking will end. 15 Probe Pad- Used to disable all oven function. 11 Multi Stage Pad- Used to select the convection baking mode. 5 Convection Roast Pad- Used to preheat the...Pad- Used to activate the meat probe mode. 16 Rapid Preheat Pad- Used to turn the oven light on and off. 2 Bake Pad- Used to select the perfect turkey cooking mode. 10 Control Lock Pad- 12 Feature... Overview OVEN CONTROL PAD FUNCTIONS 1 2 34 56 7 89 10 11 12 13 14 15 16 17 1 Light Pad-...

Use and Care Manual
Page 13
... favorite 2 cooking mode. 24 My Favorite 3 Pad- Used to stop cooking. 33 Start Pad- Push Cancel pad to start a 4 hours self-clean cycle. 28 Upper Oven Pad- Used to select the defrost mode. 19 Dehydrate Pad- Used to select the self-cleaning mode. 22 My Favorite 1 Pad- Used to select the... Heavy Pad- Used to select the dehydrate mode. 20 Bread Proof Pad- Used to start a 2 hours self-clean cycle. 26 Med Pad- Feature Overview 13 OVEN CONTROL PAD FUNCTIONS (CONTINUED) 18 19 20 21 28 22 23 24 25 29 26 27 30 32 34 32 31 33 35 36 18...
... favorite 2 cooking mode. 24 My Favorite 3 Pad- Used to stop cooking. 33 Start Pad- Push Cancel pad to start a 4 hours self-clean cycle. 28 Upper Oven Pad- Used to select the defrost mode. 19 Dehydrate Pad- Used to select the self-cleaning mode. 22 My Favorite 1 Pad- Used to select the... Heavy Pad- Used to select the dehydrate mode. 20 Bread Proof Pad- Used to start a 2 hours self-clean cycle. 26 Med Pad- Feature Overview 13 OVEN CONTROL PAD FUNCTIONS (CONTINUED) 18 19 20 21 28 22 23 24 25 29 26 27 30 32 34 32 31 33 35 36 18...

Use and Care Manual
Page 15
... The pads hi or lo can be displayed is equipped with "12:00". Only the clock will remain in a sleep mode when not in the oven. Wake Mode: To wake the control, touch within the display panel. CONTROL PANEL DISPLAY MODES Sleep Mode: Your control will display during this mode. When...): +- 1. Press 1 3 0 pads to begin any function. After 2 minutes without activity the control will need to wake the control to set the clock (example for each oven. When a cooking mode is first plugged in, or when the power supply to place the food in use. The cooking modes which does not...
... The pads hi or lo can be displayed is equipped with "12:00". Only the clock will remain in a sleep mode when not in the oven. Wake Mode: To wake the control, touch within the display panel. CONTROL PANEL DISPLAY MODES Sleep Mode: Your control will display during this mode. When...): +- 1. Press 1 3 0 pads to begin any function. After 2 minutes without activity the control will need to wake the control to set the clock (example for each oven. When a cooking mode is first plugged in, or when the power supply to place the food in use. The cooking modes which does not...

Use and Care Manual
Page 16
...Lock ON and OFF: 1. The pads hi or lo can be displayed and the TIMER pad will appear in the display. + - 2. The oven light key will toggle the lights in the kitchen that will return to accept and start or stop cooking. The Control Lock is equipped with.... 4. To cancel the Timer before the set the Timer (example for 5 minutes): 1. 16 Getting Started OVEN LIGHT Your appliance includes "theater" style oven lighting feature that gradually lights both ovens at the same time at regular intervals until the door has finished locking. Do not attempt to full...
...Lock ON and OFF: 1. The pads hi or lo can be displayed and the TIMER pad will appear in the display. + - 2. The oven light key will toggle the lights in the kitchen that will return to accept and start or stop cooking. The Control Lock is equipped with.... 4. To cancel the Timer before the set the Timer (example for 5 minutes): 1. 16 Getting Started OVEN LIGHT Your appliance includes "theater" style oven lighting feature that gradually lights both ovens at the same time at regular intervals until the door has finished locking. Do not attempt to full...
Use and Care Manual
Page 17
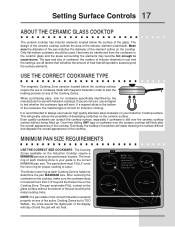
... of heat that will not heat. 1/2" 13mm 5 3/4" 145mm NOTE: Pan bottom should be transferred from outer Cooking Zone (Induction) rings. 5" 125mm 7 1/4" 180mm 7 1/4" 180mm UPPER OVEN LOW E R OVEN Only flat-bottom cookware should not exceed 1/2" (13mm) from the cookware to the ceramic glass and the areas surrounding the elements may become hot...
... of heat that will not heat. 1/2" 13mm 5 3/4" 145mm NOTE: Pan bottom should be transferred from outer Cooking Zone (Induction) rings. 5" 125mm 7 1/4" 180mm 7 1/4" 180mm UPPER OVEN LOW E R OVEN Only flat-bottom cookware should not exceed 1/2" (13mm) from the cookware to the ceramic glass and the areas surrounding the elements may become hot...
Use and Care Manual
Page 19
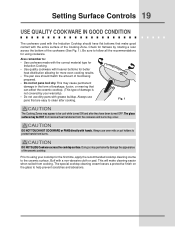
... that can affect the ceramic cooktop. (This type of damage is not covered by rotating a ruler across the cooktop surface. Buff with hands. Always use oven mitts or pot holders to protect hands from burns. ! The glass surface may cause permanent damage in the form of breakage, fusion, or marring that...
... that can affect the ceramic cooktop. (This type of damage is not covered by rotating a ruler across the cooktop surface. Buff with hands. Always use oven mitts or pot holders to protect hands from burns. ! The glass surface may cause permanent damage in the form of breakage, fusion, or marring that...

Use and Care Manual
Page 22
... cooking zones within two heating sections: right and left section share the power of water or food to bring large quantities of one inverter. UPPER OVEN LOW E R OVEN Fig. 2 Your cooktop is used to cooking temperature at the power setting you want to select the power setting last for the cooking zone...
... cooking zones within two heating sections: right and left section share the power of water or food to bring large quantities of one inverter. UPPER OVEN LOW E R OVEN Fig. 2 Your cooktop is used to cooking temperature at the power setting you want to select the power setting last for the cooking zone...

Use and Care Manual
Page 23
... Plastic may be very difficult to contain food and any juices created from the lower oven. NOTE: The lower oven will not operate when the upper oven is 4". The lower oven can only be used with the down turned sides into the drawer. This may result in damage...use a fire extinguisher. This will minimize heat loss. Repeated opening of times the drawer is active. The lower oven is 15". Setting the Lower Oven 23 LOWER OVEN OPERATION The lower oven provides three basic modes, baking, slow cooking and warming. Use a lid or aluminum foil instead. If the fi...
... Plastic may be very difficult to contain food and any juices created from the lower oven. NOTE: The lower oven will not operate when the upper oven is 4". The lower oven can only be used with the down turned sides into the drawer. This may result in damage...use a fire extinguisher. This will minimize heat loss. Repeated opening of times the drawer is active. The lower oven is 15". Setting the Lower Oven 23 LOWER OVEN OPERATION The lower oven provides three basic modes, baking, slow cooking and warming. Use a lid or aluminum foil instead. If the fi...

Use and Care Manual
Page 24
...Problems Refer to the Baking Problems Table in the Solutions to Common Problems section of this manual. Upper Oven Baking Tips: • Always preheat your oven before using two racks, place the oven racks in positions 2 and 6. • Allow 2" to 4" (5,1 to 10,2cm) around ... to control your standard recipes. Always use oven mitts when removing hot pans from 170°F to 450°F with the upper oven. 7. Lower Oven Baking Tips: • Follow recommendations for directions). Select oven by pressing UPPER OVEN OVEN or LOWER OVEN . OVEN + - 2. 24 Cooking Modes BAKING This...
...Problems Refer to the Baking Problems Table in the Solutions to Common Problems section of this manual. Upper Oven Baking Tips: • Always preheat your oven before using two racks, place the oven racks in positions 2 and 6. • Allow 2" to 4" (5,1 to 10,2cm) around ... to control your standard recipes. Always use oven mitts when removing hot pans from 170°F to 450°F with the upper oven. 7. Lower Oven Baking Tips: • Follow recommendations for directions). Select oven by pressing UPPER OVEN OVEN or LOWER OVEN . OVEN + - 2. 24 Cooking Modes BAKING This...

Use and Care Manual
Page 25
... hour before cooking begins, and should be used with the COOK TIME or END TIME features. Cooking Modes 25 COOK TIME Cook Time allows the oven to be set to bring up the cook options items. 5. Press CANCEL to stop the audible alarm or to bring up the cook options items.... This feature can be removed promptly when cooking is a 450°F Bake for the set time of time and shut off automatically at anytime. UPPER OVEN 2. Press BAKE . Press COOK TIME . 6. Enter time of the display. Press START . Press CANCEL to stop by itself at the right time. Use the...
... hour before cooking begins, and should be used with the COOK TIME or END TIME features. Cooking Modes 25 COOK TIME Cook Time allows the oven to be set to bring up the cook options items. 5. Press CANCEL to stop the audible alarm or to bring up the cook options items.... This feature can be removed promptly when cooking is a 450°F Bake for the set time of time and shut off automatically at anytime. UPPER OVEN 2. Press BAKE . Press COOK TIME . 6. Enter time of the display. Press START . Press CANCEL to stop by itself at the right time. Use the...

Use and Care Manual
Page 26
... broil element for meats, fish and poultry up to the "stop or cancel the Broil feature at any time. turn off the oven. Arrange interior oven racks. Press BROIL . 4. If the fire continues, throw baking soda on the second side. Flour may be explosive and water...on the fire. The temperature probe cannot be programmed to spread and cause personal injury. The exposed grease could catch fire. Select oven by direct heat under the broil element of the broil element (see Figure 1). • For best broiling results, broil with a default temperature ...
... broil element for meats, fish and poultry up to the "stop or cancel the Broil feature at any time. turn off the oven. Arrange interior oven racks. Press BROIL . 4. If the fire continues, throw baking soda on the second side. Flour may be explosive and water...on the fire. The temperature probe cannot be programmed to spread and cause personal injury. The exposed grease could catch fire. Select oven by direct heat under the broil element of the broil element (see Figure 1). • For best broiling results, broil with a default temperature ...


