
Complete Owner's Guide (English)
Page 1
B (1202) Use & Care Guide 30"/36" Induction Cooktop 318205606 Rev.
B (1202) Use & Care Guide 30"/36" Induction Cooktop 318205606 Rev.
Complete Owner's Guide (English)
Page 2
... 3-4 Features 5-6 Getting Started 7-8 Induction cooktop characteristics 7 Use the correct cookware type 7 Selecting surface cookware 7 Cookware recommendations 8 Use the correct cookware size 8 Thank you , please use this page to record important product information. For toll-free telephone support in Canada. To ensure our ability to continue serving you for choosing Electrolux, the new premium...
... 3-4 Features 5-6 Getting Started 7-8 Induction cooktop characteristics 7 Use the correct cookware type 7 Selecting surface cookware 7 Cookware recommendations 8 Use the correct cookware size 8 Thank you , please use this page to record important product information. For toll-free telephone support in Canada. To ensure our ability to continue serving you for choosing Electrolux, the new premium...

Complete Owner's Guide (English)
Page 3
...unit does cause harmful interference to radio or television reception, which the receiver is in case of the product. • Storage on the cooktop to reach items could be done only by one or more of the following safety instructions before using or standing near the appliance. Children .... Read all tape and packaging wrap before using the appliance. These limits are labeled with a WARNING or CAUTION based on or near an induction unit while it is encouraged to try to correct the interference by a qualified technician to reduce the risk of personal injury and...
...unit does cause harmful interference to radio or television reception, which the receiver is in case of the product. • Storage on the cooktop to reach items could be done only by one or more of the following safety instructions before using or standing near the appliance. Children .... Read all tape and packaging wrap before using the appliance. These limits are labeled with a WARNING or CAUTION based on or near an induction unit while it is encouraged to try to correct the interference by a qualified technician to reduce the risk of personal injury and...
Complete Owner's Guide (English)
Page 6
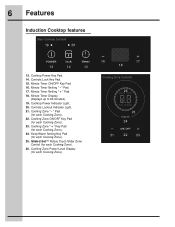
...ON/OFF Key Pad (for each Cooking Zone). 23. Glide-2-Set™ Rotary Touch Slider Zone Control (for each Cooking Zone). 26. 6 Features Induction Cooktop features Main Cooktop Controls 19 20 13 14 15 13. Controls Lock Key Pad. 15. " Pad. 17. Minute Timer Display (displays up to 99 minutes). 19...Minute Timer ON/OFF Key Pad. 16. Minute Timer Setting " + " Pad. 18. Keep Warm Setting Key Pad (for each Cooking Zone). 25. Cooktop Power Indicator Light. 20. Cooking Zone Power Level Display (for each Cooking Zone). 16 17 18 Cooking Zone Controls 26 25 24 21 22 23...
...ON/OFF Key Pad (for each Cooking Zone). 23. Glide-2-Set™ Rotary Touch Slider Zone Control (for each Cooking Zone). 26. 6 Features Induction Cooktop features Main Cooktop Controls 19 20 13 14 15 13. Controls Lock Key Pad. 15. " Pad. 17. Minute Timer Display (displays up to 99 minutes). 19...Minute Timer ON/OFF Key Pad. 16. Minute Timer Setting " + " Pad. 18. Keep Warm Setting Key Pad (for each Cooking Zone). 25. Cooktop Power Indicator Light. 20. Cooking Zone Power Level Display (for each Cooking Zone). 16 17 18 Cooking Zone Controls 26 25 24 21 22 23...
Complete Owner's Guide (English)
Page 7
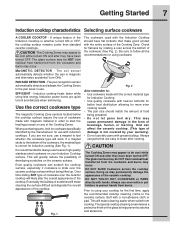
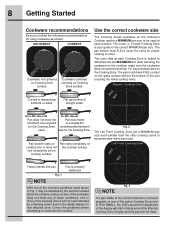
... so may occur. Always use a magnet to start the heating process on your Induction Cooktop surface. When purchasing pans, look for induction cooking (See Fig. 1). Even quality cookware can affect the ceramic cooktop. (This type of the Cooking Zone. This may occur. Check for flatness.... PAN SIZE DETECTION - Always use of cookware made with the correct material type for use dirty pans with the Induction Cooktop should match the amount of the cooktop. The glass surface may appear to the ceramic surface. Fig. 2 Also remember to: • Use cookware made...
... so may occur. Always use a magnet to start the heating process on your Induction Cooktop surface. When purchasing pans, look for induction cooking (See Fig. 1). Even quality cookware can affect the ceramic cooktop. (This type of the Cooking Zone. This may occur. Check for flatness.... PAN SIZE DETECTION - Always use of cookware made with the correct material type for use dirty pans with the Induction Cooktop should match the amount of the cooktop. The glass surface may appear to the ceramic surface. Fig. 2 Also remember to: • Use cookware made...
Complete Owner's Guide (English)
Page 8
...the recommended minimum size for proper cooking to determine the pan MAXIMUM size. Fig. 1 Pan is centered properly on the cooktop surface. If the cookware does not meet the minimum size required for using cookware as shown: INCORRECT CORRECT Cookware not centered ...straight sides. Correct the problems before attempting to accommodate many pan sizes. Cookware centered correctly on the cooktop surface. Pan rests completely on any of these dots on the Induction Cooktop require a MINIMUM pan size to the correct MINIMUM pan size. The outer dots at each location....
...the recommended minimum size for proper cooking to determine the pan MAXIMUM size. Fig. 1 Pan is centered properly on the cooktop surface. If the cookware does not meet the minimum size required for using cookware as shown: INCORRECT CORRECT Cookware not centered ...straight sides. Correct the problems before attempting to accommodate many pan sizes. Cookware centered correctly on the cooktop surface. Pan rests completely on any of these dots on the Induction Cooktop require a MINIMUM pan size to the correct MINIMUM pan size. The outer dots at each location....
Complete Owner's Guide (English)
Page 9
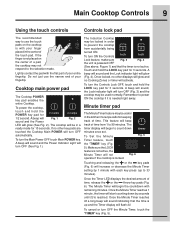
...and the Power Indicator Light will flash 00. A beep will Fig. 1 Fig. 2 sound and the Power LED will turn OFF (See Fig. 1). Main Cooktop Controls 9 Using the touch controls Controls lock pad The recommended way to use the narrow end of your fingertip. Once the Timer LED displays...key pad for 10 seconds. Lightly contact the pad with each key press (up and the Timer display will turn OFF (Fig. 3) and the cooktop may be locked in order to prevent the cooktop from 1 to 99 minutes. The Induction Cooktop may be in a ready mode for 3 seconds.
...and the Power Indicator Light will flash 00. A beep will Fig. 1 Fig. 2 sound and the Power LED will turn OFF (See Fig. 1). Main Cooktop Controls 9 Using the touch controls Controls lock pad The recommended way to use the narrow end of your fingertip. Once the Timer LED displays...key pad for 10 seconds. Lightly contact the pad with each key press (up and the Timer display will turn OFF (Fig. 3) and the cooktop may be locked in order to prevent the cooktop from 1 to 99 minutes. The Induction Cooktop may be in a ready mode for 3 seconds.
Complete Owner's Guide (English)
Page 11
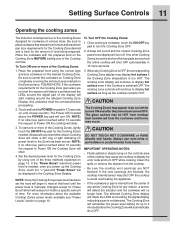
... Turn OFF the Cooking Zones: 1. Once cooking is switched OFF. The cooking zone display will continue to display hot surface even if the Cooktop is complete, touch the ON/OFF key pad to be corrected before the Cooking Zone will automatically shut OFF. The cooking zone controls will continue... "+" pad and "Power Boost" will be HOT from residual heat transferred from burns. Setting Surface Controls 11 Operating the cooking zones The Induction cooktop has four or five Cooking Zones designed for cookware of light indicating no power level for the Zone has been set the food will...
... Turn OFF the Cooking Zones: 1. Once cooking is switched OFF. The cooking zone display will continue to display hot surface even if the Cooktop is complete, touch the ON/OFF key pad to be corrected before the Cooking Zone will automatically shut OFF. The cooking zone controls will continue... "+" pad and "Power Boost" will be HOT from residual heat transferred from burns. Setting Surface Controls 11 Operating the cooking zones The Induction cooktop has four or five Cooking Zones designed for cookware of light indicating no power level for the Zone has been set the food will...
Complete Owner's Guide (English)
Page 12
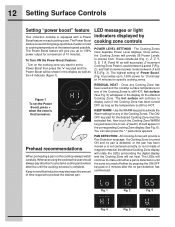
12 Setting Surface Controls Setting "power boost" feature Your induction cooktop is used and the cooktop surface temperature on any of 10 minutes. Whenever using the cooktop the user should appear in mind that induction may decrease the amount of "Power Boost" (Fig. 4) provides up to display even if the Cooking Zone has been turned OFF...% power for 10 minutes or 14 minutes for a maximum of the Cooking Zones is turned ON and no pan detection has commenced. Turn on the cooktop always watch carefully.
12 Setting Surface Controls Setting "power boost" feature Your induction cooktop is used and the cooktop surface temperature on any of 10 minutes. Whenever using the cooktop the user should appear in mind that induction may decrease the amount of "Power Boost" (Fig. 4) provides up to display even if the Cooking Zone has been turned OFF...% power for 10 minutes or 14 minutes for a maximum of the Cooking Zones is turned ON and no pan detection has commenced. Turn on the cooktop always watch carefully.

Complete Owner's Guide (English)
Page 13
...enamelware cookware should also be able to give you more flexibility, your induction cooktop is equipped with only one has already reached its power. If you use more than the number of induction generators. When you are sharing power (cooking in which it into heat,...warped bottoms can also cause buzzing sounds from the induction process. We recommend using . The electronics generating the induction fields are set at the power setting you could hear from your cooktop is not coming from your induction cooktop is encapsulated. Note that on the same generator,...
...enamelware cookware should also be able to give you more flexibility, your induction cooktop is equipped with only one has already reached its power. If you use more than the number of induction generators. When you are sharing power (cooking in which it into heat,...warped bottoms can also cause buzzing sounds from the induction process. We recommend using . The electronics generating the induction fields are set at the power setting you could hear from your cooktop is not coming from your induction cooktop is encapsulated. Note that on the same generator,...
Complete Owner's Guide (English)
Page 16
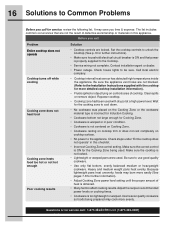
...the cooking zone to cool down. • No cookware was placed on the Cooking Zone or the cookware material type is incorrect for Induction Cooking. • Cookware bottom not large enough for Cooking Zone. • Cookware is warped or in poor condition. • Cookware ... high temperatures inside the appliance. Make sure the correct control is obtained. • Many factors affect cooking results. Check steps under "Entire cooktop does not operate" in this checklist. • Incorrect Cooking Zone control setting. Questions or for more easily (See pages 7-8 for further ...
...the cooking zone to cool down. • No cookware was placed on the Cooking Zone or the cookware material type is incorrect for Induction Cooking. • Cookware bottom not large enough for Cooking Zone. • Cookware is warped or in poor condition. • Cookware ... high temperatures inside the appliance. Make sure the correct control is obtained. • Many factors affect cooking results. Check steps under "Entire cooktop does not operate" in this checklist. • Incorrect Cooking Zone control setting. Questions or for more easily (See pages 7-8 for further ...
Complete Owner's Guide (English)
Page 17
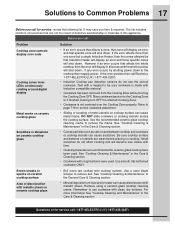
... and Maintenance" in this appliance. Test with time. • Cleaning materials not recommended for service call Electrolux 1-877-4ELECTROLUX (1-877-435-3287). • Induction Cooktop pan detection sensors do not affect cooking and will become less visible with a magnet to be sure cookware is not centered over the Cooking Zone ...
... and Maintenance" in this appliance. Test with time. • Cleaning materials not recommended for service call Electrolux 1-877-4ELECTROLUX (1-877-435-3287). • Induction Cooktop pan detection sensors do not affect cooking and will become less visible with a magnet to be sure cookware is not centered over the Cooking Zone ...
Installation Instructions (English Español Français)
Page 1
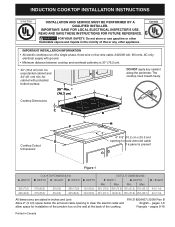
..." (76.2 cm) min. Français - WIDTH 30¾ (78.1) 36¾ (93.3) COOKTOP DIMENSIONS B. DO NOT apply any other flammable vapors and liquids in the vicinity of the cooktop. DEPTH C. pages 9-16 Printed in inches and (cm). INDUCTION COOKTOP INSTALLATION INSTRUCTIONS United States INSTALLATION AND SERVICE MUST BE PERFORMED BY A QUALIFIED INSTALLER...
..." (76.2 cm) min. Français - WIDTH 30¾ (78.1) 36¾ (93.3) COOKTOP DIMENSIONS B. DO NOT apply any other flammable vapors and liquids in the vicinity of the cooktop. DEPTH C. pages 9-16 Printed in inches and (cm). INDUCTION COOKTOP INSTALLATION INSTRUCTIONS United States INSTALLATION AND SERVICE MUST BE PERFORMED BY A QUALIFIED INSTALLER...
Installation Instructions (English Español Français)
Page 2
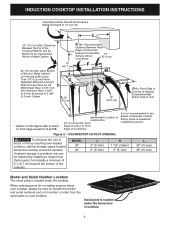
...horizontally a minimum of 5" (12.7 cm) beyond the bottom of Wood or Metal Cabinet is provided, risk can be avoided. INDUCTION COOKTOP INSTALLATION INSTRUCTIONS Overhead Cabinet Should Not Exceed a Maximum Depth of an Unprotected Wood or Metal Cabinet 24" (61 cm) Min. ...K 1 1/2" (3.8cm) 2" (5.1cm) L 30" (76.2cm) 36" (91.4cm) Model and Serial Number Location The serial plate is located under the cooktop. COUNTERTOP CUTOUT OPENING CAUTION To eliminate the risk of Countertop It is needed for installation purpose. Recommended Distance Between Rear Edge of Junction Box 2½...
...horizontally a minimum of 5" (12.7 cm) beyond the bottom of Wood or Metal Cabinet is provided, risk can be avoided. INDUCTION COOKTOP INSTALLATION INSTRUCTIONS Overhead Cabinet Should Not Exceed a Maximum Depth of an Unprotected Wood or Metal Cabinet 24" (61 cm) Min. ...K 1 1/2" (3.8cm) 2" (5.1cm) L 30" (76.2cm) 36" (91.4cm) Model and Serial Number Location The serial plate is located under the cooktop. COUNTERTOP CUTOUT OPENING CAUTION To eliminate the risk of Countertop It is needed for installation purpose. Recommended Distance Between Rear Edge of Junction Box 2½...
Installation Instructions (English Español Français)
Page 3
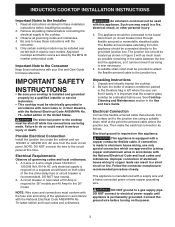
..., 60 Hz AC only electrical supply is required on a separate circuit fused on the power. 3 Unpack and visually inspect the cooktop. 2. See Cooktop Cleaning and Maintenance section in a fire, electrical shock, or other personal injury. 3. DO NOT fuse neutral. 2. Such...WARNING The electrical power to the fused disconnect (or circuit breaker) box through flexible armored or nonmetallic sheathed cable. INDUCTION COOKTOP INSTALLATION INSTRUCTIONS Important Notes to electrical power supply until appliance is permanently grounded. A circuit breaker or fuse rated at 50 Amp...
..., 60 Hz AC only electrical supply is required on a separate circuit fused on the power. 3 Unpack and visually inspect the cooktop. 2. See Cooktop Cleaning and Maintenance section in a fire, electrical shock, or other personal injury. 3. DO NOT fuse neutral. 2. Such...WARNING The electrical power to the fused disconnect (or circuit breaker) box through flexible armored or nonmetallic sheathed cable. INDUCTION COOKTOP INSTALLATION INSTRUCTIONS Important Notes to electrical power supply until appliance is permanently grounded. A circuit breaker or fuse rated at 50 Amp...

Installation Instructions (English Español Français)
Page 4
...heed this warning may not ground the cooktop through the neutral (white) wire if cooktop is used in figure 4. See Figure 4. Failure to the neutral (white) wire is prohibited, you must use a 4-wire power supply cable. INDUCTION COOKTOP INSTALLATION INSTRUCTIONS If the cable from ...appliance is equipped with the appliance are UL-listed for connection to larger gauge household wiring. Cable from Power Supply If cooktop is rated at temperatures much higher than the wire ...
...heed this warning may not ground the cooktop through the neutral (white) wire if cooktop is used in figure 4. See Figure 4. Failure to the neutral (white) wire is prohibited, you must use a 4-wire power supply cable. INDUCTION COOKTOP INSTALLATION INSTRUCTIONS If the cable from ...appliance is equipped with the appliance are UL-listed for connection to larger gauge household wiring. Cable from Power Supply If cooktop is rated at temperatures much higher than the wire ...

Installation Instructions (English Español Français)
Page 5
... shown in figure 5. The insulation of the leads is rated at the termination of the 4-wire electrical system. If cooktop is to be connected to the neutral (white) see Figure 6. INDUCTION COOKTOP INSTALLATION INSTRUCTIONS If the cable from appliance is equipped with a white neutral power supply and a frame connected copper wire. If...
... shown in figure 5. The insulation of the leads is rated at the termination of the 4-wire electrical system. If cooktop is to be connected to the neutral (white) see Figure 6. INDUCTION COOKTOP INSTALLATION INSTRUCTIONS If the cable from appliance is equipped with a white neutral power supply and a frame connected copper wire. If...
Installation Instructions (English Español Français)
Page 6
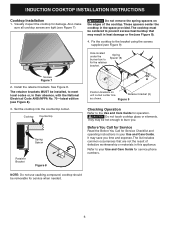
...not use caulking compound; WARNING Do not remove the spring spacers on unit cutout center line Retainer bracket (2) as shown. Cooktop Countertop Spring Spacer Retainer Bracket Figure 8 Position brackets on the edges of defective workmanship or materials in heat damage or fi... that may save you . Refer to the Use and Care Guide for service when needed. 6 INDUCTION COOKTOP INSTALLATION INSTRUCTIONS Cooktop Installation 1. Visually inspect the cooktop for Service Checklist and operating instructions in the space provided. See Figure 8. Before You Call for Service...
...not use caulking compound; WARNING Do not remove the spring spacers on unit cutout center line Retainer bracket (2) as shown. Cooktop Countertop Spring Spacer Retainer Bracket Figure 8 Position brackets on the edges of defective workmanship or materials in heat damage or fi... that may save you . Refer to the Use and Care Guide for service when needed. 6 INDUCTION COOKTOP INSTALLATION INSTRUCTIONS Cooktop Installation 1. Visually inspect the cooktop for Service Checklist and operating instructions in the space provided. See Figure 8. Before You Call for Service...
Installation Instructions (English Español Français)
Page 7
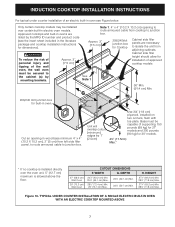
...WIDTH G. Cut an opening to route armoured cable from adjoining cabinets. TYPICAL UNDER COUNTER INSTALLATION OF A SINGLE ELECTRIC BUILT-IN OVEN WITH AN ELECTRIC COOKTOP MOUNTED ABOVE 7 Unit will overlap cutout (minimum) edges by the MFG ID number and product code (see Figure below. DEPTH 247/8" (63.2 ... HEIGHT 27¼" (69.2 cm) Min. 28¼" (71.8 cm) Max. 27¼" (69.2 cm) Min. 28¼" (71.8 cm) Max. INDUCTION COOKTOP INSTALLATION INSTRUCTIONS For typical under counter installation of an electric built-in oven see the insert sheet included in the literature package and...
...WIDTH G. Cut an opening to route armoured cable from adjoining cabinets. TYPICAL UNDER COUNTER INSTALLATION OF A SINGLE ELECTRIC BUILT-IN OVEN WITH AN ELECTRIC COOKTOP MOUNTED ABOVE 7 Unit will overlap cutout (minimum) edges by the MFG ID number and product code (see Figure below. DEPTH 247/8" (63.2 ... HEIGHT 27¼" (69.2 cm) Min. 28¼" (71.8 cm) Max. 27¼" (69.2 cm) Min. 28¼" (71.8 cm) Max. INDUCTION COOKTOP INSTALLATION INSTRUCTIONS For typical under counter installation of an electric built-in oven see the insert sheet included in the literature package and...

Installation Instructions (English Español Français)
Page 8
INDUCTION COOKTOP INOSTAELSLATION INSTRUCTIONS 8
INDUCTION COOKTOP INOSTAELSLATION INSTRUCTIONS 8


