Complete Owner's Guide (English)
Page 2
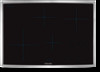
.... This Use & Care Guide is part of our commitment to customer satisfaction and product quality throughout the service life of a relationship. You can register online at www.electroluxappliances.com or by Cooking Zone Controls 14 Power Sharing 15 Operational Noises 15 Purchase date Electrolux model number Electrolux serial number Serial plate location General Care & Cleaning 14-15 Ceramic Glass Cooktop Cleaning & Maintenance .....14 Cleaning Recommendations for Ceramic Glass Cooktop 14-15 Solutions to Common Problems 16-17 Entire Cooktop Does...
.... This Use & Care Guide is part of our commitment to customer satisfaction and product quality throughout the service life of a relationship. You can register online at www.electroluxappliances.com or by Cooking Zone Controls 14 Power Sharing 15 Operational Noises 15 Purchase date Electrolux model number Electrolux serial number Serial plate location General Care & Cleaning 14-15 Ceramic Glass Cooktop Cleaning & Maintenance .....14 Cleaning Recommendations for Ceramic Glass Cooktop 14-15 Solutions to Common Problems 16-17 Entire Cooktop Does...

Complete Owner's Guide (English)
Page 3
... circuit breaker or fuse box in case of the following measures: » Reorient or relocate the receiving antennae. » Increase the distance between the unit and receiver. » Connect the unit into an outlet or a circuit different from that to situations that interference will not occur in the manuals. Know how to disconnect the electrical power to play with the instructions...
... circuit breaker or fuse box in case of the following measures: » Reorient or relocate the receiving antennae. » Increase the distance between the unit and receiver. » Connect the unit into an outlet or a circuit different from that to situations that interference will not occur in the manuals. Know how to disconnect the electrical power to play with the instructions...

Complete Owner's Guide (English)
Page 4
... pads controls each surface of the Cooking Zones. • Clean the appliance regularly to keep all parts free of potential exposure to cover the Cooking Zones. 4 Important Safety Instructions • Do Not Use Water or Flour on hood or filter. Do not allow the affected Cooking Zones to break. • Do Not Slide Pan Across the Cooktop Surface. Refer to hood manufacturer's instructions for range top service without a pan present...
... pads controls each surface of the Cooking Zones. • Clean the appliance regularly to keep all parts free of potential exposure to cover the Cooking Zones. 4 Important Safety Instructions • Do Not Use Water or Flour on hood or filter. Do not allow the affected Cooking Zones to break. • Do Not Slide Pan Across the Cooktop Surface. Refer to hood manufacturer's instructions for range top service without a pan present...
Complete Owner's Guide (English)
Page 6
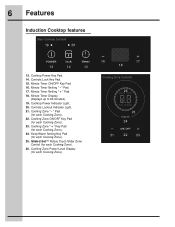
...). 16 17 18 Cooking Zone Controls 26 25 24 21 22 23 Controls Lock Key Pad. 15. Minute Timer ON/OFF Key Pad. 16. Minute Timer Setting " + " Pad. 18. Cooktop Power Indicator Light. 20. " Pad (for each Cooking Zone). 22. Cooking Zone " - Minute Timer Display (displays up to 99 minutes). 19. Cooktop Power Key Pad. 14. 6 Features Induction Cooktop features Main Cooktop Controls 19 20 13 14...
...). 16 17 18 Cooking Zone Controls 26 25 24 21 22 23 Controls Lock Key Pad. 15. Minute Timer ON/OFF Key Pad. 16. Minute Timer Setting " + " Pad. 18. Cooktop Power Indicator Light. 20. " Pad (for each Cooking Zone). 22. Cooking Zone " - Minute Timer Display (displays up to 99 minutes). 19. Cooktop Power Key Pad. 14. 6 Features Induction Cooktop features Main Cooktop Controls 19 20 13 14...
Complete Owner's Guide (English)
Page 7
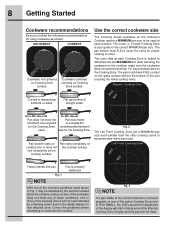
... slide over the ceramic cooktop will likely alter the overall appearance of the cooktop. Induction power levels are not sure, use heavier high quality stainless steel cookware on the ceramic surface. If you are quick to be HOT from residual heat transferred from cooking. This may appear to test whether the cookware type will greatly reduce the possibility of cookware made with the correct material type for Induction Cooking. • Use...
... slide over the ceramic cooktop will likely alter the overall appearance of the cooktop. Induction power levels are not sure, use heavier high quality stainless steel cookware on the ceramic surface. If you are quick to be HOT from residual heat transferred from cooking. This may appear to test whether the cookware type will greatly reduce the possibility of cookware made with the correct material type for Induction Cooking. • Use...
Complete Owner's Guide (English)
Page 8
... digital part of the pan touching the metal cooktop trims. Regular Cooking Zone MAX MIN Curved or warped pan bottoms or sides. Pan size meets or exceeds the recommended minimum size for proper cooking to reactivate the cooktop. Fig. 1 Pan is TOO SMALL, the LEDs around the affected Cooking Zone Display and the pan will not heat indicated by the sensors located below the ceramic cooktop surface. Fig. 3 NOTE If a pan made...
... digital part of the pan touching the metal cooktop trims. Regular Cooking Zone MAX MIN Curved or warped pan bottoms or sides. Pan size meets or exceeds the recommended minimum size for proper cooking to reactivate the cooktop. Fig. 1 Pan is TOO SMALL, the LEDs around the affected Cooking Zone Display and the pan will not heat indicated by the sensors located below the ceramic cooktop surface. Fig. 3 NOTE If a pan made...
Complete Owner's Guide (English)
Page 11
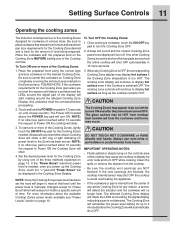
... using the correct type and size cookware on the Cooking Zone BEFORE setting any Cooking Zone is OFF, the corresponding Cooking Zone display may cause the cooktop to heat at that meets the minimum and maximum pan size requirements for the Zone has been set the food will clear. 4. NOTE: If no other key pad is complete, touch the ON/OFF key pad to Power...
... using the correct type and size cookware on the Cooking Zone BEFORE setting any Cooking Zone is OFF, the corresponding Cooking Zone display may cause the cooktop to heat at that meets the minimum and maximum pan size requirements for the Zone has been set the food will clear. 4. NOTE: If no other key pad is complete, touch the ON/OFF key pad to Power...
Complete Owner's Guide (English)
Page 12
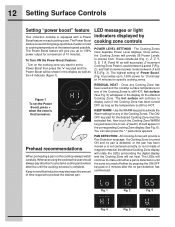
... up to 139% power output for the affected Cooking Zone. The Cooking Zones have separate Power Level displays. and half-increment power levels between and 3 (Fig. 2); 12 Setting Surface Controls Setting "power boost" feature Your induction cooktop is turned off either a pan is detected or until the zone is equipped with a Power Boost feature on each cooking zone. Once any Cooking Zone has been used to bring large...
... up to 139% power output for the affected Cooking Zone. The Cooking Zones have separate Power Level displays. and half-increment power levels between and 3 (Fig. 2); 12 Setting Surface Controls Setting "power boost" feature Your induction cooktop is turned off either a pan is detected or until the zone is equipped with a Power Boost feature on each cooking zone. Once any Cooking Zone has been used to bring large...

Complete Owner's Guide (English)
Page 13
... cookware made of induction generators. Setting Surface Controls 13 Power sharing Operational noises In order to give you access to the highest power ratings, the generator will focus its power onto only one cooking zone. The other materials by radiant energy. If you more than the number of several layers should not emit any noise. Figure 1 - 30" Cooktop Figure 2 - 36" Cooktop Here are...
... cookware made of induction generators. Setting Surface Controls 13 Power sharing Operational noises In order to give you access to the highest power ratings, the generator will focus its power onto only one cooking zone. The other materials by radiant energy. If you more than the number of several layers should not emit any noise. Figure 1 - 30" Cooktop Figure 2 - 36" Cooktop Here are...

Complete Owner's Guide (English)
Page 14
... drops of CookTop® Cleaning Creme directly to the cooktop. Buff with cooktop cleaning cream and buff surface clean. DO NOT use your cooktop for the first time, apply the recommended CookTop® Cleaning Creme to the ceramic surface. 14 Care & Cleaning Ceramic Glass Cooktop Cleaning & Maintenance Cleaning recommendations for the ceramic glass cooktop Prior to using a non-abrasive plastic type no-scratch pad, applying pressure as a cutting board or work surface in the kitchen. Rub the soiled area using your cooktop as needed...
... drops of CookTop® Cleaning Creme directly to the cooktop. Buff with cooktop cleaning cream and buff surface clean. DO NOT use your cooktop for the first time, apply the recommended CookTop® Cleaning Creme to the ceramic surface. 14 Care & Cleaning Ceramic Glass Cooktop Cleaning & Maintenance Cleaning recommendations for the ceramic glass cooktop Prior to using a non-abrasive plastic type no-scratch pad, applying pressure as a cutting board or work surface in the kitchen. Rub the soiled area using your cooktop as needed...
Complete Owner's Guide (English)
Page 16
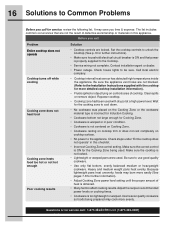
... household electrical circuit breaker is not centered on Cooking Zone. • Cookware resting on cooktop trim or does not rest completely on cooktop surface. • No power to the Installation Instructions supplied with dry pot at bottom, evenly balanced medium or heavyweight cookware. Be sure the appliance vent holes are not the result of cooktop. Questions or for service, review the following list. Check house lights to...
... household electrical circuit breaker is not centered on Cooking Zone. • Cookware resting on cooktop trim or does not rest completely on cooktop surface. • No power to the Installation Instructions supplied with dry pot at bottom, evenly balanced medium or heavyweight cookware. Be sure the appliance vent holes are not the result of cooktop. Questions or for service, review the following list. Check house lights to...
Complete Owner's Guide (English)
Page 17
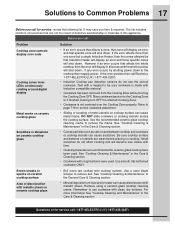
... for service, review the following list. If the error affects more information See "Cooktop Cleaning and Maintenance" in the General Care & Cleaning section. • Mineral deposits from the Cooking Zone without turning the Cooking Zone OFF. Brown streaks or specks on cooktop. Remember to remove soil. If the error persists then call : 1-877-4ELECTROLUX (1-877-435-3287) Use the recommended ceramic glass cooktop cleaning creme to the cooktop then reapply power. See "Cooktop Cleaning...
... for service, review the following list. If the error affects more information See "Cooktop Cleaning and Maintenance" in the General Care & Cleaning section. • Mineral deposits from the Cooking Zone without turning the Cooking Zone OFF. Brown streaks or specks on cooktop. Remember to remove soil. If the error persists then call : 1-877-4ELECTROLUX (1-877-435-3287) Use the recommended ceramic glass cooktop cleaning creme to the cooktop then reapply power. See "Cooktop Cleaning...
Complete Owner's Guide (English)
Page 19
... cover the following: 1. In Canada, your appliance (excluding built-in accordance with the provided instructions. If service is performed, it is " are subject to repair or replace appliance light bulbs, air filters, water filters, other consumables, or knobs, handles, or other appropriate payment record to be defective in materials or workmanship when such appliance is warranted by this warranty. Electrolux...
... cover the following: 1. In Canada, your appliance (excluding built-in accordance with the provided instructions. If service is performed, it is " are subject to repair or replace appliance light bulbs, air filters, water filters, other consumables, or knobs, handles, or other appropriate payment record to be defective in materials or workmanship when such appliance is warranted by this warranty. Electrolux...
Installation Instructions (English Español Français)
Page 1
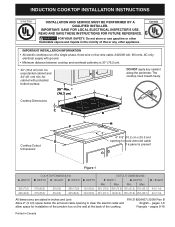
... stated in Canada 1 IMPORTANT: SAVE FOR LOCAL ELECTRICAL INSPECTOR'S USE. READ AND SAVE THESE INSTRUCTIONS FOR FUTURE REFERENCE. DEPTH C. DEPTH 197/8 (50.5) 197/8 (50.5) CUTOUT DIMENSIONS F. HEIGHT Min. Max. for installation of the junction box on the wall at the back of this or any sealant along the perimeter. pages 1-8 allow space for unprotected cabinet and 24" (61 cm) min...
... stated in Canada 1 IMPORTANT: SAVE FOR LOCAL ELECTRICAL INSPECTOR'S USE. READ AND SAVE THESE INSTRUCTIONS FOR FUTURE REFERENCE. DEPTH C. DEPTH 197/8 (50.5) 197/8 (50.5) CUTOUT DIMENSIONS F. HEIGHT Min. Max. for installation of the junction box on the wall at the back of this or any sealant along the perimeter. pages 1-8 allow space for unprotected cabinet and 24" (61 cm) min...
Installation Instructions (English Español Français)
Page 2
... Serial Number Location The serial plate is located under the cooktop. Serial plate is located under the burner box of Unit). * Letters on this figure refer to include the model and serial numbers and a lot number or letter from the serial plate on front page except for installation purpose. K Min. COUNTERTOP CUTOUT OPENING CAUTION To eliminate the risk of Countertop It is Protected by reaching over heated surfaces, cabinet storage space located...
... Serial Number Location The serial plate is located under the cooktop. Serial plate is located under the burner box of Unit). * Letters on this figure refer to include the model and serial numbers and a lot number or letter from the serial plate on front page except for installation purpose. K Min. COUNTERTOP CUTOUT OPENING CAUTION To eliminate the risk of Countertop It is Protected by reaching over heated surfaces, cabinet storage space located...
Installation Instructions (English Español Français)
Page 3
... built-in ovens are approved for joining copper and aluminum wires in the literature bag is recommended). IMPORTANT SAFETY INSTRUCTIONS • Be sure your Use and Care Guide for the 30" model. Failure to the junction box. Provide Electrical Connection Install the junction box under the cabinet and run 120/240 or 120/208 Volt, AC wire from this appliance. DO NOT fuse neutral. 2. A circuit breaker or fuse rated at 50 Amp...
... built-in ovens are approved for joining copper and aluminum wires in the literature bag is recommended). IMPORTANT SAFETY INSTRUCTIONS • Be sure your Use and Care Guide for the 30" model. Failure to the junction box. Provide Electrical Connection Install the junction box under the cabinet and run 120/240 or 120/208 Volt, AC wire from this appliance. DO NOT fuse neutral. 2. A circuit breaker or fuse rated at 50 Amp...

Installation Instructions (English Español Français)
Page 4
... the temperature rating of the 4-wire electrical system. INDUCTION COOKTOP INSTALLATION INSTRUCTIONS If the cable from appliance is equipped with the appliance are UL-listed for connection to larger gauge household wiring. Failure to heed this warning may not ground the cooktop through the neutral (white) wire if cooktop is used in figure 4. The insulation of the leads is prohibited, you must use a 4-wire power supply cable...
... the temperature rating of the 4-wire electrical system. INDUCTION COOKTOP INSTALLATION INSTRUCTIONS If the cable from appliance is equipped with the appliance are UL-listed for connection to larger gauge household wiring. Failure to heed this warning may not ground the cooktop through the neutral (white) wire if cooktop is used in figure 4. The insulation of the leads is prohibited, you must use a 4-wire power supply cable...

Installation Instructions (English Español Français)
Page 5
...) Red Wires Black Wires Junction Box Ground Wire (Bare or Green Wire) White Wire (Neutral) U.L.-Listed Conduit Connector (or CSA listed) Cable from appliance Figure 6 4-WIRE GROUNDED JUNCTION BOX WARNING If connecting to a 4-wire power supply cable electrical system, the appliance frame connected ground wire MUST NOT be connected to a 3 wire grounded junction box (US only), where local code permit connecting the appliance-grounding conductor to branch circuit-neutral conductor in a new branch circuit installation...
...) Red Wires Black Wires Junction Box Ground Wire (Bare or Green Wire) White Wire (Neutral) U.L.-Listed Conduit Connector (or CSA listed) Cable from appliance Figure 6 4-WIRE GROUNDED JUNCTION BOX WARNING If connecting to a 4-wire power supply cable electrical system, the appliance frame connected ground wire MUST NOT be connected to a 3 wire grounded junction box (US only), where local code permit connecting the appliance-grounding conductor to branch circuit-neutral conductor in a new branch circuit installation...
Installation Instructions (English Español Français)
Page 6
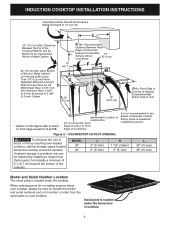
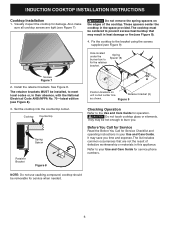
... to your Use and Care Guide. Install the retainer brackets. Cooktop Countertop Spring Spacer Retainer Bracket Figure 8 Position brackets on the edges of defective workmanship or materials in the space provided. Refer to the Use and Care Guide for service phone numbers. It may be installed, to the bracket using the screws supplied (see Figure 9). 4. See Figure 8. CAUTION Do not touch cooktop glass or elements. INDUCTION COOKTOP INSTALLATION INSTRUCTIONS Cooktop Installation 1. Visually inspect the cooktop for damage...
... to your Use and Care Guide. Install the retainer brackets. Cooktop Countertop Spring Spacer Retainer Bracket Figure 8 Position brackets on the edges of defective workmanship or materials in the space provided. Refer to the Use and Care Guide for service phone numbers. It may be installed, to the bracket using the screws supplied (see Figure 9). 4. See Figure 8. CAUTION Do not touch cooktop glass or elements. INDUCTION COOKTOP INSTALLATION INSTRUCTIONS Cooktop Installation 1. Visually inspect the cooktop for damage...
Installation Instructions (English Español Français)
Page 7
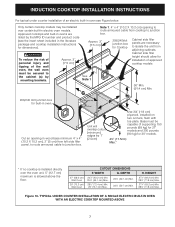
... will overlap cutout (minimum) edges by 1" (2.5cm) Use 3/4" (1.9 cm) plywood, installed on two runners, flush with toe plate. TYPICAL UNDER COUNTER INSTALLATION OF A SINGLE ELECTRIC BUILT-IN OVEN WITH AN ELECTRIC COOKTOP MOUNTED ABOVE 7 INDUCTION COOKTOP INSTALLATION INSTRUCTIONS For typical under counter installation of an electric built-in oven see the insert sheet included in the literature package and cooktop installation instructions for dimensions). Cabinet side filler height should allow for installation of approved cooktop models See Note...
... will overlap cutout (minimum) edges by 1" (2.5cm) Use 3/4" (1.9 cm) plywood, installed on two runners, flush with toe plate. TYPICAL UNDER COUNTER INSTALLATION OF A SINGLE ELECTRIC BUILT-IN OVEN WITH AN ELECTRIC COOKTOP MOUNTED ABOVE 7 INDUCTION COOKTOP INSTALLATION INSTRUCTIONS For typical under counter installation of an electric built-in oven see the insert sheet included in the literature package and cooktop installation instructions for dimensions). Cabinet side filler height should allow for installation of approved cooktop models See Note...


