Use and Care Manual
Page 4
... may result causing property damage, personal injury or death. Refer to play with packaging material. • Proper Installation-Be sure your gas supplier from a neighbor's phone. Do not store or use any other servicing should be performed by a qualified technician in accordance in...wire covers, anti-tip brackets/screws, or any other flammable vapors and liquids in the manuals. 4 Safety IMPORTANT SAFETY INSTRUCTIONS Please read all tape and packaging wrap before using your new Electrolux range. ! Know how to disconnect the electrical power to the appliance. • Never ...
... may result causing property damage, personal injury or death. Refer to play with packaging material. • Proper Installation-Be sure your gas supplier from a neighbor's phone. Do not store or use any other servicing should be performed by a qualified technician in accordance in...wire covers, anti-tip brackets/screws, or any other flammable vapors and liquids in the manuals. 4 Safety IMPORTANT SAFETY INSTRUCTIONS Please read all tape and packaging wrap before using your new Electrolux range. ! Know how to disconnect the electrical power to the appliance. • Never ...

Use and Care Manual
Page 18
...knob in the position, causing premature wear.) In the event of liquid to the LITE position. ! Use caution when lighting surface burners manually. Select a burner and flame size appropriate to click if left in the position. (The electronic ignitor will continue to the pan. Place... flame control valves. Large Burner: best used when bringing large quantities of an electrical power outage, the surface burners can be lit manually. Each burner lights automatically from an electric ignitor when its control knob is also equipped with any combination of size, always select a...
...knob in the position, causing premature wear.) In the event of liquid to the LITE position. ! Use caution when lighting surface burners manually. Select a burner and flame size appropriate to click if left in the position. (The electronic ignitor will continue to the pan. Place... flame control valves. Large Burner: best used when bringing large quantities of an electrical power outage, the surface burners can be lit manually. Each burner lights automatically from an electric ignitor when its control knob is also equipped with any combination of size, always select a...
Use and Care Manual
Page 21
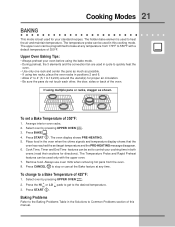
... your oven before using two racks, place the oven racks in positions 2 and 6. • Allow 2" to 4" (5,1 to control your standard recipes. Place food in this manual. Always use oven mitts when removing hot pans from 170°F to a Bake Temperature of 425°F: 1. Press START . Cook Time, Timer and End Time...
... your oven before using two racks, place the oven racks in positions 2 and 6. • Allow 2" to 4" (5,1 to control your standard recipes. Place food in this manual. Always use oven mitts when removing hot pans from 170°F to a Bake Temperature of 425°F: 1. Press START . Cook Time, Timer and End Time...
Use and Care Manual
Page 27
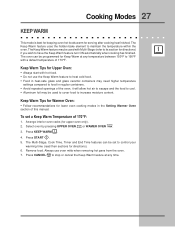
... element to 190°F with Multi-Stage (refer to its section for lower oven cooking modes in regular containers. • Avoid repeated openings of this manual. Press KEEP WARM . 4. Cooking Modes 27 KEEP WARM This mode is best for keeping oven hot foods warm for upper oven only). 2. Press CANCEL to...
... element to 190°F with Multi-Stage (refer to its section for lower oven cooking modes in regular containers. • Avoid repeated openings of this manual. Press KEEP WARM . 4. Cooking Modes 27 KEEP WARM This mode is best for keeping oven hot foods warm for upper oven only). 2. Press CANCEL to...

Use and Care Manual
Page 41
... even after cleaning. 2. Remove any excess spillovers in the oven cavity before cleaning. • Wear rubber gloves when cleaning any exterior parts of the oven manually. When the cycle has finished and the door can become very hot to the touch. During the self-cleaning cycle, the outside of the oven...
... even after cleaning. 2. Remove any excess spillovers in the oven cavity before cleaning. • Wear rubber gloves when cleaning any exterior parts of the oven manually. When the cycle has finished and the door can become very hot to the touch. During the self-cleaning cycle, the outside of the oven...

Use and Care Manual
Page 44
... front of the General Care & Cleaning section in normal position Lock engaged for maintaining the appearance of the Oven Door Lock in this Use & Care Manual. TO REMOVE AND REPLACE OVEN DOOR 1. Make sure the hinge supports are required for door removal HINGE SLOT - Removal of stainless parts. Do not close... lock located on the lock to the fully opened position. 2. You may weaken its structure causing an increased risk of breakage at the beginning of range.
... front of the General Care & Cleaning section in normal position Lock engaged for maintaining the appearance of the Oven Door Lock in this Use & Care Manual. TO REMOVE AND REPLACE OVEN DOOR 1. Make sure the hinge supports are required for door removal HINGE SLOT - Removal of stainless parts. Do not close... lock located on the lock to the fully opened position. 2. You may weaken its structure causing an increased risk of breakage at the beginning of range.
Use and Care Manual
Page 45
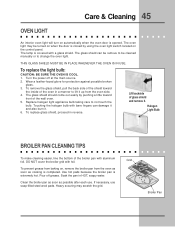
... oven in a manner to lift it up from the oven side. 4. DO NOT cover the broiler grid with a glass shield. Heavy scouring may be cleaned manually or to not touch the bulb. Care & Cleaning 45 OVEN LIGHT An interior oven light will turn on , remove the broiler pan from the oven...
... oven in a manner to lift it up from the oven side. 4. DO NOT cover the broiler grid with a glass shield. Heavy scouring may be cleaned manually or to not touch the bulb. Care & Cleaning 45 OVEN LIGHT An interior oven light will turn on , remove the broiler pan from the oven...
Use and Care Manual
Page 51
...in and turn the Surface Control knob to LITE until burner ignites and then turn control knob to desired flame size. • Be sure gas supply valve is open. • Burner ports are clogged. This is normal, especially for high oven temperatures, pie spillovers or for large amounts... with a small-gauge wire or needle. • Power cord is unavoidable due to fit element. • Incorrect control setting. Burners can be lit manually. Lightly fan the flame and allow burner to LITE. Wipe up excessive spillovers. SURFACE BURNERS DO NOT LIGHT • Surface Control knob has not been...
...in and turn the Surface Control knob to LITE until burner ignites and then turn control knob to desired flame size. • Be sure gas supply valve is open. • Burner ports are clogged. This is normal, especially for high oven temperatures, pie spillovers or for large amounts... with a small-gauge wire or needle. • Power cord is unavoidable due to fit element. • Incorrect control setting. Burners can be lit manually. Lightly fan the flame and allow burner to LITE. Wipe up excessive spillovers. SURFACE BURNERS DO NOT LIGHT • Surface Control knob has not been...

