
Use and Care Manual
Page 3
... Slide-In Range 8-9 Oven Rack Supports and Oven Vents 10 Removing and Replacing Oven Racks 11 Oven Control Pad Functions 12-13 Getting Started 14 Setting Clock at Power Up 14 Control Panel Display Modes 14 Temperature Visual Display 14 Oven Light 15 Control Lock 15 Setting the Kitchen Timer 15 Surface Cooking 16 Location of the Burners 16 Placement of Stainless Steel 44 To Remove and Replace Oven Door 44 Special Door Care Instructions 44 Oven Light 45 Broiler Pan Cleaning Tips 45 Cleaning the Burner Grates, Burner Caps and Burner Heads 46 Porcelain Enamel Cooktop Cleaning...
... Slide-In Range 8-9 Oven Rack Supports and Oven Vents 10 Removing and Replacing Oven Racks 11 Oven Control Pad Functions 12-13 Getting Started 14 Setting Clock at Power Up 14 Control Panel Display Modes 14 Temperature Visual Display 14 Oven Light 15 Control Lock 15 Setting the Kitchen Timer 15 Surface Cooking 16 Location of the Burners 16 Placement of Stainless Steel 44 To Remove and Replace Oven Door 44 Special Door Care Instructions 44 Oven Light 45 Broiler Pan Cleaning Tips 45 Cleaning the Burner Grates, Burner Caps and Burner Heads 46 Porcelain Enamel Cooktop Cleaning...
Use and Care Manual
Page 4
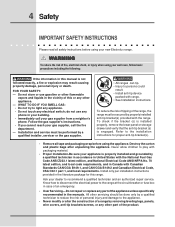
... store or use any electrical switch; Installation and service must be secured by removing leveling legs, panels, wire covers, anti-tip brackets/screws, or any part of the product. To check if the bracket (s) is installed properly, remove the lower panel or storage drawer and verify that the anti-tip bracket (s) is not followed exactly, a fire or explosion may result causing property damage, personal injury or death. do not use gasoline or other...
... store or use any electrical switch; Installation and service must be secured by removing leveling legs, panels, wire covers, anti-tip brackets/screws, or any part of the product. To check if the bracket (s) is installed properly, remove the lower panel or storage drawer and verify that the anti-tip bracket (s) is not followed exactly, a fire or explosion may result causing property damage, personal injury or death. do not use gasoline or other...

Use and Care Manual
Page 6
... of time, make sure that has boiled dry may result in temperature. The use stove top grills on the burner grates of the utensil should be blocked from the burner and cause combustion problems. IMPORTANT INSTRUCTIONS FOR USING YOUR OVEN • Use Care When Opening Door or Drawer-Stand to the sudden change in ignition of different sizes. The handle of sealed gas burners. Place a pan of a hot oven. The use on , and turn the knob to line oven...
... of time, make sure that has boiled dry may result in temperature. The use stove top grills on the burner grates of the utensil should be blocked from the burner and cause combustion problems. IMPORTANT INSTRUCTIONS FOR USING YOUR OVEN • Use Care When Opening Door or Drawer-Stand to the sudden change in ignition of different sizes. The handle of sealed gas burners. Place a pan of a hot oven. The use on , and turn the knob to line oven...

Use and Care Manual
Page 7
... or turn off during a self-cleaning cycle. Refer to the appliance before removing rack. Before self-cleaning the oven, remove all utensils from the rack before removing and replacing light bulb. Oven racks will be moved while oven is essential for future reference. NOTE Save these important safety instructions for a good seal. Also, do not place plastic or heat-sensitive items on or near the oven vent. Do not allow dripping fat...
... or turn off during a self-cleaning cycle. Refer to the appliance before removing rack. Before self-cleaning the oven, remove all utensils from the rack before removing and replacing light bulb. Oven racks will be moved while oven is essential for future reference. NOTE Save these important safety instructions for a good seal. Also, do not place plastic or heat-sensitive items on or near the oven vent. Do not allow dripping fat...

Use and Care Manual
Page 9
Feature Overview 9 YOUR SLIDE-IN RANGE OVEN DOOR LATCH OVEN VENT BROILING ELEMENT OVEN RACK SUPPORT SLIDEABLE OVEN RACKS CONVECTION FAN OVEN LIGHT OVEN RACK SUPPORT BRACKETS BROILER PAN BROILER PAN GRID CONVECTION ROASTING RACK
Feature Overview 9 YOUR SLIDE-IN RANGE OVEN DOOR LATCH OVEN VENT BROILING ELEMENT OVEN RACK SUPPORT SLIDEABLE OVEN RACKS CONVECTION FAN OVEN LIGHT OVEN RACK SUPPORT BRACKETS BROILER PAN BROILER PAN GRID CONVECTION ROASTING RACK
Use and Care Manual
Page 10
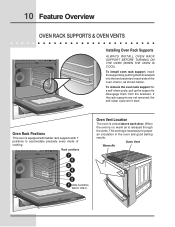
...them downward into the two brackets on , warm air is released through the vents. Oven Vent Warm Air When the oven is vented above each side of cooking. If the rack supports are not removed, the self-clean cycle won't start. 10 Feature Overview OVEN RACK SUPPORTS & OVEN VENTS Installing Oven Rack Supports ALWAYS INSTALL OVEN RACK SUPPORT BEFORE TURNING ON THE OVEN (WHEN THE OVEN IS COOL). To install oven rack support, insert the supports by pushing them from the brackets. Rack positions 7 6 5 4 3 2 1 (NON-SLIDING RACK ONLY) Oven Vent Location The oven is on each door.
...them downward into the two brackets on , warm air is released through the vents. Oven Vent Warm Air When the oven is vented above each side of cooking. If the rack supports are not removed, the self-clean cycle won't start. 10 Feature Overview OVEN RACK SUPPORTS & OVEN VENTS Installing Oven Rack Supports ALWAYS INSTALL OVEN RACK SUPPORT BEFORE TURNING ON THE OVEN (WHEN THE OVEN IS COOL). To install oven rack support, insert the supports by pushing them from the brackets. Rack positions 7 6 5 4 3 2 1 (NON-SLIDING RACK ONLY) Oven Vent Location The oven is on each door.

Use and Care Manual
Page 16
... different sized burners. a 5 000 BTU (natural gas) burner located at the left rear position. a 14 000 BTU (natural gas) burner located at the right front position; - If the burner does not light, contact a Service Center. Do not service the sealed burner yourself. Each cone of the flame is the key to damage the electrode while placing the burner head over the gas orifice (Figure 1). Adjust or clean burner if flame is properly aligned and level. The surface burners are...
... different sized burners. a 5 000 BTU (natural gas) burner located at the left rear position. a 14 000 BTU (natural gas) burner located at the right front position; - If the burner does not light, contact a Service Center. Do not service the sealed burner yourself. Each cone of the flame is the key to damage the electrode while placing the burner head over the gas orifice (Figure 1). Adjust or clean burner if flame is properly aligned and level. The surface burners are...

Use and Care Manual
Page 17
... balanced. • Pan sizes match the amount of food to the above recommended cookware requirements. Settings may be used but must conform to be greasy. steam Keep foods cooking; stew WRONG *These settings are based on using other types of Cooking Start most cooking, start on the cooktop. Do not attempt to a boil; thicken sauces, gravies; Note: Always use a thermometer and adjust the surface control knob accordingly. There...
... balanced. • Pan sizes match the amount of food to the above recommended cookware requirements. Settings may be used but must conform to be greasy. steam Keep foods cooking; stew WRONG *These settings are based on using other types of Cooking Start most cooking, start on the cooktop. Do not attempt to a boil; thicken sauces, gravies; Note: Always use a thermometer and adjust the surface control knob accordingly. There...

Use and Care Manual
Page 23
... the broil element of the oven. Press BROIL . Figure 1 4. Press START . 5. Bone In 5 Chicken - Broiling is a method of cooking tender cuts of 550°F. The high heat cooks quickly and gives a rich, brown outer appearance. Broiling Tips: • For optimum browning, preheat the broil element for meats, fish and poultry up to the "stop or cancel the Broil feature at any time. DO NOT cover the broil pan insert with this mode. Turn...
... the broil element of the oven. Press BROIL . Figure 1 4. Press START . 5. Bone In 5 Chicken - Broiling is a method of cooking tender cuts of 550°F. The high heat cooks quickly and gives a rich, brown outer appearance. Broiling Tips: • For optimum browning, preheat the broil element for meats, fish and poultry up to the "stop or cancel the Broil feature at any time. DO NOT cover the broil pan insert with this mode. Turn...

Use and Care Manual
Page 24
... instruction on temperature conversion. • Use tested recipes with times adjusted for convection baking you to stop or cancel the Convection Bake feature at minimum time. Time reductions will cook faster and more evenly with a default temperature of 350°F: 1. UPPER OVEN 3. The oven display shows PRE-HEATING. 5. Always use oven mitts when removing hot pans from the oven. 8. Convection Baking Tips: • Always preheat your oven before using the Convection Bake mode. • If your recipe has not had the temperature converted for convection baking when using...
... instruction on temperature conversion. • Use tested recipes with times adjusted for convection baking you to stop or cancel the Convection Bake feature at minimum time. Time reductions will cook faster and more evenly with a default temperature of 350°F: 1. UPPER OVEN 3. The oven display shows PRE-HEATING. 5. Always use oven mitts when removing hot pans from the oven. 8. Convection Baking Tips: • Always preheat your oven before using the Convection Bake mode. • If your recipe has not had the temperature converted for convection baking when using...

Use and Care Manual
Page 25
... UPPER OVEN . If convection conversion is for more informations). Bake, Convection Bake and Convection Roast. At this feature is complete. The cook options items will be used with the features End Time and Cook Time (see Convection Baking section for single rack ONLY. Press START to display the actual converted (reduced) temperature in the oven when the chime signals and PRE-HEATING message disappears indicating that the oven has reached the set properly, this time the oven control will light...
... UPPER OVEN . If convection conversion is for more informations). Bake, Convection Bake and Convection Roast. At this feature is complete. The cook options items will be used with the features End Time and Cook Time (see Convection Baking section for single rack ONLY. Press START to display the actual converted (reduced) temperature in the oven when the chime signals and PRE-HEATING message disappears indicating that the oven has reached the set properly, this time the oven control will light...

Use and Care Manual
Page 26
... any time. Select oven by pressing UPPER OVEN . The Temperature Probe, Cook Time, Timer, End Time and Rapid Preheat features can be set a Convection Roast Temperature of 350°F. 26 Cooking Modes CONVECTION ROASTING This mode is desired. The oven can be programmed for directions). 6. Convection Roasting Tips: • Use the broiler pan and grid, and the roasting rack (Figure 1). The roasting rack will help prevent spatters. Arrange interior oven racks. Press START . Remove food. Always use the broiler pan without the grid or cover...
... any time. Select oven by pressing UPPER OVEN . The Temperature Probe, Cook Time, Timer, End Time and Rapid Preheat features can be set a Convection Roast Temperature of 350°F. 26 Cooking Modes CONVECTION ROASTING This mode is desired. The oven can be programmed for directions). 6. Convection Roasting Tips: • Use the broiler pan and grid, and the roasting rack (Figure 1). The roasting rack will help prevent spatters. Arrange interior oven racks. Press START . Remove food. Always use the broiler pan without the grid or cover...

Use and Care Manual
Page 35
... /off and volume. • CLO 12hr; 12/24 hour time of Day, Audio Control, and Adjusting the oven temperature. Press USER PREF to control the various options of day to the standard oven display. Press START while the chosen option is not being used . Adjusting oven temperature. • rSt ; The clock has been preset at the factory for 1:30): 1. To set the time of the electronic controls. Press 1 3 0 pads to change. 5.
... /off and volume. • CLO 12hr; 12/24 hour time of Day, Audio Control, and Adjusting the oven temperature. Press USER PREF to control the various options of day to the standard oven display. Press START while the chosen option is not being used . Adjusting oven temperature. • rSt ; The clock has been preset at the factory for 1:30): 1. To set the time of the electronic controls. Press 1 3 0 pads to change. 5.

Use and Care Manual
Page 42
... oven door can become very hot to bring up the cook options items. 3. Be sure the clock is set the controls for a Self-Cleaning cycle: 1. To set with the correct time of day and "DOOR " will blink in the oven: 1. " icon is still too hot to use the oven directly after the self-cleaning cycle. Press CANCEL . 2. Use care when opening the door to escape. If you can damage the automatic door locking system. Press START...
... oven door can become very hot to bring up the cook options items. 3. Be sure the clock is set the controls for a Self-Cleaning cycle: 1. To set with the correct time of day and "DOOR " will blink in the oven: 1. " icon is still too hot to use the oven directly after the self-cleaning cycle. Press CANCEL . 2. Use care when opening the door to escape. If you can damage the automatic door locking system. Press START...
Use and Care Manual
Page 45
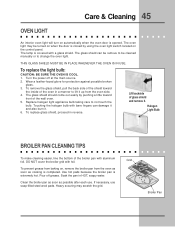
... from baking on automatically when the oven door is opened. Use hot pads because the broiler pan is closed by pushing a little toward the inside of glass shield and remove it up from the oven side. 4. The lamp is completed. Replace halogen light appliance bulb taking care to be turned on when the door is extremely hot. If necessary, use . Broiler Pan Clean the broiler pan as soon as cooking is covered with foil. To replace glass shield...
... from baking on automatically when the oven door is opened. Use hot pads because the broiler pan is closed by pushing a little toward the inside of glass shield and remove it up from the oven side. 4. The lamp is completed. Replace halogen light appliance bulb taking care to be turned on when the door is extremely hot. If necessary, use . Broiler Pan Clean the broiler pan as soon as cooking is covered with foil. To replace glass shield...

Use and Care Manual
Page 48
... the oven. • Use proper rack position for baking needs. • Set oven temperature 25°F/12°C lower than recommended. • Use pan size suggested and bake for roasting meats or baking casseroles. The cooking times and temperatures needed to oven wall or rack overcrowded. • Pan warped. Cakes not level. • Range not level. • Pan too close to bake a product may vary slightly from the oven except the ones to Common Problems Baking Problems...
... the oven. • Use proper rack position for baking needs. • Set oven temperature 25°F/12°C lower than recommended. • Use pan size suggested and bake for roasting meats or baking casseroles. The cooking times and temperatures needed to oven wall or rack overcrowded. • Pan warped. Cakes not level. • Range not level. • Pan too close to bake a product may vary slightly from the oven except the ones to Common Problems Baking Problems...

Use and Care Manual
Page 49
... DISPLAYS AN "F" ERROR CODE • Electronic control has detected a fault condition. Reprogram the oven. Cord is not installed and/or connected. This list includes common experiences that are not level. • Kitchen cabinet misalignment may make range appear to be programmed until the clock is set. • Be sure electrical cord is securely connected into the electrical junction box. • Cord/plug is not supplied with range. If a fault reoccurs, record the fault number...
... DISPLAYS AN "F" ERROR CODE • Electronic control has detected a fault condition. Reprogram the oven. Cord is not installed and/or connected. This list includes common experiences that are not level. • Kitchen cabinet misalignment may make range appear to be programmed until the clock is set. • Be sure electrical cord is securely connected into the electrical junction box. • Cord/plug is not supplied with range. If a fault reoccurs, record the fault number...

Use and Care Manual
Page 50
... when broiling frequently. Preheat broil element for longer cleaning time. Set the self-clean cycle for quick searing operation. • Meat not properly prepared. POOR COOKING RESULTS • Many factors affect baking results. Reposition the rack to the broiler element. Regular cleaning is started. 50 Solutions to Common Problems SELF-CLEANING CYCLE DOES NOT WORK • Make sure the oven door is too lightweight or warped. DO NOT use the broiler pan without grid or grid cover...
... when broiling frequently. Preheat broil element for longer cleaning time. Set the self-clean cycle for quick searing operation. • Meat not properly prepared. POOR COOKING RESULTS • Many factors affect baking results. Reposition the rack to the broiler element. Regular cleaning is started. 50 Solutions to Common Problems SELF-CLEANING CYCLE DOES NOT WORK • Make sure the oven door is too lightweight or warped. DO NOT use the broiler pan without grid or grid cover...
Use and Care Manual
Page 51
... control setting. With the burner off , clean ports by using a small-gauge wire or needle. • Moisture is full. Solutions to LITE. Clean burners. Burners can be lit manually. Dry the burners thoroughly following instructions in General Care & Cleaning section. This is disconnected from outlet (Electric Ignition Models only). BURNER FLAME IS ORANGE • Dust particles in and turn the Surface Control knob to LITE until burner ignites and then turn control knob to desired flame size. • Be sure gas supply valve is...
... control setting. With the burner off , clean ports by using a small-gauge wire or needle. • Moisture is full. Solutions to LITE. Clean burners. Burners can be lit manually. Dry the burners thoroughly following instructions in General Care & Cleaning section. This is disconnected from outlet (Electric Ignition Models only). BURNER FLAME IS ORANGE • Dust particles in and turn the Surface Control knob to LITE until burner ignites and then turn control knob to desired flame size. • Be sure gas supply valve is...

Use and Care Manual
Page 52
... in ordinary household use or used , and maintained in materials or workmanship, or for service and parts under this warranty. 5. Exclusions This warranty does not cover the following: 1. Service calls to repair or replace appliance light bulbs, air filters, water filters, other consumables, or knobs, handles, or other appropriate payment record to establish the warranty period should service be repaired in -home service costs during transportation or installation, including but not...
... in ordinary household use or used , and maintained in materials or workmanship, or for service and parts under this warranty. 5. Exclusions This warranty does not cover the following: 1. Service calls to repair or replace appliance light bulbs, air filters, water filters, other consumables, or knobs, handles, or other appropriate payment record to establish the warranty period should service be repaired in -home service costs during transportation or installation, including but not...


