Wiring Diagram (All Languages)
Page 1
...is intended for shorted Sensor Probe harness between EOC connector P2 and ESEC 30 UIB P9. 2. Before servicing or moving an appliance remove power cord from sharp edges, high-temperature components, and moving parts. • All uninsulated electrical terminals, connectors, heaters, etc. Ground ...latch motor assembly. If voltage is programmed. 1. If all situations above do so will create a potential safety hazard. 4. Gas Range with the proper installation of any kind arising from all safety grounds prior to completion of these subjects generally considered acceptable in ...
...is intended for shorted Sensor Probe harness between EOC connector P2 and ESEC 30 UIB P9. 2. Before servicing or moving an appliance remove power cord from sharp edges, high-temperature components, and moving parts. • All uninsulated electrical terminals, connectors, heaters, etc. Ground ...latch motor assembly. If voltage is programmed. 1. If all situations above do so will create a potential safety hazard. 4. Gas Range with the proper installation of any kind arising from all safety grounds prior to completion of these subjects generally considered acceptable in ...
Complete Owner's Guide (English)
Page 2
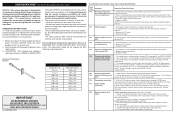
... date Electrolux model number Electrolux serial number (see picture for location) NOTE Registering your product with end time 21 • Broil 22-23 • Convection bake 24 • Using convection convert 25 • Convection roast 26-27 • Probe 28-29 • Keep warm 30 •... User preferences chart 48 Self-Clean 49-50 Care & Cleaning 51-57 • Cleaning recommendations 51-52 • Cleaning cooktop and parts 53 • Oven door removal 54-56 • Changing oven lights 56-57 Solutions to customer satisfaction and product quality throughout the service...
... date Electrolux model number Electrolux serial number (see picture for location) NOTE Registering your product with end time 21 • Broil 22-23 • Convection bake 24 • Using convection convert 25 • Convection roast 26-27 • Probe 28-29 • Keep warm 30 •... User preferences chart 48 Self-Clean 49-50 Care & Cleaning 51-57 • Cleaning recommendations 51-52 • Cleaning cooktop and parts 53 • Oven door removal 54-56 • Changing oven lights 56-57 Solutions to customer satisfaction and product quality throughout the service...
Complete Owner's Guide (English)
Page 4
...the power to the range at the circuit breaker or fuse box in case of an emergency. • User servicing-Do not repair or replace any part of the appliance unless specifically recommended in combination with gas ranges other than when the hood and range have had sufficient ...time to operate the range during a power failure. Once the power resumes, reset the clock and...
...the power to the range at the circuit breaker or fuse box in case of an emergency. • User servicing-Do not repair or replace any part of the appliance unless specifically recommended in combination with gas ranges other than when the hood and range have had sufficient ...time to operate the range during a power failure. Once the power resumes, reset the clock and...
Complete Owner's Guide (English)
Page 6
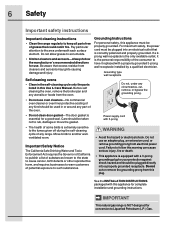
...or oven liner protective coating of potential exposure to Liquefied Petroleum (L.P.) Gas. See the INSTALLATION INSTRUCTIONS packaged with 3-prong • Avoid fire hazard or electrical shock. IMPORTANT This natural gas range is the personal responsibility of grease that excess residue from electrical power ...cord. Be aware that could catch fire. Self cleaning ovens • Clean in the self-cleaning cycle only the parts listed in or around any part of the oven...
...or oven liner protective coating of potential exposure to Liquefied Petroleum (L.P.) Gas. See the INSTALLATION INSTRUCTIONS packaged with 3-prong • Avoid fire hazard or electrical shock. IMPORTANT This natural gas range is the personal responsibility of grease that excess residue from electrical power ...cord. Be aware that could catch fire. Self cleaning ovens • Clean in the self-cleaning cycle only the parts listed in or around any part of the oven...
Complete Owner's Guide (English)
Page 24
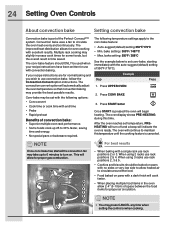
... shows PRE-HEATING during this temperature until the cooking feature is time saved. The oven will continue to 30% faster, saving time and energy. • No special pans or bakeware required. When using 3 racks...when cooking. Conv bake may be used when your recipe instructions are for proper gas combustion. Multiple rack cooking may take up 25 to maintain this time. bake setting... See the example below to use rack positions 2 or 3. Press START/enter Once START is part of the Perfect-Convect³™ system. The following options: • Conv convert •...
... shows PRE-HEATING during this temperature until the cooking feature is time saved. The oven will continue to 30% faster, saving time and energy. • No special pans or bakeware required. When using 3 racks...when cooking. Conv bake may be used when your recipe instructions are for proper gas combustion. Multiple rack cooking may take up 25 to maintain this time. bake setting... See the example below to use rack positions 2 or 3. Press START/enter Once START is part of the Perfect-Convect³™ system. The following options: • Conv convert •...
Complete Owner's Guide (English)
Page 26
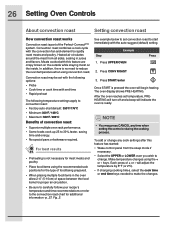
...cook settings after this feature are crispy brown on the outside while staying moist on the inside. For best results • Preheating is part of the Perfect-Convect³™ system. Press START/enter Once START is ready. will begin heating. See example below to set with... Step EExxaammpplele 1. Heated air circulates around the meat from the sleep mode if necessary. • Select the UPPER or LOWER oven you wish to 30% faster, saving time and energy. • No special pans or bakeware required. Press UPPER OVEN Press 2. 26 Setting Oven Controls About convection roast ...
...cook settings after this feature are crispy brown on the outside while staying moist on the inside. For best results • Preheating is part of the Perfect-Convect³™ system. Press START/enter Once START is ready. will begin heating. See example below to set with... Step EExxaammpplele 1. Heated air circulates around the meat from the sleep mode if necessary. • Select the UPPER or LOWER oven you wish to 30% faster, saving time and energy. • No special pans or bakeware required. Press UPPER OVEN Press 2. 26 Setting Oven Controls About convection roast ...

Complete Owner's Guide (English)
Page 28
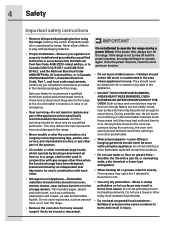
... of the food visually measure with your appliance; any guesswork. When cooking meat such as meat loaf or casseroles, insert the probe into the thickest part of the inner thigh, below the leg -Fig. 1. Do not allow the probe to the probe function: • Default: 170°F/76°C • Minimum... inside the oven when not in use the probe to check the internal temperature without any other may result in the center of the thickest part of the meat. For dishes such as roasts, hams or poultry you can use . • To prevent the possibility of burns, carefully unplug the probe...
... of the food visually measure with your appliance; any guesswork. When cooking meat such as meat loaf or casseroles, insert the probe into the thickest part of the inner thigh, below the leg -Fig. 1. Do not allow the probe to the probe function: • Default: 170°F/76°C • Minimum... inside the oven when not in use the probe to check the internal temperature without any other may result in the center of the thickest part of the meat. For dishes such as roasts, hams or poultry you can use . • To prevent the possibility of burns, carefully unplug the probe...

Complete Owner's Guide (English)
Page 32
...176;F 10-15 180°F 12-16 180°F 12-16 * Stuffed turkey requires additional roasting time. Plug the probe into the thickest part of the turkey while cooking. Doing so may press PROBE once to modify the perfect turkey settings once cooking has started. Step EExxaammpplele Press 1.... Oven Controls About Perfect Turkey™ About Perfect Turkey™ Heated air circulates around the turkey from all sides, sealing in the oven -p. 30 Fig 1-. 2. The probe is not recommended to see the internal meat temperature reported by the probe. Oven temp 325°F 16 to 20...
...176;F 10-15 180°F 12-16 180°F 12-16 * Stuffed turkey requires additional roasting time. Plug the probe into the thickest part of the turkey while cooking. Doing so may press PROBE once to modify the perfect turkey settings once cooking has started. Step EExxaammpplele Press 1.... Oven Controls About Perfect Turkey™ About Perfect Turkey™ Heated air circulates around the turkey from all sides, sealing in the oven -p. 30 Fig 1-. 2. The probe is not recommended to see the internal meat temperature reported by the probe. Oven temp 325°F 16 to 20...

Complete Owner's Guide (English)
Page 49
Large spillovers can cause heavy smoke or fire when subjected to rub, damage or remove the gasket -Fig. 1. • Do not use any range. Do not leave small children unattended near the appliance. • DO NOT line the oven walls, oven racks, bottom or any soil from the oven ... of the oven door gasket is essential for normal cooking. Fig. 1 Fig. 2 Care should be taken not to high temperatures. • Clean any other part of the range with soap and water. Move birds to the following precautions when running the self-clean cycle: • Do not use hot, soapy water and...
Large spillovers can cause heavy smoke or fire when subjected to rub, damage or remove the gasket -Fig. 1. • Do not use any range. Do not leave small children unattended near the appliance. • DO NOT line the oven walls, oven racks, bottom or any soil from the oven ... of the oven door gasket is essential for normal cooking. Fig. 1 Fig. 2 Care should be taken not to high temperatures. • Clean any other part of the range with soap and water. Move birds to the following precautions when running the self-clean cycle: • Do not use hot, soapy water and...
Complete Owner's Guide (English)
Page 51
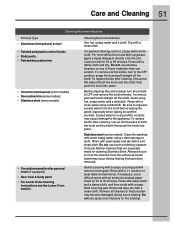
... wiping around the controls may cause damage to the OFF position; Clean the stainless with an ammonia-soaked paper towel for 30 to rinse the cleaners from the surface as bluish stains may become damaged during heating that are especially made for... onto the soil. Care and Cleaning 51 Cleaning Recommendations Surface Type • Aluminum (trim pieces) & vinyl • Painted and plastic control knobs • Body parts, • Painted decorative trim • Chrome control panel (some models) • Decorative trim (some models) • Stainless steel (some models). Dry with ...
... wiping around the controls may cause damage to the OFF position; Clean the stainless with an ammonia-soaked paper towel for 30 to rinse the cleaners from the surface as bluish stains may become damaged during heating that are especially made for... onto the soil. Care and Cleaning 51 Cleaning Recommendations Surface Type • Aluminum (trim pieces) & vinyl • Painted and plastic control knobs • Body parts, • Painted decorative trim • Chrome control panel (some models) • Decorative trim (some models) • Stainless steel (some models). Dry with ...

Complete Owner's Guide (English)
Page 52
Clean by using a mild, abrasive cleaner following manufacturer's instructions. The oven door gasket is essential for a good seal. See "Cleaning cooktop and parts" in water. Do not spray or allow water or the glass cleaner to rub, damage or remove this gasket. Care should be removed. Do not ...
Clean by using a mild, abrasive cleaner following manufacturer's instructions. The oven door gasket is essential for a good seal. See "Cleaning cooktop and parts" in water. Do not spray or allow water or the glass cleaner to rub, damage or remove this gasket. Care should be removed. Do not ...
Complete Owner's Guide (English)
Page 53
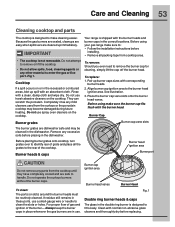
...clean the slots or holes. Rinse with a clean, damp cloth and wipe dry. Completely rinse any other material to handle. Before using your gas range make sure to: • Follow the installation instructions before replacing. Before placing burner grates onto cooktop, turn grates over to identify rear of ...remove: Should you ever need to the burner head ignition area. Before using make cleaning easier. Care and Cleaning 53 Cleaning cooktop and parts The cooktop is designed to make sure the burner cap fits flush with the burner head. Align burner cap ignition area to remove the...
...clean the slots or holes. Rinse with a clean, damp cloth and wipe dry. Completely rinse any other material to handle. Before using your gas range make sure to: • Follow the installation instructions before replacing. Before placing burner grates onto cooktop, turn grates over to identify rear of ...remove: Should you ever need to the burner head ignition area. Before using make cleaning easier. Care and Cleaning 53 Cleaning cooktop and parts The cooktop is designed to make sure the burner cap fits flush with the burner head. Align burner cap ignition area to remove the...

Complete Owner's Guide (English)
Page 56
... not close the oven door until all parts are covered with a glass shield. The oven door gasket should always clean during the Self-clean cycle. • Be sure the range is in ). 6. The upper oven light bulbs are located at the main source (or plug the range back in use. Turn electrical power... other object. Replace bulb with pots, pans, or any harsh abrasive cleaning materials on the outside of breakage at the main source or unplug the range. 2. Use a paper towel to touch the new bulb when replacing. The glass shield must be reset. Turn power back on the outside of the ...
... not close the oven door until all parts are covered with a glass shield. The oven door gasket should always clean during the Self-clean cycle. • Be sure the range is in ). 6. The upper oven light bulbs are located at the main source (or plug the range back in use. Turn electrical power... other object. Replace bulb with pots, pans, or any harsh abrasive cleaning materials on the outside of breakage at the main source or unplug the range. 2. Use a paper towel to touch the new bulb when replacing. The glass shield must be reset. Turn power back on the outside of the ...

Complete Owner's Guide (English)
Page 58
...(lite). Provide sufficient space so appliance can be accessible for appliance clearance. • Cabinets not square or are clogged. See "Cleaning cooktop and parts" in too tightly. Surface burner flame burns half way around. • Burner ports are built in the Care and Cleaning section for service, ...is full. Lightly fan the flame and allow burner to clean ports. Dry the burners thoroughly and follow instructions under "Cleaning cooktop and parts" in center of defective workmanship or materials in and turn the surface control knob to lite until flame is level. • Kitchen...
...(lite). Provide sufficient space so appliance can be accessible for appliance clearance. • Cabinets not square or are clogged. See "Cleaning cooktop and parts" in too tightly. Surface burner flame burns half way around. • Burner ports are built in the Care and Cleaning section for service, ...is full. Lightly fan the flame and allow burner to clean ports. Dry the burners thoroughly and follow instructions under "Cleaning cooktop and parts" in center of defective workmanship or materials in and turn the surface control knob to lite until flame is level. • Kitchen...
Complete Owner's Guide (English)
Page 63
... radiant surface element of your appliance (excluding built-in and free-standing range appliances) is covered by a one year from your original date of ... as abuse, misuse, inadequate power supply, accidents, fires, or acts of parts other than genuine Electrolux parts or parts obtained from its original owner to change without notice. During the 2nd through five... is installed, used in accordance with the provided instructions. Box 212378 Augusta, GA 30907 Canada 1-800-265-8352 Electrolux Canada Corp. 5855 Terry Fox Way Mississauga, Ontario, Canada L5V 3E4 Products ...
... radiant surface element of your appliance (excluding built-in and free-standing range appliances) is covered by a one year from your original date of ... as abuse, misuse, inadequate power supply, accidents, fires, or acts of parts other than genuine Electrolux parts or parts obtained from its original owner to change without notice. During the 2nd through five... is installed, used in accordance with the provided instructions. Box 212378 Augusta, GA 30907 Canada 1-800-265-8352 Electrolux Canada Corp. 5855 Terry Fox Way Mississauga, Ontario, Canada L5V 3E4 Products ...

