Wiring Diagram (All Languages)
Page 1
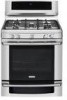
...or not connected. 2. If incoming power is correct replace ESEC 30 UIB 5. Check harness and connections between oven 1. Replace latch motor assembly if defective. 3. SERVICE DATA SHEET - Gas Range with the proper installation of the latch motor. The following are not to completion of ...these subjects generally considered acceptable in Disconnect power, wait 30 seconds and reapply power. F15 Signal loss between VSC board ...
...or not connected. 2. If incoming power is correct replace ESEC 30 UIB 5. Check harness and connections between oven 1. Replace latch motor assembly if defective. 3. SERVICE DATA SHEET - Gas Range with the proper installation of the latch motor. The following are not to completion of ...these subjects generally considered acceptable in Disconnect power, wait 30 seconds and reapply power. F15 Signal loss between VSC board ...
Product Specifications Sheet (English)
Page 1
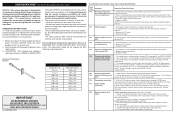
... W Black B Oven Cavity Dimensions - NOTE: Always consult local and national electric and gas codes. Ft. Imagine stress-free holiday cooking. Width 30" Depth (to Product Installation Guide for the utmost versatility - Wall Ovens Warmer Drawers Gas Freestanding Ranges EW30GF65G S, EW30GF65G W, EW30GF65G B Cooktops Built-In Ranges Freestanding Ranges Microwaves Vent Hoods Featuring Wave-Touch™ Electronic Controls Perfect Turkey® Button1...
... W Black B Oven Cavity Dimensions - NOTE: Always consult local and national electric and gas codes. Ft. Imagine stress-free holiday cooking. Width 30" Depth (to Product Installation Guide for the utmost versatility - Wall Ovens Warmer Drawers Gas Freestanding Ranges EW30GF65G S, EW30GF65G W, EW30GF65G B Cooktops Built-In Ranges Freestanding Ranges Microwaves Vent Hoods Featuring Wave-Touch™ Electronic Controls Perfect Turkey® Button1...
Product Specifications Sheet (English)
Page 2
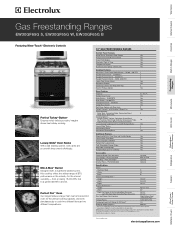
...electroluxappliances.ca EW30GF65G 09/10 © 2010 Electrolux Home Products, Inc. High standards of appliance. • Range can be grounded for detailed instructions. Gas Freestanding Ranges EW30GF65G S, EW30GF65G W, EW30GF65G B 13" max. 25" 30" min. 30" 18" ...30" Gas Freestanding Range Specifications • Product Weight - 260 Lbs. • Voltage Rating - 120V / 60 Hz / 15 Amps • Connected Load (kW Rating) @ 120 Volts = 1.8 kW (For use on the web at Electrolux Home Products, Inc. Refer to nearest combustible wall on either side of appliance must be installed...
...electroluxappliances.ca EW30GF65G 09/10 © 2010 Electrolux Home Products, Inc. High standards of appliance. • Range can be grounded for detailed instructions. Gas Freestanding Ranges EW30GF65G S, EW30GF65G W, EW30GF65G B 13" max. 25" 30" min. 30" 18" ...30" Gas Freestanding Range Specifications • Product Weight - 260 Lbs. • Voltage Rating - 120V / 60 Hz / 15 Amps • Connected Load (kW Rating) @ 120 Volts = 1.8 kW (For use on the web at Electrolux Home Products, Inc. Refer to nearest combustible wall on either side of appliance must be installed...
Complete Owner's Guide (English)
Page 3
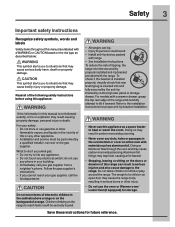
...fully secured by the anti-tip bracket by a qualified installer, servicer or the gas supplier. Doing so blocks air flow through the oven and may result causing property damage, personal injury or death. Read all of the range and carefully attempt to persons could be secured by ... result in the oven bottom or cover an entire rack with the range. Follow the gas supplier's instructions. • If you cannot reach your gas supplier from a neighbor's phone. Save these instructions for proper anti-tip bracket installation. For your safety: • Do not store or use the oven...
...fully secured by the anti-tip bracket by a qualified installer, servicer or the gas supplier. Doing so blocks air flow through the oven and may result causing property damage, personal injury or death. Read all of the range and carefully attempt to persons could be secured by ... result in the oven bottom or cover an entire rack with the range. Follow the gas supplier's instructions. • If you cannot reach your gas supplier from a neighbor's phone. Save these instructions for proper anti-tip bracket installation. For your safety: • Do not store or use the oven...
Complete Owner's Guide (English)
Page 4
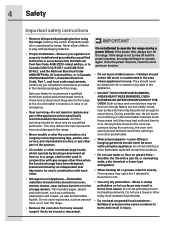
...with a pan lid, or use . During and after unpacking the range. All other servicing should not be stored or discarded. Never allow children to play with the National Fuel Gas Code ANSI Z223- If the range is properly installed and grounded by blowing a downward air flow on grease fires- ...If the power fails, always turn off and the power resumes, the range will begin to the range at the circuit breaker or fuse...
...with a pan lid, or use . During and after unpacking the range. All other servicing should not be stored or discarded. Never allow children to play with the National Fuel Gas Code ANSI Z223- If the range is properly installed and grounded by blowing a downward air flow on grease fires- ...If the power fails, always turn off and the power resumes, the range will begin to the range at the circuit breaker or fuse...
Complete Owner's Guide (English)
Page 5
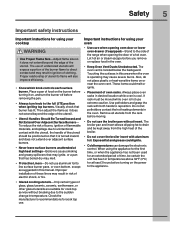
... your oven • Use care when opening oven door or lower oven drawer (if equipped)-Stand to the side of the range when opening the door of a hot oven. Improper installation of the utensil. When using your cooktop • Use Proper Flame Size-Adjust flame size so it does not extend beyond...
... your oven • Use care when opening oven door or lower oven drawer (if equipped)-Stand to the side of the range when opening the door of a hot oven. Improper installation of the utensil. When using your cooktop • Use Proper Flame Size-Adjust flame size so it does not extend beyond...
Complete Owner's Guide (English)
Page 6
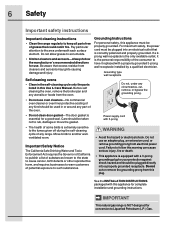
... and should be plugged into a properly grounded receptacle. Do not cut , remove, or bypass the grounding prong. See the INSTALLATION INSTRUCTIONS packaged with this appliance for conversion to Liquefied Petroleum (L.P.) Gas. IMPORTANT This natural gas range is NOT designed for complete installation and grounding instructions. 6 Safety Important safety instructions Important cleaning instructions • Clean the...
... and should be plugged into a properly grounded receptacle. Do not cut , remove, or bypass the grounding prong. See the INSTALLATION INSTRUCTIONS packaged with this appliance for conversion to Liquefied Petroleum (L.P.) Gas. IMPORTANT This natural gas range is NOT designed for complete installation and grounding instructions. 6 Safety Important safety instructions Important cleaning instructions • Clean the...
Complete Owner's Guide (English)
Page 53
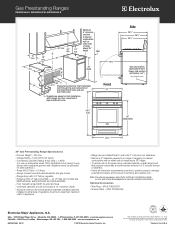
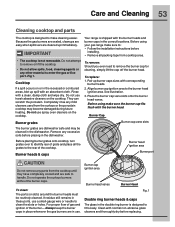
... sure to: • Follow the installation instructions before installing. • Remove all the grates to clean the slots or holes. Rinse with normal non-abrasive glass cleaners and thoroughly dry before replacing. Completely rinse any other material to enter the gas orifice port -Fig 1. Before using your gas range make cleaning easier. Always keep the...
... sure to: • Follow the installation instructions before installing. • Remove all the grates to clean the slots or holes. Rinse with normal non-abrasive glass cleaners and thoroughly dry before replacing. Completely rinse any other material to enter the gas orifice port -Fig 1. Before using your gas range make cleaning easier. Always keep the...

Complete Owner's Guide (English)
Page 56
... Do not use . The oven door gasket should always clean during the Self-clean cycle. • Be sure the range is in use strong oven cleaners, powders or any other object. The upper oven light bulbs are covered with a glass ...shield. Replace bulb with pots, pans, or any harsh abrasive cleaning materials on again at the main source or unplug the range. 2. Replace glass shield over bulb. 5. Wear a leather-faced glove for protection against possible broken glass or burns. Turn...door until all parts are fully inserted and retracted to cover the new bulb when installing. 4.
... Do not use . The oven door gasket should always clean during the Self-clean cycle. • Be sure the range is in use strong oven cleaners, powders or any other object. The upper oven light bulbs are covered with a glass ...shield. Replace bulb with pots, pans, or any harsh abrasive cleaning materials on again at the main source or unplug the range. 2. Replace glass shield over bulb. 5. Wear a leather-faced glove for protection against possible broken glass or burns. Turn...door until all parts are fully inserted and retracted to cover the new bulb when installing. 4.

Complete Owner's Guide (English)
Page 58
...8226; Carpet interferes with appliance. Place oven rack in the Care and Cleaning section for service, review the following list. Contact builder or installer to Common Problems Before you call : 1-877-4ELECTROLUX (1-877-435-3287) See "Cleaning cooktop and parts" in center of oven. With ... Before you time & expense. With the burners OFF, use a small-gauge wire or needle to correct the situation. • Poor installation. The list includes common occurrences that are built in this appliance. Provide sufficient space so appliance can be accessible for appliance clearance. •...
...8226; Carpet interferes with appliance. Place oven rack in the Care and Cleaning section for service, review the following list. Contact builder or installer to Common Problems Before you call : 1-877-4ELECTROLUX (1-877-435-3287) See "Cleaning cooktop and parts" in center of oven. With ... Before you time & expense. With the burners OFF, use a small-gauge wire or needle to correct the situation. • Poor installation. The list includes common occurrences that are built in this appliance. Provide sufficient space so appliance can be accessible for appliance clearance. •...

Complete Owner's Guide (English)
Page 59
.... See Setting Oven Controls in this checklist. • The time of day must first be set . The time of day is used. Call your dealer, installing agent or authorized service agent. • Electrical power outage. Center food in order to salt air. • Be sure the oven controls are set temperature...
.... See Setting Oven Controls in this checklist. • The time of day must first be set . The time of day is used. Call your dealer, installing agent or authorized service agent. • Electrical power outage. Center food in order to salt air. • Be sure the oven controls are set temperature...
Complete Owner's Guide (English)
Page 63
... your appliance is warranted by contacting Electrolux at the addresses or phone numbers below. Box 212378 Augusta, GA 30907 Canada 1-800-265-8352 Electrolux Canada Corp. 5855 Terry Fox Way... appliance (excluding built-in and free-standing range appliances) is covered by a two through 5th years from your original date of purchase, Electrolux will repair or replace any after hour,...incurred during transportation or installation, including but not limited to, any parts of this warranty must be obtained by Electrolux Major Appliances North America, a division of Electrolux Home Products, Inc...
... your appliance is warranted by contacting Electrolux at the addresses or phone numbers below. Box 212378 Augusta, GA 30907 Canada 1-800-265-8352 Electrolux Canada Corp. 5855 Terry Fox Way... appliance (excluding built-in and free-standing range appliances) is covered by a two through 5th years from your original date of purchase, Electrolux will repair or replace any after hour,...incurred during transportation or installation, including but not limited to, any parts of this warranty must be obtained by Electrolux Major Appliances North America, a division of Electrolux Home Products, Inc...

