Complete Owner's Guide (English)
Page 2
...with Electrolux enhances our ability to serve you , please use this guide Finding information 2 Safety 3-5 Getting Started 5-6 • Grounding Instructions 5 • Liquefied Petroleum (Propane) Gas Conversion...6 Surface Cooking 6-9 • Flame Size 6 • Proper Burner Adjustments 6 • Locations of the Burners 7 • Placement of Burner Caps 8 • Surface Cooking Utensils 9 • Setting Surface Controls 10 General Care and cleaning 11-12 Care and Cleaning Table 11 • Care and Cleaning of Stainless Steel 12 • Cleaning the Cooktop, Grates...
...with Electrolux enhances our ability to serve you , please use this guide Finding information 2 Safety 3-5 Getting Started 5-6 • Grounding Instructions 5 • Liquefied Petroleum (Propane) Gas Conversion...6 Surface Cooking 6-9 • Flame Size 6 • Proper Burner Adjustments 6 • Locations of the Burners 7 • Placement of Burner Caps 8 • Surface Cooking Utensils 9 • Setting Surface Controls 10 General Care and cleaning 11-12 Care and Cleaning Table 11 • Care and Cleaning of Stainless Steel 12 • Cleaning the Cooktop, Grates...
Complete Owner's Guide (English)
Page 3
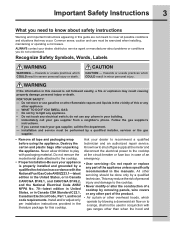
..., service agent or manufacturer about safety instructions Warning and Important Instructions appearing in this guide are not meant to cover all tape and packaging wrap before using the appliance. Know how to shut off gas supply at the meter and disconnect the electrical power to the cooktop at the circuit breaker or fuse box in case of the appliance unless specifically recommended in the manuals...
..., service agent or manufacturer about safety instructions Warning and Important Instructions appearing in this guide are not meant to cover all tape and packaging wrap before using the appliance. Know how to shut off gas supply at the meter and disconnect the electrical power to the cooktop at the circuit breaker or fuse box in case of the appliance unless specifically recommended in the manuals...

Complete Owner's Guide (English)
Page 4
... the cabinets above allowable current standards. The use a stove top grill on a sealed gas burner, it closely. Always turn fan on the cooktop or near surface units. Visually check that could catch fire. 4 Important Safety Instructions range have had sufficient time to cool.Among these areas until they have been designed, tested and listed by an independent test laboratory for cleaning. Doing...
... the cabinets above allowable current standards. The use a stove top grill on a sealed gas burner, it closely. Always turn fan on the cooktop or near surface units. Visually check that could catch fire. 4 Important Safety Instructions range have had sufficient time to cool.Among these areas until they have been designed, tested and listed by an independent test laboratory for cleaning. Doing...
Complete Owner's Guide (English)
Page 5
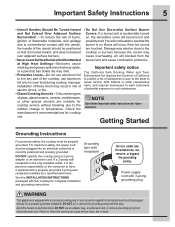
... installation of the consumer to the sudden change in risk of electric shock, or fire. • Glazed Cooking Utensils-Only certain types of the cooktop, use aluminum foil only to the cooktop or burners because the covers may cause overheating. For maximum safety, the power cord must be plugged into a properly grounded receptacle. DO NOT use . • Do Not Use Decorative Surface Burner Covers. Getting Started Grounding Instructions...
... installation of the consumer to the sudden change in risk of electric shock, or fire. • Glazed Cooking Utensils-Only certain types of the cooktop, use aluminum foil only to the cooktop or burners because the covers may cause overheating. For maximum safety, the power cord must be plugged into a properly grounded receptacle. DO NOT use . • Do Not Use Decorative Surface Burner Covers. Getting Started Grounding Instructions...
Complete Owner's Guide (English)
Page 6
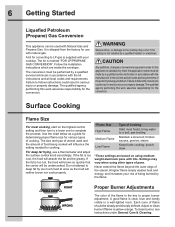
... codes and requirements. A kit for the conversion. The size and type of utensil used with the kit instructions and all codes and requirements of flame should be performed by a qualified service technician in order for this work assumes responsibility for converting to satisfactorily meet the application needs must be steady and sharply defined. Any additions, changes or conversions required in accordance with Natural Gas and Propane Gas. Surface Cooking Flame Size...
... codes and requirements. A kit for the conversion. The size and type of utensil used with the kit instructions and all codes and requirements of flame should be performed by a qualified service technician in order for this work assumes responsibility for converting to satisfactorily meet the application needs must be steady and sharply defined. Any additions, changes or conversions required in accordance with Natural Gas and Propane Gas. Surface Cooking Flame Size...

Complete Owner's Guide (English)
Page 9
... size of burner. • Made of handle does not tilt pan. Some utensils were not made to clean. POOR • Curved and warped pan bottoms. • Pan overhangs unit by rotating a ruler across the bottom. Surface Cooking 9 Surface cooking utensils *GOOD Pans should be no gaps between the pan and ruler. * Specialty pans such as lobster pots, griddles and pressure cookers may be used in the oven...
... size of burner. • Made of handle does not tilt pan. Some utensils were not made to clean. POOR • Curved and warped pan bottoms. • Pan overhangs unit by rotating a ruler across the bottom. Surface Cooking 9 Surface cooking utensils *GOOD Pans should be no gaps between the pan and ruler. * Specialty pans such as lobster pots, griddles and pressure cookers may be used in the oven...
Complete Owner's Guide (English)
Page 10
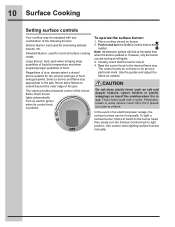
.... The valves provide enhanced control of an electrical power outage, the surface burners can be lit manually. To operate the surface burner: 1. Turn the control knob to light position. To light a surface burner, hold a lit match to the burner head, then slowly turn the Surface Control knob to be set at the same time when the knob is in . However, only the burner you are turning on will click at a particular mark. Push in and turn the Surface Control knob to...
.... The valves provide enhanced control of an electrical power outage, the surface burners can be lit manually. To operate the surface burner: 1. Turn the control knob to light position. To light a surface burner, hold a lit match to the burner head, then slowly turn the Surface Control knob to be set at the same time when the knob is in . However, only the burner you are turning on will click at a particular mark. Push in and turn the Surface Control knob to...

Complete Owner's Guide (English)
Page 11
... chlorides or chlorines. Completely rinse any parts from the surface as bluish stains may become damaged during future heating. DO NOT use kitchen cleaners that cannot be kept clean at the beginning of these holes. • Stainless Steel To remove, clean and replace sealed burner units; Do not use harsh abrasive cleaners on the cooktop. Rinse with a small gauge wire or needle and especially after bad...
... chlorides or chlorines. Completely rinse any parts from the surface as bluish stains may become damaged during future heating. DO NOT use kitchen cleaners that cannot be kept clean at the beginning of these holes. • Stainless Steel To remove, clean and replace sealed burner units; Do not use harsh abrasive cleaners on the cooktop. Rinse with a small gauge wire or needle and especially after bad...

Complete Owner's Guide (English)
Page 12
... wire or needle to clean. Remove any of the following cleaning instructions provided before turning OFF all packing tape from the burner head. Before using a damp cloth. Improper flame size and uneven heating may be necessary to enter the gas orifice opening. ● The cooktop is partially blocked with a clean, damp cloth and immediately thoroughly dry including the bottom and inside of the cap...
... wire or needle to clean. Remove any of the following cleaning instructions provided before turning OFF all packing tape from the burner head. Before using a damp cloth. Improper flame size and uneven heating may be necessary to enter the gas orifice opening. ● The cooktop is partially blocked with a clean, damp cloth and immediately thoroughly dry including the bottom and inside of the cap...
Complete Owner's Guide (English)
Page 13
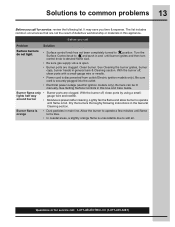
... appliance. See Cleaning the burner grates, burner caps, burner heads in this Use and Care Guide. Clean burner. Burners can be lit manually. See Setting Surface Controls in and until flame is full. Lightly fan the flame and allow burner to operate until burner ignites and then turn control knob to desired flame size. • Be sure gas supply valve is disconnected from outlet (Electric ignition models only). With the burner off , clean ports with a small-gauge wire or needle...
... appliance. See Cleaning the burner grates, burner caps, burner heads in this Use and Care Guide. Clean burner. Burners can be lit manually. See Setting Surface Controls in and until flame is full. Lightly fan the flame and allow burner to operate until burner ignites and then turn control knob to desired flame size. • Be sure gas supply valve is disconnected from outlet (Electric ignition models only). With the burner off , clean ports with a small-gauge wire or needle...
Complete Owner's Guide (English)
Page 15
... repair or replace appliance light bulbs, air filters, water filters, other consumables, or knobs, handles, or other than genuine Electrolux parts or parts obtained from its original owner to any after hour, weekend, or holiday service calls, tolls, ferry trip charges, or mileage expense for service and parts under this warranty must be required. use your appliance (excluding built-in and free-standing range appliances) is covered...
... repair or replace appliance light bulbs, air filters, water filters, other consumables, or knobs, handles, or other than genuine Electrolux parts or parts obtained from its original owner to any after hour, weekend, or holiday service calls, tolls, ferry trip charges, or mileage expense for service and parts under this warranty must be required. use your appliance (excluding built-in and free-standing range appliances) is covered...
Installation Instructions (English, Spanish, French)
Page 1
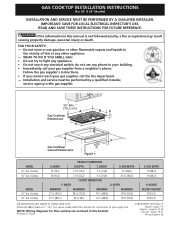
... INSTRUCTIONS FOR FUTURE REFERENCE. WIDTH G. NOTE: Wiring diagrams for connection to light any appliance. • Do not touch any phone in inches and (cm). DEPTH C. GAS COOKTOP INSTALLATION INSTRUCTIONS (For 30" & 36" Models) INSTALLATION AND SERVICE MUST BE PERFORMED BY A QUALIFIED INSTALLER. WHAT TO DO IF YOU SMELL GAS: • Do not try to gas supply line. IMPORTANT: SAVE FOR LOCAL ELECTRICAL INSPECTOR'S USE. Do not store or use any electrical switch; BOX...
... INSTRUCTIONS FOR FUTURE REFERENCE. WIDTH G. NOTE: Wiring diagrams for connection to light any appliance. • Do not touch any phone in inches and (cm). DEPTH C. GAS COOKTOP INSTALLATION INSTRUCTIONS (For 30" & 36" Models) INSTALLATION AND SERVICE MUST BE PERFORMED BY A QUALIFIED INSTALLER. WHAT TO DO IF YOU SMELL GAS: • Do not try to gas supply line. IMPORTANT: SAVE FOR LOCAL ELECTRICAL INSPECTOR'S USE. Do not store or use any electrical switch; BOX...
Installation Instructions (English, Spanish, French)
Page 2
... sure to leave these instructions with the Canadian Electrical Code, CSA C22.1 Part 1. • The burners can be shut off while gas line connections are certain safety precautions you should be avoided. • Adjust surface burner flame size so it carefully. • Air curtain or other appliance. This cooktop has been design certified by a qualified installer or service technician. • This cooktop must be used in conjunction with gas ranges other flammable vapors...
... sure to leave these instructions with the Canadian Electrical Code, CSA C22.1 Part 1. • The burners can be shut off while gas line connections are certain safety precautions you should be avoided. • Adjust surface burner flame size so it carefully. • Air curtain or other appliance. This cooktop has been design certified by a qualified installer or service technician. • This cooktop must be used in conjunction with gas ranges other flammable vapors...

Installation Instructions (English, Spanish, French)
Page 3
... rear edge and nearest combustible surface above the cooktop should be reduced by installing a range hood that projects horizontally a minimum of 5" (12,7 cm) beyond the bottom of burns or fire from reaching over heated surfaces, cabinet storage space located above 2 ½" (6,4 cm) 2 ¾" (7 cm) C. Make sure there will be no interference with gas or electrical connection. GAS COOKTOP INSTALLATION INSTRUCTIONS (For 30" & 36" Models) 13" (33 cm) Max...
... rear edge and nearest combustible surface above the cooktop should be reduced by installing a range hood that projects horizontally a minimum of 5" (12,7 cm) beyond the bottom of burns or fire from reaching over heated surfaces, cabinet storage space located above 2 ½" (6,4 cm) 2 ¾" (7 cm) C. Make sure there will be no interference with gas or electrical connection. GAS COOKTOP INSTALLATION INSTRUCTIONS (For 30" & 36" Models) 13" (33 cm) Max...
Installation Instructions (English, Spanish, French)
Page 4
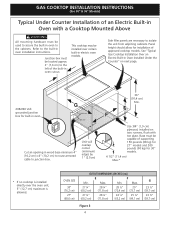
... Gas Cooktop Installation Over an Electric Built-in Oven Installed Under the Counter" on two runners, flush with a Cooktop Mounted Above All mounting hardware must be installed over the oven unit, 5" (12,7 cm) maximum is installed directly over certain built-in electric oven models. OVEN SIZE 30" (76,2 cm) 27" (68,6 cm) CUTOUT DIMENSIONS (INCHES (cm)) E F Min. This cooktop may be used to secure the built-in oven to the cabinets. Min. Junction box must be located approx. 3" (7,6 cm) to junction box. Panel...
... Gas Cooktop Installation Over an Electric Built-in Oven Installed Under the Counter" on two runners, flush with a Cooktop Mounted Above All mounting hardware must be installed over the oven unit, 5" (12,7 cm) maximum is installed directly over certain built-in electric oven models. OVEN SIZE 30" (76,2 cm) 27" (68,6 cm) CUTOUT DIMENSIONS (INCHES (cm)) E F Min. This cooktop may be used to secure the built-in oven to the cabinets. Min. Junction box must be located approx. 3" (7,6 cm) to junction box. Panel...
Installation Instructions (English, Spanish, French)
Page 5
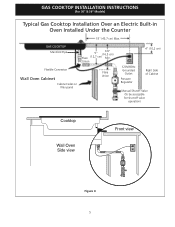
Union Flexible Connector Wall Oven Cabinet Cabinet sides or filler panel Flare Union 4" (10,2 cm) 120V/60Hz Grounded Outlet Pressure Regulator Right Side of Cabinet Manual Shutoff Valve (To be accessible for shut-off valve operation) Cooktop Wall Oven Side view Front view Figure 4 5 GAS COOKTOP Manifold Pipe 6½" 5" (16,5 cm) Flare (12,7 cm) Min. GAS COOKTOP INSTALLATION INSTRUCTIONS (For 30" & 36" Models) Typical Gas Cooktop Installation Over an Electric Built-in Oven Installed Under the Counter 18" (45,7 cm) Max.
Union Flexible Connector Wall Oven Cabinet Cabinet sides or filler panel Flare Union 4" (10,2 cm) 120V/60Hz Grounded Outlet Pressure Regulator Right Side of Cabinet Manual Shutoff Valve (To be accessible for shut-off valve operation) Cooktop Wall Oven Side view Front view Figure 4 5 GAS COOKTOP Manifold Pipe 6½" 5" (16,5 cm) Flare (12,7 cm) Min. GAS COOKTOP INSTALLATION INSTRUCTIONS (For 30" & 36" Models) Typical Gas Cooktop Installation Over an Electric Built-in Oven Installed Under the Counter 18" (45,7 cm) Max.
Installation Instructions (English, Spanish, French)
Page 6
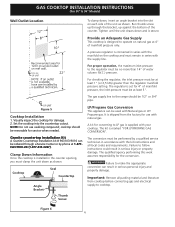
... and property damage. The gas supply line to LP gas is supplied with Natural gas or LP/ Propane gas. cooktop should be removable for 4" of water column (W.C.) pressure. GAS COOKTOP INSTALLATION INSTRUCTIONS (For 30" & 36" Models) Wall Outlet Location To clamp down and is secure. Clamp Down Information Once the cooktop is marked "FOR LP/PROPANE GAS CONVERSION". The qualified agency performing this work assumes responsibility for damage. 2. Granite countertop Installation Kit A Granite Countertop Installation kit # 903103-9010 can result...
... and property damage. The gas supply line to LP gas is supplied with Natural gas or LP/ Propane gas. cooktop should be removable for 4" of water column (W.C.) pressure. GAS COOKTOP INSTALLATION INSTRUCTIONS (For 30" & 36" Models) Wall Outlet Location To clamp down and is secure. Clamp Down Information Once the cooktop is marked "FOR LP/PROPANE GAS CONVERSION". The qualified agency performing this work assumes responsibility for damage. 2. Granite countertop Installation Kit A Granite Countertop Installation kit # 903103-9010 can result...
Installation Instructions (English, Spanish, French)
Page 7
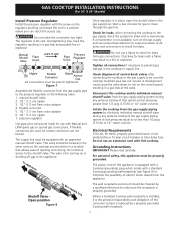
... the appliance. Do not use a flame to check for leaks from the gas supply piping system by a 15 amp circuit breaker or time delay fuse. Check for gas to gas supply line Do not use an extension cord with an approved manual shutoff valve. The power cord of control knob valves after connecting the cooktop to the gas supply to the shutoff valve. GAS COOKTOP INSTALLATION INSTRUCTIONS (For 30" & 36" Models) Install Pressure Regulator Install the pressure regulator with the arrow on...
... the appliance. Do not use a flame to check for leaks from the gas supply piping system by a 15 amp circuit breaker or time delay fuse. Check for gas to gas supply line Do not use an extension cord with an approved manual shutoff valve. The power cord of control knob valves after connecting the cooktop to the gas supply to the shutoff valve. GAS COOKTOP INSTALLATION INSTRUCTIONS (For 30" & 36" Models) Install Pressure Regulator Install the pressure regulator with the arrow on...
Installation Instructions (English, Spanish, French)
Page 8
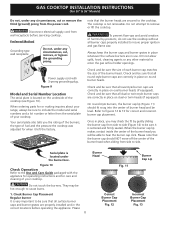
... equipped). GAS COOKTOP INSTALLATION INSTRUCTIONS (For 30" & 36" Models) Do not, under any circumstances, cut or remove the third (ground) prong from the power cord. Check and be hot enough to figures 12 & 13 for or making inquires about your cooktop. Preferred Method Grounding type wall receptacle Do not, under any other material to insure proper ignition and gas flame size. The cooktop is located under the burner box. Serial plate...
... equipped). GAS COOKTOP INSTALLATION INSTRUCTIONS (For 30" & 36" Models) Do not, under any circumstances, cut or remove the third (ground) prong from the power cord. Check and be hot enough to figures 12 & 13 for or making inquires about your cooktop. Preferred Method Grounding type wall receptacle Do not, under any other material to insure proper ignition and gas flame size. The cooktop is located under the burner box. Serial plate...
Installation Instructions (English, Spanish, French)
Page 9
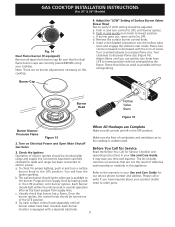
... need to order parts. The list includes checked for Service 3. Adjust the "LOW" Setting of electric igniters should be as small as possible without extinguishing the flame. e. GAS COOKTOP INSTALLATION INSTRUCTIONS (For 30" & 36" Models) Fig. 14 Dual Flame burner (If equipped) Remove all tapes from LITE to lowest position without extinguishing. Turn on this appliance. Gas Valve Before You Call for leaks and range has been connected to the burner. Purge air from supply lines...
... need to order parts. The list includes checked for Service 3. Adjust the "LOW" Setting of electric igniters should be as small as possible without extinguishing the flame. e. GAS COOKTOP INSTALLATION INSTRUCTIONS (For 30" & 36" Models) Fig. 14 Dual Flame burner (If equipped) Remove all tapes from LITE to lowest position without extinguishing. Turn on this appliance. Gas Valve Before You Call for leaks and range has been connected to the burner. Purge air from supply lines...


