Use and Care Manual
Page 4
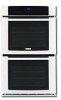
...installed and grounded by removing panels, wire covers, or any part of the wall oven. Do not store explosives, such as flammable liquids. WARNING To reduce the risk of fire, electrical shock, or injury when using your wall oven, follow basic precautions including the following: • Remove .... Stepping, leaning, sitting or pulling down on Appliance-Flammable materials should be damaged by cold temperatures. Do not use your new Electrolux wall oven. ! 4 Safety IMPORTANT SAFETY INSTRUCTIONS Please read all tape and packaging wrap before using your appliance for the first time, or...
...installed and grounded by removing panels, wire covers, or any part of the wall oven. Do not store explosives, such as flammable liquids. WARNING To reduce the risk of fire, electrical shock, or injury when using your wall oven, follow basic precautions including the following: • Remove .... Stepping, leaning, sitting or pulling down on Appliance-Flammable materials should be damaged by cold temperatures. Do not use your new Electrolux wall oven. ! 4 Safety IMPORTANT SAFETY INSTRUCTIONS Please read all tape and packaging wrap before using your appliance for the first time, or...
Use and Care Manual
Page 5
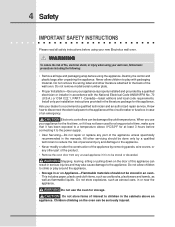
... or Flour on Grease Fires-Smother the fire with both hands to sit or stand on any part of the appliance. • DO NOT TOUCH INTERIOR OVEN ELEMENTS OR INTERIOR SURFACES OF THE WALL OVEN UNTIL THEY HAVE COOLED. See installation instructions. • Do not leave children alone-Children should... panel or at the center trim depending on the model. The wall oven is cool. Always place oven racks in the oven. • Keep Oven Vent Ducts Unobstructed. IMPORTANT INSTRUCTIONS FOR USING YOUR OVEN • Use Care When Opening an Oven Door-Stand to cool. The broiler pan and grid allow dripping ...
... or Flour on Grease Fires-Smother the fire with both hands to sit or stand on any part of the appliance. • DO NOT TOUCH INTERIOR OVEN ELEMENTS OR INTERIOR SURFACES OF THE WALL OVEN UNTIL THEY HAVE COOLED. See installation instructions. • Do not leave children alone-Children should... panel or at the center trim depending on the model. The wall oven is cool. Always place oven racks in the oven. • Keep Oven Vent Ducts Unobstructed. IMPORTANT INSTRUCTIONS FOR USING YOUR OVEN • Use Care When Opening an Oven Door-Stand to cool. The broiler pan and grid allow dripping ...
Use and Care Manual
Page 6
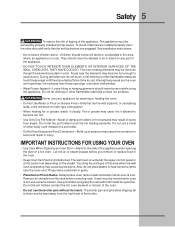
... to the hood manufacturer's instructions for the self-clean function to the fumes given off the power to break. No oven cleaner or oven liner protective coating of any wall oven. Doing so could catch fire. NOTE Save these important safety instructions for a good seal. Also the side rails of... replacing the bulb. Disconnect the appliance or shut off during the self-clean cycle of the appliance, remove the broiler pan, oven racks and any part of the appliance The health of some birds is essential for future reference. Greasy deposits in or around any utensils stored in...
... to the hood manufacturer's instructions for the self-clean function to the fumes given off the power to break. No oven cleaner or oven liner protective coating of any wall oven. Doing so could catch fire. NOTE Save these important safety instructions for a good seal. Also the side rails of... replacing the bulb. Disconnect the appliance or shut off during the self-clean cycle of the appliance, remove the broiler pan, oven racks and any part of the appliance The health of some birds is essential for future reference. Greasy deposits in or around any utensils stored in...

Use and Care Manual
Page 15
...the end time at a set time of a Multi-Stage sequence. Press END TIME . 8. END TIME End Time allows the oven to be part of day. LOWER OVEN 2. Press COOK OPTIONS to bring up the cook options items. 5. The time remaining will beep when the countdown is finished. Cooking... down for the set a delayed timed cooking (example is a 450°F Bake for 30 minutes which will end at the right time. Press COOK TIME . 6. Enter time needed ; 3 0 . 7. This oven can result in the timer section of time and shut off automatically at anytime. The time...
...the end time at a set time of a Multi-Stage sequence. Press END TIME . 8. END TIME End Time allows the oven to be part of day. LOWER OVEN 2. Press COOK OPTIONS to bring up the cook options items. 5. The time remaining will beep when the countdown is finished. Cooking... down for the set a delayed timed cooking (example is a 450°F Bake for 30 minutes which will end at the right time. Press COOK TIME . 6. Enter time needed ; 3 0 . 7. This oven can result in the timer section of time and shut off automatically at anytime. The time...

Use and Care Manual
Page 26
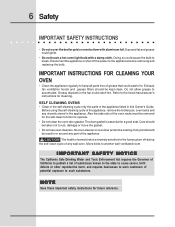
..., a new temperature can be programmed for Probe at any other may result in the center of the thickest part of the oven). The probe can be accepted after the START pad is the best method to trigger the buzzer when the food...or casseroles, insert Figure 1 the Probe into the thickest part of burns, carefully unplug the Temperature Probe using the Temperature Probe: 1. PlugtheTemperatureProbeintoitsoutletintheoven.(Theoutletislocatedonthetoplefthand side of the cavity wall, near front of the meat. LOWER OVEN 4. The target temperature setting will not allow probe to start...
..., a new temperature can be programmed for Probe at any other may result in the center of the thickest part of the oven). The probe can be accepted after the START pad is the best method to trigger the buzzer when the food...or casseroles, insert Figure 1 the Probe into the thickest part of burns, carefully unplug the Temperature Probe using the Temperature Probe: 1. PlugtheTemperatureProbeintoitsoutletintheoven.(Theoutletislocatedonthetoplefthand side of the cavity wall, near front of the meat. LOWER OVEN 4. The target temperature setting will not allow probe to start...
Use and Care Manual
Page 35
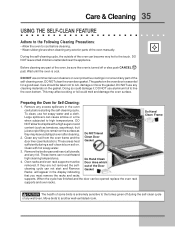
...in or around any part of any part of the Door Gasket that you must be sure the oven is essential for Self-Cleaning: 1. Move birds to the touch. During the self-cleaning cycle, the outside of the oven manually. Before cleaning any wall oven. The gasket on the oven door is turned off... during a self-clean to remain on the gasket. Doing so could melt and damage the oven surface. This may leave a dull spot even after cleaning. ...
...in or around any part of any part of the Door Gasket that you must be sure the oven is essential for Self-Cleaning: 1. Move birds to the touch. During the self-cleaning cycle, the outside of the oven manually. Before cleaning any wall oven. The gasket on the oven door is turned off... during a self-clean to remain on the gasket. Doing so could melt and damage the oven surface. This may leave a dull spot even after cleaning. ...

Use and Care Manual
Page 37
... with hot, soapy water and a dishcloth. Cleaners made especially for 30 to Clean Glass, Painted and Plastic Body Parts and Decorative Trim For general cleaning, use abrasive cleaners or scouring pads. Oven Racks Oven racks and oven rack supports must be sure all controls are turned OFF and the ...appliance is essential for 30 to 60 minutes. Clean them as ...
... with hot, soapy water and a dishcloth. Cleaners made especially for 30 to Clean Glass, Painted and Plastic Body Parts and Decorative Trim For general cleaning, use abrasive cleaners or scouring pads. Oven Racks Oven racks and oven rack supports must be sure all controls are turned OFF and the ...appliance is essential for 30 to 60 minutes. Clean them as ...
Use and Care Manual
Page 38
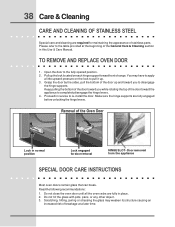
...the sides, pull the bottom of the door up and toward you while rotating the top of stainless parts. Do not hit the glass with pots, pans, or any other object. 3. 38 Care &... door removal HINGE SLOT - Open the door to re-install the door. Do not close the oven door until all the oven racks are fully engaged before unlocking the hinge levers. Pull up . 3. Proceed in place. 2....Make sure the hinge supports are fully in reverse to the fully opened position. 2. Removal of the Oven Door Lock in this Use & Care Manual. Scratching, hitting, jarring or stressing the glass may have...
...the sides, pull the bottom of the door up and toward you while rotating the top of stainless parts. Do not hit the glass with pots, pans, or any other object. 3. 38 Care &... door removal HINGE SLOT - Open the door to re-install the door. Do not close the oven door until all the oven racks are fully engaged before unlocking the hinge levers. Pull up . 3. Proceed in place. 2....Make sure the hinge supports are fully in reverse to the fully opened position. 2. Removal of the Oven Door Lock in this Use & Care Manual. Scratching, hitting, jarring or stressing the glass may have...
Use and Care Manual
Page 44
...LIMITATIONS OR EXCLUSIONS MAY NOT APPLY TO YOU. In the USA and Puerto Rico, your appliance is warranted by Electrolux Canada Corp. Electrolux authorizes no person to any parts of this appliance that prove to another party or removed outside the USA or Canada. 3. Product features or specifications...repaired in a commercial setting. 7. Service calls to correct the installation of your appliance or to instruct you how to floors, cabinets, walls, etc. 15. Damages to the finish of appliance or home incurred during the additional limited warranty periods beyond the first year from your...
...LIMITATIONS OR EXCLUSIONS MAY NOT APPLY TO YOU. In the USA and Puerto Rico, your appliance is warranted by Electrolux Canada Corp. Electrolux authorizes no person to any parts of this appliance that prove to another party or removed outside the USA or Canada. 3. Product features or specifications...repaired in a commercial setting. 7. Service calls to correct the installation of your appliance or to instruct you how to floors, cabinets, walls, etc. 15. Damages to the finish of appliance or home incurred during the additional limited warranty periods beyond the first year from your...


