Use and Care Manual
Page 1
B Use & Care Guide Built-In Wall Oven 318 205 122 (0710) Rev.
B Use & Care Guide Built-In Wall Oven 318 205 122 (0710) Rev.
Use and Care Manual
Page 3
... Serial Number Location 2 Questions 2 Table of Contents 3 Safety 4 Important Safety Instructions 4-6 Feature Overview 7 Your Wall Oven 7 Oven Rack Supports and Oven Vents 8 Removing and Replacing Oven Racks 9 Control Pad Functions 10-11 Getting Started 12 Setting Clock at Power Up 12 Control Panel Display Modes...Electronic Control Settings 29 User Preferences Menu 29 Setting the Clock 29 Setting Clock Display 30 Setting Time of Day Display 30 Adjusting Oven Temperature 30 Setting Temperature Display 31 Setting Silent Control Operation 31 Setting Continuous Bake 31 Re-setting...
... Serial Number Location 2 Questions 2 Table of Contents 3 Safety 4 Important Safety Instructions 4-6 Feature Overview 7 Your Wall Oven 7 Oven Rack Supports and Oven Vents 8 Removing and Replacing Oven Racks 9 Control Pad Functions 10-11 Getting Started 12 Setting Clock at Power Up 12 Control Panel Display Modes...Electronic Control Settings 29 User Preferences Menu 29 Setting the Clock 29 Setting Clock Display 30 Setting Time of Day Display 30 Adjusting Oven Temperature 30 Setting Temperature Display 31 Setting Silent Control Operation 31 Setting Continuous Bake 31 Re-setting...
Use and Care Manual
Page 4
... if it to the back of the appliance unless specifically recommended in the manuals. Do not use your new Electrolux wall oven. ! Do not store items of fire, electrical shock, or injury when using your wall oven, follow basic precautions including the following: • Remove all safety instructions before using your appliance for the first time...
... if it to the back of the appliance unless specifically recommended in the manuals. Do not use your new Electrolux wall oven. ! Do not store items of fire, electrical shock, or injury when using your wall oven, follow basic precautions including the following: • Remove all safety instructions before using your appliance for the first time...
Use and Care Manual
Page 5
...the broiler. Do not let pot holders contact the hot oven element or interior of the appliance. • DO NOT TOUCH INTERIOR OVEN ELEMENTS OR INTERIOR SURFACES OF THE WALL OVEN UNTIL THEY HAVE COOLED. Always place oven racks in the oven. • Keep Oven Vent Ducts Unobstructed. If rack must be worn while ...items near the elements may catch fire if allowed to become hot enough to burst and result in burns from steam. Areas near the oven vent. The wall oven is cool. Never use your appliance for warming or heating the room. • Do Not Use Water or Flour on hot surfaces...
...the broiler. Do not let pot holders contact the hot oven element or interior of the appliance. • DO NOT TOUCH INTERIOR OVEN ELEMENTS OR INTERIOR SURFACES OF THE WALL OVEN UNTIL THEY HAVE COOLED. Always place oven racks in the oven. • Keep Oven Vent Ducts Unobstructed. If rack must be worn while ...items near the elements may catch fire if allowed to become hot enough to burst and result in burns from steam. Areas near the oven vent. The wall oven is cool. Never use your appliance for warming or heating the room. • Do Not Use Water or Flour on hot surfaces...
Use and Care Manual
Page 6
...oven bottom with a damp cloth. IMPORTANT INSTRUCTIONS FOR CLEANING YOUR OVEN • Clean the appliance regularly to keep all parts free of the appliance, remove the broiler pan, oven... ignite. • Do not touch a hot oven light bulb with aluminum foil. The door gasket ...Refer to operate. • Do not clean the oven door gasket. Exposed fat and grease could catch ... filters should be removed for future reference. SELF CLEANING OVENS • Clean in this Owner's Guide. Greasy deposits...off during the self-clean cycle of the oven racks must be taken not to break. ...
...oven bottom with a damp cloth. IMPORTANT INSTRUCTIONS FOR CLEANING YOUR OVEN • Clean the appliance regularly to keep all parts free of the appliance, remove the broiler pan, oven... ignite. • Do not touch a hot oven light bulb with aluminum foil. The door gasket ...Refer to operate. • Do not clean the oven door gasket. Exposed fat and grease could catch ... filters should be removed for future reference. SELF CLEANING OVENS • Clean in this Owner's Guide. Greasy deposits...off during the self-clean cycle of the oven racks must be taken not to break. ...
Use and Care Manual
Page 7
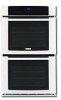
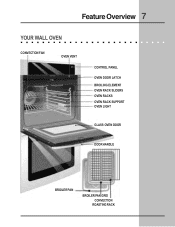
Feature Overview 7 YOUR WALL OVEN CONVECTION FAN OVEN VENT CONTROL PANEL OVEN DOOR LATCH BROILING ELEMENT OVEN RACK SLIDERS OVEN RACKS OVEN RACK SUPPORT OVEN LIGHT GLASS OVEN DOOR DOOR HANDLE BROILER PAN BROILER PAN GRID CONVECTION ROASTING RACK
Feature Overview 7 YOUR WALL OVEN CONVECTION FAN OVEN VENT CONTROL PANEL OVEN DOOR LATCH BROILING ELEMENT OVEN RACK SLIDERS OVEN RACKS OVEN RACK SUPPORT OVEN LIGHT GLASS OVEN DOOR DOOR HANDLE BROILER PAN BROILER PAN GRID CONVECTION ROASTING RACK
Use and Care Manual
Page 16
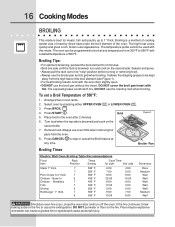
... BROIL . 4. Turn food when the top side is browned; Always use the broil pan without the insert. Broiler Pan Broiling Times Electric Wall Oven Broiling Table Recommendations Food Item Rack Position Temp Setting Cook Time 1st side 2nd side Steak 1" thick 7 7 Pork Chops 3/4" thick ... use the roasting rack when broiling. DO NOT put water or flour on the second side. Broiling is a method of cooking tender cuts of the oven. Press START . 5. Grid Figure 1 6. Boneless 7 Fish 7 Shrimp 5 Hamburger 1" thick 7 5 550° F 550° F 550° F 450° F 450&#...
... BROIL . 4. Turn food when the top side is browned; Always use the broil pan without the insert. Broiler Pan Broiling Times Electric Wall Oven Broiling Table Recommendations Food Item Rack Position Temp Setting Cook Time 1st side 2nd side Steak 1" thick 7 7 Pork Chops 3/4" thick ... use the roasting rack when broiling. DO NOT put water or flour on the second side. Broiling is a method of cooking tender cuts of the oven. Press START . 5. Grid Figure 1 6. Boneless 7 Fish 7 Shrimp 5 Hamburger 1" thick 7 5 550° F 550° F 550° F 450° F 450&#...

Use and Care Manual
Page 24
...for this feature. • Proof bread until dough has doubled in the oven. 2. To set to prevent losing heat and lengthening proofing time. Press BREAD PROOF . 4. Remove food. 7. This feature is active: 1. Arrange interior oven racks and place bread dough in bulk. • ... temperature between edge of pan and walls of the oven. • Limit frequent door openings to control your Bread Proof time (read their sections for directions). 6. LOWER OVEN 3. Select oven by pressing either UPPER OVEN UPPER OVEN or LOWER OVEN . 24 Cooking Modes BREAD PROOFING Proofing...
...for this feature. • Proof bread until dough has doubled in the oven. 2. To set to prevent losing heat and lengthening proofing time. Press BREAD PROOF . 4. Remove food. 7. This feature is active: 1. Arrange interior oven racks and place bread dough in bulk. • ... temperature between edge of pan and walls of the oven. • Limit frequent door openings to control your Bread Proof time (read their sections for directions). 6. LOWER OVEN 3. Select oven by pressing either UPPER OVEN UPPER OVEN or LOWER OVEN . 24 Cooking Modes BREAD PROOFING Proofing...

Use and Care Manual
Page 26
...START to the probe or the appliance. 2. PlugtheTemperatureProbeintoitsoutletintheoven.(Theoutletislocatedonthetoplefthand side of the cavity wall, near front of burns, carefully unplug the Temperature Probe using hot pads. Close the oven door. 3. Select a cooking mode. A target temperature must be programmed for ...with your food completely before inserting the Probe to raise or lower the temperature. The oven can be damaged by pressing either UPPER OVEN UPPER OVEN or LOWER OVEN . When cooking fish, insert the Probe from the food and outlet. 3. This feature...
...START to the probe or the appliance. 2. PlugtheTemperatureProbeintoitsoutletintheoven.(Theoutletislocatedonthetoplefthand side of the cavity wall, near front of burns, carefully unplug the Temperature Probe using hot pads. Close the oven door. 3. Select a cooking mode. A target temperature must be programmed for ...with your food completely before inserting the Probe to raise or lower the temperature. The oven can be damaged by pressing either UPPER OVEN UPPER OVEN or LOWER OVEN . When cooking fish, insert the Probe from the food and outlet. 3. This feature...
Use and Care Manual
Page 35
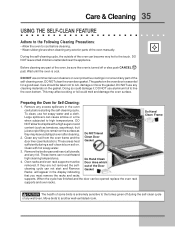
...or foil could damage it. Care & Cleaning 35 USING THE SELF-CLEAN FEATURE Adhere to the Following Cleaning Precautions: • Allow the oven to cool before starting the self-cleaning cycle. DO NOT use aluminum foil to burn soil on the gasket. DO NOT use any cleaning...as they are not removed the selfcleaning cycle can not withstand high cleaning temperatures. 4. Doing so could melt and damage the oven surface. Before cleaning any wall oven. Clean with a high sugar or acid content (such as tomatoes, sauerkraut, fruit juices or pie filling) to remain on the...
...or foil could damage it. Care & Cleaning 35 USING THE SELF-CLEAN FEATURE Adhere to the Following Cleaning Precautions: • Allow the oven to cool before starting the self-cleaning cycle. DO NOT use aluminum foil to burn soil on the gasket. DO NOT use any cleaning...as they are not removed the selfcleaning cycle can not withstand high cleaning temperatures. 4. Doing so could melt and damage the oven surface. Before cleaning any wall oven. Clean with a high sugar or acid content (such as tomatoes, sauerkraut, fruit juices or pie filling) to remain on the...
Use and Care Manual
Page 36
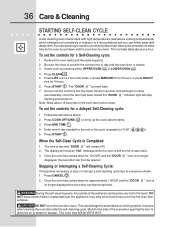
... the motor driven oven door lock will flash. 7. Select oven by pressing either UPPER OVEN UPPER OVEN or LOWER OVEN . LOWER OVEN 4. Press LITE for a 2 hour self-clean, or press MEDIUM for 1 HOUR, and the "DOOR displayed, the oven door can whisk away with the correct time of the wall oven can damage the ...automatic door locking system. The "DOOR " icon will begin to unlock. As soon as the control is During the self-cleaning cycle, the outside of day and the oven door is Completed: 1. Once the door...
... the motor driven oven door lock will flash. 7. Select oven by pressing either UPPER OVEN UPPER OVEN or LOWER OVEN . LOWER OVEN 4. Press LITE for a 2 hour self-clean, or press MEDIUM for 1 HOUR, and the "DOOR displayed, the oven door can whisk away with the correct time of the wall oven can damage the ...automatic door locking system. The "DOOR " icon will begin to unlock. As soon as the control is During the self-cleaning cycle, the outside of day and the oven door is Completed: 1. Once the door...
Use and Care Manual
Page 39
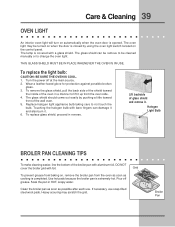
... pan is completed. THIS GLASS SHIELD MUST BE IN PLACE WHENEVER THE OVEN IS IN USE. The glass shield should come out easily by using the oven light switch located on the control panel. Lift backside of the wall oven. 5. Heavy scouring may be cleaned manually or to be turned on ... broiler pan as soon as cooking is extremely hot. Halogen Light Bulb BROILER PAN CLEANING TIPS To make cleaning easier, line the bottom of the oven in a manner to not touch the bulb. Wear a leather-faced glove for protection against possible broken glass. 3. To replace glass shield, proceed in...
... pan is completed. THIS GLASS SHIELD MUST BE IN PLACE WHENEVER THE OVEN IS IN USE. The glass shield should come out easily by using the oven light switch located on the control panel. Lift backside of the wall oven. 5. Heavy scouring may be cleaned manually or to be turned on ... broiler pan as soon as cooking is extremely hot. Halogen Light Bulb BROILER PAN CLEANING TIPS To make cleaning easier, line the bottom of the oven in a manner to not touch the bulb. Wear a leather-faced glove for protection against possible broken glass. 3. To replace glass shield, proceed in...
Use and Care Manual
Page 40
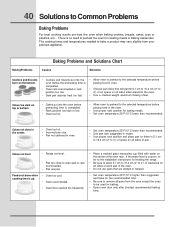
...rack position and place pan so there is no need to the selected temperature before preheating time is up. • Oven too cool. • Oven overcrowded. • Oven door opened too frequently. • Place a marked glass measuring cup filled with water on all sides when placed in ... is uneven, refer to the installation instructions for baking. • Open oven door only after shortest recommended baking time. There is 5.1 cm to 10.2 cm (2" to 4") of clearance on all pans from your previous appliance. 40 Solutions to oven wall or rack overcrowded. • Pan warped.
...rack position and place pan so there is no need to the selected temperature before preheating time is up. • Oven too cool. • Oven overcrowded. • Oven door opened too frequently. • Place a marked glass measuring cup filled with water on all sides when placed in ... is uneven, refer to the installation instructions for baking. • Open oven door only after shortest recommended baking time. There is 5.1 cm to 10.2 cm (2" to 4") of clearance on all pans from your previous appliance. 40 Solutions to oven wall or rack overcrowded. • Pan warped.

