Use and Care Manual
Page 3
... Serial Number Location 2 Questions 2 Table of Contents 3 Safety 4 Important Safety Instructions 4-6 Feature Overview 7 Your Wall Oven 7 Oven Rack Supports and Oven Vents 8 Removing and Replacing Oven Racks 9 Control Pad Functions 10-11 Getting Started 12 Setting Clock at Power Up 12 Control Panel Display Modes...Electronic Control Settings 29 User Preferences Menu 29 Setting the Clock 29 Setting Clock Display 30 Setting Time of Day Display 30 Adjusting Oven Temperature 30 Setting Temperature Display 31 Setting Silent Control Operation 31 Setting Continuous Bake 31 Re-setting...
... Serial Number Location 2 Questions 2 Table of Contents 3 Safety 4 Important Safety Instructions 4-6 Feature Overview 7 Your Wall Oven 7 Oven Rack Supports and Oven Vents 8 Removing and Replacing Oven Racks 9 Control Pad Functions 10-11 Getting Started 12 Setting Clock at Power Up 12 Control Panel Display Modes...Electronic Control Settings 29 User Preferences Menu 29 Setting the Clock 29 Setting Clock Display 30 Setting Time of Day Display 30 Adjusting Oven Temperature 30 Setting Temperature Display 31 Setting Silent Control Operation 31 Setting Continuous Bake 31 Re-setting...
Use and Care Manual
Page 11
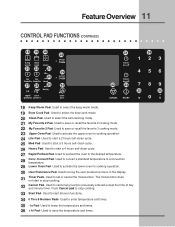
.... 24 Lite Pad- lo Pad- Used to start all oven functions. 34 0 Thru 9 Number Pads- Used to activate the upper oven for cooking operation. 30 User Preference Pad- Used to preheat the oven to save or recall the favorite 3 cooking mode. 23 Upper Oven Pad- Feature Overview 11 CONTROL PAD FUNCTIONS (CONTINUED) 18 ... warm 21 slow cook 22 clean 24 lite my my favorite favorite 27 28 25 med 26 heavy rapid conv preheat convert 23 UPPER OVEN 29 LOWER OVEN 30 user pref 31 timer on-off timer on-off 32 33 CANCEL START 34 123 456 789 35 36 - + lo 0 hi 18 Keep...
.... 24 Lite Pad- lo Pad- Used to start all oven functions. 34 0 Thru 9 Number Pads- Used to activate the upper oven for cooking operation. 30 User Preference Pad- Used to preheat the oven to save or recall the favorite 3 cooking mode. 23 Upper Oven Pad- Feature Overview 11 CONTROL PAD FUNCTIONS (CONTINUED) 18 ... warm 21 slow cook 22 clean 24 lite my my favorite favorite 27 28 25 med 26 heavy rapid conv preheat convert 23 UPPER OVEN 29 LOWER OVEN 30 user pref 31 timer on-off timer on-off 32 33 CANCEL START 34 123 456 789 35 36 - + lo 0 hi 18 Keep...
Use and Care Manual
Page 12
...mode. To start with a temperature visual display for 1:30): 1. The cooking modes which does not feature the temperature visual display will be shown in the display and will rise as timers, oven light and the control lock. TEMPERATURE VISUAL DISPLAY Your oven is equipped with a time of 12:00. bake...accept the changes or CANCEL to start a cooking feature you to re-enter a valid time of day to 1:30. User preferences will be set the clock (example for each oven. This feature will be active with "12:00". The clock cannot be available during this mode as well ...
...mode. To start with a temperature visual display for 1:30): 1. The cooking modes which does not feature the temperature visual display will be shown in the display and will rise as timers, oven light and the control lock. TEMPERATURE VISUAL DISPLAY Your oven is equipped with a time of 12:00. bake...accept the changes or CANCEL to start a cooking feature you to re-enter a valid time of day to 1:30. User preferences will be set the clock (example for each oven. This feature will be active with "12:00". The clock cannot be available during this mode as well ...

Use and Care Manual
Page 15
...such as milk, eggs, fish, meat or poultry, should be chilled in the display. 10. Select oven by pressing either UPPER OVEN UPPER OVEN or LOWER OVEN . The temperature numbers will start counting down for 30 minutes): 1. Press COOK OPTIONS to bring up the cook options items. 5. Press START . END ...off automatically at the right time. The time remaining will beep when the countdown is finished. This feature can be shown in the oven for 30 minutes which will end at anytime. Enter time of the display. Press START . Use the automatic timer when cooking cured or ...
...such as milk, eggs, fish, meat or poultry, should be chilled in the display. 10. Select oven by pressing either UPPER OVEN UPPER OVEN or LOWER OVEN . The temperature numbers will start counting down for 30 minutes): 1. Press COOK OPTIONS to bring up the cook options items. 5. Press START . END ...off automatically at the right time. The time remaining will beep when the countdown is finished. This feature can be shown in the oven for 30 minutes which will end at anytime. Enter time of the display. Press START . Use the automatic timer when cooking cured or ...
Use and Care Manual
Page 19
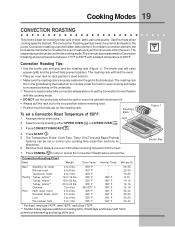
... between 170°F to control your cooking time (read their sections for cooking tender cuts of 350°F. Grid 2. Select oven by pressing either UPPER OVEN UPPER OVEN or LOWER OVEN LOWER OVEN . 3. Press CONVECTION ROAST . 4. Press START . 5. The broiler pan will catch grease spills and the grid will hold...176; F 180° F 180° F 180° F 160° F 160° F 160° F 160° F 25-30 25-30 15-25 8-10 10-15 12-16 12-16 30-40 20-30 20-25 30-40 * For beef: med rare 145°F, med 160°F, well done 170°F ** Stuffed turkey requires additional...
... between 170°F to control your cooking time (read their sections for cooking tender cuts of 350°F. Grid 2. Select oven by pressing either UPPER OVEN UPPER OVEN or LOWER OVEN LOWER OVEN . 3. Press CONVECTION ROAST . 4. Press START . 5. The broiler pan will catch grease spills and the grid will hold...176; F 180° F 180° F 180° F 160° F 160° F 160° F 160° F 25-30 25-30 15-25 8-10 10-15 12-16 12-16 30-40 20-30 20-25 30-40 * For beef: med rare 145°F, med 160°F, well done 170°F ** Stuffed turkey requires additional...

Use and Care Manual
Page 29
... • E S on; 12 hour Energy Saving on display to raise or lower the actual time displayed. 3. The clock must be set before the oven can also be pressed hi lo to change. 5. Press START to accept the changes and go back to toggle between the available options. This feature... be used (not cooking). Press USER PREF until you to set the clock (example for 1:30): 1. When power to the unit has been interrupted, to control the various options of Day, Audio Control and Adjusting the oven temperature. Press + or - The pads + or - can be set the time of day ...
... • E S on; 12 hour Energy Saving on display to raise or lower the actual time displayed. 3. The clock must be set before the oven can also be pressed hi lo to change. 5. Press START to accept the changes and go back to toggle between the available options. This feature... be used (not cooking). Press USER PREF until you to set the clock (example for 1:30): 1. When power to the unit has been interrupted, to control the various options of Day, Audio Control and Adjusting the oven temperature. Press + or - The pads + or - can be set the time of day ...
Use and Care Manual
Page 30
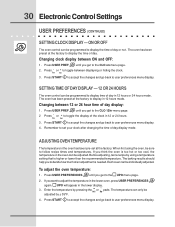
...or 24 hours mode. Press - ADJUSTING OVEN TEMPERATURE The temperature in the oven has been pre-set your clock after changing the time of the clock in the oven can be adjusted. Each oven can be individually adjusted. 30 Electronic Control Settings USER PREFERENCES (CONTINUED) SETTING... CLOCK DISPLAY - If you think the oven is higher or lower than the recommended temperature. Enter the...
...or 24 hours mode. Press - ADJUSTING OVEN TEMPERATURE The temperature in the oven has been pre-set your clock after changing the time of the clock in the oven can be adjusted. Each oven can be individually adjusted. 30 Electronic Control Settings USER PREFERENCES (CONTINUED) SETTING... CLOCK DISPLAY - If you think the oven is higher or lower than the recommended temperature. Enter the...
Use and Care Manual
Page 32
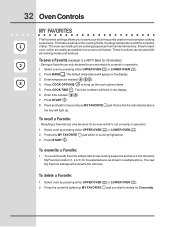
... and save a Favorite (example is a 450°F Bake for an oven which is currently in example above the key will save your most complex cooking sequences. Select oven by pressing either UPPER OVEN UPPER OVEN or LOWER OVEN . Saving a Favorite can only be done for 30 minutes): - To recall a Favorite: - Press START . Enter temperature needed ; 3 0 . 7. The...
... and save a Favorite (example is a 450°F Bake for an oven which is currently in example above the key will save your most complex cooking sequences. Select oven by pressing either UPPER OVEN UPPER OVEN or LOWER OVEN . Saving a Favorite can only be done for 30 minutes): - To recall a Favorite: - Press START . Enter temperature needed ; 3 0 . 7. The...

Use and Care Manual
Page 37
...minutes. Rinse with a damp cloth and dry. Cleaners made especially for 30 to OFF. Clean them as bluish stains may become damaged during the selfclean cycle for 30 to rinse the cleaners as described above. The oven gasket located on the inner frame of clear water and ammonia. Care ...should be removed from the oven during future heating. These can scratch. Rinse with a soapy scouring...
...minutes. Rinse with a damp cloth and dry. Cleaners made especially for 30 to OFF. Clean them as bluish stains may become damaged during the selfclean cycle for 30 to rinse the cleaners as described above. The oven gasket located on the inner frame of clear water and ammonia. Care ...should be removed from the oven during future heating. These can scratch. Rinse with a soapy scouring...