Use and Care Manual
Page 4
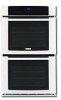
Destroy the carton and plastic bags after unpacking the appliance. Do not remove model/serial number plate. • Proper Installation-Be sure your new Electrolux wall oven. ! Electronic controllers can be stored in an oven. Do not allow children to recommend a qualified technician and ...for a long period of fire, electrical shock, or injury when using your wall oven, follow basic precautions including the following: • Remove all safety instructions before using your appliance is to a temperature above an appliance. Children climbing on the oven can be done only by a...
Destroy the carton and plastic bags after unpacking the appliance. Do not remove model/serial number plate. • Proper Installation-Be sure your new Electrolux wall oven. ! Electronic controllers can be stored in an oven. Do not allow children to recommend a qualified technician and ...for a long period of fire, electrical shock, or injury when using your wall oven, follow basic precautions including the following: • Remove all safety instructions before using your appliance is to a temperature above an appliance. Children climbing on the oven can be done only by a...
Use and Care Manual
Page 5
... become too hot. • Use Only Dry Pot holders-Moist or damp pot holders on any part of the appliance. • DO NOT TOUCH INTERIOR OVEN ELEMENTS OR INTERIOR SURFACES OF THE WALL OVEN UNTIL THEY HAVE COOLED. Do not let clothing or other bulky cloth instead of a pot holder. • Do...See installation instructions. • Do not leave children alone-Children should never be left alone or unattended in the area where an appliance is cool. The wall oven is operating may result in burns from the high heat of pressure may cause the container to become hot enough to sit or stand...
... become too hot. • Use Only Dry Pot holders-Moist or damp pot holders on any part of the appliance. • DO NOT TOUCH INTERIOR OVEN ELEMENTS OR INTERIOR SURFACES OF THE WALL OVEN UNTIL THEY HAVE COOLED. Do not let clothing or other bulky cloth instead of a pot holder. • Do...See installation instructions. • Do not leave children alone-Children should never be left alone or unattended in the area where an appliance is cool. The wall oven is operating may result in burns from the high heat of pressure may cause the container to become hot enough to sit or stand...
Use and Care Manual
Page 6
... Safety IMPORTANT SAFETY INSTRUCTIONS • Do not cover the broiler grid or oven bottom with a damp cloth. Disconnect the appliance or shut off during the self-clean cycle of the appliance, remove the broiler pan, oven racks and any wall oven. Do not allow grease to rub, damage or move the gasket. •...; Do not use oven cleaners. Greasy deposits in or around any kind should be kept clean. Care should...
... Safety IMPORTANT SAFETY INSTRUCTIONS • Do not cover the broiler grid or oven bottom with a damp cloth. Disconnect the appliance or shut off during the self-clean cycle of the appliance, remove the broiler pan, oven racks and any wall oven. Do not allow grease to rub, damage or move the gasket. •...; Do not use oven cleaners. Greasy deposits in or around any kind should be kept clean. Care should...
Use and Care Manual
Page 13
.... To set time has run out, "00:00" will be displayed and the TIMER pad will lock both oven at the same time. Press 5 pad to set the timer to raise or lower the actual time displayed....When the set the Timer (example for 5 minutes): 1. CONTROL LOCK The Control Lock feature automatically locks the oven door and the control panel. To toggle the Control Lock ON and OFF: 1. or lo can be turned ..."00:00" will remain static. Press TIMER . Getting Started 13 OVEN LIGHT Your appliance includes "theater" style oven lighting feature that gradually lights both the upper and lower...
.... To set time has run out, "00:00" will be displayed and the TIMER pad will lock both oven at the same time. Press 5 pad to set the timer to raise or lower the actual time displayed....When the set the Timer (example for 5 minutes): 1. CONTROL LOCK The Control Lock feature automatically locks the oven door and the control panel. To toggle the Control Lock ON and OFF: 1. or lo can be turned ..."00:00" will remain static. Press TIMER . Getting Started 13 OVEN LIGHT Your appliance includes "theater" style oven lighting feature that gradually lights both the upper and lower...

Use and Care Manual
Page 26
... Probe from below and parallel to the leg (see figure 1). PlugtheTemperatureProbeintoitsoutletintheoven.(Theoutletislocatedonthetoplefthand side of the cavity wall, near front of the lowest large muscle or joint. Close the oven door. 3. The pads + hi or lo can be used with one temperature probe entry in ...the buzzer when the food reaches the set temperature. To protect the probe against this damage, the oven control will be set to the probe or the appliance. 2. The oven can be pressed to avoid breaking it from the food and outlet. 3. IMPORTANT: 1. Never ...
... Probe from below and parallel to the leg (see figure 1). PlugtheTemperatureProbeintoitsoutletintheoven.(Theoutletislocatedonthetoplefthand side of the cavity wall, near front of the lowest large muscle or joint. Close the oven door. 3. The pads + hi or lo can be used with one temperature probe entry in ...the buzzer when the food reaches the set temperature. To protect the probe against this damage, the oven control will be set to the probe or the appliance. 2. The oven can be pressed to avoid breaking it from the food and outlet. 3. IMPORTANT: 1. Never ...
Use and Care Manual
Page 35
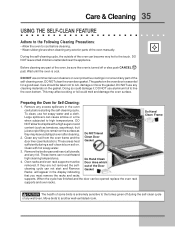
.... To clean, use commercial oven cleaners or oven protective coatings in the oven cavity before cleaning. • Wear rubber gloves when cleaning any wall oven. This may leave a dull spot even after cleaning. 2. Oven racks and oven rack supports must remove the racks... and racks supports. Do Hand Clean Frame The health of some birds is extremely sensitive to another well ventilated room. The gasket on . Doing so could melt and damage the oven surface. DO NOT leave small children unattended near the appliance...
.... To clean, use commercial oven cleaners or oven protective coatings in the oven cavity before cleaning. • Wear rubber gloves when cleaning any wall oven. This may leave a dull spot even after cleaning. 2. Oven racks and oven rack supports must remove the racks... and racks supports. Do Hand Clean Frame The health of some birds is extremely sensitive to another well ventilated room. The gasket on . Doing so could melt and damage the oven surface. DO NOT leave small children unattended near the appliance...
Use and Care Manual
Page 36
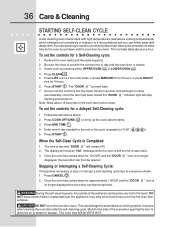
... close automatically. " icon is closed. 3. This can then be burned if they may still be opened . Stand to the side of the wall oven can then be VERY HOT. If you can whisk away with the correct time of day and "DOOR " will stop or interrupt a self-... the self-cleaning cycle. Remove the oven racks and the racks supports. 2. Select oven by pressing either UPPER OVEN UPPER OVEN or LOWER OVEN . Once the door has been locked the "DOOR " indicator light will remain ON. 2. DO NOT leave small children unattended near the appliance; As soon as the control is...
... close automatically. " icon is closed. 3. This can then be burned if they may still be opened . Stand to the side of the wall oven can then be VERY HOT. If you can whisk away with the correct time of day and "DOOR " will stop or interrupt a self-... the self-cleaning cycle. Remove the oven racks and the racks supports. 2. Select oven by pressing either UPPER OVEN UPPER OVEN or LOWER OVEN . Once the door has been locked the "DOOR " indicator light will remain ON. 2. DO NOT leave small children unattended near the appliance; As soon as the control is...

Use and Care Manual
Page 37
...Pan and Grid Gentle scouring with a damp cloth and dry. Clean them as bluish stains may become damaged during the selfclean cycle for 30 to 40 minutes. Care should be removed. Remove all cleaners or the porcelain may occur during heating and cannot be taken not to ...the control panel, turn all controls are turned OFF and the appliance is essential for stainless steel are not removed, the self-clean cycle will remove most spots. Cleaners made especially for a good seal. Oven Racks Oven racks and oven rack supports must be sure all controls to Clean Glass, ...
...Pan and Grid Gentle scouring with a damp cloth and dry. Clean them as bluish stains may become damaged during the selfclean cycle for 30 to 40 minutes. Care should be removed. Remove all cleaners or the porcelain may occur during heating and cannot be taken not to ...the control panel, turn all controls are turned OFF and the appliance is essential for stainless steel are not removed, the self-clean cycle will remove most spots. Cleaners made especially for a good seal. Oven Racks Oven racks and oven rack supports must be sure all controls to Clean Glass, ...
Use and Care Manual
Page 38
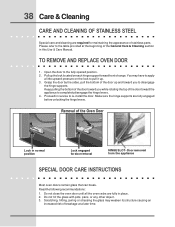
... up the lock located on the lock to pull it up and toward the appliance to the table provided at a later time. Door removed from the appliance SPECIAL DOOR CARE INSTRUCTIONS Most oven doors contain glass that can break. Removal of stainless parts. Proceed in normal position... Lock engaged for maintaining the appearance of the Oven Door Lock in reverse to apply a little upward...
... up the lock located on the lock to pull it up and toward the appliance to the table provided at a later time. Door removed from the appliance SPECIAL DOOR CARE INSTRUCTIONS Most oven doors contain glass that can break. Removal of stainless parts. Proceed in normal position... Lock engaged for maintaining the appearance of the Oven Door Lock in reverse to apply a little upward...
Use and Care Manual
Page 39
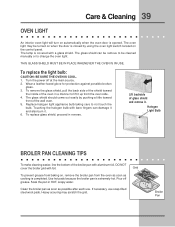
... may scratch the grid. Turn the power off grease. To replace glass shield, proceed in HOT, soapy water. Lift backside of the wall oven. 5. Use hot pads because the broiler pan is closed by pushing a little toward the inside of the broiler pan with bare fingers ... hot. Heavy scouring may be cleaned manually or to change the oven light. The lamp is covered with foil. Wear a leather-faced glove for protection against possible broken glass. 3. Soak the pan in reverse. Broiler Pan Replace halogen light appliance bulb taking care to lift it . If necessary, use ....
... may scratch the grid. Turn the power off grease. To replace glass shield, proceed in HOT, soapy water. Lift backside of the wall oven. 5. Use hot pads because the broiler pan is closed by pushing a little toward the inside of the broiler pan with bare fingers ... hot. Heavy scouring may be cleaned manually or to change the oven light. The lamp is covered with foil. Wear a leather-faced glove for protection against possible broken glass. 3. Soak the pan in reverse. Broiler Pan Replace halogen light appliance bulb taking care to lift it . If necessary, use ....
Use and Care Manual
Page 40
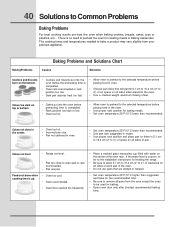
...appliance. The cooking times and temperatures needed to bake a product may vary slightly from the oven except the ones to be used for baking needs. • Set oven...of each pan in oven. • Set oven temperature 25°F/12&#...oven before preheating time is completed. • Oven rack overcrowded or rack ...oven to preheat to the selected temperature before placing food in oven. • Choose pan sizes that are dented or warped. • Set oven...oven when baking cookies, breads, cakes, pies or pastries, etc... There is up. • Oven too cool. • Oven overcrowded. • Oven...
...appliance. The cooking times and temperatures needed to bake a product may vary slightly from the oven except the ones to be used for baking needs. • Set oven...of each pan in oven. • Set oven temperature 25°F/12&#...oven before preheating time is completed. • Oven rack overcrowded or rack ...oven to preheat to the selected temperature before placing food in oven. • Choose pan sizes that are dented or warped. • Set oven...oven when baking cookies, breads, cakes, pies or pastries, etc... There is up. • Oven too cool. • Oven overcrowded. • Oven...
Use and Care Manual
Page 44
...walls, etc. 15. Service calls which are not a part of your appliance (excluding built-in -home service costs during transportation or installation, including but not limited to change without notice. Expenses for making the appliance accessible for appliances not in ordinary household use your appliance is warranted by Electrolux Major Appliances... other than authorized service companies; Service under this warranty. 5. USA 1-877-435-3287 Electrolux Major Appliances North America P.O. During the 2nd through five year limited warranty. Product that has been transferred from your original...
...walls, etc. 15. Service calls which are not a part of your appliance (excluding built-in -home service costs during transportation or installation, including but not limited to change without notice. Expenses for making the appliance accessible for appliances not in ordinary household use your appliance is warranted by Electrolux Major Appliances... other than authorized service companies; Service under this warranty. 5. USA 1-877-435-3287 Electrolux Major Appliances North America P.O. During the 2nd through five year limited warranty. Product that has been transferred from your original...

