Use and Care Manual
Page 1
A Use & Care Guide Electric Slide-In Range 318 203 819 (0710) Rev.
A Use & Care Guide Electric Slide-In Range 318 203 819 (0710) Rev.
Use and Care Manual
Page 3
...Future Use 2 Model and Serial Number Location 2 Questions 2 Table of Contents 3 Safety 4 Important Safety Instructions 4-7 Feature Overview 8 Your Slide-In Range 8-9 Oven Rack Supports and Oven Vents 10 Removing and Replacing Oven Racks 11 Control Pad Functions 12-14 Getting Started 15 Setting Clock ... 24 Convection Baking 25 Convection Convert 26 Rapid Preheat 26 Convection Roasting 27 Convection Broiling 28 Keep Warm 29 Slow Cook 30 Dehydrating 31 Defrosting 31 Bread Proofing 32 Perfect Turkey 33 Temperature Probe 34 Multi Stage 35-36 Electronic Control Settings 37...
...Future Use 2 Model and Serial Number Location 2 Questions 2 Table of Contents 3 Safety 4 Important Safety Instructions 4-7 Feature Overview 8 Your Slide-In Range 8-9 Oven Rack Supports and Oven Vents 10 Removing and Replacing Oven Racks 11 Control Pad Functions 12-14 Getting Started 15 Setting Clock ... 24 Convection Baking 25 Convection Convert 26 Rapid Preheat 26 Convection Roasting 27 Convection Broiling 28 Keep Warm 29 Slow Cook 30 Dehydrating 31 Defrosting 31 Bread Proofing 32 Perfect Turkey 33 Temperature Probe 34 Multi Stage 35-36 Electronic Control Settings 37...
Use and Care Manual
Page 9
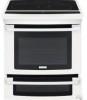
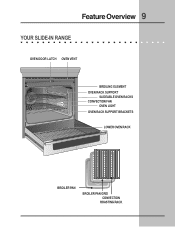
Feature Overview 9 YOUR SLIDE-IN RANGE OVEN DOOR LATCH OVEN VENT BROILING ELEMENT OVEN RACK SUPPORT SLIDEABLE OVEN RACKS CONVECTION FAN OVEN LIGHT OVEN RACK SUPPORT BRACKETS LOWER OVEN RACK BROILER PAN BROILER PAN GRID CONVECTION ROASTING RACK
Feature Overview 9 YOUR SLIDE-IN RANGE OVEN DOOR LATCH OVEN VENT BROILING ELEMENT OVEN RACK SUPPORT SLIDEABLE OVEN RACKS CONVECTION FAN OVEN LIGHT OVEN RACK SUPPORT BRACKETS LOWER OVEN RACK BROILER PAN BROILER PAN GRID CONVECTION ROASTING RACK
Use and Care Manual
Page 10
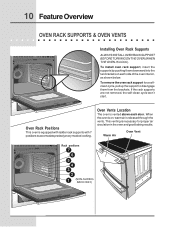
... Oven Rack Supports ALWAYS INSTALL OVEN RACK SUPPORT BEFORE TURNING ON THE OVEN (WHEN THE OVEN IS COOL). Warm Air Oven Vent Rack positions 7 6 5 4 3 2 1 (NON-SLIDING RACK ONLY) Oven Rack Positions This oven is equipped with ladder rack supports with 7 positions to disengage them downward into the two brackets on , warm...
... Oven Rack Supports ALWAYS INSTALL OVEN RACK SUPPORT BEFORE TURNING ON THE OVEN (WHEN THE OVEN IS COOL). Warm Air Oven Vent Rack positions 7 6 5 4 3 2 1 (NON-SLIDING RACK ONLY) Oven Rack Positions This oven is equipped with ladder rack supports with 7 positions to disengage them downward into the two brackets on , warm...
Use and Care Manual
Page 11
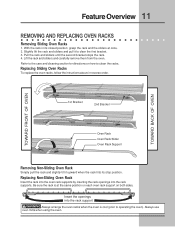
...With the rack in reverse order. Slightly lift the rack and sliders and pull it upward when the rack hits its closed position; Replacing Non-Sliding Oven Rack Insert the rack into the oven rack supports by inserting the rack openings into the rack support Always arrange the oven racks when... the oven is at once. 2. Replacing Sliding Oven Racks To replace the oven racks, follow the intructions above in its stop position. grasp the rack and the sliders at the same position...
...With the rack in reverse order. Slightly lift the rack and sliders and pull it upward when the rack hits its closed position; Replacing Non-Sliding Oven Rack Insert the rack into the oven rack supports by inserting the rack openings into the rack support Always arrange the oven racks when... the oven is at once. 2. Replacing Sliding Oven Racks To replace the oven racks, follow the intructions above in its stop position. grasp the rack and the sliders at the same position...
Use and Care Manual
Page 18
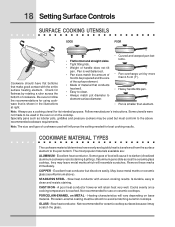
... leave metal marks which will vary depending on ceramic cooktops. Not recommended for use a cooking utensil for using cookware that is reached. If aluminum pans slide across the bottom of cookware used but discolors easily. Not recommended for ceramic cooktop surfaces because it to avoid scratching ceramic cooktops. Remove these marks...
... leave metal marks which will vary depending on ceramic cooktops. Not recommended for use a cooking utensil for using cookware that is reached. If aluminum pans slide across the bottom of cookware used but discolors easily. Not recommended for ceramic cooktop surfaces because it to avoid scratching ceramic cooktops. Remove these marks...
Use and Care Manual
Page 21
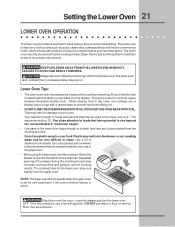
... and Keep Warm (read their sections for self-cleaning or if the control lockout feature is active. Always use oven mitts when removing food from sliding off. • DO NOT LINE THE OVEN DRAWER WITH FOIL OR COVER THE OVEN RACK WITH FOIL. Lower Oven Tips: • The lower oven rack...
... and Keep Warm (read their sections for self-cleaning or if the control lockout feature is active. Always use oven mitts when removing food from sliding off. • DO NOT LINE THE OVEN DRAWER WITH FOIL OR COVER THE OVEN RACK WITH FOIL. Lower Oven Tips: • The lower oven rack...
Use and Care Manual
Page 48
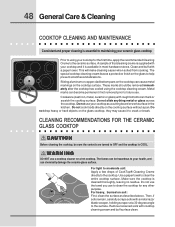
... to moderate soil: Apply a few drops of that cleaning creme is supplied with a metal razor blade scraper, holding scraper at a 30 degree angle to clean the entire cooktop surface. Do not slide anything metal or glass across the cooktop. WARNING DO NOT use your health, and can become permanent if not removed... prior to future use to clean the cooktop for the first time, apply the recommended Cleaning Creme to crack or break. Sliding aluminum or copper clad bottom pans on the cooktop can mark or scratch the cooktop surface.
... to moderate soil: Apply a few drops of that cleaning creme is supplied with a metal razor blade scraper, holding scraper at a 30 degree angle to clean the entire cooktop surface. Do not slide anything metal or glass across the cooktop. WARNING DO NOT use your health, and can become permanent if not removed... prior to future use to clean the cooktop for the first time, apply the recommended Cleaning Creme to crack or break. Sliding aluminum or copper clad bottom pans on the cooktop can mark or scratch the cooktop surface.
Use and Care Manual
Page 54
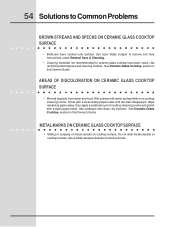
.... See instructions under General Care & Cleaning. • Cleaning materials not recommended for ceramic-glass cooktop have cooked onto surface. Do not slide metal utensils on a cooktop cleaning creme. Scrub with a clean paper towel. See Ceramic-Glass Cooktop section in this Owner's Guide. AREAS... Ceramic-Glass Cooktop section in this Owner's Guide. 54 Solutions to remove marks. METAL MARKS ON CERAMIC GLASS COOKTOP SURFACE • Sliding or scraping of cooktop cleaning creme and polish with a clean damp paper towel until the stain disappears. Use razor blade scraper to ...
.... See instructions under General Care & Cleaning. • Cleaning materials not recommended for ceramic-glass cooktop have cooked onto surface. Do not slide metal utensils on a cooktop cleaning creme. Scrub with a clean paper towel. See Ceramic-Glass Cooktop section in this Owner's Guide. AREAS... Ceramic-Glass Cooktop section in this Owner's Guide. 54 Solutions to remove marks. METAL MARKS ON CERAMIC GLASS COOKTOP SURFACE • Sliding or scraping of cooktop cleaning creme and polish with a clean damp paper towel until the stain disappears. Use razor blade scraper to ...


