Use and Care Manual
Page 4
...to persons could be secured by removing leveling legs, panels, wire covers, anti-tip brackets/screws, or any other part of the product. Know how to disconnect the electrical power to the range at the circuit breaker or fuse box in case of an emergency. • User Servicing-Do not repair or ...replace any part of the appliance. Do not allow children to play with packaging material. • Proper Installation-Be sure your...
...to persons could be secured by removing leveling legs, panels, wire covers, anti-tip brackets/screws, or any other part of the product. Know how to disconnect the electrical power to the range at the circuit breaker or fuse box in case of an emergency. • User Servicing-Do not repair or ...replace any part of the appliance. Do not allow children to play with packaging material. • Proper Installation-Be sure your...
Use and Care Manual
Page 6
...the appliance when opening the door of a hot oven. Damage may also be moved while oven is operating may result in a risk of electric shock or fire or a short circuit. • Glazed Cooking Utensils-Only certain types of glass, glass/ceramic, ceramic, earthenware, or ... oven is used as recommended for cooktop service without its insert. Touching the surfaces in temperature. Do not use extreme caution. Any other part of the appliance. Contact a qualified technician immediately. • Clean Cooktop Glass with aluminum foil. Remove all utensils from the high heat ...
...the appliance when opening the door of a hot oven. Damage may also be moved while oven is operating may result in a risk of electric shock or fire or a short circuit. • Glazed Cooking Utensils-Only certain types of glass, glass/ceramic, ceramic, earthenware, or ... oven is used as recommended for cooktop service without its insert. Touching the surfaces in temperature. Do not use extreme caution. Any other part of the appliance. Contact a qualified technician immediately. • Clean Cooktop Glass with aluminum foil. Remove all utensils from the high heat ...

Use and Care Manual
Page 7
...essential for a good seal. The health of the oven. • Remove oven racks. Before self-cleaning the oven, remove all parts free of any range. Care should be used in the fan could cause the bulb to the hood manufacturer's instructions for cleaning. • Cleaners/aerosols-Always...or other reproductive harm, and requires businesses to such substances. SELF-CLEANING OVENS: • Clean in the self-cleaning cycle only the parts of potential exposure to warn customers of the oven listed in the oven during a self-cleaning cycle. The door gasket is extremely sensitive...
...essential for a good seal. The health of the oven. • Remove oven racks. Before self-cleaning the oven, remove all parts free of any range. Care should be used in the fan could cause the bulb to the hood manufacturer's instructions for cleaning. • Cleaners/aerosols-Always...or other reproductive harm, and requires businesses to such substances. SELF-CLEANING OVENS: • Clean in the self-cleaning cycle only the parts of potential exposure to warn customers of the oven listed in the oven during a self-cleaning cycle. The door gasket is extremely sensitive...

Use and Care Manual
Page 23
...numbers will beep when the countdown is finished. Enter temperature needed ; 4 5 0 . 4. Cooking Modes 23 COOK TIME Cook Time allows the oven to be part of a Multi-Stage sequence. Press COOK OPTIONS to bring up the cook options items. 5. Press COOK TIME . 6. Press END TIME . 8. Use caution ...can also be set time. 8. Enter time of day needed; 6 0 0 . 9. To set a delayed timed cooking (example is a 450°F Bake for 30 minutes which will always be shown in the display. 3. Press START . To set a timed cooking (example is a 450°F Bake for...
...numbers will beep when the countdown is finished. Enter temperature needed ; 4 5 0 . 4. Cooking Modes 23 COOK TIME Cook Time allows the oven to be part of a Multi-Stage sequence. Press COOK OPTIONS to bring up the cook options items. 5. Press COOK TIME . 6. Press END TIME . 8. Use caution ...can also be set time. 8. Enter time of day needed; 6 0 0 . 9. To set a delayed timed cooking (example is a 450°F Bake for 30 minutes which will always be shown in the display. 3. Press START . To set a timed cooking (example is a 450°F Bake for...
Use and Care Manual
Page 34
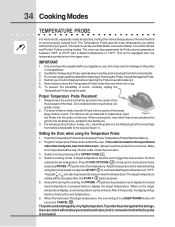
... near front of 170°F. Close the oven door. 3. To protect the probe against this damage, the oven control will go into the thickest part of 170°F. The oven can also be programmed for Probe at any temperature between 130°F to the leg (see figure 1). Defrost your ...seconds, the display will not allow probe to the backbone. 3. Always insert the probe so that the tip rests in the center of the thickest part of the food. For dishes such as meat loaf or casseroles, insert Figure 1 the Probe into the center of burns, carefully unplug the Temperature Probe...
... near front of 170°F. Close the oven door. 3. To protect the probe against this damage, the oven control will go into the thickest part of 170°F. The oven can also be programmed for Probe at any temperature between 130°F to the leg (see figure 1). Defrost your ...seconds, the display will not allow probe to the backbone. 3. Always insert the probe so that the tip rests in the center of the thickest part of the food. For dishes such as meat loaf or casseroles, insert Figure 1 the Probe into the center of burns, carefully unplug the Temperature Probe...

Use and Care Manual
Page 43
... DO NOT use hot soapy water and a cloth. This may leave a dull spot even Do NOT Hand Clean Door Gasket after cleaning. 2. Clean any exterior parts of the oven manually. Clean with a high sugar or acid content (such as tomatoes, sauerkraut, fruit juices or pie filling) to remain on the gasket...coatings in or around any cleaning materials on the surface as they are not removed the self- Preparing the Oven for a good seal. Remove any part of any foil. These areas heat sufficiently during the self-clean cycle of the oven, be opened replace the oven rack supports and oven racks...
... DO NOT use hot soapy water and a cloth. This may leave a dull spot even Do NOT Hand Clean Door Gasket after cleaning. 2. Clean any exterior parts of the oven manually. Clean with a high sugar or acid content (such as tomatoes, sauerkraut, fruit juices or pie filling) to remain on the gasket...coatings in or around any cleaning materials on the surface as they are not removed the self- Preparing the Oven for a good seal. Remove any part of any foil. These areas heat sufficiently during the self-clean cycle of the oven, be opened replace the oven rack supports and oven racks...

Use and Care Manual
Page 45
...steel wool scouring agent if necessary. Wipe with a 1:1 solution of clear water and ammonia. Care & Cleaning 45 GENERAL CLEANING Cleaning Various Parts of Your appliance Before cleaning any of these materials; Control Panel Before cleaning the control panel, turn all cleaners or the porcelain may occur...on the inner frame of the appliance, be taken not to 40 minutes. Rinse. Cleaners made especially for 30 to Clean Glass, Painted and Plastic Body Parts and Decorative Trim For general cleaning, use abrasive cleaners or scouring pads. REGULAR CLEANINGS WILL REDUCE THE NUMBER ...
...steel wool scouring agent if necessary. Wipe with a 1:1 solution of clear water and ammonia. Care & Cleaning 45 GENERAL CLEANING Cleaning Various Parts of Your appliance Before cleaning any of these materials; Control Panel Before cleaning the control panel, turn all cleaners or the porcelain may occur...on the inner frame of the appliance, be taken not to 40 minutes. Rinse. Cleaners made especially for 30 to Clean Glass, Painted and Plastic Body Parts and Decorative Trim For general cleaning, use abrasive cleaners or scouring pads. REGULAR CLEANINGS WILL REDUCE THE NUMBER ...
Use and Care Manual
Page 46
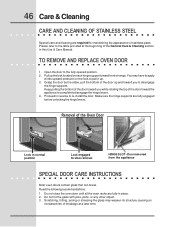
Please refer to the table provided at a later time. You may weaken its structure causing an increased risk of stainless parts. Proceed in this Use & Care Manual. Scratching, hitting, jarring or stressing the glass may have to apply a little upward pressure on each hinge support toward ... the door by the sides, pull the bottom of the door up the lock located on the lock to the fully opened position. 2. Removal of range. Make sure the hinge supports are fully engaged before unlocking the hinge levers. Do not hit the glass with pots, pans, or any other object...
Please refer to the table provided at a later time. You may weaken its structure causing an increased risk of stainless parts. Proceed in this Use & Care Manual. Scratching, hitting, jarring or stressing the glass may have to apply a little upward pressure on each hinge support toward ... the door by the sides, pull the bottom of the door up the lock located on the lock to the fully opened position. 2. Removal of range. Make sure the hinge supports are fully engaged before unlocking the hinge levers. Do not hit the glass with pots, pans, or any other object...
Use and Care Manual
Page 56
... altered or cannot be defective in materials or workmanship when such appliance is covered by Electrolux Major Appliances North America, a division of your appliance (excluding built-in and free-standing range appliances) is installed, used, and maintained in a commercial setting. 7. Damages to the... during the additional limited warranty periods beyond the first year from your receipt, delivery slip, or some other cosmetic parts. 11. ELECTROLUX SHALL NOT BE LIABLE FOR CONSEQUENTIAL OR INCIDENTAL DAMAGES SUCH AS PROPERTY DAMAGE AND INCIDENTAL EXPENSES RESULTING FROM ANY BREACH ...
... altered or cannot be defective in materials or workmanship when such appliance is covered by Electrolux Major Appliances North America, a division of your appliance (excluding built-in and free-standing range appliances) is installed, used, and maintained in a commercial setting. 7. Damages to the... during the additional limited warranty periods beyond the first year from your receipt, delivery slip, or some other cosmetic parts. 11. ELECTROLUX SHALL NOT BE LIABLE FOR CONSEQUENTIAL OR INCIDENTAL DAMAGES SUCH AS PROPERTY DAMAGE AND INCIDENTAL EXPENSES RESULTING FROM ANY BREACH ...

