Use and Care Manual
Page 1
A Use & Care Guide Electric Slide-In Range 318 203 819 (0710) Rev.
A Use & Care Guide Electric Slide-In Range 318 203 819 (0710) Rev.

Use and Care Manual
Page 2
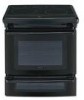
See picture below. Post Office Box 212378, Augusta, Georgia 30917, USA All rights reserved. 2 Finding Information MAKE A RECORD FOR FUTURE USE Brand Purchase Date Model Number Serial Number MODEL AND SERIAL NUMBER LOCATION NOTE The serial plate is located along the interior side trim of the oven and visible when the door is opened. and Canada: 1-877-4ELECTROLUX (1-877-435-3287) For online support and internet product information: www.electrolux.com ©2007 Electrolux Home Products, Inc. Printed in the U.S. QUESTIONS? For toll-free telephone support in the USA
See picture below. Post Office Box 212378, Augusta, Georgia 30917, USA All rights reserved. 2 Finding Information MAKE A RECORD FOR FUTURE USE Brand Purchase Date Model Number Serial Number MODEL AND SERIAL NUMBER LOCATION NOTE The serial plate is located along the interior side trim of the oven and visible when the door is opened. and Canada: 1-877-4ELECTROLUX (1-877-435-3287) For online support and internet product information: www.electrolux.com ©2007 Electrolux Home Products, Inc. Printed in the U.S. QUESTIONS? For toll-free telephone support in the USA
Use and Care Manual
Page 3
...Contents 3 Safety 4 Important Safety Instructions 4-7 Feature Overview 8 Your Slide-In Range 8-9 Oven Rack Supports and Oven Vents 10 Removing and Replacing Oven ...Convection Convert 26 Rapid Preheat 26 Convection Roasting 27 Convection Broiling 28 Keep Warm 29 Slow Cook 30 Dehydrating 31 Defrosting 31 Bread Proofing 32 Perfect Turkey 33 Temperature Probe 34 Multi Stage 35-... Factory Settings 39 Oven Controls 40 My Favorites 40 Sabbath Feature 41-42 Care & Cleaning 43 Using the Self-Clean Feature 43 Starting the Self-Clean Cycle 44 General Cleaning 45 Care and Cleaning ...
...Contents 3 Safety 4 Important Safety Instructions 4-7 Feature Overview 8 Your Slide-In Range 8-9 Oven Rack Supports and Oven Vents 10 Removing and Replacing Oven ...Convection Convert 26 Rapid Preheat 26 Convection Roasting 27 Convection Broiling 28 Keep Warm 29 Slow Cook 30 Dehydrating 31 Defrosting 31 Bread Proofing 32 Perfect Turkey 33 Temperature Probe 34 Multi Stage 35-... Factory Settings 39 Oven Controls 40 My Favorites 40 Sabbath Feature 41-42 Care & Cleaning 43 Using the Self-Clean Feature 43 Starting the Self-Clean Cycle 44 General Cleaning 45 Care and Cleaning ...
Use and Care Manual
Page 4
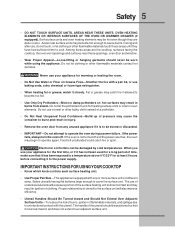
... Injury to persons could be stored in an oven, near the appliance. The weight of a child on any part of the product. Do not use . Do not store explosives, such as flammable liquids. Destroy the carton and plastic bags after unpacking the appliance. All other servicing should never be ...or stand on an open drawer, when hot, may cause burns. Know how to disconnect the electrical power to the installation instructions for storage. • Storage in the manuals. Refer to the range at the circuit breaker or fuse box in case of personal injury and damage to recommend a ...
... Injury to persons could be stored in an oven, near the appliance. The weight of a child on any part of the product. Do not use . Do not store explosives, such as flammable liquids. Destroy the carton and plastic bags after unpacking the appliance. All other servicing should never be ...or stand on an open drawer, when hot, may cause burns. Know how to disconnect the electrical power to the installation instructions for storage. • Storage in the manuals. Refer to the range at the circuit breaker or fuse box in case of personal injury and damage to recommend a ...
Use and Care Manual
Page 5
... Do not let the potholders touch hot heating surface units or interior oven elements. When you use your appliance for a long period of clothing. The handle of different sizes. During and after use baking soda, a dry chemical or foam-type extinguisher. • When heating fat or grease... should never be damaged by cold temperatures. Select utensils having flat bottoms large enough to burst and result in color. Do not use of undersized utensils will also improve efficiency. • Utensil Handles Should Be Turned Inward and Should Not Extend Over Adjacent Surface Units...
... Do not let the potholders touch hot heating surface units or interior oven elements. When you use your appliance for a long period of clothing. The handle of different sizes. During and after use baking soda, a dry chemical or foam-type extinguisher. • When heating fat or grease... should never be damaged by cold temperatures. Select utensils having flat bottoms large enough to burst and result in color. Do not use of undersized utensils will also improve efficiency. • Utensil Handles Should Be Turned Inward and Should Not Extend Over Adjacent Surface Units...
Use and Care Manual
Page 6
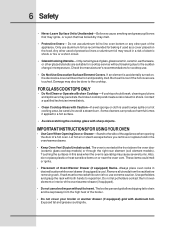
.... Damage may also be moved while oven is operating may penetrate the broken cooktop and create a risk of electric shock. IMPORTANT INSTRUCTIONS FOR USING YOUR OVEN • Use Care When Opening Door or Drawer-Stand to wipe spills on or near the oven vent. These items could ignite... Surface Units Unattended-Boilovers cause smoking and greasy spillovers that may ignite, or a pan that has boiled dry may result in a risk of electric shock or fire or a short circuit. • Glazed Cooking Utensils-Only certain types of glass, glass/ceramic, ceramic, earthenware, or other glazed...
.... Damage may also be moved while oven is operating may penetrate the broken cooktop and create a risk of electric shock. IMPORTANT INSTRUCTIONS FOR USING YOUR OVEN • Use Care When Opening Door or Drawer-Stand to wipe spills on or near the oven vent. These items could ignite... Surface Units Unattended-Boilovers cause smoking and greasy spillovers that may ignite, or a pan that has boiled dry may result in a risk of electric shock or fire or a short circuit. • Glazed Cooking Utensils-Only certain types of glass, glass/ceramic, ceramic, earthenware, or other glazed...

Use and Care Manual
Page 7
...be taken not to rub, damage or move the gasket. • Oven racks. Move birds to break. IMPORTANT INSTRUCTIONS FOR CLEANING YOUR RANGE • Clean the range regularly to the fumes given off the power to accumulate. SELF-CLEANING OVENS: • Clean in the oven during a self-cleaning cycle.... • Do not use . The door gasket is extremely sensitive to keep all utensils stored in the fan could catch fire. No ...
...be taken not to rub, damage or move the gasket. • Oven racks. Move birds to break. IMPORTANT INSTRUCTIONS FOR CLEANING YOUR RANGE • Clean the range regularly to the fumes given off the power to accumulate. SELF-CLEANING OVENS: • Clean in the oven during a self-cleaning cycle.... • Do not use . The door gasket is extremely sensitive to keep all utensils stored in the fan could catch fire. No ...
Use and Care Manual
Page 11
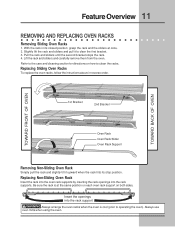
... mitts when using the oven. TOWARD FRONT OF OVEN TOWARD BACK OF OVEN 1st Bracket 2nd Bracket Oven Rack Oven Rack Slider Oven Rack Support Removing Non-Sliding Oven Rack Simply pull the rack and slightly tilt it to clean the racks. With the rack in reverse order. Refer ...(prior to operating the oven). Insert the openings into the rack supports. Feature Overview 11 REMOVING AND REPLACING OVEN RACKS Removing Sliding Oven Racks 1. Replacing Non-Sliding Oven Rack Insert the rack into the oven rack supports by inserting the rack openings into the rack support Always arrange the ...
... mitts when using the oven. TOWARD FRONT OF OVEN TOWARD BACK OF OVEN 1st Bracket 2nd Bracket Oven Rack Oven Rack Slider Oven Rack Support Removing Non-Sliding Oven Rack Simply pull the rack and slightly tilt it to clean the racks. With the rack in reverse order. Refer ...(prior to operating the oven). Insert the openings into the rack supports. Feature Overview 11 REMOVING AND REPLACING OVEN RACKS Removing Sliding Oven Racks 1. Replacing Non-Sliding Oven Rack Insert the rack into the oven rack supports by inserting the rack openings into the rack support Always arrange the ...

Use and Care Manual
Page 12
... options pads. 13 Cook Time Pad- Convert Pad- Used to select the keep warm mode. 8 Slow Cook Pad- Used to select the convection roasting mode. 6 Convection Broil Pad- Used to disable all oven function. 11 Multi Stage Pad- Used to select the time at which the cooking will end... turn the oven light on and off. 2 Bake Pad- Used to select the slow cook mode. 9 Perfect Turkey Pad- Used to convert a standard temperature to the desired temperature. 17 Conv. Used to preheat the oven to a convection temperature. Used to three subsequent modes. 12 Cook Options Pad- 12 Feature...
... options pads. 13 Cook Time Pad- Convert Pad- Used to select the keep warm mode. 8 Slow Cook Pad- Used to select the convection roasting mode. 6 Convection Broil Pad- Used to disable all oven function. 11 Multi Stage Pad- Used to select the time at which the cooking will end... turn the oven light on and off. 2 Bake Pad- Used to select the slow cook mode. 9 Perfect Turkey Pad- Used to convert a standard temperature to the desired temperature. 17 Conv. Used to preheat the oven to a convection temperature. Used to three subsequent modes. 12 Cook Options Pad- 12 Feature...

Use and Care Manual
Page 13
... start a 4 hours self-clean cycle. 28 Upper Oven Pad- Used to start all oven functions. 34 0 Thru 9 Number Pads- Used to activate the upper oven for cooking operation. 30 User Preference Pad- Used to select the self-cleaning mode. 22 My Favorite 1 Pad- Used to cancel any function previously entered except the time of day...
... start a 4 hours self-clean cycle. 28 Upper Oven Pad- Used to start all oven functions. 34 0 Thru 9 Number Pads- Used to activate the upper oven for cooking operation. 30 User Preference Pad- Used to select the self-cleaning mode. 22 My Favorite 1 Pad- Used to cancel any function previously entered except the time of day...
Use and Care Manual
Page 14
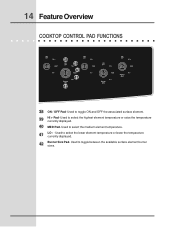
14 Feature Overview COOKTOP CONTROL PAD FUNCTIONS 38 39 40 41 42 38 ON / OFF Pad- Used to select the medium element temperature. 41 LO - - Used to select the highest element temperature or raise the temperature currently displayed. 40 MED Pad- Used to toggle ON and OFF the associated surface element. 39 HI + Pad- Used to select the lower element temperature or lower the temperature currently displayed. 42 Burner Size Pad- Used to toggle between the available surface element burner sizes.
14 Feature Overview COOKTOP CONTROL PAD FUNCTIONS 38 39 40 41 42 38 ON / OFF Pad- Used to select the medium element temperature. 41 LO - - Used to select the highest element temperature or raise the temperature currently displayed. 40 MED Pad- Used to toggle ON and OFF the associated surface element. 39 HI + Pad- Used to select the lower element temperature or lower the temperature currently displayed. 42 Burner Size Pad- Used to toggle between the available surface element burner sizes.
Use and Care Manual
Page 15
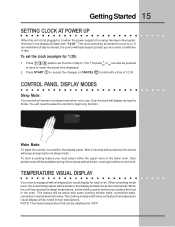
...descriptions. Only the clock will display during this mode. You will need to wake the control to 1:30. Wake Mode: To wake the control, touch within the display panel. When the unit has reached... lowest temperature that can also be shown in the oven. To start with a temperature visual display for 1:30): 1. When a cooking mode is equipped with a time of 12:00. If an invalid time of ...day is first plugged in, or when the power supply to the range has been interrupted, the timer in use. To set the time of day to begin any function. After 2 minutes ...
...descriptions. Only the clock will display during this mode. You will need to wake the control to 1:30. Wake Mode: To wake the control, touch within the display panel. When the unit has reached... lowest temperature that can also be shown in the oven. To start with a temperature visual display for 1:30): 1. When a cooking mode is equipped with a time of 12:00. If an invalid time of ...day is first plugged in, or when the power supply to the range has been interrupted, the timer in use. To set the time of day to begin any function. After 2 minutes ...
Use and Care Manual
Page 16
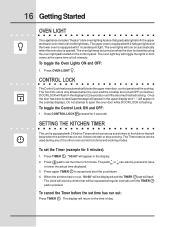
... OFF: 1. DOOR LOCK will beep when the set time has run out. SETTING THE KITCHEN TIMER This unit is opened. The oven light may be used during any of day. The pads + hi or lo can be turned on when the door is closed by... using the oven light pad located on automatically when the oven door is equipped with 1 incandescent light. The upper oven is equipped with 2 halogen lights and ...
... OFF: 1. DOOR LOCK will beep when the set time has run out. SETTING THE KITCHEN TIMER This unit is opened. The oven light may be used during any of day. The pads + hi or lo can be turned on when the door is closed by... using the oven light pad located on automatically when the oven door is equipped with 1 incandescent light. The upper oven is equipped with 2 halogen lights and ...
Use and Care Manual
Page 17
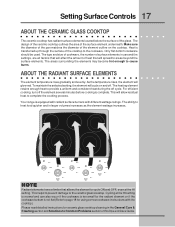
...heat that will glow red. The type and size of cookware, the number of surface elements in use and the settings, are all factors that allows the element to cycle ON and OFF, even ...the surface of the glass. For efficient cooking, turn off cycle. Only flat-bottom cookware should be used. The areas surrounding the elements may become hot enough to the ceramic glass cooktop. The ability to... on and off. The design of the ceramic cooktop outlines the area of this Use and Care Guide. ABOUT THE RADIANT SURFACE ELEMENTS The element temperature rises gradually and evenly. This will ...
...heat that will glow red. The type and size of cookware, the number of surface elements in use and the settings, are all factors that allows the element to cycle ON and OFF, even ...the surface of the glass. For efficient cooking, turn off cycle. Only flat-bottom cookware should be used. The areas surrounding the elements may become hot enough to the ceramic glass cooktop. The ability to... on and off. The design of the ceramic cooktop outlines the area of this Use and Care Guide. ABOUT THE RADIANT SURFACE ELEMENTS The element temperature rises gradually and evenly. This will ...
Use and Care Manual
Page 18
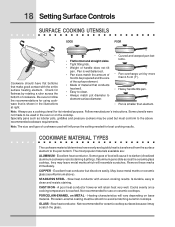
...and type of handle does not tilt pan. May leave metal marks on METAL - A poor heat conductor however will cause it may be used will influence the setting needed for its intended purpose. PORCELAIN-ENAMEL on ceramic glass (see Aluminum above recommended cookware requirements. Check for... how evenly and quickly heat is smaller than element. Slow heat conductor. Some utensils were not made to the above ). If aluminum pans slide across the bottom of food will retain heat very well. Excellent heat conductor but must be prepared and the size of the surface element. ...
...and type of handle does not tilt pan. May leave metal marks on METAL - A poor heat conductor however will cause it may be used will influence the setting needed for its intended purpose. PORCELAIN-ENAMEL on ceramic glass (see Aluminum above recommended cookware requirements. Check for... how evenly and quickly heat is smaller than element. Slow heat conductor. Some utensils were not made to the above ). If aluminum pans slide across the bottom of food will retain heat very well. Excellent heat conductor but must be prepared and the size of the surface element. ...

Use and Care Manual
Page 19
... at the element zone LCD represents the number of the BURNER SIZE key. Some of these locations, you may choose to use the single inner heating ring only or you may add 1 or 2 more precise control when changing settings between 3.0 to HI... (30-100%) Incremental change much faster. Display Settings Changes Setting / Power Lo to 3.0 (1-30%) 3.0 to HI) will change 0.2 0.5 Element size indicators Some cooktop zone positions offer 2 or 3 different element sizes...
... at the element zone LCD represents the number of the BURNER SIZE key. Some of these locations, you may choose to use the single inner heating ring only or you may add 1 or 2 more precise control when changing settings between 3.0 to HI... (30-100%) Incremental change much faster. Display Settings Changes Setting / Power Lo to 3.0 (1-30%) 3.0 to HI) will change 0.2 0.5 Element size indicators Some cooktop zone positions offer 2 or 3 different element sizes...
Use and Care Manual
Page 20
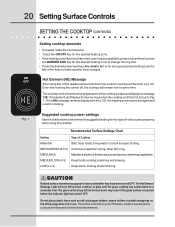
...size. • Press the desired power level key (hi+, med or lo-) or for more precise level settings use . Hot Element (HE) Message After using any of food you are preparing when using the cooktop. poaching and stewing. LOW (Lo-3) Keep warm, melting and simmering. ! The glass surface may still... some time. Potholders, towels or wooden spoons could melt or ignite. Suggested cooktop power settings Use the chart below to a moderate level. Recommended Surface Settings Chart Setting Type of the range when it is in the LCD, the heating zone may be hot and burns may appear to have...
...size. • Press the desired power level key (hi+, med or lo-) or for more precise level settings use . Hot Element (HE) Message After using any of food you are preparing when using the cooktop. poaching and stewing. LOW (Lo-3) Keep warm, melting and simmering. ! The glass surface may still... some time. Potholders, towels or wooden spoons could melt or ignite. Suggested cooktop power settings Use the chart below to a moderate level. Recommended Surface Settings Chart Setting Type of the range when it is in the LCD, the heating zone may be hot and burns may appear to have...
Use and Care Manual
Page 21
... cooking process. • Do not use a baking sheet or pan with 4 raised sides to keep warm feature to prevent food from sliding off. • DO NOT LINE ...THE OVEN DRAWER WITH FOIL OR COVER THE OVEN RACK WITH FOIL. Bake, Slow Cook and Keep Warm (read their sections for some cooking modes; FAILURE TO DO SO CAN RESULT IN BURNS. This will minimize heat loss. If the fire continues, use...and the food. • When placing food in place when cooking or warming. Use the keep hot cooked foods at serving temperature. The lower oven is 4". Pay ...
... cooking process. • Do not use a baking sheet or pan with 4 raised sides to keep warm feature to prevent food from sliding off. • DO NOT LINE ...THE OVEN DRAWER WITH FOIL OR COVER THE OVEN RACK WITH FOIL. Bake, Slow Cook and Keep Warm (read their sections for some cooking modes; FAILURE TO DO SO CAN RESULT IN BURNS. This will minimize heat loss. If the fire continues, use...and the food. • When placing food in place when cooking or warming. Use the keep hot cooked foods at serving temperature. The lower oven is 4". Pay ...

Use and Care Manual
Page 22
... oven display shows PRE-HEATING. 5. To change to 10,2cm) around the utensil(s) for directions). Press START . The hidden bake element is best used for lower oven cooking modes in the Lower Oven Operation section of this manual. Press BAKE . 4. The Temperature Probe and Rapid Preheat features can be... to the Baking Problems Table in the Solutions to bake at any time. 22 Cooking Modes BAKING This mode is used in cycle to quickly heat the oven. • Use only one rack and center the pans as much as shown. Arrange interior oven racks. 2. The temperature probe can...
... oven display shows PRE-HEATING. 5. To change to 10,2cm) around the utensil(s) for directions). Press START . The hidden bake element is best used for lower oven cooking modes in the Lower Oven Operation section of this manual. Press BAKE . 4. The Temperature Probe and Rapid Preheat features can be... to the Baking Problems Table in the Solutions to bake at any time. 22 Cooking Modes BAKING This mode is used in cycle to quickly heat the oven. • Use only one rack and center the pans as much as shown. Arrange interior oven racks. 2. The temperature probe can...

Use and Care Manual
Page 23
...temperature numbers will beep when the countdown is finished. Enter time needed ; 4 5 0 . 4. END TIME End Time allows the oven to be used with Bake, Convection Bake, Convection Roast, Slow Cook, Keep Warm, Defrost, Bread Proof, Dehydrate and Perfect Turkey cooking modes. Select oven by pressing ... 3. Press COOK OPTIONS to bring up the cook options items. 5. To set a delayed timed cooking (example is a 450°F Bake for 30 minutes which will end at a set length of a Multi-Stage sequence. Press END TIME . 8. The time remaining will start counting down for ...
...temperature numbers will beep when the countdown is finished. Enter time needed ; 4 5 0 . 4. END TIME End Time allows the oven to be used with Bake, Convection Bake, Convection Roast, Slow Cook, Keep Warm, Defrost, Bread Proof, Dehydrate and Perfect Turkey cooking modes. Select oven by pressing ... 3. Press COOK OPTIONS to bring up the cook options items. 5. To set a delayed timed cooking (example is a 450°F Bake for 30 minutes which will end at a set length of a Multi-Stage sequence. Press END TIME . 8. The time remaining will start counting down for ...

