Complete Owner's Guide (English)
Page 1
Use & Care Guide Electric Cooktop Dishwasher 31 8 2 0 3 621 ( 0807) R ev. A
Use & Care Guide Electric Cooktop Dishwasher 31 8 2 0 3 621 ( 0807) R ev. A
Complete Owner's Guide (English)
Page 2
QUESTIONS? Post Office Box 212378, Augusta, Georgia 30917, USA All rights reserved. 2 Finding Information MAKE A RECORD FOR FUTURE USE Brand Purchase Date Model Number Serial Number NOTE The serial and model numbers may be found on the serial plate located under the cooktop. For toll-free telephone support in the USA Printed in the U.S. and Canada: 1-877-4ELECTROLUX (1-877-435-3287) For online support and internet product information: www.electroluxappliances.com ©2008 Electrolux Home Products, Inc.
QUESTIONS? Post Office Box 212378, Augusta, Georgia 30917, USA All rights reserved. 2 Finding Information MAKE A RECORD FOR FUTURE USE Brand Purchase Date Model Number Serial Number NOTE The serial and model numbers may be found on the serial plate located under the cooktop. For toll-free telephone support in the USA Printed in the U.S. and Canada: 1-877-4ELECTROLUX (1-877-435-3287) For online support and internet product information: www.electroluxappliances.com ©2008 Electrolux Home Products, Inc.
Complete Owner's Guide (English)
Page 3
Finding Information 3 TABLE OF CONTENTS Finding Information 2-3 Make a Record for Future use 2 Questions 2 Safety 4-6 Important Safety Instructions 4 Cooktop Features 7-8 Setting Surface Controls 9-18 About the Ceramic Glass Cooktop 9 About the Radiant Surface Elements 9 Locations of the Surface Radiant Elements .......... 10 Using the Touch Control 10 LED Messages or Light Indicators Displayed by Main...
Finding Information 3 TABLE OF CONTENTS Finding Information 2-3 Make a Record for Future use 2 Questions 2 Safety 4-6 Important Safety Instructions 4 Cooktop Features 7-8 Setting Surface Controls 9-18 About the Ceramic Glass Cooktop 9 About the Radiant Surface Elements 9 Locations of the Surface Radiant Elements .......... 10 Using the Touch Control 10 LED Messages or Light Indicators Displayed by Main...
Complete Owner's Guide (English)
Page 4
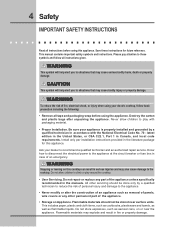
...This includes paper, plastic and cloth items, such as cookbooks, plasticware and towels, as well as aerosol cans, on this cooktop can result in fire or property damage. Do not store explosives, such as flammable liquids. This manual contains important safety symbols...packaging material. • Proper Installation. WARNING Stepping or leaning on or near surface units. Do not allow children to the cooktop. Ask your electric cooktop, follow all instructions given. ! 4 Safety IMPORTANT SAFETY INSTRUCTIONS Read all instructions before using the appliance. Destroy the carton ...
...This includes paper, plastic and cloth items, such as cookbooks, plasticware and towels, as well as aerosol cans, on this cooktop can result in fire or property damage. Do not store explosives, such as flammable liquids. This manual contains important safety symbols...packaging material. • Proper Installation. WARNING Stepping or leaning on or near surface units. Do not allow children to the cooktop. Ask your electric cooktop, follow all instructions given. ! 4 Safety IMPORTANT SAFETY INSTRUCTIONS Read all instructions before using the appliance. Destroy the carton ...

Complete Owner's Guide (English)
Page 5
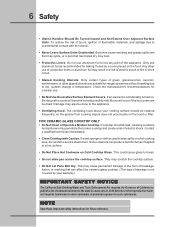
...on Grease Fires. They should be seriously injured. • Do not leave children alone. Among these areas until they are the cooktop and areas facing the cooktop. • Wear Proper Apparel. Do not use of clothing. Do not attempt to children in use baking soda, a dry ...chemical or foam-type extinguisher. • When heating fat or grease, watch it closely. IMPORTANT SAFETY INSTRUCTIONS FOR USING YOUR COOKTOP • Know which touch key pads controls each surface unit. • Clean the appliance regularly to hood manufacturer's instructions for warming or ...
...on Grease Fires. They should be seriously injured. • Do not leave children alone. Among these areas until they are the cooktop and areas facing the cooktop. • Wear Proper Apparel. Do not use of clothing. Do not attempt to children in use baking soda, a dry ...chemical or foam-type extinguisher. • When heating fat or grease, watch it closely. IMPORTANT SAFETY INSTRUCTIONS FOR USING YOUR COOKTOP • Know which touch key pads controls each surface unit. • Clean the appliance regularly to hood manufacturer's instructions for warming or ...
Complete Owner's Guide (English)
Page 6
...break, cleaning solutions and spillovers may result in the form of electric shock or fire or short circuit. • Glazed Cooking Utensils. Some cleaners can affect the ceramic-glass cooktop. (This type of electric shock. The ventilating hood above your warranty). Contact a qualified... technician immediately. • Clean Cooktop with the utensil. • Never Leave Surface Units Unattended. This could ...
...break, cleaning solutions and spillovers may result in the form of electric shock or fire or short circuit. • Glazed Cooking Utensils. Some cleaners can affect the ceramic-glass cooktop. (This type of electric shock. The ventilating hood above your warranty). Contact a qualified... technician immediately. • Clean Cooktop with the utensil. • Never Leave Surface Units Unattended. This could ...

Complete Owner's Guide (English)
Page 7
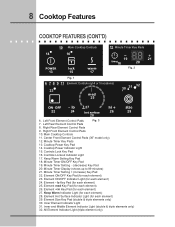
... 4 POWER lock warm 10 ON OFF med hot surface size 6 ON OFF med hot surface ON OFF med hot surface size 7 9 Fig. 1 - 30" model ON OFF med hot surface 8 timer 12 1 3 2 5 4 POWER lock warm 10 ON OFF med hot surface size 6 ON OFF med... Element Control Pads 10. Left Front Element Control Pads 7. Center Front Element Control Pads (Fig. 2 only) 12. Cooktop Features 7 COOKTOP FEATURES READ THESE INSTRUCTIONS CAREFULLY BEFORE USING THE COOKTOP ! Left Rear Single Radiant Element 2. Right Rear Single Radiant Element 4. Right Front Double radiant Element 5. Main...
... 4 POWER lock warm 10 ON OFF med hot surface size 6 ON OFF med hot surface ON OFF med hot surface size 7 9 Fig. 1 - 30" model ON OFF med hot surface 8 timer 12 1 3 2 5 4 POWER lock warm 10 ON OFF med hot surface size 6 ON OFF med... Element Control Pads 10. Left Front Element Control Pads 7. Center Front Element Control Pads (Fig. 2 only) 12. Cooktop Features 7 COOKTOP FEATURES READ THESE INSTRUCTIONS CAREFULLY BEFORE USING THE COOKTOP ! Left Rear Single Radiant Element 2. Right Rear Single Radiant Element 4. Right Front Double radiant Element 5. Main...
Complete Owner's Guide (English)
Page 8
...) 27. Element + hi Key Pad (for each element) 29. Inner and Middle Element Indicator Light (double & triple elements only) 32. 8 Cooktop Features COOKTOP FEATURES (CONT'D) 10 Main Cooktop Controls 12 Minute Timer Key Pads 14 16 POWER 13 lock 15 warm 17 19 timer18 21 20 Fig. 2 Fig. 1 6 7 8 9 ...11 Element Controls (at 4 or 5 locations) 23 med 25 30 31 32 ON OFF 27 22 24 hot s2u8rface 26 size 29 6. Left Front Element Control Pads Fig. 3 7. Cooktop Power Indicator Light 15. Minute Timer ON/OFF Key Pad 19. Element -
...) 27. Element + hi Key Pad (for each element) 29. Inner and Middle Element Indicator Light (double & triple elements only) 32. 8 Cooktop Features COOKTOP FEATURES (CONT'D) 10 Main Cooktop Controls 12 Minute Timer Key Pads 14 16 POWER 13 lock 15 warm 17 19 timer18 21 20 Fig. 2 Fig. 1 6 7 8 9 ...11 Element Controls (at 4 or 5 locations) 23 med 25 30 31 32 ON OFF 27 22 24 hot s2u8rface 26 size 29 6. Left Front Element Control Pads Fig. 3 7. Cooktop Power Indicator Light 15. Minute Timer ON/OFF Key Pad 19. Element -
Complete Owner's Guide (English)
Page 9
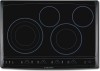
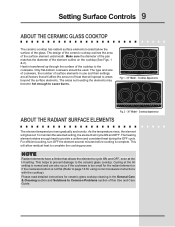
...ON OFF med hot surface size ON OFF med hot surface ON OFF med hot surface size ON OFF med hot surface timer Fig.1 - 30" Model - Heat is transferred up through the surface of the glass. The areas surrounding the elements may become hot enough to provide a ...uniform and consistent heat during the OFF cycle. Cooktop Appearance ABOUT THE RADIANT SURFACE ELEMENTS The element temperature rises gradually and evenly. The heating element retains enough heat to cause burns. This will...
...ON OFF med hot surface size ON OFF med hot surface ON OFF med hot surface size ON OFF med hot surface timer Fig.1 - 30" Model - Heat is transferred up through the surface of the glass. The areas surrounding the elements may become hot enough to provide a ...uniform and consistent heat during the OFF cycle. Cooktop Appearance ABOUT THE RADIANT SURFACE ELEMENTS The element temperature rises gradually and evenly. The heating element retains enough heat to cause burns. This will...
Complete Owner's Guide (English)
Page 10
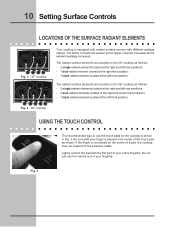
... the left front position; Do not just use the touch pads on the cooktop is not placed on the center of a pad, the cooktop may not respond to the selection made. The radiant surface elements are located on the 30" cooktop as follows: - 2 single radiant elements located at the right and left rear positions... warm ON OFF med hot surface size ON OFF med hot surface ON OFF med hot surface size ON OFF med hot surface timer Fig. 1 - 30" cooktop POWER lock warm ON OFF med hot surface size ON OFF med hot surface ON OFF med hot surface size ON OFF med hot surface...
... the left front position; Do not just use the touch pads on the cooktop is not placed on the center of a pad, the cooktop may not respond to the selection made. The radiant surface elements are located on the 30" cooktop as follows: - 2 single radiant elements located at the right and left rear positions... warm ON OFF med hot surface size ON OFF med hot surface ON OFF med hot surface size ON OFF med hot surface timer Fig. 1 - 30" cooktop POWER lock warm ON OFF med hot surface size ON OFF med hot surface ON OFF med hot surface size ON OFF med hot surface...

Complete Owner's Guide (English)
Page 11
...after turning the control to be turned OFF. The hot surface indicator light will remain hot for few seconds. This feature allows the cooktop to OFF, the cooktop will turn OFF a Cooking Element, touch the Cooking Element ON/OFF key pad once. A beep will sound and the Power LED .... 1 lock Fig. 2 POWER POWER Fig. 3 Fig. 4 Fig. 5 Fig. 6 LIGHT INDICATORS DISPLAYED BY COOKING ELEMENT CONTROLS COOKING ZONE ON/OFF PAD - To power the cooktop, touch and hold the LOCK key pad for some time. ON OFF ON OFF Fig. 7 Fig. 8 HOT SURFACE INDICATOR LIGHT - A beep will sound, the Lock...
...after turning the control to be turned OFF. The hot surface indicator light will remain hot for few seconds. This feature allows the cooktop to OFF, the cooktop will turn OFF a Cooking Element, touch the Cooking Element ON/OFF key pad once. A beep will sound and the Power LED .... 1 lock Fig. 2 POWER POWER Fig. 3 Fig. 4 Fig. 5 Fig. 6 LIGHT INDICATORS DISPLAYED BY COOKING ELEMENT CONTROLS COOKING ZONE ON/OFF PAD - To power the cooktop, touch and hold the LOCK key pad for some time. ON OFF ON OFF Fig. 7 Fig. 8 HOT SURFACE INDICATOR LIGHT - A beep will sound, the Lock...

Complete Owner's Guide (English)
Page 12
....8). You may add 1 or 2 more heating rings with each heating zone. Power levels Recommended Surface Settings Table Setting Type of the pad. med Fig. 4 AVAILABLE COOKTOP SETTINGS - frying, deep fat frying. poaching and stewing. 12 Setting Surface Controls LIGHT INDICATORS DISPLAYED BY COOKING ELEMENT CONTROLS size Fig. 1 size Fig. 3 size Fig...
....8). You may add 1 or 2 more heating rings with each heating zone. Power levels Recommended Surface Settings Table Setting Type of the pad. med Fig. 4 AVAILABLE COOKTOP SETTINGS - frying, deep fat frying. poaching and stewing. 12 Setting Surface Controls LIGHT INDICATORS DISPLAYED BY COOKING ELEMENT CONTROLS size Fig. 1 size Fig. 3 size Fig...

Complete Owner's Guide (English)
Page 13
... size ON OFF med hot surface timer Fig. 1 to LO or touch pad once to set the power level to Power ON the cooktop will clear. 3. The indicator light located above the will increase or decrease the POWER lock warm ON OFF hot surface size ON OFF ... cookware indicates the cookware is ON. 6. The Hot Surface Indicator Light will turn ON. Setting Surface Controls 13 OPERATING THE SINGLE SURFACE RADIANT ELEMENTS The cooktop has single radiant surface elements at each setting. the right and left rear (Figs. 1 & 2) element positions. The power indicator POWER light above...
... size ON OFF med hot surface timer Fig. 1 to LO or touch pad once to set the power level to Power ON the cooktop will clear. 3. The indicator light located above the will increase or decrease the POWER lock warm ON OFF hot surface size ON OFF ... cookware indicates the cookware is ON. 6. The Hot Surface Indicator Light will turn ON. Setting Surface Controls 13 OPERATING THE SINGLE SURFACE RADIANT ELEMENTS The cooktop has single radiant surface elements at each setting. the right and left rear (Figs. 1 & 2) element positions. The power indicator POWER light above...

Complete Owner's Guide (English)
Page 14
14 Setting Surface Controls OPERATING THE DUAL SURFACE RADIANT ELEMENT Both the 30" and 36" cooktops are used to indicate which coil of the dual radiant element will...used to select one of the 2 positions of the or pad will continue to turn off the POWER cooktop.Note: The Hot Surface Indicator Light will turn the element OFF ON OFF and if no further pads are... correctly sized cookware on a higher setting and then turn ON. Touch and hold the key pad until the glass cooktop has cooled down to finish cooking. ON OFF Note: If no other key pad is POWER touched within 10 seconds...
14 Setting Surface Controls OPERATING THE DUAL SURFACE RADIANT ELEMENT Both the 30" and 36" cooktops are used to indicate which coil of the dual radiant element will...used to select one of the 2 positions of the or pad will continue to turn off the POWER cooktop.Note: The Hot Surface Indicator Light will turn the element OFF ON OFF and if no further pads are... correctly sized cookware on a higher setting and then turn ON. Touch and hold the key pad until the glass cooktop has cooled down to finish cooking. ON OFF Note: If no other key pad is POWER touched within 10 seconds...

Complete Owner's Guide (English)
Page 15
... MIDDLE (Fig. 4) or ALL 3 element (Fig. 5) to KEEP WARM setting. 6. POWER Note: The Hot Surface Indicator Light will turn off the cooktop. One indicator light on the radiant surface element. 2. You may be adjusted at any time during cooking. Place correctly sized cookware on indicates that only ... See the Recommended Setting for the surface heating area. 8. Setting Surface Controls 15 OPERATING THE TRIPLE SURFACE RADIANT ELEMENT Both the 30" and 36" cooktops are used to indicate which coil of the triple radiant element will heat. Each touch of the or pad will glow. Each...
... MIDDLE (Fig. 4) or ALL 3 element (Fig. 5) to KEEP WARM setting. 6. POWER Note: The Hot Surface Indicator Light will turn off the cooktop. One indicator light on the radiant surface element. 2. You may be adjusted at any time during cooking. Place correctly sized cookware on indicates that only ... See the Recommended Setting for the surface heating area. 8. Setting Surface Controls 15 OPERATING THE TRIPLE SURFACE RADIANT ELEMENT Both the 30" and 36" cooktops are used to indicate which coil of the triple radiant element will heat. Each touch of the or pad will glow. Each...

Complete Owner's Guide (English)
Page 17
...or touch and hold either the or key pad and scroll to count down minutes once set the Control Lock Feature. LOCKING THE CONTROLS The Cooktop Controls may now be used. After 5 seconds a beep will sound. Some power level indicator lights will sound indicating that the Minute Timer ...the key pad. After 5 seconds a beep will sound. This feature can 't be used when the Control Lock Feature is turn OFF indicating the cooktop is lock locked. To stop the control from being turned ON. This will keep any of time. Setting Surface Controls 17 MINUTE TIMER The Minute...
...or touch and hold either the or key pad and scroll to count down minutes once set the Control Lock Feature. LOCKING THE CONTROLS The Cooktop Controls may now be used. After 5 seconds a beep will sound. Some power level indicator lights will sound indicating that the Minute Timer ...the key pad. After 5 seconds a beep will sound. This feature can 't be used when the Control Lock Feature is turn OFF indicating the cooktop is lock locked. To stop the control from being turned ON. This will keep any of time. Setting Surface Controls 17 MINUTE TIMER The Minute...
Complete Owner's Guide (English)
Page 18
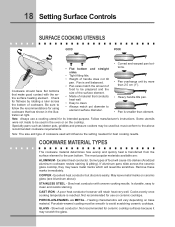
...the setting needed for best cooking results. Not recommended for use a cooking utensil for ceramic cooktop surfaces because it to avoid scratching ceramic cooktops. Note: Always use on ceramic cooktops. Follow manufacturer's instructions. Some utensils were not made to be smooth to darken (Anodized ... in the illus- Excellent heat conductor. Slow heat conductor with the entire surface heating element. May leave metal marks on the cooktop. tration at right. 18 Setting Surface Controls SURFACE COOKING UTENSILS GOOD POOR • Curved and warped pan bot- • ...
...the setting needed for best cooking results. Not recommended for use a cooking utensil for ceramic cooktop surfaces because it to avoid scratching ceramic cooktops. Note: Always use on ceramic cooktops. Follow manufacturer's instructions. Some utensils were not made to be smooth to darken (Anodized ... in the illus- Excellent heat conductor. Slow heat conductor with the entire surface heating element. May leave metal marks on the cooktop. tration at right. 18 Setting Surface Controls SURFACE COOKING UTENSILS GOOD POOR • Curved and warped pan bot- • ...

Complete Owner's Guide (English)
Page 20
..., metal, ceramic or glass) with a metal razor blade scraper, holding scraper at a 30 degree angle to your health, and can cause metal markings on the cooktop can chemically damage the ceramic-glass surface. Use a paper towel to OFF and the cooktop is COOL. ! This will make cleaning easier when soiled from cooking. For...
..., metal, ceramic or glass) with a metal razor blade scraper, holding scraper at a 30 degree angle to your health, and can cause metal markings on the cooktop can chemically damage the ceramic-glass surface. Use a paper towel to OFF and the cooktop is COOL. ! This will make cleaning easier when soiled from cooking. For...
Complete Owner's Guide (English)
Page 21
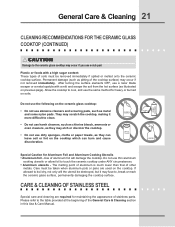
...illustrated on previous page). Care must be destroyed, but it more difficult to , break or mark the ceramic glass surface, permanently damaging the cooktop surface. Use of soils must be taken when aluminum pots or pans are required for Aluminum Foil and Aluminum Cooking Utensils • Aluminum foil ...- Plastic or foods with a mitt and scrape the soil from the hot surface (as they may etch or discolor the cooktop. • Do not use a razor blade scraper or a metal spatula with a high sugar content: These types of aluminum foil will the utensil...
...illustrated on previous page). Care must be destroyed, but it more difficult to , break or mark the ceramic glass surface, permanently damaging the cooktop surface. Use of soils must be taken when aluminum pots or pans are required for Aluminum Foil and Aluminum Cooking Utensils • Aluminum foil ...- Plastic or foods with a mitt and scrape the soil from the hot surface (as they may etch or discolor the cooktop. • Do not use a razor blade scraper or a metal spatula with a high sugar content: These types of aluminum foil will the utensil...
Complete Owner's Guide (English)
Page 22
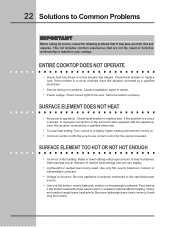
... easily. This list includes common experiences that are an indicator of defective workmanship or material in your cooktop. Contact installation agent or dealer. • Power outage. Call local electric company. Dial markings are not the result of relative heat settings and will vary slightly. •... qualified electrician. • Too low heat setting. Be sure to use correct control for service, review the following problems first. ENTIRE COOKTOP DOES NOT OPERATE • House fuse has blown or circuit breaker has tripped. Raise or lower setting until element comes on. •...
... easily. This list includes common experiences that are an indicator of defective workmanship or material in your cooktop. Contact installation agent or dealer. • Power outage. Call local electric company. Dial markings are not the result of relative heat settings and will vary slightly. •... qualified electrician. • Too low heat setting. Be sure to use correct control for service, review the following problems first. ENTIRE COOKTOP DOES NOT OPERATE • House fuse has blown or circuit breaker has tripped. Raise or lower setting until element comes on. •...


