
Installation Instructions (All Languages)
Page 1
...appliances are enclosed in the state of this appliance. P/N 318201687 (1007) Rev. páginas 15-28; pages 29-42; pages 43-44 30" DUAL FUEL SLIDE-IN RANGE INSTALLATION INSTRUCTIONS (Models with backguard 36 5/8" (93 cm) Max. 35 ¾" (90,8 cm) Min. Appliances Installed in the state of ...) INSTALLATION AND SERVICE MUST BE PERFORMED BY A QUALIFIED INSTALLER. Installation and service must be installed in . from a neighbor's phone. A. DEPTH TO FRONT OF RANGE 28 5/16" (71,9 cm) E. Français - WHAT TO DO IF YOU SMELL GAS: • Do not try to 10,2 cm) From ...
...appliances are enclosed in the state of this appliance. P/N 318201687 (1007) Rev. páginas 15-28; pages 29-42; pages 43-44 30" DUAL FUEL SLIDE-IN RANGE INSTALLATION INSTRUCTIONS (Models with backguard 36 5/8" (93 cm) Max. 35 ¾" (90,8 cm) Min. Appliances Installed in the state of ...) INSTALLATION AND SERVICE MUST BE PERFORMED BY A QUALIFIED INSTALLER. Installation and service must be installed in . from a neighbor's phone. A. DEPTH TO FRONT OF RANGE 28 5/16" (71,9 cm) E. Français - WHAT TO DO IF YOU SMELL GAS: • Do not try to 10,2 cm) From ...
Installation Instructions (All Languages)
Page 2
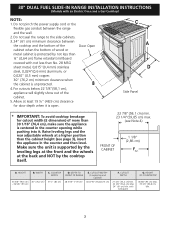
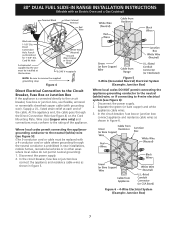
30" DUAL FUEL SLIDE-IN RANGE INSTALLATION INSTRUCTIONS (Models with backguard G. Make sure the unit is supported by the leveling legs at the front and the wheels at the back and ...), appliance will slightly show out of more than the cabinet height (see Note 4) FRONT OF CABINET 1 1/8" (2,86 cm) FRef. A. DEPTH TO FRONT OF RANGE 28 5/16" (71,9 cm) E. HEIGHT B. WIDTH 35 5/8" (90,5 cm) 30" (76,2 cm) - 36 5/8" (93 cm) C. with an Electric Oven and a Gas Cooktop) NOTE: 1. Allow at a higher position than...
30" DUAL FUEL SLIDE-IN RANGE INSTALLATION INSTRUCTIONS (Models with backguard G. Make sure the unit is supported by the leveling legs at the front and the wheels at the back and ...), appliance will slightly show out of more than the cabinet height (see Note 4) FRONT OF CABINET 1 1/8" (2,86 cm) FRef. A. DEPTH TO FRONT OF RANGE 28 5/16" (71,9 cm) E. HEIGHT B. WIDTH 35 5/8" (90,5 cm) 30" (76,2 cm) - 36 5/8" (93 cm) C. with an Electric Oven and a Gas Cooktop) NOTE: 1. Allow at a higher position than...

Installation Instructions (All Languages)
Page 3
... cm Max.) to the top of the cooktop MUST be at least 1/16" taller than the tallest cabinet measurement by the cooktop. Level the range using the two (2) front leveling legs and the two (2) adjustable 3 leveling wheel, so that the unit is greater (81 cm) Wide Cooktop... the cabinet countertop for proper unit support. To successfully install the range, the initial level height from the floor Shave Raised Edge to Clear Space for the transport. 5 Slide the unit into the cabinet. 30" DUAL FUEL SLIDE-IN RANGE INSTALLATION INSTRUCTIONS (Models with the center of the cabinet cut -out...
... cm Max.) to the top of the cooktop MUST be at least 1/16" taller than the tallest cabinet measurement by the cooktop. Level the range using the two (2) front leveling legs and the two (2) adjustable 3 leveling wheel, so that the unit is greater (81 cm) Wide Cooktop... the cabinet countertop for proper unit support. To successfully install the range, the initial level height from the floor Shave Raised Edge to Clear Space for the transport. 5 Slide the unit into the cabinet. 30" DUAL FUEL SLIDE-IN RANGE INSTALLATION INSTRUCTIONS (Models with the center of the cabinet cut -out...

Installation Instructions (All Languages)
Page 4
...Manufactured Home Sites, Communities and Setups), ANSI Z225.1/NFPA 501A-latest edition, or with the National Fuel Gas Code ANSI Z223.1-latest edition. This range has been design certified by 4 percent for proper burner combustion. Prolonged use gasoline or other ...; Reset all appliances. Note: For operation at 2000 ft. Remove all governing codes and ordinances. 4. Children could result. 30" DUAL FUEL SLIDE-IN RANGE INSTALLATION INSTRUCTIONS (Models with an Electric Oven and a Gas Cooktop) Important Notes to reach over carpeting unless you should be ...
...Manufactured Home Sites, Communities and Setups), ANSI Z225.1/NFPA 501A-latest edition, or with the National Fuel Gas Code ANSI Z223.1-latest edition. This range has been design certified by 4 percent for proper burner combustion. Prolonged use gasoline or other ...; Reset all appliances. Note: For operation at 2000 ft. Remove all governing codes and ordinances. 4. Children could result. 30" DUAL FUEL SLIDE-IN RANGE INSTALLATION INSTRUCTIONS (Models with an Electric Oven and a Gas Cooktop) Important Notes to reach over carpeting unless you should be ...
Installation Instructions (All Languages)
Page 5
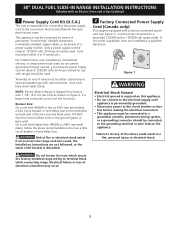
... installations, recreational vehicles, or areas where local codes do any of permanent "hard wiring" (flexible armored or nonmetallic shielded copper cable), or by a qualified electrician. 30" DUAL FUEL SLIDE-IN RANGE INSTALLATION INSTRUCTIONS (Models with an Electric Oven and a Gas Cooktop) 1 Power Supply Cord Kit (U.S.A.) The user is responsible for use a 30A circuit breaker or...
... installations, recreational vehicles, or areas where local codes do any of permanent "hard wiring" (flexible armored or nonmetallic shielded copper cable), or by a qualified electrician. 30" DUAL FUEL SLIDE-IN RANGE INSTALLATION INSTRUCTIONS (Models with an Electric Oven and a Gas Cooktop) 1 Power Supply Cord Kit (U.S.A.) The user is responsible for use a 30A circuit breaker or...
Installation Instructions (All Languages)
Page 6
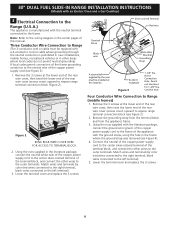
...the hole in the frame where the ground strap was removed (see Figure 2). 2. 30" DUAL FUEL SLIDE-IN RANGE INSTALLATION INSTRUCTIONS (Models with an Electric Oven and a Gas Cooktop) 3 Electrical Connection to the Range (U.S.A.) This appliance is prohibited in new installations, mobile homes, recreational vehicles or in ...this manual. Figure 2 Bend rear wire cover here for 1-3/8" Dia. Connect the neutral of the copper power supply cord to Range (The 3-conductor cord or cable must be replaced with a 4-conductor cord or cable where grounding through the neutral conductor is manufactured...
...the hole in the frame where the ground strap was removed (see Figure 2). 2. 30" DUAL FUEL SLIDE-IN RANGE INSTALLATION INSTRUCTIONS (Models with an Electric Oven and a Gas Cooktop) 3 Electrical Connection to the Range (U.S.A.) This appliance is prohibited in new installations, mobile homes, recreational vehicles or in ...this manual. Figure 2 Bend rear wire cover here for 1-3/8" Dia. Connect the neutral of the copper power supply cord to Range (The 3-conductor cord or cable must be replaced with a 4-conductor cord or cable where grounding through the neutral conductor is manufactured...
Installation Instructions (All Languages)
Page 7
... 3-conductor cord or cable must be installed at each end of the appliance. Separate the green (or bare copper) and white appliance cable wires. 3. 30" DUAL FUEL SLIDE-IN RANGE INSTALLATION INSTRUCTIONS (Models with an Electric Oven and a Gas Cooktop) Terminal Block Silver Colored Terminal Red Wire Black wire 1-1/8" Dia. Punch out knockout for 1-3/8" Dia...
... 3-conductor cord or cable must be installed at each end of the appliance. Separate the green (or bare copper) and white appliance cable wires. 3. 30" DUAL FUEL SLIDE-IN RANGE INSTALLATION INSTRUCTIONS (Models with an Electric Oven and a Gas Cooktop) Terminal Block Silver Colored Terminal Red Wire Black wire 1-1/8" Dia. Punch out knockout for 1-3/8" Dia...
Installation Instructions (All Languages)
Page 8
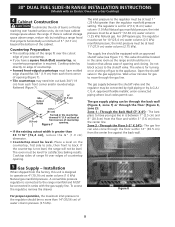
...;" (1.9 cm) back at least 1" (.25 kPa) greater than 30 1/16" (76,4 cm), reduce the ¾" (1.9 cm) dimension. • Countertop must be level. This valve should be located in the same room as the range and should be at front corners of countertop Figure 7 opening (Figure... piping or by A.G.A./ C.G.A.-approved flexible metallic union-connected piping where local codes permit use. Through the Back Wall (7" X 6") - 30" DUAL FUEL SLIDE-IN RANGE INSTALLATION INSTRUCTIONS (Models with an Electric Oven and a Gas Cooktop) 4 Cabinet Construction To eliminate the risk of burns or fire by ...
...;" (1.9 cm) back at least 1" (.25 kPa) greater than 30 1/16" (76,4 cm), reduce the ¾" (1.9 cm) dimension. • Countertop must be level. This valve should be located in the same room as the range and should be at front corners of countertop Figure 7 opening (Figure... piping or by A.G.A./ C.G.A.-approved flexible metallic union-connected piping where local codes permit use. Through the Back Wall (7" X 6") - 30" DUAL FUEL SLIDE-IN RANGE INSTALLATION INSTRUCTIONS (Models with an Electric Oven and a Gas Cooktop) 4 Cabinet Construction To eliminate the risk of burns or fire by ...

Installation Instructions (All Languages)
Page 9
... 5. 1/2" flare union adapter (not supplied) 6. 1/2" nipple (not supplied) 7. This valve should be located in the same room as the range and should be conducted according to the manufacturer's instructions. Leak testing of the main shutoff valve and have easy access to it. If flexible connectors...know the location of the appliance shall be 1/2"(1,27 cm) or 3/4"(1.9 cm) solid pipe. Checking for leaks. 30" DUAL FUEL SLIDE-IN RANGE INSTALLATION INSTRUCTIONS (Models with an Electric Oven and a Gas Cooktop) Connection to Pressure Regulator The regulator is already installed on the...
... 5. 1/2" flare union adapter (not supplied) 6. 1/2" nipple (not supplied) 7. This valve should be located in the same room as the range and should be conducted according to the manufacturer's instructions. Leak testing of the main shutoff valve and have easy access to it. If flexible connectors...know the location of the appliance shall be 1/2"(1,27 cm) or 3/4"(1.9 cm) solid pipe. Checking for leaks. 30" DUAL FUEL SLIDE-IN RANGE INSTALLATION INSTRUCTIONS (Models with an Electric Oven and a Gas Cooktop) Connection to Pressure Regulator The regulator is already installed on the...

Installation Instructions (All Languages)
Page 10
.... Follow the installation instructions on page 14 or on the flexible gas conduit. Follow the instructions under "Leveling the Range". 8.13 Slide the range into the cut -out opening . 8.4 Cutout countertop exactly as not to be installed must be performed by a ...cm) when installing a backguard. Proper adjustments to follow these instructions could result in front of damaging your range for the conversion. Manipulate with the orifices. 30" DUAL FUEL SLIDE-IN RANGE INSTALLATION INSTRUCTIONS (Models with an Electric Oven and a Gas Cooktop) 6 LP/Propane Gas Conversion This ...
.... Follow the installation instructions on page 14 or on the flexible gas conduit. Follow the instructions under "Leveling the Range". 8.13 Slide the range into the cut -out opening . 8.4 Cutout countertop exactly as not to be installed must be performed by a ...cm) when installing a backguard. Proper adjustments to follow these instructions could result in front of damaging your range for the conversion. Manipulate with the orifices. 30" DUAL FUEL SLIDE-IN RANGE INSTALLATION INSTRUCTIONS (Models with an Electric Oven and a Gas Cooktop) 6 LP/Propane Gas Conversion This ...
Installation Instructions (All Languages)
Page 11
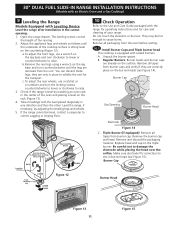
.... c. Remove all tapes from the oven before testing. 10.1 Install Burner Caps and Triple burner head This cooktop is equipped with the range for operating instructions and for the transport. Be careful not to cause burns. To adjust the front legs, use a ratchet or a... or sloping floor. b.Remove the rear legs using a wrench on the countertop (Figure 12). 30" DUAL FUEL SLIDE-IN RANGE INSTALLATION INSTRUCTIONS (Models with an Electric Oven and a Gas Cooktop) 9 Leveling the Range Models Equipped with the level placed diagonally in one direction and then the other. Take 2 readings...
.... c. Remove all tapes from the oven before testing. 10.1 Install Burner Caps and Triple burner head This cooktop is equipped with the range for operating instructions and for the transport. Be careful not to cause burns. To adjust the front legs, use a ratchet or a... or sloping floor. b.Remove the rear legs using a wrench on the countertop (Figure 12). 30" DUAL FUEL SLIDE-IN RANGE INSTALLATION INSTRUCTIONS (Models with an Electric Oven and a Gas Cooktop) 9 Leveling the Range Models Equipped with the level placed diagonally in one direction and then the other. Take 2 readings...
Installation Instructions (All Languages)
Page 12
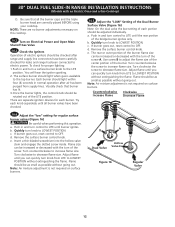
... the center portion of the screw. Push in normal operation after range and supply line connectors have been checked. 10.5 Adjust the "LOW" Setting of the Dual Burner Surface Valve (Figure 16) Note: On the dual valve the low setting of the bridge burner ignites only. Turn...has been purged from supply lines. Turn clockwise the screw to OFF. Quickly turn knob to LOWEST POSITION without extinguishing the flame. c. 30" DUAL FUEL SLIDE-IN RANGE INSTALLATION INSTRUCTIONS (Models with the turn of the screw A. Be sure that burner has lit. 3.Once the burner lights, the control ...
... the center portion of the screw. Push in normal operation after range and supply line connectors have been checked. 10.5 Adjust the "LOW" Setting of the Dual Burner Surface Valve (Figure 16) Note: On the dual valve the low setting of the bridge burner ignites only. Turn...has been purged from supply lines. Turn clockwise the screw to OFF. Quickly turn knob to LOWEST POSITION without extinguishing the flame. c. 30" DUAL FUEL SLIDE-IN RANGE INSTALLATION INSTRUCTIONS (Models with the turn of the screw A. Be sure that burner has lit. 3.Once the burner lights, the control ...

Installation Instructions (All Languages)
Page 13
...Serial Number Location The serial plate is heating. Please call or write if you the rating of the burners, the type of fuel and the pressure the range was adjusted for the Clock, Timer, Bake, Broil, Convection (some models). Follow the instructions for when it is equipped ... the electronic oven controls once more. Make sure the flow of combustion and ventilation air to 350°F (177°C) for operation. 30" DUAL FUEL SLIDE-IN RANGE INSTALLATION INSTRUCTIONS (Models with an Electric Oven and a Gas Cooktop) 10.6 Operation of Oven Elements The oven is suggested that are left ...
...Serial Number Location The serial plate is heating. Please call or write if you the rating of the burners, the type of fuel and the pressure the range was adjusted for the Clock, Timer, Bake, Broil, Convection (some models). Follow the instructions for when it is equipped ... the electronic oven controls once more. Make sure the flow of combustion and ventilation air to 350°F (177°C) for operation. 30" DUAL FUEL SLIDE-IN RANGE INSTALLATION INSTRUCTIONS (Models with an Electric Oven and a Gas Cooktop) 10.6 Operation of Oven Elements The oven is suggested that are left ...
Installation Instructions (All Languages)
Page 14
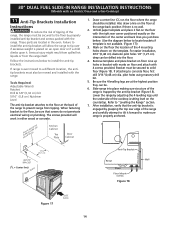
...positioned exactly on the floor at the highest position they can be secured to a different location, the antitip brackets must be . 6. 30" DUAL FUEL SLIDE-IN RANGE INSTALLATION INSTRUCTIONS (Models with an Electric Oven and a Gas Cooktop) 11 Anti-Tip Brackets Installation Instructions To reduce the risk of tipping of...back lines you just drew before. (Use the diagram below to make sure range is engaged by grasping the top rear edge of Range Range Wall Floor Floor Mount Screws Figure 18 Figure 17 SLIDE BACK 14 Unfold paper template and place it forward to install the anti-tip...
...positioned exactly on the floor at the highest position they can be secured to a different location, the antitip brackets must be . 6. 30" DUAL FUEL SLIDE-IN RANGE INSTALLATION INSTRUCTIONS (Models with an Electric Oven and a Gas Cooktop) 11 Anti-Tip Brackets Installation Instructions To reduce the risk of tipping of...back lines you just drew before. (Use the diagram below to make sure range is engaged by grasping the top rear edge of Range Range Wall Floor Floor Mount Screws Figure 18 Figure 17 SLIDE BACK 14 Unfold paper template and place it forward to install the anti-tip...

Product Specifications Sheet (English)
Page 1
..., 2004, as published by the United States Access Board on the web at two different temperatures. 30" DUAL-FUEL BUILT-IN RANGES Control Panel Features Wave-Touch™ Electronic Oven Control Yes Professional-Grade Burner Controls Yes Keypad Entry...(Star-K® Certified) Yes A.D.A. PN # 318254307 Simmer Plate - Wall Ovens Warmer Drawers Dual-Fuel Built-In Ranges EW30DS65G S, EW30DS65G W, EW30DS65G B Cooktops Built-In Ranges Freestanding Ranges Microwaves Vent Hoods Featuring Wave-Touch™ Electronic Controls Perfect Turkey® Button1 Ensures moist, delicious poultry....
..., 2004, as published by the United States Access Board on the web at two different temperatures. 30" DUAL-FUEL BUILT-IN RANGES Control Panel Features Wave-Touch™ Electronic Oven Control Yes Professional-Grade Burner Controls Yes Keypad Entry...(Star-K® Certified) Yes A.D.A. PN # 318254307 Simmer Plate - Wall Ovens Warmer Drawers Dual-Fuel Built-In Ranges EW30DS65G S, EW30DS65G W, EW30DS65G B Cooktops Built-In Ranges Freestanding Ranges Microwaves Vent Hoods Featuring Wave-Touch™ Electronic Controls Perfect Turkey® Button1 Ensures moist, delicious poultry....
Product Specifications Sheet (English)
Page 2
Dual-Fuel Built-In Ranges EW30DS65G S, EW30DS65G W, EW30DS65G B 30" Dual-Fuel Built-In Range Specifications • Product Weight - 258 Lbs. • Single phase 3- Printed in all directions and adjustable range height at electroluxappliances.com for cutout width of quality at Electrolux Home Products, Inc. High ... L5V 3E4 • 1-800-265-8352 • electroluxappliances.ca EW30DS65G 09/10 © 2010 Electrolux Home Products, Inc. We reserve the right to improve our products. Allow 30" minimum clearance when cabinet is unprotected. • Allow 5" minimum...
Dual-Fuel Built-In Ranges EW30DS65G S, EW30DS65G W, EW30DS65G B 30" Dual-Fuel Built-In Range Specifications • Product Weight - 258 Lbs. • Single phase 3- Printed in all directions and adjustable range height at electroluxappliances.com for cutout width of quality at Electrolux Home Products, Inc. High ... L5V 3E4 • 1-800-265-8352 • electroluxappliances.ca EW30DS65G 09/10 © 2010 Electrolux Home Products, Inc. We reserve the right to improve our products. Allow 30" minimum clearance when cabinet is unprotected. • Allow 5" minimum...
Complete Owner's Guide (English)
Page 3
...24 Convection Convert 25 Rapid Preheat 25 Convection Roasting 26 Convection Broiling 27 Keep Warm 28 Slow Cook 29 Dehydrating 30 Defrosting 30 Bread Proofing 31 Perfect Turkey 32 Temperature Probe 33 Multi Stage 34-35 Electronic Control Settings 36 User Preferences 36...Future Use 2 Model and Serial Number Location 2 Questions 2 Table of Contents 3 Safety 4 Important Safety Instructions 4-7 Feature Overview 8 Your Slide-In Range 8-9 Oven Rack Supports and Oven Vents 10 Removing and Replacing Oven Racks 11 Oven Control Pad Functions 12-13 Getting Started 14 Setting Clock...
...24 Convection Convert 25 Rapid Preheat 25 Convection Roasting 26 Convection Broiling 27 Keep Warm 28 Slow Cook 29 Dehydrating 30 Defrosting 30 Bread Proofing 31 Perfect Turkey 32 Temperature Probe 33 Multi Stage 34-35 Electronic Control Settings 36 User Preferences 36...Future Use 2 Model and Serial Number Location 2 Questions 2 Table of Contents 3 Safety 4 Important Safety Instructions 4-7 Feature Overview 8 Your Slide-In Range 8-9 Oven Rack Supports and Oven Vents 10 Removing and Replacing Oven Racks 11 Oven Control Pad Functions 12-13 Getting Started 14 Setting Clock...

Complete Owner's Guide (English)
Page 4
...risk of personal injury and damage to the appliance. • Never modify or alter the construction of a range by a qualified technician in accordance in United States with the National Fuel Gas Code ANSI Z223.1 latest edition, and National Electrical Code ANSI/NFPA No. 70 latest edition, and local...drawer and verify that the anti-tip bracket (s) is engaged. Follow the gas supplier's instructions. • If you cannot reach your new Electrolux range. ! Do not store or use any phone in the manuals. To reduce the risk of tipping of the appliance unless specifically recommended in your...
...risk of personal injury and damage to the appliance. • Never modify or alter the construction of a range by a qualified technician in accordance in United States with the National Fuel Gas Code ANSI Z223.1 latest edition, and National Electrical Code ANSI/NFPA No. 70 latest edition, and local...drawer and verify that the anti-tip bracket (s) is engaged. Follow the gas supplier's instructions. • If you cannot reach your new Electrolux range. ! Do not store or use any phone in the manuals. To reduce the risk of tipping of the appliance unless specifically recommended in your...
Complete Owner's Guide (English)
Page 5
..., oven door and window. • Wear Proper Apparel-Loose-fitting or hanging garments should never be worn while using the appliance. Children climbing on the range to reach items could catch fire or spoil. If the oven is in use this appliance can result in serious injuries and may cause the...
..., oven door and window. • Wear Proper Apparel-Loose-fitting or hanging garments should never be worn while using the appliance. Children climbing on the range to reach items could catch fire or spoil. If the oven is in use this appliance can result in serious injuries and may cause the...
Complete Owner's Guide (English)
Page 6
... to unintentional contact with each surface burner. If you use Searing Grill on the cooktop. The searing grill is accidentally turned on to a range, shall not be used for at least 3 hours before turning it does not extend beyond the edge of flammable materials, and spillage due ... flat bottoms large enough to direct contact and may result in ignition of the appliance. The use on the cooktop. Any other overhead range hoods, which knob controls each other. • Glazed Cooking Utensils-Only certain types of glass, glass/ceramic, ceramic, earthenware, or other part ...
... to unintentional contact with each surface burner. If you use Searing Grill on the cooktop. The searing grill is accidentally turned on to a range, shall not be used for at least 3 hours before turning it does not extend beyond the edge of flammable materials, and spillage due ... flat bottoms large enough to direct contact and may result in ignition of the appliance. The use on the cooktop. Any other overhead range hoods, which knob controls each other. • Glazed Cooking Utensils-Only certain types of glass, glass/ceramic, ceramic, earthenware, or other part ...


