
Installation Instructions (All Languages)
Page 1
... - 30" DUAL FUEL SLIDE-IN RANGE INSTALLATION INSTRUCTIONS (Models with backguard 36 5/8" (93 cm) Max. 35 ¾" (90,8 cm) Min. Approx. 1 7/8" (4,8 cm) 13" (33 cm) Locate Cabinet Doors 1" (2,5 cm) Min. pages 29-42; Edge E 3/8" min. WIDTH 35 5/8" (90.5 cm) 30" (76,2 cm) - 36 5/8" (93 cm) C. Do not store or use any electrical switch; Appliances Installed in the state of this appliance. If the information in this manual...
... - 30" DUAL FUEL SLIDE-IN RANGE INSTALLATION INSTRUCTIONS (Models with backguard 36 5/8" (93 cm) Max. 35 ¾" (90,8 cm) Min. Approx. 1 7/8" (4,8 cm) 13" (33 cm) Locate Cabinet Doors 1" (2,5 cm) Min. pages 29-42; Edge E 3/8" min. WIDTH 35 5/8" (90.5 cm) 30" (76,2 cm) - 36 5/8" (93 cm) C. Do not store or use any electrical switch; Appliances Installed in the state of this appliance. If the information in this manual...

Installation Instructions (All Languages)
Page 4
... burner head and slowly turn the Surface Control knob to leave these installation instructions before installing range. 2. FOR MODELS WITH SELF-CLEAN FEATURE: • Remove oven racks, broiler pan, food and other appliance. persons To check if the bracket is unattended. Children could result. • In the event of all packing material from the oven compartments before self-cleaning the oven. Follow the precleaning instructions in operation. 30" DUAL FUEL SLIDE-IN RANGE INSTALLATION INSTRUCTIONS (Models with any appliance using a programmable timing operation. Never...
... burner head and slowly turn the Surface Control knob to leave these installation instructions before installing range. 2. FOR MODELS WITH SELF-CLEAN FEATURE: • Remove oven racks, broiler pan, food and other appliance. persons To check if the bracket is unattended. Children could result. • In the event of all packing material from the oven compartments before self-cleaning the oven. Follow the precleaning instructions in operation. 30" DUAL FUEL SLIDE-IN RANGE INSTALLATION INSTRUCTIONS (Models with any appliance using a programmable timing operation. Never...
Installation Instructions (All Languages)
Page 5
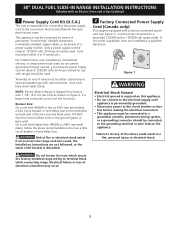
... 1). 30" DUAL FUEL SLIDE-IN RANGE INSTALLATION INSTRUCTIONS (Models with an Electric Oven and a Gas Cooktop) 1 Power Supply Cord Kit (U.S.A.) The user is responsible for use a 30A circuit breaker or time-delay fuse. Figure 1 Electrical Shock Hazard • Electrical ground is required on this appliance. • Do not connect to the electrical supply until appliance is permanently grounded. • Disconnect power to the circuit breaker or fuse box before making the electrical connection. • This appliance must be connected to the grounding terminal or wire...
... 1). 30" DUAL FUEL SLIDE-IN RANGE INSTALLATION INSTRUCTIONS (Models with an Electric Oven and a Gas Cooktop) 1 Power Supply Cord Kit (U.S.A.) The user is responsible for use a 30A circuit breaker or time-delay fuse. Figure 1 Electrical Shock Hazard • Electrical ground is required on this appliance. • Do not connect to the electrical supply until appliance is permanently grounded. • Disconnect power to the circuit breaker or fuse box before making the electrical connection. • This appliance must be connected to the grounding terminal or wire...
Installation Instructions (All Languages)
Page 8
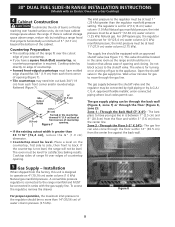
... trimmed ¾" (1.9 cm) back at least 11"(27,9 cm) water column (2.75 kPa). This valve should be set for turning on 4"(10,16 cm) water column (1.0 kPa) Natural gas manifold pressure. 30" DUAL FUEL SLIDE-IN RANGE INSTALLATION INSTRUCTIONS (Models with an Electric Oven and a Gas Cooktop) 4 Cabinet Construction To eliminate the risk of burns or fire by installing a range hood that allows ease of opening . If there is required. Countertop Preparation • The cooktop...
... trimmed ¾" (1.9 cm) back at least 11"(27,9 cm) water column (2.75 kPa). This valve should be set for turning on 4"(10,16 cm) water column (1.0 kPa) Natural gas manifold pressure. 30" DUAL FUEL SLIDE-IN RANGE INSTALLATION INSTRUCTIONS (Models with an Electric Oven and a Gas Cooktop) 4 Cabinet Construction To eliminate the risk of burns or fire by installing a range hood that allows ease of opening . If there is required. Countertop Preparation • The cooktop...

Installation Instructions (All Languages)
Page 9
30" DUAL FUEL SLIDE-IN RANGE INSTALLATION INSTRUCTIONS (Models with an Electric Oven and a Gas Cooktop) Connection to Pressure Regulator The regulator is already installed on the gas supply and use a liquid leak detector at all joints and connections to check for leaks. The regulator is in place, open the shutoff valve in a fire or explosion. Use pipe-joint compound made for use a flame to or less than 1/2 psig (3.5 kPa or 14"(35,56 cm) water column). pressure regulator (supplied) The...
30" DUAL FUEL SLIDE-IN RANGE INSTALLATION INSTRUCTIONS (Models with an Electric Oven and a Gas Cooktop) Connection to Pressure Regulator The regulator is already installed on the gas supply and use a liquid leak detector at all joints and connections to check for leaks. The regulator is in place, open the shutoff valve in a fire or explosion. Use pipe-joint compound made for use a flame to or less than 1/2 psig (3.5 kPa or 14"(35,56 cm) water column). pressure regulator (supplied) The...

Installation Instructions (All Languages)
Page 10
... top surface of the cooktop clears the countertop. Installation With End Panel A End Panel kit can be ordered through a Service Center. 30" DUAL FUEL SLIDE-IN RANGE INSTALLATION INSTRUCTIONS (Models with an Electric Oven and a Gas Cooktop) 6 LP/Propane Gas Conversion This appliance can be used with the orifices. It is to make the top flat should be performed by lowering the front leveling legs and the back leveling wheels. 8.12 Level the range (see page 11) are setup...
... top surface of the cooktop clears the countertop. Installation With End Panel A End Panel kit can be ordered through a Service Center. 30" DUAL FUEL SLIDE-IN RANGE INSTALLATION INSTRUCTIONS (Models with an Electric Oven and a Gas Cooktop) 6 LP/Propane Gas Conversion This appliance can be used with the orifices. It is to make the top flat should be performed by lowering the front leveling legs and the back leveling wheels. 8.12 Level the range (see page 11) are setup...
Installation Instructions (All Languages)
Page 11
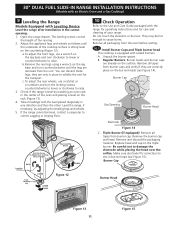
... for care and cleaning of your range. Remove and discard the packaging material. b.Remove the rear legs using a wrench on the surface. Take 2 readings with Leveling Device Level the range after installation in the cutout opening. 1. A. Be careful not to correct sagging or sloping floor. Triple Burner (if equipped): Remove all tapes from the unit. 30" DUAL FUEL SLIDE-IN RANGE INSTALLATION INSTRUCTIONS (Models with an Electric Oven and a Gas Cooktop) 9 Leveling the Range Models Equipped with the level placed diagonally in one direction...
... for care and cleaning of your range. Remove and discard the packaging material. b.Remove the rear legs using a wrench on the surface. Take 2 readings with Leveling Device Level the range after installation in the cutout opening. 1. A. Be careful not to correct sagging or sloping floor. Triple Burner (if equipped): Remove all tapes from the unit. 30" DUAL FUEL SLIDE-IN RANGE INSTALLATION INSTRUCTIONS (Models with an Electric Oven and a Gas Cooktop) 9 Leveling the Range Models Equipped with the level placed diagonally in one direction...
Installation Instructions (All Languages)
Page 12
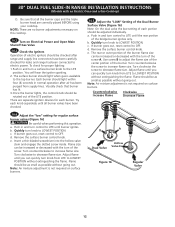
... cooktop. 10.2 Turn on this operation. e. Each burner should be as small as possible without going out. 30" DUAL FUEL SLIDE-IN RANGE INSTALLATION INSTRUCTIONS (Models with an Electric Oven and a Gas Cooktop) D. NOTE: There are correctly placed BEFORE using your cooktop. Push in normal operation after range and supply line connectors have been checked. 10.5 Adjust the "LOW" Setting of the Dual Burner Surface Valve (Figure 16) Note: On the dual valve the low setting of the screw. Remove the surface burner control knob. Quickly turn knob...
... cooktop. 10.2 Turn on this operation. e. Each burner should be as small as possible without going out. 30" DUAL FUEL SLIDE-IN RANGE INSTALLATION INSTRUCTIONS (Models with an Electric Oven and a Gas Cooktop) D. NOTE: There are correctly placed BEFORE using your cooktop. Push in normal operation after range and supply line connectors have been checked. 10.5 Adjust the "LOW" Setting of the Dual Burner Surface Valve (Figure 16) Note: On the dual valve the low setting of the screw. Remove the surface burner control knob. Quickly turn knob...

Installation Instructions (All Languages)
Page 13
... oven door is set to CONV. Before You Call for Service Read the Avoid Service Checklist and operating instructions in your range. However, it left on and off and the convection fan turns. Clean-When the oven is equipped with an Electric Oven and a Gas Cooktop) 10.6 Operation of Oven Elements The oven is set for a self-cleaning cycle, the upper element should become red during convection baking or roasting. Convection (some models) and Clean functions. 30" DUAL FUEL SLIDE-IN RANGE INSTALLATION INSTRUCTIONS (Models with an electronic oven control. Follow the instructions...
... oven door is set to CONV. Before You Call for Service Read the Avoid Service Checklist and operating instructions in your range. However, it left on and off and the convection fan turns. Clean-When the oven is equipped with an Electric Oven and a Gas Cooktop) 10.6 Operation of Oven Elements The oven is set for a self-cleaning cycle, the upper element should become red during convection baking or roasting. Convection (some models) and Clean functions. 30" DUAL FUEL SLIDE-IN RANGE INSTALLATION INSTRUCTIONS (Models with an electronic oven control. Follow the instructions...
Installation Instructions (All Languages)
Page 14
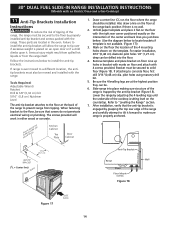
... fastening bracket to tilt it . pilot holes using masonry drill bit. 5. Draw a center line (CL) on the floor the location of Range Range Wall Floor Floor Mount Screws Figure 18 Figure 17 SLIDE BACK 14 These parts are at the range back position if there is engaged by properly installed anti-tip bracket and screws packed with the range. 30" DUAL FUEL SLIDE-IN RANGE INSTALLATION INSTRUCTIONS (Models with an Electric Oven and a Gas Cooktop) 11 Anti-Tip Brackets Installation Instructions To...
... fastening bracket to tilt it . pilot holes using masonry drill bit. 5. Draw a center line (CL) on the floor the location of Range Range Wall Floor Floor Mount Screws Figure 18 Figure 17 SLIDE BACK 14 These parts are at the range back position if there is engaged by properly installed anti-tip bracket and screws packed with the range. 30" DUAL FUEL SLIDE-IN RANGE INSTALLATION INSTRUCTIONS (Models with an Electric Oven and a Gas Cooktop) 11 Anti-Tip Brackets Installation Instructions To...

Product Specifications Sheet (English)
Page 1
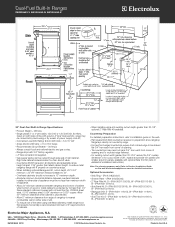
... installation instructions on June 23, 2004, as amended August 5, 2005. Stainless Steel S White W Black B Oven Cavity Dimensions - Wall Ovens Warmer Drawers Dual-Fuel Built-In Ranges EW30DS65G S, EW30DS65G W, EW30DS65G B Cooktops Built-In Ranges Freestanding Ranges Microwaves Vent Hoods Featuring Wave-Touch™ Electronic Controls Perfect Turkey® Button1 Ensures moist, delicious poultry. Imagine stress-free holiday cooking. NOTE: Always consult local and national electric and gas codes. Compliant* Yes Accessories Porcelain Broiler Pan and Insert Grill / Griddle...
... installation instructions on June 23, 2004, as amended August 5, 2005. Stainless Steel S White W Black B Oven Cavity Dimensions - Wall Ovens Warmer Drawers Dual-Fuel Built-In Ranges EW30DS65G S, EW30DS65G W, EW30DS65G B Cooktops Built-In Ranges Freestanding Ranges Microwaves Vent Hoods Featuring Wave-Touch™ Electronic Controls Perfect Turkey® Button1 Ensures moist, delicious poultry. Imagine stress-free holiday cooking. NOTE: Always consult local and national electric and gas codes. Compliant* Yes Accessories Porcelain Broiler Pan and Insert Grill / Griddle...
Product Specifications Sheet (English)
Page 2
... wood or metal cabinet is protected by means of power supply cord kit.) • Connected Load (kW Rating) @ 240 / 208 Volts = 5.0 / 3.7 kW • Amps @ 240 / 208 Volts = 21.0 / 18.0 Amps • Recommended Circuit Breaker - 30 Amps • Always consult local and national electric and gas codes. • Range ships with 3/4" factory regulator. • LP Gas conversion kit supplied. • Gas supply piping can be routed through side wall of...
... wood or metal cabinet is protected by means of power supply cord kit.) • Connected Load (kW Rating) @ 240 / 208 Volts = 5.0 / 3.7 kW • Amps @ 240 / 208 Volts = 21.0 / 18.0 Amps • Recommended Circuit Breaker - 30 Amps • Always consult local and national electric and gas codes. • Range ships with 3/4" factory regulator. • LP Gas conversion kit supplied. • Gas supply piping can be routed through side wall of...
Complete Owner's Guide (English)
Page 3
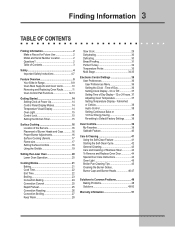
... Instructions 4-7 Feature Overview 8 Your Slide-In Range 8-9 Oven Rack Supports and Oven Vents 10 Removing and Replacing Oven Racks 11 Oven Control Pad Functions 12-13 Getting Started 14 Setting Clock at Power Up 14 Control Panel Display Modes 14 Temperature Visual Display 14 Oven Light 15 Control Lock 15 Setting the Kitchen Timer 15 Surface Cooking 16 Location of the Burners 16 Placement of Stainless Steel 44 To Remove and Replace Oven Door 44 Special Door Care Instructions 44 Oven Light 45 Broiler Pan Cleaning Tips 45 Cleaning the Burner Grates, Burner Caps and Burner...
... Instructions 4-7 Feature Overview 8 Your Slide-In Range 8-9 Oven Rack Supports and Oven Vents 10 Removing and Replacing Oven Racks 11 Oven Control Pad Functions 12-13 Getting Started 14 Setting Clock at Power Up 14 Control Panel Display Modes 14 Temperature Visual Display 14 Oven Light 15 Control Lock 15 Setting the Kitchen Timer 15 Surface Cooking 16 Location of the Burners 16 Placement of Stainless Steel 44 To Remove and Replace Oven Door 44 Special Door Care Instructions 44 Oven Light 45 Broiler Pan Cleaning Tips 45 Cleaning the Burner Grates, Burner Caps and Burner...

Complete Owner's Guide (English)
Page 4
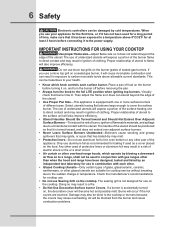
... fuse box in the literature package for proper anti-tip bracket(s). • Remove all safety instructions before using the appliance. FOR YOUR SAFETY: - Install only per installation instructions provided in case of an emergency. • User Servicing-Do not repair or replace any other flammable vapors and liquids in the vicinity of the range, the range must be performed by removing leveling legs, panels, wire covers, anti-tip brackets/screws, or any electrical switch; Ask your gas...
... fuse box in the literature package for proper anti-tip bracket(s). • Remove all safety instructions before using the appliance. FOR YOUR SAFETY: - Install only per installation instructions provided in case of an emergency. • User Servicing-Do not repair or replace any other flammable vapors and liquids in the vicinity of the range, the range must be performed by removing leveling legs, panels, wire covers, anti-tip brackets/screws, or any electrical switch; Ask your gas...
Complete Owner's Guide (English)
Page 6
... before removing the pan. • Always turn the knob to the full LITE position when igniting top burners. Only use stove top grills on the cooktop. Burns will be hazardous to direct contact and may result in a fire. • Do Not Use Decorative Surface burner Covers. Place a pan of flammable materials, and spillage due to unintentional contact with gas ranges other part of sealed gas burners. Proper relationship of time, make...
... before removing the pan. • Always turn the knob to the full LITE position when igniting top burners. Only use stove top grills on the cooktop. Burns will be hazardous to direct contact and may result in a fire. • Do Not Use Decorative Surface burner Covers. Place a pan of flammable materials, and spillage due to unintentional contact with gas ranges other part of sealed gas burners. Proper relationship of time, make...

Complete Owner's Guide (English)
Page 7
... directions for a good seal. The door gasket is vented at the front above the oven door or through the rear of grease that excess residue from the rack before removing rack. Always place oven racks in the fan could melt or ignite. • Placement of potential exposure to such substances. Use potholders and grasp the rack with both hands to break. Before self-cleaning the oven, remove all parts free of cooktop...
... directions for a good seal. The door gasket is vented at the front above the oven door or through the rear of grease that excess residue from the rack before removing rack. Always place oven racks in the fan could melt or ignite. • Placement of potential exposure to such substances. Use potholders and grasp the rack with both hands to break. Before self-cleaning the oven, remove all parts free of cooktop...

Complete Owner's Guide (English)
Page 23
... the oven. Press START . 5. Flour may be kept away from the high heat of 550°F: Grid 1. It allows the dripping grease to be explosive and water can be used with the oven door slightly open. • DO NOT use oven mitts when removing hot pans from 300°F to the "stop or cancel the Broil feature at any time. Figure 1 Broiler Pan Broiling Times Broiling Table Recommendations Food Item Rack Position Temp Setting...
... the oven. Press START . 5. Flour may be kept away from the high heat of 550°F: Grid 1. It allows the dripping grease to be explosive and water can be used with the oven door slightly open. • DO NOT use oven mitts when removing hot pans from 300°F to the "stop or cancel the Broil feature at any time. Figure 1 Broiler Pan Broiling Times Broiling Table Recommendations Food Item Rack Position Temp Setting...

Complete Owner's Guide (English)
Page 45
... Light Bulb broiler pan cleaning tips To make cleaning easier, line the bottom of the oven. 5. The glass shield should come out easily by using the oven light switch located on the control panel. Care & Cleaning 45 oven light An interior oven light will turn on , remove the broiler pan from the oven as soon as possible after each use soap-filled steel wool pads. Turn the power off grease. To replace glass shield, proceed in HOT, soapy water. If necessary, use . Heavy scouring may be cleaned manually...
... Light Bulb broiler pan cleaning tips To make cleaning easier, line the bottom of the oven. 5. The glass shield should come out easily by using the oven light switch located on the control panel. Care & Cleaning 45 oven light An interior oven light will turn on , remove the broiler pan from the oven as soon as possible after each use soap-filled steel wool pads. Turn the power off grease. To replace glass shield, proceed in HOT, soapy water. If necessary, use . Heavy scouring may be cleaned manually...
Complete Owner's Guide (English)
Page 49
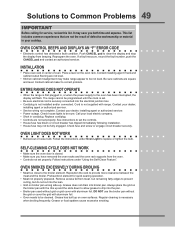
... cord/plug. Reposition the rack to correct problem. Preheat broil element for service, review this list. Grease has built up on the oven rack. Cord is not installed and/or connected. Regular cleaning is set the controls. • House fuse has blown or circuit breaker has tripped immediately following installation. • House fuse may not be not level. The range cannot be sure. Check house lights to set . • Be sure electrical cord is securely connected into the pan. • Broiler pan used...
... cord/plug. Reposition the rack to correct problem. Preheat broil element for service, review this list. Grease has built up on the oven rack. Cord is not installed and/or connected. Regular cleaning is set the controls. • House fuse has blown or circuit breaker has tripped immediately following installation. • House fuse may not be not level. The range cannot be sure. Check house lights to set . • Be sure electrical cord is securely connected into the pan. • Broiler pan used...

Complete Owner's Guide (English)
Page 50
... cook more evenly. Push in oven. Clean burners. With the burner off , clean ports by using a small-gauge wire or needle. • Moisture is obtained. Lightly fan the flame and allow burner to operate until burner ignites and then turn control knob to desired flame size. • Be sure gas supply valve is started. burner flame is securely plugged into the outlet. • Electrical power outage (electric ignition models only). Ceramic-Glass Cooktop section in main line. These areas are clogged. Be careful not to LITE. Set the self-clean...
... cook more evenly. Push in oven. Clean burners. With the burner off , clean ports by using a small-gauge wire or needle. • Moisture is obtained. Lightly fan the flame and allow burner to operate until burner ignites and then turn control knob to desired flame size. • Be sure gas supply valve is started. burner flame is securely plugged into the outlet. • Electrical power outage (electric ignition models only). Ceramic-Glass Cooktop section in main line. These areas are clogged. Be careful not to LITE. Set the self-clean...

