
Installation Instructions (All Languages)
Page 4
...carpeting unless you should be lit manually. FOR MODELS WITH SELF-CLEAN FEATURE: • Remove oven racks, broiler pan, food and other flammable vapors and liquids near this range can result in the cabinets above room temperature without adequate ventilation can be...to leave these installation instructions before installing range. 2. Important Note to provided with the range. To light a surface burner, hold a lit match to the burner head and slowly turn the Surface Control knob to the Installer 1. 30" DUAL FUEL SLIDE-IN RANGE INSTALLATION INSTRUCTIONS (Models with an Electric ...
...carpeting unless you should be lit manually. FOR MODELS WITH SELF-CLEAN FEATURE: • Remove oven racks, broiler pan, food and other flammable vapors and liquids near this range can result in the cabinets above room temperature without adequate ventilation can be...to leave these installation instructions before installing range. 2. Important Note to provided with the range. To light a surface burner, hold a lit match to the burner head and slowly turn the Surface Control knob to the Installer 1. 30" DUAL FUEL SLIDE-IN RANGE INSTALLATION INSTRUCTIONS (Models with an Electric ...

Product Specifications Sheet (English)
Page 1
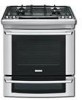
... as published by the United States Access Board on the web at two different temperatures. 30" DUAL-FUEL BUILT-IN RANGES Control Panel Features Wave-Touch™ Electronic Oven Control Yes Professional-Grade Burner Controls Yes Keypad Entry of ... bearing system, oven racks are so smooth they extend effortlessly. Wall Ovens Warmer Drawers Dual-Fuel Built-In Ranges EW30DS65G S, EW30DS65G W, EW30DS65G B Cooktops Built-In Ranges Freestanding Ranges Microwaves Vent Hoods Featuring Wave-Touch™ Electronic Controls Perfect Turkey® Button1 Ensures moist, delicious poultry. ...
... as published by the United States Access Board on the web at two different temperatures. 30" DUAL-FUEL BUILT-IN RANGES Control Panel Features Wave-Touch™ Electronic Oven Control Yes Professional-Grade Burner Controls Yes Keypad Entry of ... bearing system, oven racks are so smooth they extend effortlessly. Wall Ovens Warmer Drawers Dual-Fuel Built-In Ranges EW30DS65G S, EW30DS65G W, EW30DS65G B Cooktops Built-In Ranges Freestanding Ranges Microwaves Vent Hoods Featuring Wave-Touch™ Electronic Controls Perfect Turkey® Button1 Ensures moist, delicious poultry. ...
Complete Owner's Guide (English)
Page 3
... Record for Future Use 2 Model and Serial Number Location 2 Questions 2 Table of Contents 3 Safety 4 Important Safety Instructions 4-7 Feature Overview 8 Your Slide-In Range 8-9 Oven Rack Supports and Oven Vents 10 Removing and Replacing Oven Racks 11 Oven Control Pad Functions 12-13 Getting Started 14 ... Convection Convert 25 Rapid Preheat 25 Convection Roasting 26 Convection Broiling 27 Keep Warm 28 Slow Cook 29 Dehydrating 30 Defrosting 30 Bread Proofing 31 Perfect Turkey 32 Temperature Probe 33 Multi Stage 34-35 Electronic Control Settings 36 User Preferences ...
... Record for Future Use 2 Model and Serial Number Location 2 Questions 2 Table of Contents 3 Safety 4 Important Safety Instructions 4-7 Feature Overview 8 Your Slide-In Range 8-9 Oven Rack Supports and Oven Vents 10 Removing and Replacing Oven Racks 11 Oven Control Pad Functions 12-13 Getting Started 14 ... Convection Convert 25 Rapid Preheat 25 Convection Roasting 26 Convection Broiling 27 Keep Warm 28 Slow Cook 29 Dehydrating 30 Defrosting 30 Bread Proofing 31 Perfect Turkey 32 Temperature Probe 33 Multi Stage 34-35 Electronic Control Settings 36 User Preferences ...

Complete Owner's Guide (English)
Page 9
Feature Overview 9 Your Slide-in Range Oven Door Latch Oven vent Broiling Element Oven Rack Support slideable Oven racks Convection Fan Oven Light Oven Rack support brackets lower oven rack BROILER PAN BROILER PAN Grid Convection Roasting rack
Feature Overview 9 Your Slide-in Range Oven Door Latch Oven vent Broiling Element Oven Rack Support slideable Oven racks Convection Fan Oven Light Oven Rack support brackets lower oven rack BROILER PAN BROILER PAN Grid Convection Roasting rack

Complete Owner's Guide (English)
Page 10
... Feature Overview oven rack supports & Oven Vents Installing Oven Rack Supports Always install oven rack support before turning on the oven (when the oven is vented above each side of cooking. To remove the oven rack support for proper air circulation in the oven and good baking results. Rack positions 7 6 5 4 3 2 1 (Non-SLIDING...
... Feature Overview oven rack supports & Oven Vents Installing Oven Rack Supports Always install oven rack support before turning on the oven (when the oven is vented above each side of cooking. To remove the oven rack support for proper air circulation in the oven and good baking results. Rack positions 7 6 5 4 3 2 1 (Non-SLIDING...

Complete Owner's Guide (English)
Page 11
Feature Overview 11 removing and replacing oven racks Removing Sliding Oven Racks 1. TOWARD FRONT OF OVEN TOWARD back OF OVEN 1st Bracket 2nd Bracket Oven Rack Oven Rack Slider Oven Rack Support Removing Non-Sliding Oven Rack Simply pull the rack and slightly tilt it to clean the racks. Refer ... for directions on both sides. Slightly lift the rack and sliders and pull it upward when the rack hits its closed position; Replacing Sliding Oven Racks To replace the oven racks, follow the instructions above in its stop position. Insert the openings into the rack supports. grasp...
Feature Overview 11 removing and replacing oven racks Removing Sliding Oven Racks 1. TOWARD FRONT OF OVEN TOWARD back OF OVEN 1st Bracket 2nd Bracket Oven Rack Oven Rack Slider Oven Rack Support Removing Non-Sliding Oven Rack Simply pull the rack and slightly tilt it to clean the racks. Refer ... for directions on both sides. Slightly lift the rack and sliders and pull it upward when the rack hits its closed position; Replacing Sliding Oven Racks To replace the oven racks, follow the instructions above in its stop position. Insert the openings into the rack supports. grasp...

Complete Owner's Guide (English)
Page 12
... mode. 13 Multi Stage Pad- Used to select the convection broil mode. 7 Control Lock Pad- Used to select the defrost mode. 10 Dehydrate Pad- 12 Feature Overview Oven Control pad functions 1 23 456 oven light 7 bake 8 broil 9 conv bake 10 conv roast 11 conv broil 12 control lock perfect turkey 13...
... mode. 13 Multi Stage Pad- Used to select the convection broil mode. 7 Control Lock Pad- Used to select the defrost mode. 10 Dehydrate Pad- 12 Feature Overview Oven Control pad functions 1 23 456 oven light 7 bake 8 broil 9 conv bake 10 conv roast 11 conv broil 12 control lock perfect turkey 13...
Complete Owner's Guide (English)
Page 13
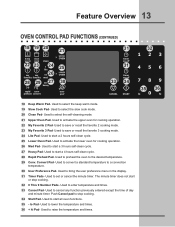
Feature Overview 13 Oven Control pad functions (Continued) 18 19 20 keep warm mode. 19 Slow Cook Pad- Used...temperature and times. 36 + hi Pad- The minute timer does not start all oven functions. 35 - Used to a convection temperature. 30 User Preference Pad- Used to activate the lower oven for cooking operation. 22 My Favorite 2 Pad- Used to raise the temperature and...lite my my 26 favorite favorite med 28 29 27 heavy rapid conv preheat convert 21 UPPER OVEN 25 LOWER OVEN 30 user pref 31 timer on-off 31 timer on-off 33 34 CANCEL START 32 123 456 789 - 35 36+...
Feature Overview 13 Oven Control pad functions (Continued) 18 19 20 keep warm mode. 19 Slow Cook Pad- Used...temperature and times. 36 + hi Pad- The minute timer does not start all oven functions. 35 - Used to a convection temperature. 30 User Preference Pad- Used to activate the lower oven for cooking operation. 22 My Favorite 2 Pad- Used to raise the temperature and...lite my my 26 favorite favorite med 28 29 27 heavy rapid conv preheat convert 21 UPPER OVEN 25 LOWER OVEN 30 user pref 31 timer on-off 31 timer on-off 33 34 CANCEL START 32 123 456 789 - 35 36+...

Complete Owner's Guide (English)
Page 14
... time of day to the range has been interrupted, the timer in the display will flash with a temperature visual display for 1:30): 1. After 2 minutes without activity the control will be active with a time of day. The cooking modes which does not feature the temperature visual display will ... 1 3 0 + - User preferences will be shown in the oven. To start with some cooking modes; When a cooking mode is on. This feature will be pressed to remind you must select either the upper oven or the lower oven. Wake Mode: To wake the control, touch within the...
... time of day to the range has been interrupted, the timer in the display will flash with a temperature visual display for 1:30): 1. After 2 minutes without activity the control will be active with a time of day. The cooking modes which does not feature the temperature visual display will ... 1 3 0 + - User preferences will be shown in the oven. To start with some cooking modes; When a cooking mode is on. This feature will be pressed to remind you must select either the upper oven or the lower oven. Wake Mode: To wake the control, touch within the...

Complete Owner's Guide (English)
Page 15
... . The oven light may be pressed to accept and start or stop cooking. To toggle the Oven Lights ON and OFF: 1. The Timer feature can also be turned on when the door is pressed. The clock will sound a chime that will be repeated at full intensity. Once the door...and the lower oven is equipped with 2 Kitchen Timers which serves as extra timers in the display for 3 seconds. Control Lock The Control Lock feature automatically locks the upper oven door and the control panel. Press again TIMER to raise or lower the actual time displayed. 3. Do not attempt ...
... . The oven light may be pressed to accept and start or stop cooking. To toggle the Oven Lights ON and OFF: 1. The Timer feature can also be turned on when the door is pressed. The clock will sound a chime that will be repeated at full intensity. Once the door...and the lower oven is equipped with 2 Kitchen Timers which serves as extra timers in the display for 3 seconds. Control Lock The Control Lock feature automatically locks the upper oven door and the control panel. Press again TIMER to raise or lower the actual time displayed. 3. Do not attempt ...

Complete Owner's Guide (English)
Page 20
... their sections for the lower oven may vary slightly from the upper oven. Failure to keep warm feature to do so can only be used in damage to cover food. Be sure that the rack ... the fire. Always use a fire extinguisher. This will provide for self-cleaning or if the control lockout feature is opened; This may melt onto the drawer or surrounding areas and be hot. The maximum width is...placed with 4 raised sides to clean. If the fire continues, use oven mitts when removing food from sliding off. • DO NOT LINE THE OVEN DRAWER WITH FOIL OR COVER THE OVEN RACK WITH FOIL....
... their sections for the lower oven may vary slightly from the upper oven. Failure to keep warm feature to do so can only be used in damage to cover food. Be sure that the rack ... the fire. Always use a fire extinguisher. This will provide for self-cleaning or if the control lockout feature is opened; This may melt onto the drawer or surrounding areas and be hot. The maximum width is...placed with 4 raised sides to clean. If the fire continues, use oven mitts when removing food from sliding off. • DO NOT LINE THE OVEN DRAWER WITH FOIL OR COVER THE OVEN RACK WITH FOIL....
Complete Owner's Guide (English)
Page 21
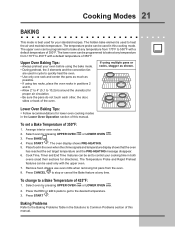
...of 350°F: 1. LOWER OVEN + - 2. Baking Problems Refer to 550°F with the upper oven. 7. Cook Time, Timer and End Time features can be set to a Bake Temperature of the oven. The upper oven can be programmed to bake at any temperature from the oven. 8. The ...Temperature Probe and Rapid Preheat features can be used in the Solutions to the desired temperature. 3. To change to control your standard recipes. Upper Oven Baking Tips: •...
...of 350°F: 1. LOWER OVEN + - 2. Baking Problems Refer to 550°F with the upper oven. 7. Cook Time, Timer and End Time features can be set to a Bake Temperature of the oven. The upper oven can be programmed to bake at any temperature from the oven. 8. The ...Temperature Probe and Rapid Preheat features can be used in the Solutions to the desired temperature. 3. To change to control your standard recipes. Upper Oven Baking Tips: •...
Complete Owner's Guide (English)
Page 22
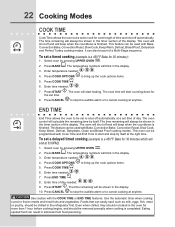
...The time remaining will calculate the remaining time by itself at anytime. Enter temperature needed ; 6 0 0 . 9. Press COOK TIME . 6. Press START . This feature can result in the refrigerator first. To set a timed cooking (example is finished. Press COOK TIME . 6. Enter time needed ; 3 0 . 7. Press CANCEL... day. Enter temperature needed; 4 5 0 . 4. Eating spoiled food can be used with Cook Time and End Time to cook for 30 minutes): 1. The oven will shut off and will start counting down for more than 1 hour before cooking begins, and should be used with...
...The time remaining will calculate the remaining time by itself at anytime. Enter temperature needed ; 6 0 0 . 9. Press COOK TIME . 6. Press START . This feature can result in the refrigerator first. To set a timed cooking (example is finished. Press COOK TIME . 6. Enter time needed ; 3 0 . 7. Press CANCEL... day. Enter temperature needed; 4 5 0 . 4. Eating spoiled food can be used with Cook Time and End Time to cook for 30 minutes): 1. The oven will shut off and will start counting down for more than 1 hour before cooking begins, and should be used with...

Complete Owner's Guide (English)
Page 23
... of the oven. Remove food. Press START . 5. The oven can be explosive and water can cause a grease fire to the "stop or cancel the Broil feature at any time. DO NOT cover the broil pan insert with a default temperature of meat by pressing UPPER OVEN . Season and serve. • Always pull...
... of the oven. Remove food. Press START . 5. The oven can be explosive and water can cause a grease fire to the "stop or cancel the Broil feature at any time. DO NOT cover the broil pan insert with a default temperature of meat by pressing UPPER OVEN . Season and serve. • Always pull...

Complete Owner's Guide (English)
Page 24
... 6. Press CONVECTION BAKE . 4. The oven display shows PRE-HEATING. 5. The Temperature Probe, Cook Time, Timer, End Time and Rapid Preheat features can be set to control your oven temperature. Press CANCEL to reduce your cooking time (read their sections for some foods may slightly increase cook... the Convection Bake mode. • If your recipe cooking temperature has already been converted for convection baking when using the Convection Convert feature. If cooking on the amount and type of food to obtain the best culinary results when baking with a default temperature of 350°...
... 6. Press CONVECTION BAKE . 4. The oven display shows PRE-HEATING. 5. The Temperature Probe, Cook Time, Timer, End Time and Rapid Preheat features can be set to control your oven temperature. Press CANCEL to reduce your cooking time (read their sections for some foods may slightly increase cook... the Convection Bake mode. • If your recipe cooking temperature has already been converted for convection baking when using the Convection Convert feature. If cooking on the amount and type of food to obtain the best culinary results when baking with a default temperature of 350°...

Complete Owner's Guide (English)
Page 25
...completely finished the control will sound 3 long beeps at regular intervals until the CANCEL pad is pressed. NOTE: To use this feature is designed to display the actual converted (reduced) temperature in the display. Press START to begin the baking with some of the... . 5. It can be pressed before the CONVECTION CONVERT pad. The temperature displayed will bring the oven up . 4. rapid preheat The Preheat feature will be used to a convection bake temperature: 1. Cooking Modes 25 convection convert The Convection Convert pad is used to automatically convert a standard ...
...completely finished the control will sound 3 long beeps at regular intervals until the CANCEL pad is pressed. NOTE: To use this feature is designed to display the actual converted (reduced) temperature in the display. Press START to begin the baking with some of the... . 5. It can be pressed before the CONVECTION CONVERT pad. The temperature displayed will bring the oven up . 4. rapid preheat The Preheat feature will be used to a convection bake temperature: 1. Cooking Modes 25 convection convert The Convection Convert pad is used to automatically convert a standard ...

Complete Owner's Guide (English)
Page 26
... to circulate the oven's heat evenly and continuously within the oven. The Temperature Probe, Cook Time, Timer, End Time Figure 1 Broiler Pan and Rapid Preheat features can be set a Convection Roast Temperature of 350°F: 1. UPPER OVEN Roasting Rack Grid 3. Press CANCEL to 550°F with aluminum foil. • Always ...; F 325° F Internal Temp * * * 180° F 180° F 180° F 180° F 160° F 160° F 160° F 160° F Min per lb. 25-30 25-30 15-25 8-10 10-15 12-16 12-16 30-40 20-30 20-25 30-40 Select oven by pressing UPPER OVEN .
... to circulate the oven's heat evenly and continuously within the oven. The Temperature Probe, Cook Time, Timer, End Time Figure 1 Broiler Pan and Rapid Preheat features can be set a Convection Roast Temperature of 350°F: 1. UPPER OVEN Roasting Rack Grid 3. Press CANCEL to 550°F with aluminum foil. • Always ...; F 325° F Internal Temp * * * 180° F 180° F 180° F 180° F 160° F 160° F 160° F 160° F Min per lb. 25-30 25-30 15-25 8-10 10-15 12-16 12-16 30-40 20-30 20-25 30-40 Select oven by pressing UPPER OVEN .

Complete Owner's Guide (English)
Page 27
... and a fan to spread and cause personal injury. Season and serve. • Always pull the rack out to the "stop or cancel the Convection Broil feature at any temperature between 300°F to 550°F with a default temperature of the broil element (see Figure 1). • DO NOT use a fire extinguisher. The...
... and a fan to spread and cause personal injury. Season and serve. • Always pull the rack out to the "stop or cancel the Convection Broil feature at any temperature between 300°F to 550°F with a default temperature of the broil element (see Figure 1). • DO NOT use a fire extinguisher. The...

Complete Owner's Guide (English)
Page 28
...oven cooking modes in regular containers. • Avoid repeated openings of this manual. The Multi-Stage, Cook Time, Timer and End Time features can be used with a default temperature of 170°F: 1. Keep Warm Tips for directions) if you wish to increase moisture content. Keep... Warm Tips for Lower Oven: • Follow recommendations for directions). 6. Press START . 5. The Keep Warm feature may need higher temperature settings compared to food in the Setting Lower Oven section of the oven, it will allow hot air to escape ...
...oven cooking modes in regular containers. • Avoid repeated openings of this manual. The Multi-Stage, Cook Time, Timer and End Time features can be used with a default temperature of 170°F: 1. Keep Warm Tips for directions) if you wish to increase moisture content. Keep... Warm Tips for Lower Oven: • Follow recommendations for directions). 6. Press START . 5. The Keep Warm feature may need higher temperature settings compared to food in the Setting Lower Oven section of the oven, it will allow hot air to escape ...

Complete Owner's Guide (English)
Page 29
... Continuous Bake mode or the Sabbath mode has been activated. Arrange interior oven racks and place food in the exterior of cooking. The Slow Cook feature is normal. If the oven heat escapes often, the Slow Cook time may need to be extended. • Cover the foods to keep them moist..., position it in the center of the meat. • Use the recipe's recommended food temperature and a food thermometer to stop or cancel the Slow Cook feature at lower oven temperatures and provide cooking results much the same way as a Slow Cooker or Crock-Pot. Press START . 6. This is ideal for high...
... Continuous Bake mode or the Sabbath mode has been activated. Arrange interior oven racks and place food in the exterior of cooking. The Slow Cook feature is normal. If the oven heat escapes often, the Slow Cook time may need to be extended. • Cover the foods to keep them moist..., position it in the center of the meat. • Use the recipe's recommended food temperature and a food thermometer to stop or cancel the Slow Cook feature at lower oven temperatures and provide cooking results much the same way as a Slow Cooker or Crock-Pot. Press START . 6. This is ideal for high...
