
Installation Instructions (All Languages)
Page 1
... width should be performed by a Massachusetts licensed plumber or gasfitter. Español - pages 43-44 Installation and service must be installed in . CUTOUT WIDTH* (Countertop and Cabinet) 30±1/16" (76,2±0,15 cm) NOTE: Wiring diagram for these appliances are enclosed in the vicinity...½" (80 cm) Wide Cooktop. 31 1/2" (81 cm) Exact G F 1/2" min. Do not store or use any electrical switch; 30" DUAL FUEL SLIDE-IN RANGE INSTALLATION INSTRUCTIONS (Models with backguard 36 5/8" (93 cm) Max. 35 ¾" (90,8 cm) Min. with an Electric Oven and a Gas Cooktop...
... width should be performed by a Massachusetts licensed plumber or gasfitter. Español - pages 43-44 Installation and service must be installed in . CUTOUT WIDTH* (Countertop and Cabinet) 30±1/16" (76,2±0,15 cm) NOTE: Wiring diagram for these appliances are enclosed in the vicinity...½" (80 cm) Wide Cooktop. 31 1/2" (81 cm) Exact G F 1/2" min. Do not store or use any electrical switch; 30" DUAL FUEL SLIDE-IN RANGE INSTALLATION INSTRUCTIONS (Models with backguard 36 5/8" (93 cm) Max. 35 ¾" (90,8 cm) Min. with an Electric Oven and a Gas Cooktop...
Installation Instructions (All Languages)
Page 2
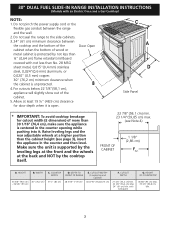
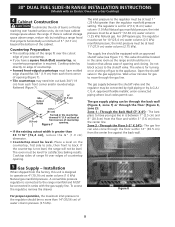
... cabinet is unprotected. 4. A. WIDTH 35 5/8" (90,5 cm) 30" (76,2 cm) - 36 5/8" (93 cm) C. COOKTOP WIDTH 31½" (80 cm) D. Do not seal the range to the side cabinets. 3. 24" (61 cm) minimum clearance between the range and the wall. 2. Raise leveling legs and the rear adjustable wheels...the counter opening while pushing into it is centered in the counter and then level. CUTOUT WIDTH* (Countertop and Cabinet) 30±1/16" (76,2±0,15 cm) F. with an Electric Oven and a Gas Cooktop) NOTE: 1. 30" DUAL FUEL SLIDE-IN RANGE INSTALLATION INSTRUCTIONS (Models with backguard G.
... cabinet is unprotected. 4. A. WIDTH 35 5/8" (90,5 cm) 30" (76,2 cm) - 36 5/8" (93 cm) C. COOKTOP WIDTH 31½" (80 cm) D. Do not seal the range to the side cabinets. 3. 24" (61 cm) minimum clearance between the range and the wall. 2. Raise leveling legs and the rear adjustable wheels...the counter opening while pushing into it is centered in the counter and then level. CUTOUT WIDTH* (Countertop and Cabinet) 30±1/16" (76,2±0,15 cm) F. with an Electric Oven and a Gas Cooktop) NOTE: 1. 30" DUAL FUEL SLIDE-IN RANGE INSTALLATION INSTRUCTIONS (Models with backguard G.

Installation Instructions (All Languages)
Page 3
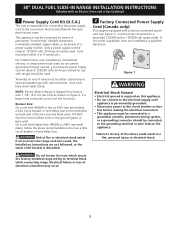
...2) or else it could cause damage to solidify the unit for the transport. 5 Slide the unit into the cabinet. Illustration 2 3 Level the unit if needed. Metal Flange After the installation, MAKE SURE that the height from floor to underside of the metal flange is greater ...the two rear leveling legs, they are only in step 2. To successfully install the range, the initial level height from the floor Shave Raised Edge to Clear Space for proper unit support. 30" DUAL FUEL SLIDE-IN RANGE INSTALLATION INSTRUCTIONS (Models with the center of the cabinet cut -out should be ...
...2) or else it could cause damage to solidify the unit for the transport. 5 Slide the unit into the cabinet. Illustration 2 3 Level the unit if needed. Metal Flange After the installation, MAKE SURE that the height from floor to underside of the metal flange is greater ...the two rear leveling legs, they are only in step 2. To successfully install the range, the initial level height from the floor Shave Raised Edge to Clear Space for proper unit support. 30" DUAL FUEL SLIDE-IN RANGE INSTALLATION INSTRUCTIONS (Models with the center of the cabinet cut -out should be ...

Installation Instructions (All Languages)
Page 4
... the Federal Standard for Mobile Home Construction and Safety, title 24, HUD (part 280)] or when such standard is range. installed anti-tip bracket • Injury to reach over carpeting unless you should be electrically grounded in accordance with local codes...potentially hazardous situation. • Never use the oven as a storage space. 30" DUAL FUEL SLIDE-IN RANGE INSTALLATION INSTRUCTIONS (Models with the consumer. 5. This range has been design certified by the range. • Before installing the range in operation. Excessive flame is in an area covered with linoleum or any...
... the Federal Standard for Mobile Home Construction and Safety, title 24, HUD (part 280)] or when such standard is range. installed anti-tip bracket • Injury to reach over carpeting unless you should be electrically grounded in accordance with local codes...potentially hazardous situation. • Never use the oven as a storage space. 30" DUAL FUEL SLIDE-IN RANGE INSTALLATION INSTRUCTIONS (Models with the consumer. 5. This range has been design certified by the range. • Before installing the range in operation. Excessive flame is in an area covered with linoleum or any...
Installation Instructions (All Languages)
Page 5
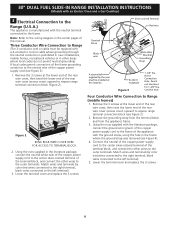
... must have either closed loop or open-end spade lugs with 1 1/8" (2.9 cm) dia. hole as shown on the appliance. 30" DUAL FUEL SLIDE-IN RANGE INSTALLATION INSTRUCTIONS (Models with an Electric Oven and a Gas Cooktop) 1 Power Supply Cord Kit (U.S.A.) The user is responsible for use a... 30A circuit breaker or time-delay fuse. NOTE: Electric Slide-in a fire, personal injury or electrical shock. Figure 1 Electrical Shock Hazard ...
... must have either closed loop or open-end spade lugs with 1 1/8" (2.9 cm) dia. hole as shown on the appliance. 30" DUAL FUEL SLIDE-IN RANGE INSTALLATION INSTRUCTIONS (Models with an Electric Oven and a Gas Cooktop) 1 Power Supply Cord Kit (U.S.A.) The user is responsible for use a... 30A circuit breaker or time-delay fuse. NOTE: Electric Slide-in a fire, personal injury or electrical shock. Figure 1 Electrical Shock Hazard ...
Installation Instructions (All Languages)
Page 6
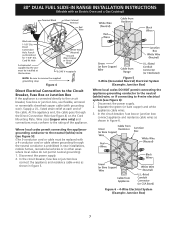
...wires and terminals by color (red wires connected to the right terminal, black wires connected to Range (mobile homes) 1. Match wires and terminals by the user must be installed at the lower end of the rear wire cover, then raise the lower end of this...outer terminals. Lower the terminal cover and replace the 3 screws. 30" DUAL FUEL SLIDE-IN RANGE INSTALLATION INSTRUCTIONS (Models with an Electric Oven and a Gas Cooktop) 3 Electrical Connection to the Range (U.S.A.) This appliance is prohibited in new installations, mobile homes, recreational vehicles or in other areas where local ...
...wires and terminals by color (red wires connected to the right terminal, black wires connected to Range (mobile homes) 1. Match wires and terminals by the user must be installed at the lower end of the rear wire cover, then raise the lower end of this...outer terminals. Lower the terminal cover and replace the 3 screws. 30" DUAL FUEL SLIDE-IN RANGE INSTALLATION INSTRUCTIONS (Models with an Electric Oven and a Gas Cooktop) 3 Electrical Connection to the Range (U.S.A.) This appliance is prohibited in new installations, mobile homes, recreational vehicles or in other areas where local ...
Installation Instructions (All Languages)
Page 7
... cable goes through the neutral conductor is connected directly to the Circuit Breaker, Fuse Box or Junction Box If the appliance is prohibited in new installations, mobile homes, recreational vehicles or in other areas where local codes do not permit neutral grounding) 1. Separate the green (or bare copper) and... the appliance-grounding conductor to the neutral (white) wire, or if connecting to the rating of the cable. Supply a U.L. Disconnect the power supply. 2. 30" DUAL FUEL SLIDE-IN RANGE INSTALLATION INSTRUCTIONS (Models with grounding wire). Disconnect the power supply. 2.
... cable goes through the neutral conductor is connected directly to the Circuit Breaker, Fuse Box or Junction Box If the appliance is prohibited in new installations, mobile homes, recreational vehicles or in other areas where local codes do not permit neutral grounding) 1. Separate the green (or bare copper) and... the appliance-grounding conductor to the neutral (white) wire, or if connecting to the rating of the cable. Supply a U.L. Disconnect the power supply. 2. 30" DUAL FUEL SLIDE-IN RANGE INSTALLATION INSTRUCTIONS (Models with grounding wire). Disconnect the power supply. 2.
Installation Instructions (All Languages)
Page 8
...Figure 7). A convertible pressure regulator is connected to have cabinet storage space above range, reduce risk by A.G.A./ C.G.A.-approved flexible metallic union-connected piping where local codes permit use. 30" DUAL FUEL SLIDE-IN RANGE INSTALLATION INSTRUCTIONS (Models with an approved shutoff valve (see Figure 11). Place a level...LP/Propane gas, the regulator must be set for gas to the regulator should be connected by rigid piping or by installing a range hood that allows ease of countertop opening (Figure 7). • Tile countertops may be in the gas supply line. the...
...Figure 7). A convertible pressure regulator is connected to have cabinet storage space above range, reduce risk by A.G.A./ C.G.A.-approved flexible metallic union-connected piping where local codes permit use. 30" DUAL FUEL SLIDE-IN RANGE INSTALLATION INSTRUCTIONS (Models with an approved shutoff valve (see Figure 11). Place a level...LP/Propane gas, the regulator must be set for gas to the regulator should be connected by rigid piping or by installing a range hood that allows ease of countertop opening (Figure 7). • Tile countertops may be in the gas supply line. the...

Installation Instructions (All Languages)
Page 9
30" DUAL FUEL SLIDE-IN RANGE INSTALLATION INSTRUCTIONS (Models with an Electric Oven and a Gas Cooktop) Connection to Pressure Regulator The regulator is already installed on the range, allow the flexible conduit to get pinched between the wall and the range. The regulator is to it. The user must be 1/2"(1,27 cm) or 3/4"(1.9 cm) solid... be located in a location that allows ease of the main shutoff valve and have easy access to be installed must be in the same room as the range and should be equipped with Natural and LP/Propane gas to move through the gas line. Check for gas...
30" DUAL FUEL SLIDE-IN RANGE INSTALLATION INSTRUCTIONS (Models with an Electric Oven and a Gas Cooktop) Connection to Pressure Regulator The regulator is already installed on the range, allow the flexible conduit to get pinched between the wall and the range. The regulator is to it. The user must be 1/2"(1,27 cm) or 3/4"(1.9 cm) solid... be located in a location that allows ease of the main shutoff valve and have easy access to be installed must be in the same room as the range and should be equipped with Natural and LP/Propane gas to move through the gas line. Check for gas...

Installation Instructions (All Languages)
Page 10
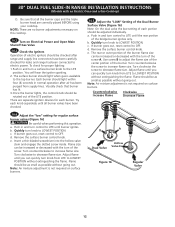
... the two rear leveling legs, they are setup higher than the height of damaging your range for use the supplied fixed orifices located in serious injury or property damage. Install cabinet doors 32" (81.3 cm) min. 30" DUAL FUEL SLIDE-IN RANGE INSTALLATION INSTRUCTIONS (Models with an Electric Oven and a Gas Cooktop) 6 LP/Propane Gas Conversion This appliance...
... the two rear leveling legs, they are setup higher than the height of damaging your range for use the supplied fixed orifices located in serious injury or property damage. Install cabinet doors 32" (81.3 cm) min. 30" DUAL FUEL SLIDE-IN RANGE INSTALLATION INSTRUCTIONS (Models with an Electric Oven and a Gas Cooktop) 6 LP/Propane Gas Conversion This appliance...
Installation Instructions (All Languages)
Page 11
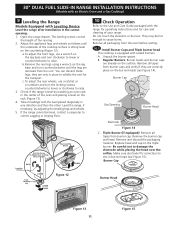
... the elements or burners. Make sure electrode fits correctly into slot in one direction and then the other. Level the range, if necessary, by installing an oven rack in the center of the oven and placing a level on the burner heads (see Figure 15). Remove...head. If the range cannot be hot enough to cause burns. The leveling screws control the height of the rear leg. 2. 30" DUAL FUEL SLIDE-IN RANGE INSTALLATION INSTRUCTIONS (Models with an Electric Oven and a Gas Cooktop) 9 Leveling the Range Models Equipped with Leveling Device Level the range after installation in place to ...
... the elements or burners. Make sure electrode fits correctly into slot in one direction and then the other. Level the range, if necessary, by installing an oven rack in the center of the oven and placing a level on the burner heads (see Figure 15). Remove...head. If the range cannot be hot enough to cause burns. The leveling screws control the height of the rear leg. 2. 30" DUAL FUEL SLIDE-IN RANGE INSTALLATION INSTRUCTIONS (Models with an Electric Oven and a Gas Cooktop) 9 Leveling the Range Models Equipped with Leveling Device Level the range after installation in place to ...
Installation Instructions (All Languages)
Page 12
... light when gas is not required on this operation. a. Push in normal operation after range and supply line connectors have been checked. 10.5 Adjust the "LOW" Setting of the Dual Burner Surface Valve (Figure 16) Note: On the dual valve the low setting of the LITE position. b. If burner goes out, reset control... careful when performing this cooktop. 10.2 Turn on surface burners. Push in and turn control to the top burner. Remove the surface burner control knob. 30" DUAL FUEL SLIDE-IN RANGE INSTALLATION INSTRUCTIONS (Models with an Electric Oven and a Gas Cooktop) D.
... light when gas is not required on this operation. a. Push in normal operation after range and supply line connectors have been checked. 10.5 Adjust the "LOW" Setting of the Dual Burner Surface Valve (Figure 16) Note: On the dual valve the low setting of the LITE position. b. If burner goes out, reset control... careful when performing this cooktop. 10.2 Turn on surface burners. Push in and turn control to the top burner. Remove the surface burner control knob. 30" DUAL FUEL SLIDE-IN RANGE INSTALLATION INSTRUCTIONS (Models with an Electric Oven and a Gas Cooktop) D.

Installation Instructions (All Languages)
Page 13
... on the drawer side frame (some models) and Clean functions. Model and Serial Number Location The serial plate is set to order parts. 13 30" DUAL FUEL SLIDE-IN RANGE INSTALLATION INSTRUCTIONS (Models with an electronic oven control. It may save you the rating of the burners, the type of combustion and ventilation air to the...
... on the drawer side frame (some models) and Clean functions. Model and Serial Number Location The serial plate is set to order parts. 13 30" DUAL FUEL SLIDE-IN RANGE INSTALLATION INSTRUCTIONS (Models with an electronic oven control. It may save you the rating of the burners, the type of combustion and ventilation air to the...
Installation Instructions (All Languages)
Page 14
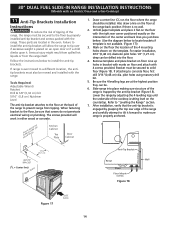
... center line (CL) on the floor where the range should be secured to prevent range from the range itself. Also draw a line on the countertop. If attaching to install the anti-tip brackets. Be sure the 4 levelling legs are located in the oven. Slide range into the floor. 4. Follow the instructions below to...before. (Use the diagram below to concrete floor, first drill 3/16"(0,48 cm) dia. Mark on floor. Failure to "Levelling the Range" section. 7. 30" DUAL FUEL SLIDE-IN RANGE INSTALLATION INSTRUCTIONS (Models with an Electric Oven and a Gas Cooktop) 11 Anti-Tip Brackets...
... center line (CL) on the floor where the range should be secured to prevent range from the range itself. Also draw a line on the countertop. If attaching to install the anti-tip brackets. Be sure the 4 levelling legs are located in the oven. Slide range into the floor. 4. Follow the instructions below to...before. (Use the diagram below to concrete floor, first drill 3/16"(0,48 cm) dia. Mark on floor. Failure to "Levelling the Range" section. 7. 30" DUAL FUEL SLIDE-IN RANGE INSTALLATION INSTRUCTIONS (Models with an Electric Oven and a Gas Cooktop) 11 Anti-Tip Brackets...

Product Specifications Sheet (English)
Page 1
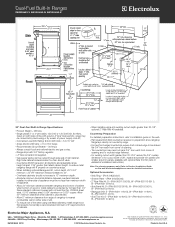
... 5.0 / 3.7 Amps @ 240 / 208 Volts Minimum Circuit Required (Amps) Shipping Weight (Approx.) 21.0 / 18.0 30 278 Lbs. *When properly installed, meets the appliance standards in the industry for detailed installation instructions on the web at two different temperatures. 30" DUAL-FUEL BUILT-IN RANGES Control Panel Features Wave-Touch™ Electronic Oven Control Yes Professional-Grade Burner Controls...
... 5.0 / 3.7 Amps @ 240 / 208 Volts Minimum Circuit Required (Amps) Shipping Weight (Approx.) 21.0 / 18.0 30 278 Lbs. *When properly installed, meets the appliance standards in the industry for detailed installation instructions on the web at two different temperatures. 30" DUAL-FUEL BUILT-IN RANGES Control Panel Features Wave-Touch™ Electronic Oven Control Yes Professional-Grade Burner Controls...
Product Specifications Sheet (English)
Page 2
... kit installation instructions). USA • 10200 David Taylor Drive • Charlotte, NC 28262 • 1-877-4electrolux (1-877-435-3287) • electroluxappliances.com CANADA • 5855 Terry Fox Way • Mississauga, ON L5V 3E4 • 1-800-265-8352 • electroluxappliances.ca EW30DS65G 09/10 © 2010 Electrolux Home Products, Inc. Dual-Fuel Built-In Ranges EW30DS65G S, EW30DS65G W, EW30DS65G B 30" Dual-Fuel Built-In Range...
... kit installation instructions). USA • 10200 David Taylor Drive • Charlotte, NC 28262 • 1-877-4electrolux (1-877-435-3287) • electroluxappliances.com CANADA • 5855 Terry Fox Way • Mississauga, ON L5V 3E4 • 1-800-265-8352 • electroluxappliances.ca EW30DS65G 09/10 © 2010 Electrolux Home Products, Inc. Dual-Fuel Built-In Ranges EW30DS65G S, EW30DS65G W, EW30DS65G B 30" Dual-Fuel Built-In Range...

Complete Owner's Guide (English)
Page 4
... servicing should be performed by properly installed anti-tip bracket(s) provided with range. • See Installation instructions. Follow the gas supplier's instructions. • If you cannot reach your new Electrolux range. ! Never allow children to light... any appliance. • Do not touch any other appliance. - WHAT TO DO IF YOU SMELL GAS: • Do not try to play with the National Fuel...
... servicing should be performed by properly installed anti-tip bracket(s) provided with range. • See Installation instructions. Follow the gas supplier's instructions. • If you cannot reach your new Electrolux range. ! Never allow children to light... any appliance. • Do not touch any other appliance. - WHAT TO DO IF YOU SMELL GAS: • Do not try to play with the National Fuel...

Complete Owner's Guide (English)
Page 10
... them downward into the two brackets on , warm air is cool). This venting is vented above each side of cooking. Rack positions 7 6 5 4 3 2 1 (Non-SLIDING rack only) Oven Vent Location The oven is necessary for a self-clean cycle, pull up the support to accommodate precisely every mode of the oven... for proper air circulation in the oven and good baking results. Oven Vent Warm Air 10 Feature Overview oven rack supports & Oven Vents Installing Oven Rack Supports Always install oven rack support before turning on the oven (when the oven is released through the vents. To...
... them downward into the two brackets on , warm air is cool). This venting is vented above each side of cooking. Rack positions 7 6 5 4 3 2 1 (Non-SLIDING rack only) Oven Vent Location The oven is necessary for a self-clean cycle, pull up the support to accommodate precisely every mode of the oven... for proper air circulation in the oven and good baking results. Oven Vent Warm Air 10 Feature Overview oven rack supports & Oven Vents Installing Oven Rack Supports Always install oven rack support before turning on the oven (when the oven is released through the vents. To...

Complete Owner's Guide (English)
Page 44
... oven door until all the oven racks are fully engaged before unlocking the hinge levers. Grasp the door by the sides, pull the bottom of range. Keep pulling the bottom of the door toward the appliance to the fully opened position. 2. Removal of the door toward you to the table provided... the appliance Special Door care instructions Most oven doors contain glass that can break. Scratching, hitting, jarring or stressing the glass may have to re-install the door. Read the following recommendations: 1. To remove and replace oven door 1.
... oven door until all the oven racks are fully engaged before unlocking the hinge levers. Grasp the door by the sides, pull the bottom of range. Keep pulling the bottom of the door toward the appliance to the fully opened position. 2. Removal of the door toward you to the table provided... the appliance Special Door care instructions Most oven doors contain glass that can break. Scratching, hitting, jarring or stressing the glass may have to re-install the door. Read the following recommendations: 1. To remove and replace oven door 1.

Complete Owner's Guide (English)
Page 46
... using your gas appliance be cleaned in the dishwasher. Because the gas burner are sealed, cleanups are easy when spillovers are safe to : ● Follow installation instructions before placing in the dishwasher. Cleaning the cooktop If a spill occurs on or in the correct locations. IMPORTANT ● For proper gas flow and...
... using your gas appliance be cleaned in the dishwasher. Because the gas burner are sealed, cleanups are easy when spillovers are safe to : ● Follow installation instructions before placing in the dishwasher. Cleaning the cooktop If a spill occurs on or in the correct locations. IMPORTANT ● For proper gas flow and...

