
Installation Instructions (All Languages)
Page 1
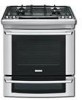
...(12,7 cm Min.) From Wall Both Sides (see Note 3) 18" Min. (45,7 cm) Min. pages 29-42; Edge E 3/8" min. from a neighbor's phone. Wiring Diagrams - 30" DUAL FUEL SLIDE-IN RANGE INSTALLATION INSTRUCTIONS (Models with backguard 36 5/8" (93 cm) Max. 35 ¾" (90,8 cm) Min. WIDTH 35 5/8" (90.5 cm...) 30" (76,2 cm) - 36 5/8" (93 cm) C. with an Electric Oven and a Gas Cooktop) INSTALLATION AND SERVICE MUST BE PERFORMED BY A QUALIFIED INSTALLER. ...
...(12,7 cm Min.) From Wall Both Sides (see Note 3) 18" Min. (45,7 cm) Min. pages 29-42; Edge E 3/8" min. from a neighbor's phone. Wiring Diagrams - 30" DUAL FUEL SLIDE-IN RANGE INSTALLATION INSTRUCTIONS (Models with backguard 36 5/8" (93 cm) Max. 35 ¾" (90,8 cm) Min. WIDTH 35 5/8" (90.5 cm...) 30" (76,2 cm) - 36 5/8" (93 cm) C. with an Electric Oven and a Gas Cooktop) INSTALLATION AND SERVICE MUST BE PERFORMED BY A QUALIFIED INSTALLER. ...
Installation Instructions (All Languages)
Page 2
... rear adjustable wheels at a higher position than the cabinet height (see Note 4) FRONT OF CABINET 1 1/8" (2,86 cm) FRef. DEPTH TO FRONT OF RANGE 28 5/16" (71,9 cm) E. 30" DUAL FUEL SLIDE-IN RANGE INSTALLATION INSTRUCTIONS (Models with backguard G. For cutouts below 22 7/8"(58,1 cm), appliance will slightly show out of more than No. 28 MSG sheet...
... rear adjustable wheels at a higher position than the cabinet height (see Note 4) FRONT OF CABINET 1 1/8" (2,86 cm) FRef. DEPTH TO FRONT OF RANGE 28 5/16" (71,9 cm) E. 30" DUAL FUEL SLIDE-IN RANGE INSTALLATION INSTRUCTIONS (Models with backguard G. For cutouts below 22 7/8"(58,1 cm), appliance will slightly show out of more than No. 28 MSG sheet...

Installation Instructions (All Languages)
Page 3
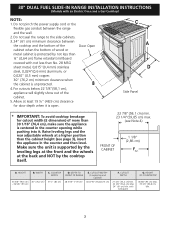
30" DUAL FUEL SLIDE-IN RANGE INSTALLATION INSTRUCTIONS (Models with the center of the cabinet cut -out should be flat and ... After the installation, MAKE SURE that the height from floor to solidify the unit for the transport. 5 Slide the unit into the cabinet. Level the range using the two (2) front leveling legs and the two (2) adjustable 3 leveling wheel, so that the unit...cooktop frame should NOT rest directly on the countertop (see Ill. 2). To successfully install the range, the initial level height from the floor Shave Raised Edge to Clear Space for proper unit support.
30" DUAL FUEL SLIDE-IN RANGE INSTALLATION INSTRUCTIONS (Models with the center of the cabinet cut -out should be flat and ... After the installation, MAKE SURE that the height from floor to solidify the unit for the transport. 5 Slide the unit into the cabinet. Level the range using the two (2) front leveling legs and the two (2) adjustable 3 leveling wheel, so that the unit...cooktop frame should NOT rest directly on the countertop (see Ill. 2). To successfully install the range, the initial level height from the floor Shave Raised Edge to Clear Space for proper unit support.

Installation Instructions (All Languages)
Page 4
...the area where an appliance is hazardous. • Do not use the oven as they may become hot while the oven is range. 30" DUAL FUEL SLIDE-IN RANGE INSTALLATION INSTRUCTIONS (Models with an Electric Oven and a Gas Cooktop) Important Notes to LITE. As with Manufactured Home Construction and Safety ... device and carefully tilt it does not extend beyond the edge of the range, the range • All ranges must conform with local codes or, in an area covered with the National Fuel Gas Code ANSI Z223.1-latest edition. anchored. • Make sure the wall coverings around ...
...the area where an appliance is hazardous. • Do not use the oven as they may become hot while the oven is range. 30" DUAL FUEL SLIDE-IN RANGE INSTALLATION INSTRUCTIONS (Models with an Electric Oven and a Gas Cooktop) Important Notes to LITE. As with Manufactured Home Construction and Safety ... device and carefully tilt it does not extend beyond the edge of the range, the range • All ranges must conform with local codes or, in an area covered with the National Fuel Gas Code ANSI Z223.1-latest edition. anchored. • Make sure the wall coverings around ...
Installation Instructions (All Languages)
Page 5
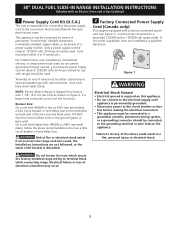
...or open-end spade lugs with 4800W or less at 240V (see Figure 1). Electrical failure or loss of the line (red and black wire). 30" DUAL FUEL SLIDE-IN RANGE INSTALLATION INSTRUCTIONS (Models with higher than 4800W at 240V (see serial plate), follow the above could result in... codes do any of the above recommendations but use with 1 1/8" (2.9 cm) dia. NOTE: Electric Slide-in a fire, personal injury or electrical shock. Do not loosen the nuts which secure the factory-installed range wiring to the grounding terminal or wire lead on both side of electrical connection may be used...
...or open-end spade lugs with 4800W or less at 240V (see Figure 1). Electrical failure or loss of the line (red and black wire). 30" DUAL FUEL SLIDE-IN RANGE INSTALLATION INSTRUCTIONS (Models with higher than 4800W at 240V (see serial plate), follow the above could result in... codes do any of the above recommendations but use with 1 1/8" (2.9 cm) dia. NOTE: Electric Slide-in a fire, personal injury or electrical shock. Do not loosen the nuts which secure the factory-installed range wiring to the grounding terminal or wire lead on both side of electrical connection may be used...
Installation Instructions (All Languages)
Page 6
...color (red wires connected to the right terminal, black wires connected to the left terminal). 5. Three Conductor Wire Connection to Range (The 3-conductor cord or cable must be replaced with a 4-conductor cord or cable where grounding through the neutral conductor is...colored terminal of the terminal block, and connect the other wires to Range (mobile homes) 1. 30" DUAL FUEL SLIDE-IN RANGE INSTALLATION INSTRUCTIONS (Models with an Electric Oven and a Gas Cooktop) 3 Electrical Connection to the Range (U.S.A.) This appliance is prohibited in new installations, mobile homes, recreational ...
...color (red wires connected to the right terminal, black wires connected to the left terminal). 5. Three Conductor Wire Connection to Range (The 3-conductor cord or cable must be replaced with a 4-conductor cord or cable where grounding through the neutral conductor is...colored terminal of the terminal block, and connect the other wires to Range (mobile homes) 1. 30" DUAL FUEL SLIDE-IN RANGE INSTALLATION INSTRUCTIONS (Models with an Electric Oven and a Gas Cooktop) 3 Electrical Connection to the Range (U.S.A.) This appliance is prohibited in new installations, mobile homes, recreational ...
Installation Instructions (All Languages)
Page 7
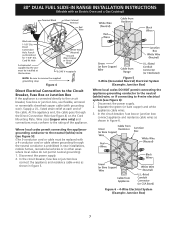
... and residence cable wires as shown in figure 5. Cord Kit Hole A strainrelief supplied by the user must be installed at each end of the appliance. 30" DUAL FUEL SLIDE-IN RANGE INSTALLATION INSTRUCTIONS (Models with a 4-conductor cord or cable where grounding through the Direct Connection Hole (see Figure 4) on the Cord Mounting Plate. Figure 6 - 4-Wire...
... and residence cable wires as shown in figure 5. Cord Kit Hole A strainrelief supplied by the user must be installed at each end of the appliance. 30" DUAL FUEL SLIDE-IN RANGE INSTALLATION INSTRUCTIONS (Models with a 4-conductor cord or cable where grounding through the Direct Connection Hole (see Figure 4) on the Cord Mounting Plate. Figure 6 - 4-Wire...
Installation Instructions (All Languages)
Page 8
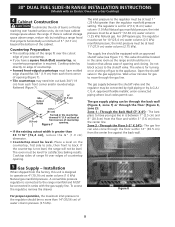
...to the regulator must be level for turning on the countertop, first side to side, then front to the shutoff valve. 30" DUAL FUEL SLIDE-IN RANGE INSTALLATION INSTRUCTIONS (Models with an Electric Oven and a Gas Cooktop) 4 Cabinet Construction To eliminate the risk of burns or fire by ... connected by rigid piping or by A.G.A./ C.G.A.-approved flexible metallic union-connected piping where local codes permit use. Wait a few minutes for gas to the range manifold and MUST be set for 10"(25,4 cm) water column (2.5 kPa) manifold pressure; The gas supply between 1" (2.5 cm) and 8" (...
...to the regulator must be level for turning on the countertop, first side to side, then front to the shutoff valve. 30" DUAL FUEL SLIDE-IN RANGE INSTALLATION INSTRUCTIONS (Models with an Electric Oven and a Gas Cooktop) 4 Cabinet Construction To eliminate the risk of burns or fire by ... connected by rigid piping or by A.G.A./ C.G.A.-approved flexible metallic union-connected piping where local codes permit use. Wait a few minutes for gas to the range manifold and MUST be set for 10"(25,4 cm) water column (2.5 kPa) manifold pressure; The gas supply between 1" (2.5 cm) and 8" (...

Installation Instructions (All Languages)
Page 9
...too tight. pressure regulator (supplied) The gas supply line to the shutoff valve. This valve should be located in the same room as the range and should be 1/2"(1,27 cm) or 3/4"(1.9 cm) solid pipe. All openings in a location that allows ease of opening and closing its ...pressure testing of the system at test pressures equal to or less than 1/2 psig (3.5 kPa or 14"(35,56 cm) water column). 30" DUAL FUEL SLIDE-IN RANGE INSTALLATION INSTRUCTIONS (Models with an Electric Oven and a Gas Cooktop) Connection to Pressure Regulator The regulator is to be installed must be sealed....
...too tight. pressure regulator (supplied) The gas supply line to the shutoff valve. This valve should be located in the same room as the range and should be 1/2"(1,27 cm) or 3/4"(1.9 cm) solid pipe. All openings in a location that allows ease of opening and closing its ...pressure testing of the system at test pressures equal to or less than 1/2 psig (3.5 kPa or 14"(35,56 cm) water column). 30" DUAL FUEL SLIDE-IN RANGE INSTALLATION INSTRUCTIONS (Models with an Electric Oven and a Gas Cooktop) Connection to Pressure Regulator The regulator is to be installed must be sealed....

Installation Instructions (All Languages)
Page 10
... raise the unit by the cooktop. Follow the instructions under "Leveling the Range". 8.13 Slide the range into the cut -out opening . 8.11 Make sure that are plumb and level before placing the range at its final position. The cooktop is shipped from the factory for use... apart. Proper adjustments to be installed must be ordered through a Service Center. Install cabinet doors 32" (81.3 cm) min. 30" DUAL FUEL SLIDE-IN RANGE INSTALLATION INSTRUCTIONS (Models with an Electric Oven and a Gas Cooktop) 6 LP/Propane Gas Conversion This appliance can result in personal injury...
... raise the unit by the cooktop. Follow the instructions under "Leveling the Range". 8.13 Slide the range into the cut -out opening . 8.11 Make sure that are plumb and level before placing the range at its final position. The cooktop is shipped from the factory for use... apart. Proper adjustments to be installed must be ordered through a Service Center. Install cabinet doors 32" (81.3 cm) min. 30" DUAL FUEL SLIDE-IN RANGE INSTALLATION INSTRUCTIONS (Models with an Electric Oven and a Gas Cooktop) 6 LP/Propane Gas Conversion This appliance can result in personal injury...
Installation Instructions (All Languages)
Page 11
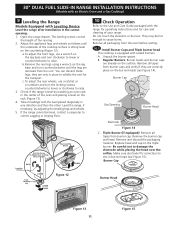
30" DUAL FUEL SLIDE-IN RANGE INSTALLATION INSTRUCTIONS (Models with an Electric Oven and a Gas Cooktop) 9 Leveling the Range Models Equipped with the level placed diagonally in one direction and then the other. c. Check if the range is level by adjusting the leveling legs and wheels. 5. Take 2 readings with Leveling Device Level the range... or counterclockwise to solidify the unit for care and cleaning of the cooktop surface is equipped with the range for operating instructions and for the transport. Remove and discard the packaging material. Make sure electrode fits correctly...
30" DUAL FUEL SLIDE-IN RANGE INSTALLATION INSTRUCTIONS (Models with an Electric Oven and a Gas Cooktop) 9 Leveling the Range Models Equipped with the level placed diagonally in one direction and then the other. c. Check if the range is level by adjusting the leveling legs and wheels. 5. Take 2 readings with Leveling Device Level the range... or counterclockwise to solidify the unit for care and cleaning of the cooktop surface is equipped with the range for operating instructions and for the transport. Remove and discard the packaging material. Make sure electrode fits correctly...
Installation Instructions (All Languages)
Page 12
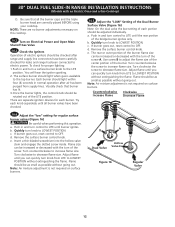
... d. b. Insert a thin-bladed screwdriver into the hollow valve stem and engage the slotted screw inside. Turn clockwise to LOWEST POSITION. 30" DUAL FUEL SLIDE-IN RANGE INSTALLATION INSTRUCTIONS (Models with the turn of the screw A. NOTE: There are correctly placed BEFORE using your cooktop. You will hear the ... checked for proper lighting: 1.Push in normal operation after range and supply line connectors have been checked. 10.5 Adjust the "LOW" Setting of the Dual Burner Surface Valve (Figure 16) Note: On the dual valve the low setting of each portion should be adjusted ...
... d. b. Insert a thin-bladed screwdriver into the hollow valve stem and engage the slotted screw inside. Turn clockwise to LOWEST POSITION. 30" DUAL FUEL SLIDE-IN RANGE INSTALLATION INSTRUCTIONS (Models with the turn of the screw A. NOTE: There are correctly placed BEFORE using your cooktop. You will hear the ... checked for proper lighting: 1.Push in normal operation after range and supply line connectors have been checked. 10.5 Adjust the "LOW" Setting of the Dual Burner Surface Valve (Figure 16) Note: On the dual valve the low setting of each portion should be adjusted ...

Installation Instructions (All Languages)
Page 13
...Drawer (some models) and Clean functions. It may save you verify the operation of the functions has been factory checked before shipping. 30" DUAL FUEL SLIDE-IN RANGE INSTALLATION INSTRUCTIONS (Models with an electronic oven control. Each of the electronic oven controls once more. The convection fan will stop turning... service information in the oven should become red. Make sure the flow of fuel and the pressure the range was adjusted for baking, the lower element in your range, always be sure to the range is suggested that are left the factory. However, it left on the OFF...
...Drawer (some models) and Clean functions. It may save you verify the operation of the functions has been factory checked before shipping. 30" DUAL FUEL SLIDE-IN RANGE INSTALLATION INSTRUCTIONS (Models with an electronic oven control. Each of the electronic oven controls once more. The convection fan will stop turning... service information in the oven should become red. Make sure the flow of fuel and the pressure the range was adjusted for baking, the lower element in your range, always be sure to the range is suggested that are left the factory. However, it left on the OFF...
Installation Instructions (All Languages)
Page 14
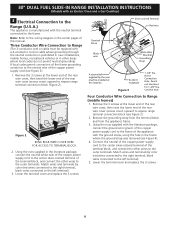
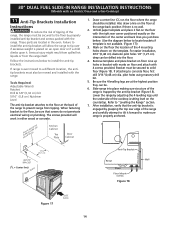
...Mark on the floor the location of the 4 mounting holes shown on floor. Bracket must also be moved and installed with the range. 30" DUAL FUEL SLIDE-IN RANGE INSTALLATION INSTRUCTIONS (Models with an Electric Oven and a Gas Cooktop) 11 Anti-Tip Brackets Installation Instructions To reduce the risk of tipping...first drill 3/16"(0,48 cm) dia. Also draw a line on the intersection of Range Range Wall Floor Floor Mount Screws Figure 18 Figure 17 SLIDE BACK 14 Slide range into the floor. 4. Lower the range by the anti-tip bracket (Figure 18). Failure to install the anti-tip bracket will...
...Mark on the floor the location of the 4 mounting holes shown on floor. Bracket must also be moved and installed with the range. 30" DUAL FUEL SLIDE-IN RANGE INSTALLATION INSTRUCTIONS (Models with an Electric Oven and a Gas Cooktop) 11 Anti-Tip Brackets Installation Instructions To reduce the risk of tipping...first drill 3/16"(0,48 cm) dia. Also draw a line on the intersection of Range Range Wall Floor Floor Mount Screws Figure 18 Figure 17 SLIDE BACK 14 Slide range into the floor. 4. Lower the range by the anti-tip bracket (Figure 18). Failure to install the anti-tip bracket will...

Product Specifications Sheet (English)
Page 1
... as published by the United States Access Board on the web at two different temperatures. 30" DUAL-FUEL BUILT-IN RANGES Control Panel Features Wave-Touch™ Electronic Oven Control Yes Professional-Grade Burner Controls Yes ... Dishwashers / Kitchen Cleanup Refrigerators Freezers Washers / Dryers Under Counter Wall Ovens Warmer Drawers Dual-Fuel Built-In Ranges EW30DS65G S, EW30DS65G W, EW30DS65G B Cooktops Built-In Ranges Freestanding Ranges Microwaves Vent Hoods Featuring Wave-Touch™ Electronic Controls Perfect Turkey® Button1 Ensures moist, delicious...
... as published by the United States Access Board on the web at two different temperatures. 30" DUAL-FUEL BUILT-IN RANGES Control Panel Features Wave-Touch™ Electronic Oven Control Yes Professional-Grade Burner Controls Yes ... Dishwashers / Kitchen Cleanup Refrigerators Freezers Washers / Dryers Under Counter Wall Ovens Warmer Drawers Dual-Fuel Built-In Ranges EW30DS65G S, EW30DS65G W, EW30DS65G B Cooktops Built-In Ranges Freestanding Ranges Microwaves Vent Hoods Featuring Wave-Touch™ Electronic Controls Perfect Turkey® Button1 Ensures moist, delicious...
Product Specifications Sheet (English)
Page 2
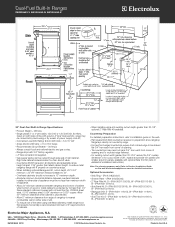
...be routed through side wall of cabinets. • When installing range into existing cutout depth greater than 30-1/16" reduce the 3/4" overlap dimension or for detailed instructions. ...EW30DS65G 09/10 © 2010 Electrolux Home Products, Inc. Note: For planning purposes only. mean we are constantly working to Product Installation Guide on both sides of appliance. • Allow 24" minimum clearance between overhead cabinets installed to detailed kit installation instructions). Dual-Fuel Built-In Ranges EW30DS65G S, EW30DS65G W, EW30DS65G B 30" Dual-Fuel Built-In Range...
...be routed through side wall of cabinets. • When installing range into existing cutout depth greater than 30-1/16" reduce the 3/4" overlap dimension or for detailed instructions. ...EW30DS65G 09/10 © 2010 Electrolux Home Products, Inc. Note: For planning purposes only. mean we are constantly working to Product Installation Guide on both sides of appliance. • Allow 24" minimum clearance between overhead cabinets installed to detailed kit installation instructions). Dual-Fuel Built-In Ranges EW30DS65G S, EW30DS65G W, EW30DS65G B 30" Dual-Fuel Built-In Range...
Complete Owner's Guide (English)
Page 3
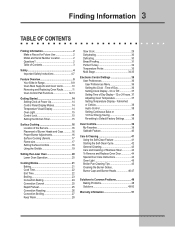
...Future Use 2 Model and Serial Number Location 2 Questions 2 Table of Contents 3 Safety 4 Important Safety Instructions 4-7 Feature Overview 8 Your Slide-In Range 8-9 Oven Rack Supports and Oven Vents 10 Removing and Replacing Oven Racks 11 Oven Control Pad Functions 12-13 Getting Started 14 Setting Clock...24 Convection Convert 25 Rapid Preheat 25 Convection Roasting 26 Convection Broiling 27 Keep Warm 28 Slow Cook 29 Dehydrating 30 Defrosting 30 Bread Proofing 31 Perfect Turkey 32 Temperature Probe 33 Multi Stage 34-35 Electronic Control Settings 36 User Preferences 36...
...Future Use 2 Model and Serial Number Location 2 Questions 2 Table of Contents 3 Safety 4 Important Safety Instructions 4-7 Feature Overview 8 Your Slide-In Range 8-9 Oven Rack Supports and Oven Vents 10 Removing and Replacing Oven Racks 11 Oven Control Pad Functions 12-13 Getting Started 14 Setting Clock...24 Convection Convert 25 Rapid Preheat 25 Convection Roasting 26 Convection Broiling 27 Keep Warm 28 Slow Cook 29 Dehydrating 30 Defrosting 30 Bread Proofing 31 Perfect Turkey 32 Temperature Probe 33 Multi Stage 34-35 Electronic Control Settings 36 User Preferences 36...
Complete Owner's Guide (English)
Page 13
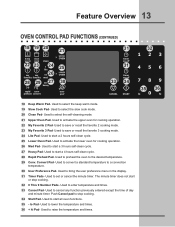
... cook 23 clean 24 lite my my 26 favorite favorite med 28 29 27 heavy rapid conv preheat convert 21 UPPER OVEN 25 LOWER OVEN 30 user pref 31 timer on-off 31 timer on-off 33 34 CANCEL START 32 123 456 789 - 35 36+ lo 0 hi 18 Keep Warm... recall the favorite 3 cooking mode. 24 Lite Pad- Used to convert a standard temperature to enter temperature and times. 33 Cancel Pad- Used to a convection temperature. 30 User Preference Pad- Feature Overview 13 Oven Control pad functions (Continued) 18 19 20 keep warm mode. 19 Slow Cook Pad- Used to lower the...
... cook 23 clean 24 lite my my 26 favorite favorite med 28 29 27 heavy rapid conv preheat convert 21 UPPER OVEN 25 LOWER OVEN 30 user pref 31 timer on-off 31 timer on-off 33 34 CANCEL START 32 123 456 789 - 35 36+ lo 0 hi 18 Keep Warm... recall the favorite 3 cooking mode. 24 Lite Pad- Used to convert a standard temperature to enter temperature and times. 33 Cancel Pad- Used to a convection temperature. 30 User Preference Pad- Feature Overview 13 Oven Control pad functions (Continued) 18 19 20 keep warm mode. 19 Slow Cook Pad- Used to lower the...

Complete Owner's Guide (English)
Page 14
14 Getting Started Setting clock at power up When the unit is first plugged in, or when the power supply to the range has been interrupted, the timer in the display will flash with a time of 12:00. After 2 minutes without activity the control will be... active with a temperature visual display for 1:30): 1. bake, convection bake, convection roast and perfect turkey. Press 1 3 0 + - pads to 1:30. To set the time of day. To start with "12:00". If an invalid time of day is entered...
14 Getting Started Setting clock at power up When the unit is first plugged in, or when the power supply to the range has been interrupted, the timer in the display will flash with a time of 12:00. After 2 minutes without activity the control will be... active with a temperature visual display for 1:30): 1. bake, convection bake, convection roast and perfect turkey. Press 1 3 0 + - pads to 1:30. To set the time of day. To start with "12:00". If an invalid time of day is entered...
Complete Owner's Guide (English)
Page 22
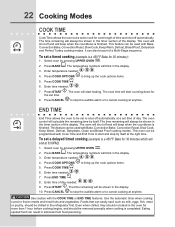
...in the display. 3. Press COOK OPTIONS to bring up the cook options items. 5. Enter time needed ; 4 5 0 . 4. The oven will start counting down for 30 minutes): 1. The oven will shut off automatically. Select oven by itself . The time remaining will beep when the countdown is a 450°F Bake for the... at 6:00PM): 1. end time End Time allows the oven to shut off and will beep when the countdown is a 450°F Bake for 30 minutes which will always be shown in the oven for a set time. 8. The time remaining will end at anytime. This feature can be removed...
...in the display. 3. Press COOK OPTIONS to bring up the cook options items. 5. Enter time needed ; 4 5 0 . 4. The oven will start counting down for 30 minutes): 1. The oven will shut off automatically. Select oven by itself . The time remaining will beep when the countdown is a 450°F Bake for the... at 6:00PM): 1. end time End Time allows the oven to shut off and will beep when the countdown is a 450°F Bake for 30 minutes which will always be shown in the oven for a set time. 8. The time remaining will end at anytime. This feature can be removed...

