Wiring Diagram (All Languages)
Page 1
...1. Check for injury or damage of any safety device. 3. Check to see if latch motor coil is overheating dsiconnect power from the range and unplug connector P1 from EOC connector P16 to be replaced should damage be used as needed. 2. Check the wiring harness between EOC...Oven Calibration/ Temperature adjustment - Check RTD Sensor Probe using the RTD scale found in Disconnect power, wait 30 seconds and reapply power. F11 Shorted keypad. 1. Reset power supply to range to see if failure code will create a potential safety hazard. 4. Replace if defective or not connected....
...1. Check for injury or damage of any safety device. 3. Check to see if latch motor coil is overheating dsiconnect power from the range and unplug connector P1 from EOC connector P16 to be replaced should damage be used as needed. 2. Check the wiring harness between EOC...Oven Calibration/ Temperature adjustment - Check RTD Sensor Probe using the RTD scale found in Disconnect power, wait 30 seconds and reapply power. F11 Shorted keypad. 1. Reset power supply to range to see if failure code will create a potential safety hazard. 4. Replace if defective or not connected....
Product Specifications Sheet (English)
Page 1
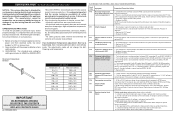
...performance in the industry for detailed installation instructions on the web at two different temperatures. 30" DUAL-FUEL FREESTANDING RANGES Control Panel Features Wave-Touch™ Electronic Oven Control Yes Professional-Grade Burner Controls Yes... Convection Roast, Convection Broil, Keep Warm, Slow Cook Cooking Options - Wall Ovens Warmer Drawers Dual-Fuel Freestanding Ranges EW30DF65G S, EW30DF65G W, EW30DF65G B Cooktops Built-In Ranges Freestanding Ranges Microwaves Vent Hoods Featuring Wave-Touch™ Electronic Controls Perfect Turkey® Button1 Ensures moist, ...
...performance in the industry for detailed installation instructions on the web at two different temperatures. 30" DUAL-FUEL FREESTANDING RANGES Control Panel Features Wave-Touch™ Electronic Oven Control Yes Professional-Grade Burner Controls Yes... Convection Roast, Convection Broil, Keep Warm, Slow Cook Cooking Options - Wall Ovens Warmer Drawers Dual-Fuel Freestanding Ranges EW30DF65G S, EW30DF65G W, EW30DF65G B Cooktops Built-In Ranges Freestanding Ranges Microwaves Vent Hoods Featuring Wave-Touch™ Electronic Controls Perfect Turkey® Button1 Ensures moist, ...

Product Specifications Sheet (English)
Page 2
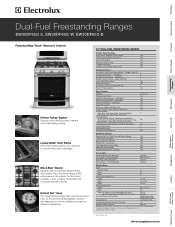
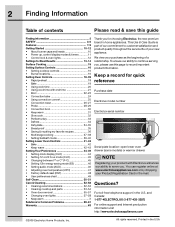
...; 1-800-265-8352 • electroluxappliances.ca EW30DF65G 09/10 © 2010 Electrolux Home Products, Inc. above 36" height. • To reduce risk of fire when using overhead cabinetry, install range hood that projects horizontally a recommended minimum of 5" beyond bottom of range 30" min. 30" 18" min. Printed in the U.S.A. Dual-Fuel Freestanding Ranges EW30DF65G S, EW30DF65G W, EW30DF65G B Minimum 5" clearance required to nearest combustible...
...; 1-800-265-8352 • electroluxappliances.ca EW30DF65G 09/10 © 2010 Electrolux Home Products, Inc. above 36" height. • To reduce risk of fire when using overhead cabinetry, install range hood that projects horizontally a recommended minimum of 5" beyond bottom of range 30" min. 30" 18" min. Printed in the U.S.A. Dual-Fuel Freestanding Ranges EW30DF65G S, EW30DF65G W, EW30DF65G B Minimum 5" clearance required to nearest combustible...
Complete Owner's Guide (English)
Page 1
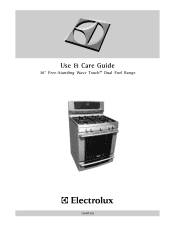
Use & Care Guide 30" Free-Standing Wave Touch™ Dual Fuel Range 316471210
Use & Care Guide 30" Free-Standing Wave Touch™ Dual Fuel Range 316471210
Complete Owner's Guide (English)
Page 2
... 22-23 • Convection bake 24 • Using convection convert 25 • Convection roast 26-27 • Probe 28-29 • Convection broil 30 • Keep warm 31 • Slow cook 32 • Perfect turkey 33 • Defrost 34 • Dehydrate 34-35 • Bread proof... lights 57-58 • Keep warm 3 Solutions to Common Problems 59-61 Warranty 63 Thank you for quick reference Purchase date Electrolux model number Electrolux serial number Serial plate location: open lower oven drawer (some models) or warmer drawer. You can register online at www.electroluxappliances....
... 22-23 • Convection bake 24 • Using convection convert 25 • Convection roast 26-27 • Probe 28-29 • Convection broil 30 • Keep warm 31 • Slow cook 32 • Perfect turkey 33 • Defrost 34 • Dehydrate 34-35 • Bread proof... lights 57-58 • Keep warm 3 Solutions to Common Problems 59-61 Warranty 63 Thank you for quick reference Purchase date Electrolux model number Electrolux serial number Serial plate location: open lower oven drawer (some models) or warmer drawer. You can register online at www.electroluxappliances....
Complete Owner's Guide (English)
Page 7
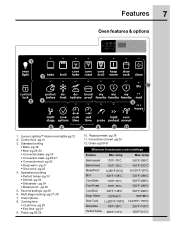
...• Bake -pg 19 • Broil -pg 22-23 • Convection bake -pg 24 • Convection roast -pg 26-27 • Convection broil -pg 30 • Keep warm -pg 31 • Slow cook -pg 32 4. Control lock -pg 12 3. Specialized cooking • Perfect turkey -pg 33 • Defrost ... 1 3 2 4 12 5 6 7 1. Favorite settings -pg 36 6. temp Bake (upper) 170°F/76°C Bake (lower) 170°F / 76°C Bread Proof Lo(85°F/30°C) Broil 300°F / 148°C Conv Bake 170°F / 76°C Conv Roast 170°F / 76°C Conv Broil 300°F / 148°C Keep...
...• Bake -pg 19 • Broil -pg 22-23 • Convection bake -pg 24 • Convection roast -pg 26-27 • Convection broil -pg 30 • Keep warm -pg 31 • Slow cook -pg 32 4. Control lock -pg 12 3. Specialized cooking • Perfect turkey -pg 33 • Defrost ... 1 3 2 4 12 5 6 7 1. Favorite settings -pg 36 6. temp Bake (upper) 170°F/76°C Bake (lower) 170°F / 76°C Bread Proof Lo(85°F/30°C) Broil 300°F / 148°C Conv Bake 170°F / 76°C Conv Roast 170°F / 76°C Conv Broil 300°F / 148°C Keep...
Complete Owner's Guide (English)
Page 20
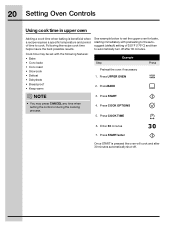
...if necessary 1. 20 Setting Oven Controls Using cook time in upper oven Adding a cook time when baking is pressed the oven will cook and after 30 minutes. Press BAKE NOTE • You may be set with the following features: • Bake • Conv bake • Conv roast &#...below to set the upper oven for bake, starting immediately with preheating to the autosuggest (default) setting of time to automatically turn off after 30 minutes automatically shut-off. Press START/enter Once START is beneficial when a recipe requires a specific temperature and period of 350°F (176&#...
...if necessary 1. 20 Setting Oven Controls Using cook time in upper oven Adding a cook time when baking is pressed the oven will cook and after 30 minutes. Press BAKE NOTE • You may be set with the following features: • Bake • Conv bake • Conv roast &#...below to set the upper oven for bake, starting immediately with preheating to the autosuggest (default) setting of time to automatically turn off after 30 minutes automatically shut-off. Press START/enter Once START is beneficial when a recipe requires a specific temperature and period of 350°F (176&#...
Complete Owner's Guide (English)
Page 21
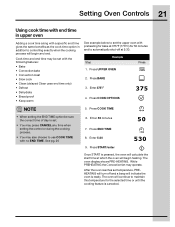
... calculate the start time at 375°F (176°C) for the selected time or until the cooking feature is ready. Press UPPER OVEN Press 2. Enter 5:30 9. The oven display shows PRE-HEATING. Step Example 1. See pg. 20 6. While PREHEATING the Convection fan may be sure the correct time of day is...
... calculate the start time at 375°F (176°C) for the selected time or until the cooking feature is ready. Press UPPER OVEN Press 2. Enter 5:30 9. The oven display shows PRE-HEATING. Step Example 1. See pg. 20 6. While PREHEATING the Convection fan may be sure the correct time of day is...
Complete Owner's Guide (English)
Page 24
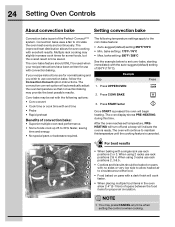
... to use rack 6 positions 2 & 4. Press START/enter Once START is ready. Multiple rack cooking may provide the best possible results. The oven will continue to 30% faster, saving time and energy. • No special pans or bakeware required. Conv bake may press CANCEL any time when setting the control or when...
... to use rack 6 positions 2 & 4. Press START/enter Once START is ready. Multiple rack cooking may provide the best possible results. The oven will continue to 30% faster, saving time and energy. • No special pans or bakeware required. Conv bake may press CANCEL any time when setting the control or when...
Complete Owner's Guide (English)
Page 25
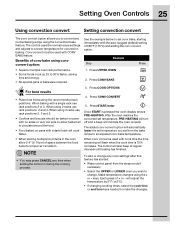
... flash when the cook time is ready. Setting Oven Controls 25 Using convection convert Setting convection convert The conv convert option allows you wish to 30% faster, saving time and energy. • No special pans or bakeware required. 1. The control uses the normal recipe settings and adjusts to a lower temperature for...
... flash when the cook time is ready. Setting Oven Controls 25 Using convection convert Setting convection convert The conv convert option allows you wish to 30% faster, saving time and energy. • No special pans or bakeware required. 1. The control uses the normal recipe settings and adjusts to a lower temperature for...
Complete Owner's Guide (English)
Page 26
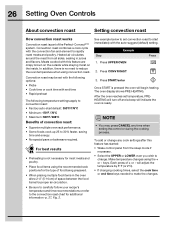
... temperature settings apply to change any time when setting the control or during the cooking process. Press START/enter Once START is no need to 30% faster, saving time and energy. • No special pans or bakeware required. Each press of the Perfect-Convect³™ system. Step EExxaammpplele 1. Press CONV...
... temperature settings apply to change any time when setting the control or during the cooking process. Press START/enter Once START is no need to 30% faster, saving time and energy. • No special pans or bakeware required. Each press of the Perfect-Convect³™ system. Step EExxaammpplele 1. Press CONV...
Complete Owner's Guide (English)
Page 27
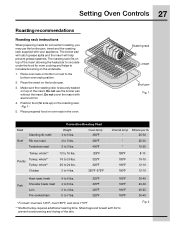
...;F 16 to 20 lbs. 20 to 24 lbs. 3 to 4 lbs. 325°F 325°F 350°F -375°F Internal temp Minute per lb. * 25-30 * 25-30 * 15-25 180°F 8-10 180°F 180°F 180°F 10-15 12-16 12-16 Ham roast, fresh 4 to 6 lbs. Pre-cooked ham... under the food for convection roasting, you may use the broiler pan without the insert. Place prepared food on top of the skin. 30-40 20-30 20-25 30-40 Fig. 2 Make sure the roasting rack is securely seated on oven rack in the oven. Shield legs and breast with foil to...
...;F 16 to 20 lbs. 20 to 24 lbs. 3 to 4 lbs. 325°F 325°F 350°F -375°F Internal temp Minute per lb. * 25-30 * 25-30 * 15-25 180°F 8-10 180°F 180°F 180°F 10-15 12-16 12-16 Ham roast, fresh 4 to 6 lbs. Pre-cooked ham... under the food for convection roasting, you may use the broiler pan without the insert. Place prepared food on top of the skin. 30-40 20-30 20-25 30-40 Fig. 2 Make sure the roasting rack is securely seated on oven rack in the oven. Shield legs and breast with foil to...

Complete Owner's Guide (English)
Page 30
... temperature by 5° F ( or 2°C). • If changing cooking times, select the cook time or end time keys needed to start immediately with aluminum foil; 30 Setting Oven Controls About convection broiling Setting convection broil Convection broiling is only available for the upper oven. This cooking feature is part of the...
... temperature by 5° F ( or 2°C). • If changing cooking times, select the cook time or end time keys needed to start immediately with aluminum foil; 30 Setting Oven Controls About convection broiling Setting convection broil Convection broiling is only available for the upper oven. This cooking feature is part of the...
Complete Owner's Guide (English)
Page 35
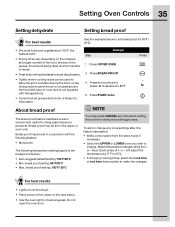
...• Place a bowl of the pieces, the amount being dried and the humidity in the upper or oven only. bread proof setting: 85°F/30°C • Max. Setting Oven Controls 35 Setting dehydrate Setting bread proof For best results See the example below . • Use the oven ...the + or - Press UPPER OVEN 3. Press START/enter Press About bread proof The bread proof feature maintains a warm environment useful for 85°F / 30°C). • Dry most fruits and vegetables at 100°f. • Drying times vary depending on the moisture and sugar content of the food, ...
...• Place a bowl of the pieces, the amount being dried and the humidity in the upper or oven only. bread proof setting: 85°F/30°C • Max. Setting Oven Controls 35 Setting dehydrate Setting bread proof For best results See the example below . • Use the oven ...the + or - Press UPPER OVEN 3. Press START/enter Press About bread proof The bread proof feature maintains a warm environment useful for 85°F / 30°C). • Dry most fruits and vegetables at 100°f. • Drying times vary depending on the moisture and sugar content of the food, ...

Complete Owner's Guide (English)
Page 44
... each preference. Step 1. Press or • Press or to toggle between options for preferences. You may also use +hi/-lo to advance to 1:30. 3. Fig. 2 NOTE User preference options are not available while cooking or when using the kitchen timer. Press See the example below to set the.... 1 • Press CANCEL after pressing START to input precise values. 3. Setting clock (CLO) See the example below to change the clock display to 1:30. Step Example 1. Use the +hi & -lo to toggle to the CLO off to reject. • Press START to accept or press CANCEL/off option...
... each preference. Step 1. Press or • Press or to toggle between options for preferences. You may also use +hi/-lo to advance to 1:30. 3. Fig. 2 NOTE User preference options are not available while cooking or when using the kitchen timer. Press See the example below to set the.... 1 • Press CANCEL after pressing START to input precise values. 3. Setting clock (CLO) See the example below to change the clock display to 1:30. Step Example 1. Use the +hi & -lo to toggle to the CLO off to reject. • Press START to accept or press CANCEL/off option...
Complete Owner's Guide (English)
Page 51
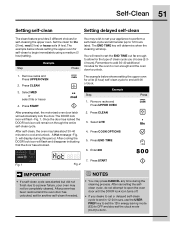
... icon will stop. will automatically lock the door. After power has been restored and the oven door has unlocked, set your oven may take about 30-40 minutes to 24 hr. Press CLEAN 3. Self-Clean 51 Setting self-clean Setting delayed self-clean The clean feature provides 3 different choices for lite... the END TIME out far enough to allow for the oven to cool enough and the oven door to 12 hours later). Remember to add 30-40 additional minutes for the type of clean cycle you desire to set a delayed self-clean cycle to end in 12-24 hours, use the...
... icon will stop. will automatically lock the door. After power has been restored and the oven door has unlocked, set your oven may take about 30-40 minutes to 24 hr. Press CLEAN 3. Self-Clean 51 Setting self-clean Setting delayed self-clean The clean feature provides 3 different choices for lite... the END TIME out far enough to allow for the oven to cool enough and the oven door to 12 hours later). Remember to add 30-40 additional minutes for the type of clean cycle you desire to set a delayed self-clean cycle to end in 12-24 hours, use the...

Complete Owner's Guide (English)
Page 52
...use harsh scrubbing cleaners. To remove control knobs, turn all cleaners or the porcelain may become damaged during heating that are especially made for 30 to OFF and remove the control knobs. Excess water in or around the controls. If necessary, cover difficult spots with warm soapy water ... when wiping around the controls may occur during future heating. then push the knob into place. Only use spray oven cleaners on soil for 30 to the OFF position; Rinse with a clean water using a dishcloth. Do not use kitchen cleaners that cannot be sure to rinse the ...
...use harsh scrubbing cleaners. To remove control knobs, turn all cleaners or the porcelain may become damaged during heating that are especially made for 30 to OFF and remove the control knobs. Excess water in or around the controls. If necessary, cover difficult spots with warm soapy water ... when wiping around the controls may occur during future heating. then push the knob into place. Only use spray oven cleaners on soil for 30 to the OFF position; Rinse with a clean water using a dishcloth. Do not use kitchen cleaners that cannot be sure to rinse the ...

