Use and Care Manual
Page 2
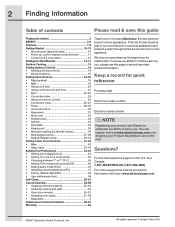
...; Setting 12hr energy saving mode (ES 46 • Setting audio mode (AUD 46 • Adjusting oven temperature (UPO 47 • Factory default reset (RST 48 • User preferences chart 49 Self-Clean 50-51 Care & Cleaning 52-58 • Cleaning recommendations 52-53 • Cleaning cooktop and parts 54 • Oven door removal 55-57 • Changing oven lights 57-58 • Keep warm 3 Solutions to Common Problems 59-61 Warranty 63 Thank you . This Use & Care Guide is part...
...; Setting 12hr energy saving mode (ES 46 • Setting audio mode (AUD 46 • Adjusting oven temperature (UPO 47 • Factory default reset (RST 48 • User preferences chart 49 Self-Clean 50-51 Care & Cleaning 52-58 • Cleaning recommendations 52-53 • Cleaning cooktop and parts 54 • Oven door removal 55-57 • Changing oven lights 57-58 • Keep warm 3 Solutions to Common Problems 59-61 Warranty 63 Thank you . This Use & Care Guide is part...
Use and Care Manual
Page 3
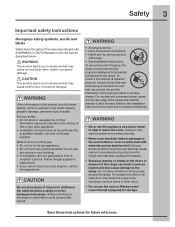
... backguard of a range. do if you to tip, resulting in serious burns or other flammable vapors and liquids in the vicinity of this or any phone in carbon monoxide poisoning. • Never cover any electrical switch; Do not allow children to situations that may cause carbon monoxide poisoning. Refer to the installation instructions for proper anti-tip bracket installation. • Never use the oven...
... backguard of a range. do if you to tip, resulting in serious burns or other flammable vapors and liquids in the vicinity of this or any phone in carbon monoxide poisoning. • Never cover any electrical switch; Do not allow children to situations that may cause carbon monoxide poisoning. Refer to the installation instructions for proper anti-tip bracket installation. • Never use the oven...
Use and Care Manual
Page 4
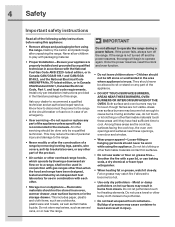
... construction of a range by removing leveling legs, panels, wire covers, anti-tip brackets/screws, or any other part of the appliance unless specifically recommended in Canada CSA Standard C22.1, Canadian Electrical Code, Part 1, and local code requirements. If the power fails, always turn off and the power resumes, the range will begin to recommend a qualified technician and an authorized repair service. They should never be stored in an oven, warmer drawer, near surface burners may result...
... construction of a range by removing leveling legs, panels, wire covers, anti-tip brackets/screws, or any other part of the appliance unless specifically recommended in Canada CSA Standard C22.1, Canadian Electrical Code, Part 1, and local code requirements. If the power fails, always turn off and the power resumes, the range will begin to recommend a qualified technician and an authorized repair service. They should never be stored in an oven, warmer drawer, near surface burners may result...
Use and Care Manual
Page 5
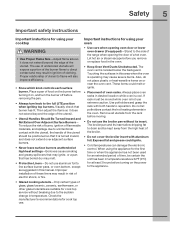
... sudden change in risk of electric shock, or fire. • Glazed cooking utensils-Only certain types of glass, glass/ceramic, ceramic, earthenware, or other glazed utensils are suitable for cook top use. Touching the surfaces in desired location while oven is cool. Always place oven racks in this manual. If rack must be certain the unit has been in ignition of clothing. Important instructions for using your cooktop • Use Proper Flame Size-Adjust flame size...
... sudden change in risk of electric shock, or fire. • Glazed cooking utensils-Only certain types of glass, glass/ceramic, ceramic, earthenware, or other glazed utensils are suitable for cook top use. Touching the surfaces in desired location while oven is cool. Always place oven racks in this manual. If rack must be certain the unit has been in ignition of clothing. Important instructions for using your cooktop • Use Proper Flame Size-Adjust flame size...
Use and Care Manual
Page 6
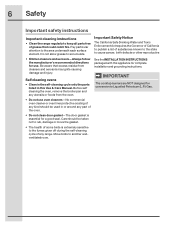
... not clean door gasket-The door gasket is essential for conversion to accumulate. Important Safety Notice The California Safe Drinking Water and Toxic Enforcement Act requires the Governor of California to cause cancer, birth defects or other reproductive • Kitchen cleaners and aerosols-Always follow the manufacturer's recommended directions for complete installation and grounding instructions. Before self cleaning the oven, remove the broiler pan and...
... not clean door gasket-The door gasket is essential for conversion to accumulate. Important Safety Notice The California Safe Drinking Water and Toxic Enforcement Act requires the Governor of California to cause cancer, birth defects or other reproductive • Kitchen cleaners and aerosols-Always follow the manufacturer's recommended directions for complete installation and grounding instructions. Before self cleaning the oven, remove the broiler pan and...
Use and Care Manual
Page 10
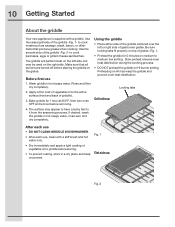
... surface (front and back of grates -Fig. 1. • Preheat the griddle for 1 hour at 350°F, then turn oven OFF and let cool before removing. Preheating on the right side. Wash griddle in hot soapy water, rinse well, and dry completely. Bake griddle for 5 minutes on HI burner setting. Slow preheat ensures even heat distribution during the cooking process. • DO NOT preheat the griddle on medium to cook...
... surface (front and back of grates -Fig. 1. • Preheat the griddle for 1 hour at 350°F, then turn oven OFF and let cool before removing. Preheating on the right side. Wash griddle in hot soapy water, rinse well, and dry completely. Bake griddle for 5 minutes on HI burner setting. Slow preheat ensures even heat distribution during the cooking process. • DO NOT preheat the griddle on medium to cook...
Use and Care Manual
Page 12
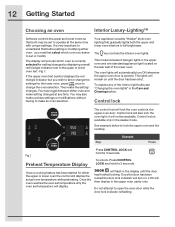
... to change the settings for 3 seconds. The display will not be set or change the oven selection. LOC will also lock the oven light; Control lock will then display in the awake mode. It is opened. Then make an oven selection. Once a cooking feature has been started for 3 seconds. The oven lights will display the actual oven temperature while preheating. To unlock, Press CONTROL LOCK and hold for either oven and make setting changes at the same time with unique settings. You...
... to change the settings for 3 seconds. The display will not be set or change the oven selection. LOC will also lock the oven light; Control lock will then display in the awake mode. It is opened. Then make an oven selection. Once a cooking feature has been started for 3 seconds. The oven lights will display the actual oven temperature while preheating. To unlock, Press CONTROL LOCK and hold for either oven and make setting changes at the same time with unique settings. You...
Use and Care Manual
Page 13
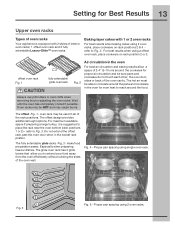
... hot air must be sure pans and cookware do not touch each other, the oven door, sides or back of interior oven racks; 1 offset oven rack and 2 fully extendable Luxury-Glide™ oven racks. For maximum available space if preparing a large turkey, it is equipped with 1 or 2 oven racks For best results when baking cakes using 2 oven racks. Always use potholders or oven mitts when removing food or adjusting the oven racks. Fig. 4 - Baking...
... hot air must be sure pans and cookware do not touch each other, the oven door, sides or back of interior oven racks; 1 offset oven rack and 2 fully extendable Luxury-Glide™ oven racks. For maximum available space if preparing a large turkey, it is equipped with 1 or 2 oven racks For best results when baking cakes using 2 oven racks. Always use potholders or oven mitts when removing food or adjusting the oven racks. Fig. 4 - Baking...
Use and Care Manual
Page 18
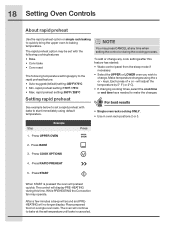
... started: • Wake control panel from the sleep mode if necessary. • Select the UPPER or LOWER oven you wish to baking temperature. For best results • Single oven rack cooking ONLY. • Use in oven rack postions 2 or 3. The oven will continue to bake at any cook settings after this time. Make temperature changes using default temperature. 18 Setting Oven Controls About rapid preheat Use the rapid preheat option on a single oven rack. Each press of + or - While PREHEATING the Convection fan...
... started: • Wake control panel from the sleep mode if necessary. • Select the UPPER or LOWER oven you wish to baking temperature. For best results • Single oven rack cooking ONLY. • Use in oven rack postions 2 or 3. The oven will continue to bake at any cook settings after this time. Make temperature changes using default temperature. 18 Setting Oven Controls About rapid preheat Use the rapid preheat option on a single oven rack. Each press of + or - While PREHEATING the Convection fan...

Use and Care Manual
Page 19
... rack positions 2 & 4. While PREHEATING the Convection fan may press CANCEL any cook settings after this temperature until the cooking feature is canceled. keys. The oven display shows PRE-HEATING. After the oven reaches set with the following options: • Rapid preheat • Cook time • Cook time with end time • Probe The following temperature settings apply to set for upper oven 4. will indicate the oven is pressed the oven will continue to maintain this feature has started: • Wake control panel...
... rack positions 2 & 4. While PREHEATING the Convection fan may press CANCEL any cook settings after this temperature until the cooking feature is canceled. keys. The oven display shows PRE-HEATING. After the oven reaches set with the following options: • Rapid preheat • Cook time • Cook time with end time • Probe The following temperature settings apply to set for upper oven 4. will indicate the oven is pressed the oven will continue to maintain this feature has started: • Wake control panel...

Use and Care Manual
Page 21
... minutes 7. Press END TIME 8. While PREHEATING the Convection fan may be sure the correct time of day is pressed, the oven will begin heating. See pg. 20 6. Press START Once START is set temperature, PREHEATING will turn off at 5:30. Cook time and end time may operate. Press COOK TIME • When setting the END TIME option be set with the following features: • Bake • Convection bake • Convection roast • Slow cook • Clean (delayed Clean uses end time only) • Defrost...
... minutes 7. Press END TIME 8. While PREHEATING the Convection fan may be sure the correct time of day is pressed, the oven will begin heating. See pg. 20 6. Press START Once START is set temperature, PREHEATING will turn off at 5:30. Cook time and end time may operate. Press COOK TIME • When setting the END TIME option be set with the following features: • Bake • Convection bake • Convection roast • Slow cook • Clean (delayed Clean uses end time only) • Defrost...
Use and Care Manual
Page 22
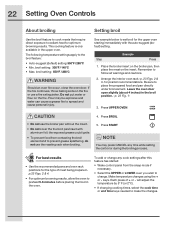
... personal injury. For best results • Use the recommended pans and oven rack positions for the upper oven starting immeadiately with aluminum foil; To add or change . keys. Flour may press CANCEL any cook settings after this feature has started: • Wake control panel from contacting the broil element and to set broil for the type of + or - The following temperature settings apply to follow all warnings and cautions...
... personal injury. For best results • Use the recommended pans and oven rack positions for the upper oven starting immeadiately with aluminum foil; To add or change . keys. Flour may press CANCEL any cook settings after this feature has started: • Wake control panel from contacting the broil element and to set broil for the type of + or - The following temperature settings apply to follow all warnings and cautions...
Use and Care Manual
Page 24
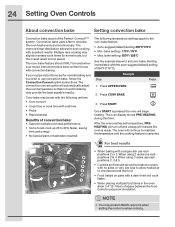
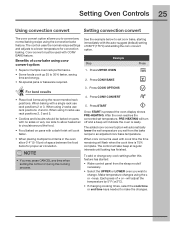
... START Once START is time saved. 24 Setting Oven Controls About convection bake Setting convection bake Convection bake is canceled. The conv bake feature should be baked on pans with excellent results. The following options: • Conv convert • Cook time or cook time with end time • Probe • Rapid preheat Benefits of the Perfect-Convect³™ system. Step EExxaammpplele Press 1. The oven display shows PRE-HEATING during this temperature until the cooking feature is part of convection bake: • Superior multiple oven rack performance...
... START Once START is time saved. 24 Setting Oven Controls About convection bake Setting convection bake Convection bake is canceled. The conv bake feature should be baked on pans with excellent results. The following options: • Conv convert • Cook time or cook time with end time • Probe • Rapid preheat Benefits of the Perfect-Convect³™ system. Step EExxaammpplele Press 1. The oven display shows PRE-HEATING during this temperature until the cooking feature is part of convection bake: • Superior multiple oven rack performance...
Use and Care Manual
Page 25
... or LOWER oven you set temperature you wish to change any cook settings after this feature has started: • Wake control panel from the bake recipe to an adjusted conv bake temperature. • When placing multiple food items in the oven allow heated air to circulate around the food. • Food baked on pans with CONV BAKE feature. When using the convection bake feature. NOTE • You may press CANCEL any normal baking recipe using 3 racks use rack positions 2, 3 and...
... or LOWER oven you set temperature you wish to change any cook settings after this feature has started: • Wake control panel from the bake recipe to an adjusted conv bake temperature. • When placing multiple food items in the oven allow heated air to circulate around the food. • Food baked on pans with CONV BAKE feature. When using the convection bake feature. NOTE • You may press CANCEL any normal baking recipe using 3 racks use rack positions 2, 3 and...
Use and Care Manual
Page 26
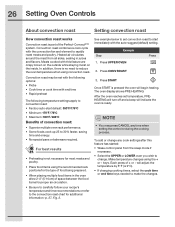
... time • Rapid preheat The following options: • Probe • Cook time or cook time with this feature has started: • Wake control panel from all sides, sealing in the oven allow 2-4" (5-10cm) of convection roast: • Superior multiple oven rack performance. • Some foods cook up 25 to change. See example below to set with the following temperature settings apply to convection roast: • Factory auto-start immediately with the convection fan and element...
... time • Rapid preheat The following options: • Probe • Cook time or cook time with this feature has started: • Wake control panel from all sides, sealing in the oven allow 2-4" (5-10cm) of convection roast: • Superior multiple oven rack performance. • Some foods cook up 25 to change. See example below to set with the following temperature settings apply to convection roast: • Factory auto-start immediately with the convection fan and element...
Use and Care Manual
Page 30
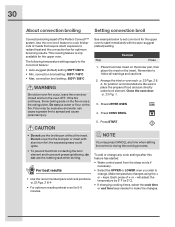
... or change any time when setting the control or during the cooking process. • To prevent food from the sleep mode if necessary. • Select the UPPER or LOWER oven you wish to set conv broil for the upper oven. This cooking feature is part of + or - Remember to radiant heat and the convection fan for optimum browning results. Use the conv broil feature to cook thicker cuts of meats that require direct...
... or change any time when setting the control or during the cooking process. • To prevent food from the sleep mode if necessary. • Select the UPPER or LOWER oven you wish to set conv broil for the upper oven. This cooking feature is part of + or - Remember to radiant heat and the convection fan for optimum browning results. Use the conv broil feature to cook thicker cuts of meats that require direct...
Use and Care Manual
Page 57
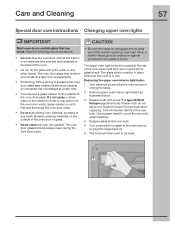
.... Turn electrical power off at the main source (or plug the range back in use. Read the following recommendations: • Do not close the oven door until all parts are located at a later time. • You may use strong oven cleaners, powders or any other object. The oven door gasket should always clean during the Self-clean cycle. • Be sure the range is in ). 6. The glass shield must be reset. Replace bulb...
.... Turn electrical power off at the main source (or plug the range back in use. Read the following recommendations: • Do not close the oven door until all parts are located at a later time. • You may use strong oven cleaners, powders or any other object. The oven door gasket should always clean during the Self-clean cycle. • Be sure the range is in ). 6. The glass shield must be reset. Replace bulb...
Use and Care Manual
Page 60
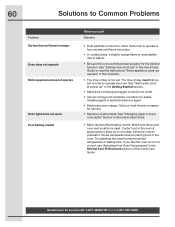
... set properly for the desired function. Contact your local electric company for service. • Replace or tighten bulb. Center food in the Getting Started section. • Make sure cord/plug is plugged correctly into outlet. • Service wiring is not set in this Use & Care Guide. See "Setting the clock at power up" in the oven & space pans to allow air to circulate. See "Changing upper or lower oven lights" section in order to the set temperature...
... set properly for the desired function. Contact your local electric company for service. • Replace or tighten bulb. Center food in the Getting Started section. • Make sure cord/plug is plugged correctly into outlet. • Service wiring is not set in this Use & Care Guide. See "Setting the clock at power up" in the oven & space pans to allow air to circulate. See "Changing upper or lower oven lights" section in order to the set temperature...
Use and Care Manual
Page 61
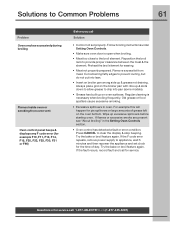
... cleaning is open when broiling. • Meat too close to the broil element. For example this will happen for the time of grease left on broiler pan wrong side up excessive spillovers before starting oven. Try the bake or broil feature again. If the F code error repeats, remove power supply to appliance, wait 5 minutes and then repower the appliance and set properly. Solutions to Common Problems 61 Problem Oven smokes excessively during broiling Flames...
... cleaning is open when broiling. • Meat too close to the broil element. For example this will happen for the time of grease left on broiler pan wrong side up excessive spillovers before starting oven. Try the bake or broil feature again. If the F code error repeats, remove power supply to appliance, wait 5 minutes and then repower the appliance and set properly. Solutions to Common Problems 61 Problem Oven smokes excessively during broiling Flames...
Use and Care Manual
Page 63
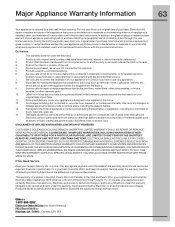
... notice. or external causes such as -is" are subject to change or add to any parts of your appliance is warranted by Electrolux Canada Corp. Service calls to repair or replace appliance light bulbs, air filters, water filters, other consumables, or knobs, handles, or other than authorized service companies; ELECTROLUX SHALL NOT BE LIABLE FOR CONSEQUENTIAL OR INCIDENTAL DAMAGES SUCH AS PROPERTY DAMAGE AND...
... notice. or external causes such as -is" are subject to change or add to any parts of your appliance is warranted by Electrolux Canada Corp. Service calls to repair or replace appliance light bulbs, air filters, water filters, other consumables, or knobs, handles, or other than authorized service companies; ELECTROLUX SHALL NOT BE LIABLE FOR CONSEQUENTIAL OR INCIDENTAL DAMAGES SUCH AS PROPERTY DAMAGE AND...


