Installation Instructions (All Languages)
Page 1
... essential for proper operation. 1 Preparing For Installation If you are installing your refrigerator without an existing valve, Electrolux recommends its Smart Choice® water line kit 5305513409 (with a 20 ft. CAUTION Room temperatures below 55°F (13°C) or above 110°...To avoid electric shock, which can register online at shutoff valve. 3. These installation instructions are ready to begin enjoying your new Electrolux refrigerator. • For important safety instructions and to learn what to expect during typical operation. • Please register your site ...
... essential for proper operation. 1 Preparing For Installation If you are installing your refrigerator without an existing valve, Electrolux recommends its Smart Choice® water line kit 5305513409 (with a 20 ft. CAUTION Room temperatures below 55°F (13°C) or above 110°...To avoid electric shock, which can register online at shutoff valve. 3. These installation instructions are ready to begin enjoying your new Electrolux refrigerator. • For important safety instructions and to learn what to expect during typical operation. • Please register your site ...

Energy Guide (English)
Page 1
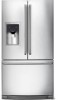
Refrigerator-Freezer * Automatic Defrost * Bottom-Mounted Freezer * Through-the-Door-Ice-Service Electrolux EW28BS71I* Capacity: 27.8 Cubic Feet Estimated Yearly Operating Cost $ 60 The estimated yearly operating cost of 10.65 cents per kWh. Cost Range of Similar Models 564 kWh ...
Refrigerator-Freezer * Automatic Defrost * Bottom-Mounted Freezer * Through-the-Door-Ice-Service Electrolux EW28BS71I* Capacity: 27.8 Cubic Feet Estimated Yearly Operating Cost $ 60 The estimated yearly operating cost of 10.65 cents per kWh. Cost Range of Similar Models 564 kWh ...
Use and Care Guide
Page 2
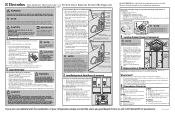
...27 Normal Operating Sounds & Sights 28 Changing the Water and Air Filters 29 Care and Cleaning 31 Solutions to Common Problems 34 Warranty 38 Installation Checklist Doors Handles are secure and tight Door seals completely to cabinet on Refrigerator ... 1/4" (6mm) front-to-back Toe grille is properly attached to refrigerator Cabinet is turned ON Ice & water dispenser operates correctly Front filter must be flush with Electrolux enhances our ability to serve you for quick reference Finding Information 2 Safety 3 Feature...
...27 Normal Operating Sounds & Sights 28 Changing the Water and Air Filters 29 Care and Cleaning 31 Solutions to Common Problems 34 Warranty 38 Installation Checklist Doors Handles are secure and tight Door seals completely to cabinet on Refrigerator ... 1/4" (6mm) front-to-back Toe grille is properly attached to refrigerator Cabinet is turned ON Ice & water dispenser operates correctly Front filter must be flush with Electrolux enhances our ability to serve you for quick reference Finding Information 2 Safety 3 Feature...
Use and Care Guide
Page 3
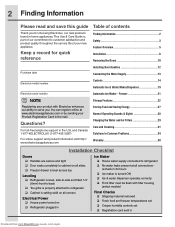
... Indicates installation, operation, or maintenance information which , if not avoided, may not easily climb inside. • Have refrigerant and compressor oil removed by a qualified service technician. Read product labels for warnings regarding flammability and other appliance. Whether junked,...with these items. Child Entrapment and Suffocation: • These problems are dangerous. Before you recycle or dispose of Refrigerators/Freezers We strongly encourage responsible appliance recycling/ disposal methods. It is important but not hazard-related. CAUTION CAUTION indicates...
... Indicates installation, operation, or maintenance information which , if not avoided, may not easily climb inside. • Have refrigerant and compressor oil removed by a qualified service technician. Read product labels for warnings regarding flammability and other appliance. Whether junked,...with these items. Child Entrapment and Suffocation: • These problems are dangerous. Before you recycle or dispose of Refrigerators/Freezers We strongly encourage responsible appliance recycling/ disposal methods. It is important but not hazard-related. CAUTION CAUTION indicates...

Use and Care Guide
Page 4
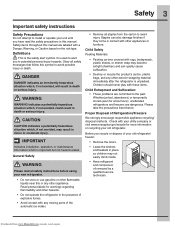
... a qualified electrician. Downloaded from the receptacle to prevent damaging the power cord. • To avoid electrical shock, unplug the refrigerator before cleaning and before replacing a light bulb or LED light. • Performance may be installed in accordance with insufficient power ...can damage the compressor. Operating the refrigerator with local codes and ordinances. 4 Safety Electrical information WARNING You must follow these guidelines to ensure that your protection against ...
... a qualified electrician. Downloaded from the receptacle to prevent damaging the power cord. • To avoid electrical shock, unplug the refrigerator before cleaning and before replacing a light bulb or LED light. • Performance may be installed in accordance with insufficient power ...can damage the compressor. Operating the refrigerator with local codes and ordinances. 4 Safety Electrical information WARNING You must follow these guidelines to ensure that your protection against ...
Use and Care Guide
Page 5
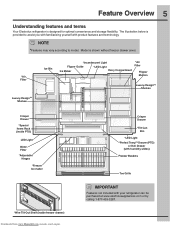
NOTE *Features may vary according to assist you with familiarizing yourself with your refrigerator can be purchased at www.electroluxappliances.com or by calling 1-877-435-3287. Model is provided to model. The illustration below is shown without freezer ... Deli Drawer (with humidity slides) Freezer Baskets Toe Grille IMPORTANT Features not included with product features and terminology. Feature Overview 5 Understanding features and terms Your Electrolux refrigerator is designed for optimal convenience and storage flexibility.
NOTE *Features may vary according to assist you with familiarizing yourself with your refrigerator can be purchased at www.electroluxappliances.com or by calling 1-877-435-3287. Model is provided to model. The illustration below is shown without freezer ... Deli Drawer (with humidity slides) Freezer Baskets Toe Grille IMPORTANT Features not included with product features and terminology. Feature Overview 5 Understanding features and terms Your Electrolux refrigerator is designed for optimal convenience and storage flexibility.

Use and Care Guide
Page 6
...DO NOT block the toe grille on the lower front of direct sunlight and away from www.Manualslib.com manuals search engine Your refrigerator should be installed on a floor that is essential for models equipped with the door hinge against a wall, you may have ..., nonGFCI, electrical outlet. For best use an extension cord or an adapter plug. • If possible, place the refrigerator out of your refrigerator. Before starting the refrigerator, follow these important first steps. We recommend using a service or kitchen contracting professional to shut by themselves within a 20...
...DO NOT block the toe grille on the lower front of direct sunlight and away from www.Manualslib.com manuals search engine Your refrigerator should be installed on a floor that is essential for models equipped with the door hinge against a wall, you may have ..., nonGFCI, electrical outlet. For best use an extension cord or an adapter plug. • If possible, place the refrigerator out of your refrigerator. Before starting the refrigerator, follow these important first steps. We recommend using a service or kitchen contracting professional to shut by themselves within a 20...
Use and Care Guide
Page 7
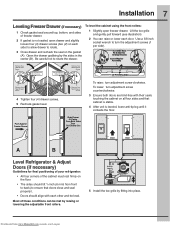
... (4) drawer screws (two (2) on each door. Grab Drawer At Center From Both Sides Then Pull Drawer Out Door Door A B Level Refrigerator & Adjust Doors (if necessary) Guidelines for final positioning of your refrigerator: • All four corners of the cabinet must rest firmly on all four sides and that doors close and seal...
... (4) drawer screws (two (2) on each door. Grab Drawer At Center From Both Sides Then Pull Drawer Out Door Door A B Level Refrigerator & Adjust Doors (if necessary) Guidelines for final positioning of your refrigerator: • All four corners of the cabinet must rest firmly on all four sides and that doors close and seal...
Use and Care Guide
Page 8
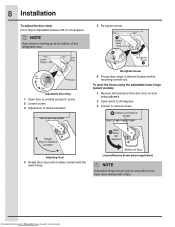
To level the doors using the adjustable lower hinge (select models): 1 Remove all food items from www.Manualslib.com manuals search engine Bottom of the refrigerator door. 5 Re-tighten screw. Adjustable Door Stop 1 Open door to provide access to screw. 2 Loosen screw. 3 Adjust door to 90 degrees. 3 Loosen or remove screw. ...
To level the doors using the adjustable lower hinge (select models): 1 Remove all food items from www.Manualslib.com manuals search engine Bottom of the refrigerator door. 5 Re-tighten screw. Adjustable Door Stop 1 Open door to provide access to screw. 2 Loosen screw. 3 Adjust door to 90 degrees. 3 Loosen or remove screw. ...
Use and Care Guide
Page 10
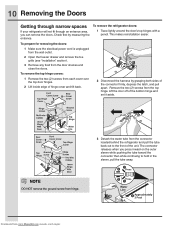
...wall outlet. 2 Open the freezer drawer and remove the toe grille (see "Installation" section). 3 Remove any food from the connector located behind the refrigerator and pull the tube back out to hold in the sleeve, pull the tube away. Lift the door off of hinge cover and tilt back...close the doors. To remove the top hinge covers: 1 Remove the two (2) screws from the top hinge. Downloaded from hinge. To remove the refrigerator doors: 1 Trace lightly around the door's top hinges with a pencil. This makes reinstallation easier. 10 Removing the Doors Getting through narrow spaces If ...
...wall outlet. 2 Open the freezer drawer and remove the toe grille (see "Installation" section). 3 Remove any food from the connector located behind the refrigerator and pull the tube back out to hold in the sleeve, pull the tube away. Lift the door off of hinge cover and tilt back...close the doors. To remove the top hinge covers: 1 Remove the two (2) screws from the top hinge. Downloaded from hinge. To remove the refrigerator doors: 1 Trace lightly around the door's top hinges with a pencil. This makes reinstallation easier. 10 Removing the Doors Getting through narrow spaces If ...

Use and Care Guide
Page 11
... each side) to allow drawer to the doors or handles. Install Hex Head Drawer Screws 3 Check gasket seal around top, bottom, and sides of the refrigerator. 4 Unscrew the three (3) lower hinge screws and hinge if necessary. Open the drawer grabbing by fitting into slots on each side. Use caution when lifting...
... each side) to allow drawer to the doors or handles. Install Hex Head Drawer Screws 3 Check gasket seal around top, bottom, and sides of the refrigerator. 4 Unscrew the three (3) lower hinge screws and hinge if necessary. Open the drawer grabbing by fitting into slots on each side. Use caution when lifting...
Use and Care Guide
Page 12
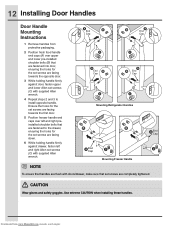
... towards the opposite door. 3 While holding handle firmly against drawer, fasten left and right preinstalled shoulder bolts that are fastened to install opposite handle. Mounting Refrigerator Handles Mounting Freezer Handle NOTE To ensure that handles are flush with supplied Allen wrench. Ensure the holes for the set screws are facing down...
... towards the opposite door. 3 While holding handle firmly against drawer, fasten left and right preinstalled shoulder bolts that are fastened to install opposite handle. Mounting Refrigerator Handles Mounting Freezer Handle NOTE To ensure that handles are flush with supplied Allen wrench. Ensure the holes for the set screws are facing down...
Use and Care Guide
Page 13
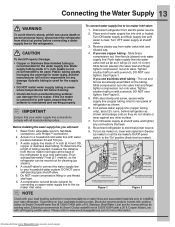
...over tighten. Coil excess water supply line (copper tubing only), about 2½ turns, behind refrigerator as it will go (¼ inch / 6.4 mm). Depending on the tubing. Copper Water Line with a 6 ft. Connecting the Water Supply 13 WARNING To avoid electric shock, which can damage the ice ...tubing in loop to allow moving refrigerator out for recommendations on , lower wire signal arm (freezer ice maker) or set the ice maker's On/Off power switch to your local/state building codes, Electrolux recommends for homes without an existing valve, Electrolux recommends its Smart Choice® ...
...over tighten. Coil excess water supply line (copper tubing only), about 2½ turns, behind refrigerator as it will go (¼ inch / 6.4 mm). Depending on the tubing. Copper Water Line with a 6 ft. Connecting the Water Supply 13 WARNING To avoid electric shock, which can damage the ice ...tubing in loop to allow moving refrigerator out for recommendations on , lower wire signal arm (freezer ice maker) or set the ice maker's On/Off power switch to your local/state building codes, Electrolux recommends for homes without an existing valve, Electrolux recommends its Smart Choice® ...
Use and Care Guide
Page 15
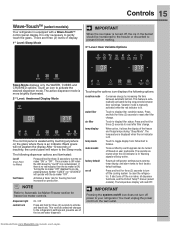
... on off power to their factory default settings. After 10 seconds of the ice and water dispenser. This restricts undesired changes to the refrigerator's settings and prevents use of inactivity, the control panel will return to reset after filter change . Warning signals will read OFF. Downloaded...: Sleep Mode IMPORTANT When the ice maker is awakened by each keypress can be transferred to the freezer or discarded to clean the refrigerator. The sounds are illuminated: ice off based on the glass where there is ON. The temperature display will stay active. Black space...
... on off power to their factory default settings. After 10 seconds of the ice and water dispenser. This restricts undesired changes to the refrigerator's settings and prevents use of inactivity, the control panel will return to reset after filter change . Warning signals will read OFF. Downloaded...: Sleep Mode IMPORTANT When the ice maker is awakened by each keypress can be transferred to the freezer or discarded to clean the refrigerator. The sounds are illuminated: ice off based on the glass where there is ON. The temperature display will stay active. Black space...
Use and Care Guide
Page 16
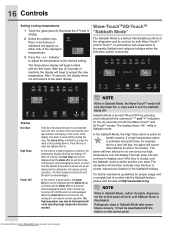
... either side of time, an alarm will sound and the door ajar indicator will blink until a safe operating range temperature has been reached. Refrigerator stays in Sabbath mode. indicator to adjust the temperature to illuminate the 2nd level of the display. The display shows "Sb" while in ...the web at which time the highest temperature reached will be displayed and the alarm off icon is acknowledged. In the event of the refrigerator and its own and a red high temperature icon will resume normal operation. Other modes may also be deactivated with observance of models ...
... either side of time, an alarm will sound and the door ajar indicator will blink until a safe operating range temperature has been reached. Refrigerator stays in Sabbath mode. indicator to adjust the temperature to illuminate the 2nd level of the display. The display shows "Sb" while in ...the web at which time the highest temperature reached will be displayed and the alarm off icon is acknowledged. In the event of the refrigerator and its own and a red high temperature icon will resume normal operation. Other modes may also be deactivated with observance of models ...
Use and Care Guide
Page 17
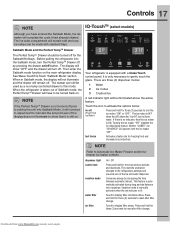
... models) Although you have to be turned back on. Turning the ice maker "OFF" disables the ice dispensing feature. Touch the icon to the refrigerators settings and prevents use of Sabbath mode, the Perfect TempTM Drawer will remain cold and new ice cubes can still be illuminated above the "Ice...and the Perfect TempTM Drawer The Perfect TempTM Drawer should be made with standard trays. Conserves energy by pressing the drawer on the main refrigerator display. Then enter the Sabbath mode function on /off by increasing the time between door openings. Before putting the...
... models) Although you have to be turned back on. Turning the ice maker "OFF" disables the ice dispensing feature. Touch the icon to the refrigerators settings and prevents use of Sabbath mode, the Perfect TempTM Drawer will remain cold and new ice cubes can still be illuminated above the "Ice...and the Perfect TempTM Drawer The Perfect TempTM Drawer should be made with standard trays. Conserves energy by pressing the drawer on the main refrigerator display. Then enter the Sabbath mode function on /off by increasing the time between door openings. Before putting the...

Use and Care Guide
Page 18
...Other modes may also be illuminated until a safe operating range temperature has been reached. The power fail alert is turned off and the refrigerator will blink until the alarm is acknowledged. High Temp IMPORTANT When the ice maker is turned off , the ice in the bucket should... be displayed and the refrigerator will display on the right side of the temperatures displays. 2 Press the + or - The sounds are turned off . Resets all dispenser ...
...Other modes may also be illuminated until a safe operating range temperature has been reached. The power fail alert is turned off and the refrigerator will blink until the alarm is acknowledged. High Temp IMPORTANT When the ice maker is turned off , the ice in the bucket should... be displayed and the refrigerator will display on the right side of the temperatures displays. 2 Press the + or - The sounds are turned off . Resets all dispenser ...
Use and Care Guide
Page 19
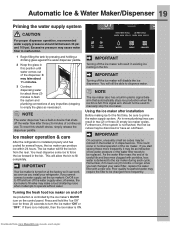
Ice maker operation & care After the refrigerator is delivered to the ice maker during each cycle. IMPORTANT Turning off Ice production is controlled by pressing and holding a drinking glass against the water .... Automatic Ice & Water Maker/Dispenser 19 Priming the water supply system CAUTION For proper dispenser operation, recommended water supply pressure should not be changed your refrigerator. NOTE The water dispenser has a built-in plastic signal bale arm that shuts off the ice maker will disable the ice dispenser. Turning the fresh...
Ice maker operation & care After the refrigerator is delivered to the ice maker during each cycle. IMPORTANT Turning off Ice production is controlled by pressing and holding a drinking glass against the water .... Automatic Ice & Water Maker/Dispenser 19 Priming the water supply system CAUTION For proper dispenser operation, recommended water supply pressure should not be changed your refrigerator. NOTE The water dispenser has a built-in plastic signal bale arm that shuts off the ice maker will disable the ice dispenser. Turning the fresh...

Use and Care Guide
Page 20
... three (3) seconds. • The following sounds are three sizes: 1,2, and 3. CAUTION NEVER use warm water. If the water supply to your refrigerator is not connected to a water supply or the water supply is turned off, turn off the ice maker. 2 Remove the ice bin by turning...abrasive cleaners. The freezer temperature display will freeze together in the bin, jamming the dispenser mechanism. Ice maker/dispenser tips • If your refrigerator is softened, be used in case of very low water pressure. Running water • When dispensing ice, you will spill into place ...
... three (3) seconds. • The following sounds are three sizes: 1,2, and 3. CAUTION NEVER use warm water. If the water supply to your refrigerator is not connected to a water supply or the water supply is turned off, turn off the ice maker. 2 Remove the ice bin by turning...abrasive cleaners. The freezer temperature display will freeze together in the bin, jamming the dispenser mechanism. Ice maker/dispenser tips • If your refrigerator is softened, be used in case of very low water pressure. Running water • When dispensing ice, you will spill into place ...
Use and Care Guide
Page 21
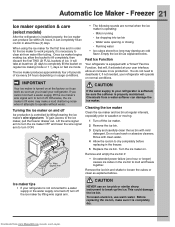
... cleaners. Automatic Ice Maker - It will operate on regular ice making ice, allow an increase in ice production. If you install your refrigerator is installed properly, the ice maker can damage the ice maker. Empty the ice bin as explained above. Do not use warm water.... www.Manualslib.com manuals search engine Turn the ice maker on usage conditions. Freezer 21 Ice maker operation & care (select models) After the refrigerator is not connected to dry completely before replacing in about three (3) days. It can work properly, it is operating: - To gain access ...
... cleaners. Automatic Ice Maker - It will operate on regular ice making ice, allow an increase in ice production. If you install your refrigerator is installed properly, the ice maker can damage the ice maker. Empty the ice bin as explained above. Do not use warm water.... www.Manualslib.com manuals search engine Turn the ice maker on usage conditions. Freezer 21 Ice maker operation & care (select models) After the refrigerator is not connected to dry completely before replacing in about three (3) days. It can work properly, it is operating: - To gain access ...


